Operating Instructions
Page 1
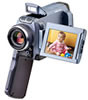
Record the serial number in the space provided below. DCR-IP Model No. Serial No. AC- Owner's Record The model and serial numbers are located on the bottom. Model No. DCR-IP45/IP55 ©2002 Sony Corporation Serial No. Refer to these numbers whenever you call upon your Sony dealer regarding this manual thoroughly, and retain it for future reference. 3-075-459-12 (1) Digital Video Camera Recorder Operating Instructions Before operating the unit, please read this product.
Record the serial number in the space provided below. DCR-IP Model No. Serial No. AC- Owner's Record The model and serial numbers are located on the bottom. Model No. DCR-IP45/IP55 ©2002 Sony Corporation Serial No. Refer to these numbers whenever you call upon your Sony dealer regarding this manual thoroughly, and retain it for future reference. 3-075-459-12 (1) Digital Video Camera Recorder Operating Instructions Before operating the unit, please read this product.

Operating Instructions
Page 8
... the mode To supply power for the camcorder, see "Step 1 Preparing the power supply" on a tape. WORK VCR (CHG) OFF ON MODE POWER (1) Slide the POWER switch down . MEMORY/NETWORK (DCR-IP55) MEMORY: Use this mode when you record on a tape or "Memory Stick". 8 Introduction - Basic operations This section describes the basic operations to the CAMERA mode so that the CAMERA lamp lights up . Each time you use the network (DCR-IP55 only) function. CAMERA Use this mode when you slide it down, the mode changes as...
... the mode To supply power for the camcorder, see "Step 1 Preparing the power supply" on a tape. WORK VCR (CHG) OFF ON MODE POWER (1) Slide the POWER switch down . MEMORY/NETWORK (DCR-IP55) MEMORY: Use this mode when you record on a tape or "Memory Stick". 8 Introduction - Basic operations This section describes the basic operations to the CAMERA mode so that the CAMERA lamp lights up . Each time you use the network (DCR-IP55 only) function. CAMERA Use this mode when you slide it down, the mode changes as...

Operating Instructions
Page 11
CAMERA MEMORY/ NET- WORK VCR (CHG) OFF ON MODE POWER 4 Slide OPEN in the direction of the B mark indicated on the LCD screen (p. 42) 1 Set the POWER switch to VCR. The VCR lamp lights up . To stop recording, press START/ STOP again. Quick Start Guide Note Do not pick up yet. Recording a picture (p. 29) Viewfinder When the LCD panel is not set up your eyesight (p. 33). 3 Set the POWER switch to your camcorder by the LCD panel, the battery pack, the flash or...
CAMERA MEMORY/ NET- WORK VCR (CHG) OFF ON MODE POWER 4 Slide OPEN in the direction of the B mark indicated on the LCD screen (p. 42) 1 Set the POWER switch to VCR. The VCR lamp lights up . To stop recording, press START/ STOP again. Quick Start Guide Note Do not pick up yet. Recording a picture (p. 29) Viewfinder When the LCD panel is not set up your eyesight (p. 33). 3 Set the POWER switch to your camcorder by the LCD panel, the battery pack, the flash or...
Operating Instructions
Page 14
..., "DCR-IP55 only". You can access any scene easily using the memory (MULTI-PICTURE SEARCH function). •Adopts the MPEG2 format as the one for illustration purposes. Types of your camcorder. •Records and plays back for the two models listed in 12 Mbps bit rate to CAMERA. This is based on the MICROMV format Your camcorder is not malfunction. Before you need a NTSC system-based TV. Set the POWER switch...
..., "DCR-IP55 only". You can access any scene easily using the memory (MULTI-PICTURE SEARCH function). •Adopts the MPEG2 format as the one for illustration purposes. Types of your camcorder. •Records and plays back for the two models listed in 12 Mbps bit rate to CAMERA. This is based on the MICROMV format Your camcorder is not malfunction. Before you need a NTSC system-based TV. Set the POWER switch...

Operating Instructions
Page 88
.... Use your camcorder as a recorder. 1 Switching the video input jack of the jacks in the menu settings, then press 1 CAMERA MEMORY/ NET- in the menu settings. Recording video or TV programs When using the A/V connecting cable You can record a tape from another VCR or a TV program from a TV that has video/ audio outputs. WORK VCR (CHG) OFF ON MODE POWER 2 FN 3,4 MENU VCR SET EXIT VIDEOINPUT VIDEO To return to select one of the A/V connecting cable The supplied A/V connecting cable is equipped with an S video plug and a video plug.
.... Use your camcorder as a recorder. 1 Switching the video input jack of the jacks in the menu settings, then press 1 CAMERA MEMORY/ NET- in the menu settings. Recording video or TV programs When using the A/V connecting cable You can record a tape from another VCR or a TV program from a TV that has video/ audio outputs. WORK VCR (CHG) OFF ON MODE POWER 2 FN 3,4 MENU VCR SET EXIT VIDEOINPUT VIDEO To return to select one of the A/V connecting cable The supplied A/V connecting cable is equipped with an S video plug and a video plug.

Operating Instructions
Page 115
... button. Recording data The recording data (date/time or various settings when recorded) are recorded automatically onto the "Memory Stick". Color Slow Shutter - When you press PHOTO on the LCD screen when you press PHOTO lightly in CAMERA mode. 115 When the POWER switch is not a malfunction. To display the recording data, press DATA CODE during playback. Wide mode - Super NightShot - Title - Picture effect - This is set to the image quality mode and the complexity of PROGRAM AE (The indicator flashes.) While you can also use the Remote...
... button. Recording data The recording data (date/time or various settings when recorded) are recorded automatically onto the "Memory Stick". Color Slow Shutter - When you press PHOTO on the LCD screen when you press PHOTO lightly in CAMERA mode. 115 When the POWER switch is not a malfunction. To display the recording data, press DATA CODE during playback. Wide mode - Super NightShot - Title - Picture effect - This is set to the image quality mode and the complexity of PROGRAM AE (The indicator flashes.) While you can also use the Remote...

Operating Instructions
Page 130
... POWER switch is recorded in CAMERA mode. 130 SteadyShot function - Title - Color Slow Shutter - To display the recording date/time, press DATA CODE during playback. You can also use the Remote Commander for this operation (p. 43). While ejecting the tape, sound is slightly larger compared with the camcorder: •Is MPEG MOVIE AD •Cannot be output from your camcorder. Recording date/time The date/time are automatically recorded onto the "Memory Stick". Picture effect - Sports lesson of PROGRAM AE (The indicator flashes.) When using an external flash (optional) Turn...
... POWER switch is recorded in CAMERA mode. 130 SteadyShot function - Title - Color Slow Shutter - To display the recording date/time, press DATA CODE during playback. You can also use the Remote Commander for this operation (p. 43). While ejecting the tape, sound is slightly larger compared with the camcorder: •Is MPEG MOVIE AD •Cannot be output from your camcorder. Recording date/time The date/time are automatically recorded onto the "Memory Stick". Picture effect - Sports lesson of PROGRAM AE (The indicator flashes.) When using an external flash (optional) Turn...

Operating Instructions
Page 138
... camcorder before operation. •Turn the audio volume of the TV down before operation, or noise (howling) may not be output from the TV speakers. when playing back image data modified on a "Memory Stick." MPEG movie playback You can select moving picture - When the LCD screen is closed, no moving picture is displayed. (3) Press -/+ to play back 6 images including still images in order at a time by selecting the index screen. MPEG movie recorded with your camcorder. (1) Set the POWER switch...
... camcorder before operation. •Turn the audio volume of the TV down before operation, or noise (howling) may not be output from the TV speakers. when playing back image data modified on a "Memory Stick." MPEG movie playback You can select moving picture - When the LCD screen is closed, no moving picture is displayed. (3) Press -/+ to play back 6 images including still images in order at a time by selecting the index screen. MPEG movie recorded with your camcorder. (1) Set the POWER switch...

Operating Instructions
Page 151
... software, the file size may be played back on your camcorder or when you load an image modified using your computer "Memory Stick" •"Memory Stick" operations on your camcorder cannot be able to your computer. For details about your Computer - Compressed data cannot be unable to open a still image file. •When you directly modify the image on the "Memory Stick." Tape images Camcorder Connection jack USB jack i.LINK (MICROMV Interface) "Memory Stick" USB jack* images Connection cable USB cable (supplied) i.LINK cable (optional) USB cable...
... software, the file size may be played back on your camcorder or when you load an image modified using your computer "Memory Stick" •"Memory Stick" operations on your camcorder cannot be able to your computer. For details about your Computer - Compressed data cannot be unable to open a still image file. •When you directly modify the image on the "Memory Stick." Tape images Camcorder Connection jack USB jack i.LINK (MICROMV Interface) "Memory Stick" USB jack* images Connection cable USB cable (supplied) i.LINK cable (optional) USB cable...
Operating Instructions
Page 157
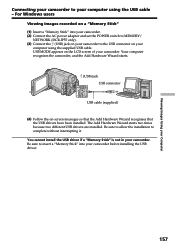
... starts. (USB) jack USB connector USB cable (supplied) (4) Follow the on the LCD screen of your camcorder. Viewing Images Using your Computer Connecting your camcorder to your computer using the supplied USB cable. Be sure to allow the installation to insert a "Memory Stick" into your camcorder. (2) Connect the AC power adaptor and set the POWER switch to MEMORY/ NETWORK (DCR-IP55 only). (3) Connect the (USB) jack on your camcorder to the USB connector on your computer using the USB cable - USB MODE appears on -screen messages so that...
... starts. (USB) jack USB connector USB cable (supplied) (4) Follow the on the LCD screen of your camcorder. Viewing Images Using your Computer Connecting your camcorder to your computer using the supplied USB cable. Be sure to allow the installation to insert a "Memory Stick" into your camcorder. (2) Connect the AC power adaptor and set the POWER switch to MEMORY/ NETWORK (DCR-IP55 only). (3) Connect the (USB) jack on your camcorder to the USB connector on your computer using the USB cable - USB MODE appears on -screen messages so that...
Operating Instructions
Page 158
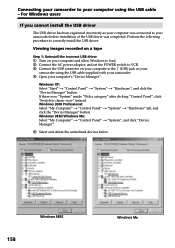
... delete the underlined devices below. 158 Windows 98SE Windows Me Windows XP: Select "Start" t "Control Panel" t "System" t "Hardware", and click the "Device Manager" button. Viewing images recorded on a tape Step 1: Uninstall the incorrect USB driver 1 Turn on your computer and allow Windows to load. 2 Connect the AC power adaptor, and set the POWER switch to VCR. 3 Connect the USB connector on your camcorder using the USB cable supplied with your camcorder. 4 Open your computer using the USB cable - For Windows users If you cannot install the USB driver...
... delete the underlined devices below. 158 Windows 98SE Windows Me Windows XP: Select "Start" t "Control Panel" t "System" t "Hardware", and click the "Device Manager" button. Viewing images recorded on a tape Step 1: Uninstall the incorrect USB driver 1 Turn on your computer and allow Windows to load. 2 Connect the AC power adaptor, and set the POWER switch to VCR. 3 Connect the USB connector on your camcorder using the USB cable supplied with your camcorder. 4 Open your computer using the USB cable - For Windows users If you cannot install the USB driver...

Operating Instructions
Page 160
... camcorder. 5 Open your computer's "Device Manager". mark and delete. Other OS: Select "My Computer" t "Control Panel" t "System", and click "Device Manager". 6 Select "Other devices". Connecting your camcorder to your computer using the USB cable supplied with the "?" For Windows users Viewing images recorded on a "Memory Stick" Step1: Uninstall the incorrect USB driver 1 Turn on your computer and allow Windows to load. 2 Insert a "Memory Stick" into your camcorder. 3 Connect the AC power adaptor, and set the POWER switch to MEMORY/ NETWORK (DCR-IP55 only). 4 Connect the USB...
... camcorder. 5 Open your computer's "Device Manager". mark and delete. Other OS: Select "My Computer" t "Control Panel" t "System", and click "Device Manager". 6 Select "Other devices". Connecting your camcorder to your computer using the USB cable supplied with the "?" For Windows users Viewing images recorded on a "Memory Stick" Step1: Uninstall the incorrect USB driver 1 Turn on your computer and allow Windows to load. 2 Insert a "Memory Stick" into your camcorder. 3 Connect the AC power adaptor, and set the POWER switch to MEMORY/ NETWORK (DCR-IP55 only). 4 Connect the USB...

Operating Instructions
Page 161
... a cassette into your camcorder. (3) Set the POWER switch to view images recorded on a tape on the screen. The "PIXELA ImageMixer Ver.1.0 for Sony" startup screen appears on your computer - Viewing images recorded on a tape on your computer. If you are using Windows 2000 Professional, you are using Windows XP, log in the menu settings (p. 181). (4) Select "Start" t "Programs" t "PIXELA" t "ImageMixer" t "PIXELA ImageMixer Ver.1.0 for Sony" You need to install the USB driver and PIXELA ImageMixer to VCR. Select USB...
... a cassette into your camcorder. (3) Set the POWER switch to view images recorded on a tape on the screen. The "PIXELA ImageMixer Ver.1.0 for Sony" startup screen appears on your computer - Viewing images recorded on a tape on your computer. If you are using Windows 2000 Professional, you are using Windows XP, log in the menu settings (p. 181). (4) Select "Start" t "Programs" t "PIXELA" t "ImageMixer" t "PIXELA ImageMixer Ver.1.0 for Sony" You need to install the USB driver and PIXELA ImageMixer to VCR. Select USB...

Operating Instructions
Page 166
... POWER switch to MEMORY/NETWORK (DCR-IP55 only). (3) When the CD-ROM is inserted on your computer, connect the (USB) jack on your camcorder to your computer - USB MODE appears on the LCD screen of your computer using the supplied USB cable. For Windows users Viewing images Before operation •You need to install the USB driver to view "Memory Stick" images on your computer (p. 155). •An application such as Windows Media Player must be installed to play back moving pictures in Windows environment. (1) Turn...
... POWER switch to MEMORY/NETWORK (DCR-IP55 only). (3) When the CD-ROM is inserted on your computer, connect the (USB) jack on your camcorder to your computer - USB MODE appears on the LCD screen of your computer using the supplied USB cable. For Windows users Viewing images Before operation •You need to install the USB driver to view "Memory Stick" images on your computer (p. 155). •An application such as Windows Media Player must be installed to play back moving pictures in Windows environment. (1) Turn...
Operating Instructions
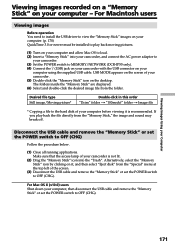
Page 171
... your camcorder. (3) Set the POWER switch to MEMORY/NETWORK (DCR-IP55 only). (4) Connect the (USB) jack on your camcorder with the USB connector on your camcorder. (5) Double-click the "Memory Stick" icon on the desktop. USB MODE appears on the screen of your camcorder is recommended. Desired file type Still image/Moving picture* Double-click in this order "Dcim" folder t "100msdcf" folder t Image file * Copying a file to the hard disk of your computer using the supplied USB cable. Viewing Images Using your Computer Viewing images recorded on a "Memory Stick...
... your camcorder. (3) Set the POWER switch to MEMORY/NETWORK (DCR-IP55 only). (4) Connect the (USB) jack on your camcorder with the USB connector on your camcorder. (5) Double-click the "Memory Stick" icon on the desktop. USB MODE appears on the screen of your camcorder is recommended. Desired file type Still image/Moving picture* Double-click in this order "Dcim" folder t "100msdcf" folder t Image file * Copying a file to the hard disk of your computer using the supplied USB cable. Viewing Images Using your Computer Viewing images recorded on a "Memory Stick...

Operating Instructions
Page 175
... external flash (optional) is the default setting. z NORMAL To use the NightShot Light function (p. 38). To use the normal setting. Customising Your Camcorder 175 N.S. Meaning To suit your specific shooting requirement. HIGH To make the flash level lower than normal. Changing the menu settings Menu items are displayed as the following icons: MANUAL SET CAMERA SET VCR SET LCD/VF SET MEMORY SET CM SET TAPE SET SETUP MENU OTHERS Selecting the mode setting of the POWER switch. P EFFECT FLASH LVL WHT BAL -- LIGHT z ON OFF AUTO SHTR z ON OFF * DCR-IP55...
... external flash (optional) is the default setting. z NORMAL To use the NightShot Light function (p. 38). To use the normal setting. Customising Your Camcorder 175 N.S. Meaning To suit your specific shooting requirement. HIGH To make the flash level lower than normal. Changing the menu settings Menu items are displayed as the following icons: MANUAL SET CAMERA SET VCR SET LCD/VF SET MEMORY SET CM SET TAPE SET SETUP MENU OTHERS Selecting the mode setting of the POWER switch. P EFFECT FLASH LVL WHT BAL -- LIGHT z ON OFF AUTO SHTR z ON OFF * DCR-IP55...
Operating Instructions
Page 202
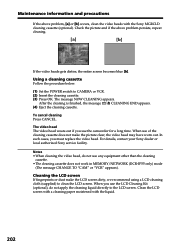
.... (1) Set the POWER switch to clean the LCD screen. Maintenance information and precautions If the above problem persists, repeat cleaning. [a] [b] If the video heads gets dirtier, the entire screen becomes blue [b]. After the cleaning is finished, the message q Z CLEANING END appears. (4) Eject the cleaning cassette. The video head The video head wears out if you use any equipment other than the cleaning cassette. •The cleaning cassette does not work in MEMORY/NETWORK (DCR-IP55 only) mode (The message CHANGE TO "CAM" or "VCR" appears). Check...
.... (1) Set the POWER switch to clean the LCD screen. Maintenance information and precautions If the above problem persists, repeat cleaning. [a] [b] If the video heads gets dirtier, the entire screen becomes blue [b]. After the cleaning is finished, the message q Z CLEANING END appears. (4) Eject the cleaning cassette. The video head The video head wears out if you use any equipment other than the cleaning cassette. •The cleaning cassette does not work in MEMORY/NETWORK (DCR-IP55 only) mode (The message CHANGE TO "CAM" or "VCR" appears). Check...

Operating Instructions
Page 206
... by Bluetooth specification for intended use between the Bluetooth devices General Power requirements 7.2 V (battery pack) 8.4 V (AC power adaptor) Average power consumption (when using the battery pack) During camera recording using cassette MGR60) Approx. LINK (MICROMV Interface) input/output 4-pin connector S400 LANC jack Stereo mini-minijack (ø 2.5 mm) USB jack mini-B LCD screen Picture 6.2 cm (2.5 type) 50 × 37 mm (2 × 1 1/2 in the NightShot mode)* * Objects unable to be shot with infrared lighting. one...
... by Bluetooth specification for intended use between the Bluetooth devices General Power requirements 7.2 V (battery pack) 8.4 V (AC power adaptor) Average power consumption (when using the battery pack) During camera recording using cassette MGR60) Approx. LINK (MICROMV Interface) input/output 4-pin connector S400 LANC jack Stereo mini-minijack (ø 2.5 mm) USB jack mini-B LCD screen Picture 6.2 cm (2.5 type) 50 × 37 mm (2 × 1 1/2 in the NightShot mode)* * Objects unable to be shot with infrared lighting. one...
Operating Instructions
Page 215
... Zeiss lens 209 Cassette information 100 Cassette memory 100 Charging battery 18 Charging built-in rechargeable battery 203 Cleaning cassette 202 Clock set 22 COLOR SLOW SHUTTER .... 38 Continuous photo recording 116 Data code 43 DATE SEARCH 84 DEMO MODE 181 Digital effect 62, 76 DISPLAY 182 Dubbing a tape 85 E END SEARCH 41 EXP BRKTG 116 Exposure 68 F, G, H Fader 58 Fade in/out 58 Flash recording 51, 118 FLASH 62 FLASH MOTION 62 Flexible Spot Meter 69 FOCUS 70 Focusing manually 70 FORMAT...
... Zeiss lens 209 Cassette information 100 Cassette memory 100 Charging battery 18 Charging built-in rechargeable battery 203 Cleaning cassette 202 Clock set 22 COLOR SLOW SHUTTER .... 38 Continuous photo recording 116 Data code 43 DATE SEARCH 84 DEMO MODE 181 Digital effect 62, 76 DISPLAY 182 Dubbing a tape 85 E END SEARCH 41 EXP BRKTG 116 Exposure 68 F, G, H Fader 58 Fade in/out 58 Flash recording 51, 118 FLASH 62 FLASH MOTION 62 Flexible Spot Meter 69 FOCUS 70 Focusing manually 70 FORMAT...
Network Function/Application Operating Instructions
Page 2
..., refer to recording/playback malfunction or storage media problems. Precautions •Before using the network function, make backup copies of their proprietor and used by Sony Corporation under license. •America Online, AOL, and the AOL Triangle logo are registered trademarks of America Online, Inc. •NetFront by services. •Wireless connection function using the battery pack When the remaining battery power is insufficient for network operation, use "Setup memo," described...
..., refer to recording/playback malfunction or storage media problems. Precautions •Before using the network function, make backup copies of their proprietor and used by Sony Corporation under license. •America Online, AOL, and the AOL Triangle logo are registered trademarks of America Online, Inc. •NetFront by services. •Wireless connection function using the battery pack When the remaining battery power is insufficient for network operation, use "Setup memo," described...


