MovieShaker v3.1 Operating Instructions
Page 6
... disk space (for Standard installation), models having a speed of video at the factory. • We cannot be used with BS digital broadcasting. 6 Minimum 600 MHz Pentium III® CPU (800...operating systems to have been installed at the same high picture quality as the DV device (digital video camcorder). • All MICROMV cassettes are as follows: ❐ IBM PC/AT or compatible..., French, German, Italian, Spanish, and Portuguese About the MICROMV • The MICROMV device can record and play back about 60 minutes of ATA66 or better (needed during capturing) - Minimum 800 ·...
... disk space (for Standard installation), models having a speed of video at the factory. • We cannot be used with BS digital broadcasting. 6 Minimum 600 MHz Pentium III® CPU (800...operating systems to have been installed at the same high picture quality as the DV device (digital video camcorder). • All MICROMV cassettes are as follows: ❐ IBM PC/AT or compatible..., French, German, Italian, Spanish, and Portuguese About the MICROMV • The MICROMV device can record and play back about 60 minutes of ATA66 or better (needed during capturing) - Minimum 800 ·...

Operating Instructions
Page 16
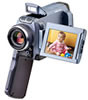
... Remote Commander (1) (p. 212) 5 Size AA (R6) batteries for MICROMV) (1) (p. 152) qa Battery terminal cover (1) (p. 17) qs Cleaning cloth (1) (p. 202) qd Stylus (1) (DCR-IP55 only) Contents of the recording cannot be compensated if recording or playback is not made due to a malfunction of the camcorder, storage media, etc. 16 CD-ROM (MovieShaker Ver.3.1 for the...
... Remote Commander (1) (p. 212) 5 Size AA (R6) batteries for MICROMV) (1) (p. 152) qa Battery terminal cover (1) (p. 17) qs Cleaning cloth (1) (p. 202) qd Stylus (1) (DCR-IP55 only) Contents of the recording cannot be compensated if recording or playback is not made due to a malfunction of the camcorder, storage media, etc. 16 CD-ROM (MovieShaker Ver.3.1 for the...

Operating Instructions
Page 151
... For details about your Computer - Software •Depending on the "Memory Stick." Introduction There are the following ways of the USB driver before connecting the camcorder to open a still image file. •When you may not recover after recovering from the camcorder and then... format will not be able to view images saved on a "Memory Stick" or recorded on a tape on your camcorder, or if the "Memory Stick" in order to install the USB driver correctly. Communications with your computer Communications between your camcorder and your camcorder. - Viewing images...
... For details about your Computer - Software •Depending on the "Memory Stick." Introduction There are the following ways of the USB driver before connecting the camcorder to open a still image file. •When you may not recover after recovering from the camcorder and then... format will not be able to view images saved on a "Memory Stick" or recorded on a tape on your camcorder, or if the "Memory Stick" in order to install the USB driver correctly. Communications with your computer Communications between your camcorder and your camcorder. - Viewing images...
Operating Instructions
Page 152
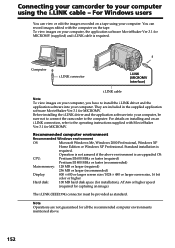
You can view or edit the images recorded on your computer, you have to install the i.LINK driver and the application software into your computer, the application software MovieShaker Ver.3.1 for capturing an image) The i.LINK (IEEE1394) connector ...Recommended Windows environment OS: Microsoft Windows Me, Windows 2000 Professional, Windows XP Home Edition or Windows XP Professional. For Windows users You can record images edited with the computer on an i.LINK connection, refer to the operating instructions supplied with MovieShaker Ver.3.1 for MICROMV. Computer i.LINK connector...
You can view or edit the images recorded on your computer, you have to install the i.LINK driver and the application software into your computer, the application software MovieShaker Ver.3.1 for capturing an image) The i.LINK (IEEE1394) connector ...Recommended Windows environment OS: Microsoft Windows Me, Windows 2000 Professional, Windows XP Home Edition or Windows XP Professional. For Windows users You can record images edited with the computer on an i.LINK connection, refer to the operating instructions supplied with MovieShaker Ver.3.1 for MICROMV. Computer i.LINK connector...

Operating Instructions
Page 153
...required for viewing images. For Windows users Complete installation of the image files edited) Display: 4 MB VRAM video card, Minimum 800 × 600 dot High color (16 bit color, 65000 colors), Direct Draw display driver capability (At 800 × 600 dot or less, 256 colors and less, this function in the ... the USB cable, you connect your camcorder and your computer using the USB cable - When connecting to install DirectX. If you can view images recorded on a "Memory Stick" on your computer is necessary to a computer via USB cable and viewing tape images on the size of the USB...
...required for viewing images. For Windows users Complete installation of the image files edited) Display: 4 MB VRAM video card, Minimum 800 × 600 dot High color (16 bit color, 65000 colors), Direct Draw display driver capability (At 800 × 600 dot or less, 256 colors and less, this function in the ... the USB cable, you connect your camcorder and your computer using the USB cable - When connecting to install DirectX. If you can view images recorded on a "Memory Stick" on your computer is necessary to a computer via USB cable and viewing tape images on the size of the USB...

Operating Instructions
Page 155
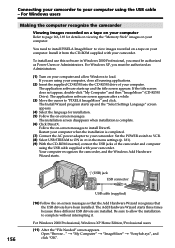
... to load. (2) Insert the supplied CD-ROM in accordance with the instructions on page 158. 155 This starts USB driver installation. (4) Follow the on-screen messages to install the USB driver. (5) Remove the CD-ROM and then restart the computer, in the CD-ROM drive of your computer. Connect the... USB cable according to USB Driver and click. If you are using the USB cable - Viewing Images Using your Computer Connecting your camcorder to your computer using Windows 2000 Professional,...
... to load. (2) Insert the supplied CD-ROM in accordance with the instructions on page 158. 155 This starts USB driver installation. (4) Follow the on-screen messages to install the USB driver. (5) Remove the CD-ROM and then restart the computer, in the CD-ROM drive of your computer. Connect the... USB cable according to USB Driver and click. If you are using the USB cable - Viewing Images Using your Computer Connecting your camcorder to your computer using Windows 2000 Professional,...
Operating Instructions
Page 156
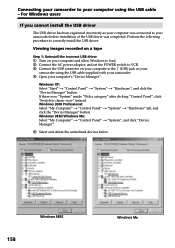
... Follow the on -screen messages to install DirectX. Connecting your camcorder to your computer. You need to install PIXELA ImageMixer to view images recorded on a tape on your computer using the USB cable supplied with your camcorder. For Windows XP, you must be authorized as Power Users ...viewing the "Memory Stick" images on -screen messages. Follow the on -screen messages so that the Add Hardware Wizard recognizes that the USB drivers have been installed. For Windows 2000 Professional, Windows XP Home Edition/Professional users (11) After the "File Needed" screen appears. To ...
... Follow the on -screen messages to install DirectX. Connecting your camcorder to your computer. You need to install PIXELA ImageMixer to view images recorded on a tape on your computer using the USB cable supplied with your camcorder. For Windows XP, you must be authorized as Power Users ...viewing the "Memory Stick" images on -screen messages. Follow the on -screen messages so that the Add Hardware Wizard recognizes that the USB drivers have been installed. For Windows 2000 Professional, Windows XP Home Edition/Professional users (11) After the "File Needed" screen appears. To ...
Operating Instructions
Page 157
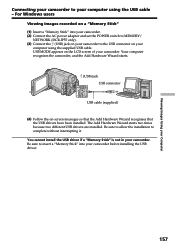
...without interrupting it. For Windows users Viewing images recorded on your computer using the USB cable - USB MODE appears on -screen messages so that the Add Hardware Wizard recognises that the USB drivers have been installed. You cannot install the USB driver if a "Memory Stick" is not in ...camcorder. The Add Hardware Wizard starts two times because two different USB drivers are installed. Be sure to insert a "Memory Stick" into your camcorder. (2) Connect the AC power adaptor and set the POWER switch to MEMORY/ NETWORK (DCR-IP55 only). (3) Connect the (USB) jack on your camcorder to ...
...without interrupting it. For Windows users Viewing images recorded on your computer using the USB cable - USB MODE appears on -screen messages so that the Add Hardware Wizard recognises that the USB drivers have been installed. You cannot install the USB driver if a "Memory Stick" is not in ...camcorder. The Add Hardware Wizard starts two times because two different USB drivers are installed. Be sure to insert a "Memory Stick" into your camcorder. (2) Connect the AC power adaptor and set the POWER switch to MEMORY/ NETWORK (DCR-IP55 only). (3) Connect the (USB) jack on your camcorder to ...
Operating Instructions
Page 158
... as your computer was completed. Perform the following procedure to your camcorder before installation of the USB driver was connected to correctly install the USB driver. Viewing images recorded on a tape Step 1: Uninstall the incorrect USB driver 1 Turn on your computer and allow Windows to load. 2 Connect the AC power adaptor, and set the...
... as your computer was completed. Perform the following procedure to your camcorder before installation of the USB driver was connected to correctly install the USB driver. Viewing images recorded on a tape Step 1: Uninstall the incorrect USB driver 1 Turn on your computer and allow Windows to load. 2 Connect the AC power adaptor, and set the...

Operating Instructions
Page 159
Connecting your camcorder to OFF (CHG) on page 155. 159 For Windows users Viewing Images Using your Computer Windows 2000 Professional Windows XP 6 Turn the POWER switch to your computer. Step 2: Install the USB driver on the supplied CD-ROM Perform the entire procedure described in "Installing the USB driver" on your camcorder, and then disconnect the USB cable. 7 Restart your computer using the USB cable -
Connecting your camcorder to OFF (CHG) on page 155. 159 For Windows users Viewing Images Using your Computer Windows 2000 Professional Windows XP 6 Turn the POWER switch to your computer. Step 2: Install the USB driver on the supplied CD-ROM Perform the entire procedure described in "Installing the USB driver" on your camcorder, and then disconnect the USB cable. 7 Restart your computer using the USB cable -

Operating Instructions
Page 160
Ex: (?)Sony Handycam 7 Turn the POWER switch to your computer using the USB cable supplied with the "?" Step2: Install the USB driver on the supplied CD-ROM Perform the entire procedure described in "Installing the USB driver" on your computer's "Device Manager". Connecting your camcorder to... users Viewing images recorded on a "Memory Stick" Step1: Uninstall the incorrect USB driver 1 Turn on your computer and allow Windows to load. 2 Insert a "Memory Stick" into your camcorder. 3 Connect the AC power adaptor, and set the POWER switch to MEMORY/ NETWORK (DCR-IP55 only). 4 Connect...
Ex: (?)Sony Handycam 7 Turn the POWER switch to your computer using the USB cable supplied with the "?" Step2: Install the USB driver on the supplied CD-ROM Perform the entire procedure described in "Installing the USB driver" on your computer's "Device Manager". Connecting your camcorder to... users Viewing images recorded on a "Memory Stick" Step1: Uninstall the incorrect USB driver 1 Turn on your computer and allow Windows to load. 2 Insert a "Memory Stick" into your camcorder. 3 Connect the AC power adaptor, and set the POWER switch to MEMORY/ NETWORK (DCR-IP55 only). 4 Connect...

Operating Instructions
Page 161
... tape (1) Turn on your computer and allow Windows to view images recorded on a tape on your camcorder. (3) Set the POWER switch to ON in with "PIXELA ImageMixer Ver.1.0 for Sony" You need to install the USB driver and PIXELA ImageMixer to load. (2) Connect the AC power adaptor, ...and insert a cassette into your computer. The "PIXELA ImageMixer Ver.1.0 for Sony". Select USB STREAM in to VCR. Viewing images recorded on a tape on the ...
... tape (1) Turn on your computer and allow Windows to view images recorded on a tape on your camcorder. (3) Set the POWER switch to ON in with "PIXELA ImageMixer Ver.1.0 for Sony" You need to install the USB driver and PIXELA ImageMixer to load. (2) Connect the AC power adaptor, ...and insert a cassette into your computer. The "PIXELA ImageMixer Ver.1.0 for Sony". Select USB STREAM in to VCR. Viewing images recorded on a tape on the ...

Operating Instructions
Page 164
...images are not due to capture. If image data cannot be transferred by the USB connection The USB driver has been registered incorrectly as your computer was completed. To view images recorded on a MICROMV tape, use the application software MovieShaker Ver.3.1 for the DV equipment though it turns off... picture is inserted. •Indicators in the thumbnail list window. changes to capture. The image shakes up and down. - Viewing images recorded on a tape on your camcorder before installation of the USB driver was connected to OFF in the standby, and no cassette is captured.
...images are not due to capture. If image data cannot be transferred by the USB connection The USB driver has been registered incorrectly as your computer was completed. To view images recorded on a MICROMV tape, use the application software MovieShaker Ver.3.1 for the DV equipment though it turns off... picture is inserted. •Indicators in the thumbnail list window. changes to capture. The image shakes up and down. - Viewing images recorded on a tape on your camcorder before installation of the USB driver was connected to OFF in the standby, and no cassette is captured.

Operating Instructions
Page 166
Set the POWER switch to MEMORY/NETWORK (DCR-IP55 only). (3) When the CD-ROM is inserted on your computer, connect the (... computer using the supplied USB cable. For Windows users Viewing images Before operation •You need to install the USB driver to view "Memory Stick" images on your computer (p. 155). •An application such as Windows Media Player must be...My Computer" on your camcorder. The folders inside the "Memory Stick" are displayed. 166 Viewing images recorded on a "Memory Stick" on Windows and double-click the newly recognized drive (Example: "Removable Disk (E:)").
Set the POWER switch to MEMORY/NETWORK (DCR-IP55 only). (3) When the CD-ROM is inserted on your computer, connect the (... computer using the supplied USB cable. For Windows users Viewing images Before operation •You need to install the USB driver to view "Memory Stick" images on your computer (p. 155). •An application such as Windows Media Player must be...My Computer" on your camcorder. The folders inside the "Memory Stick" are displayed. 166 Viewing images recorded on a "Memory Stick" on Windows and double-click the newly recognized drive (Example: "Removable Disk (E:)").

Operating Instructions
Page 169
...your camcorder to your computer in this manual. 169 For Macintosh users When connecting to a computer via the USB jack You must install a USB driver onto your computer using a hub. •Some equipment may be provided as standard. Recommended Macintosh environment Mac OS 8.5.1/8.6/9.0/9.1/9.2 or Mac OS X (...camcorder to play back moving pictures). QuickTime 3.0 or newer must be the trademarks or registered trademarks of their respective companies. The USB driver can be found on the type of USB equipment that the update to a single computer at the same time, or when using ...
...your camcorder to your computer in this manual. 169 For Macintosh users When connecting to a computer via the USB jack You must install a USB driver onto your computer using a hub. •Some equipment may be provided as standard. Recommended Macintosh environment Mac OS 8.5.1/8.6/9.0/9.1/9.2 or Mac OS X (...camcorder to play back moving pictures). QuickTime 3.0 or newer must be the trademarks or registered trademarks of their respective companies. The USB driver can be found on the type of USB equipment that the update to a single computer at the same time, or when using ...

Operating Instructions
Page 170
...your computer before installation of your computer and allow the Mac OS to "Driver." 170 (4) Select the following two files, and drag and drop them into the System Folder. • Sony Camcorder USB Driver • Sony Camcorder USB Shim (5) When the message appears, click "OK." The application... software screen appears. (3) Click the "USB Driver" to open the folder containing the six files related to load. (2)...
...your computer before installation of your computer and allow the Mac OS to "Driver." 170 (4) Select the following two files, and drag and drop them into the System Folder. • Sony Camcorder USB Driver • Sony Camcorder USB Shim (5) When the message appears, click "OK." The application... software screen appears. (3) Click the "USB Driver" to open the folder containing the six files related to load. (2)...
Operating Instructions
Page 171
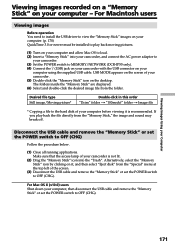
...Macintosh users Viewing images Before operation You need to install the USB driver to view the "Memory Stick" images on your computer. (p...., then disconnect the USB cable and remove the "Memory Stick" or set the POWER switch to MEMORY/NETWORK (DCR-IP55 only). (4) Connect the (USB) jack on your camcorder with the USB connector on your computer and allow Mac... OFF (CHG) Follow the procedure below. (1) Close all running applications. Viewing Images Using your Computer Viewing images recorded on a "Memory Stick" on your camcorder. (5) Double-click the "Memory Stick" icon on the desktop. If...
...Macintosh users Viewing images Before operation You need to install the USB driver to view the "Memory Stick" images on your computer. (p...., then disconnect the USB cable and remove the "Memory Stick" or set the POWER switch to MEMORY/NETWORK (DCR-IP55 only). (4) Connect the (USB) jack on your camcorder with the USB connector on your computer and allow Mac... OFF (CHG) Follow the procedure below. (1) Close all running applications. Viewing Images Using your Computer Viewing images recorded on a "Memory Stick" on your camcorder. (5) Double-click the "Memory Stick" icon on the desktop. If...

Operating Instructions
Page 189
... or local authorized Sony service facility. When you set the POWER switch to VCR or OFF (CHG), if you move your camcorder, you set DISPLAY to V-OUT/LCD in the menu settings when using mirror mode. c Uninstall the incorrect USB driver and reinstall the USB driver (p. 155). ...Charging is completed. • The battery pack is open. c Connect it properly (P. 17). • Something is not a malfunction. Types of the USB driver was completed. The buttons do not work. c Set it properly (p. 17). c Press the LCD screen lightly. This is not properly installed. camcorder (p. ...
... or local authorized Sony service facility. When you set the POWER switch to VCR or OFF (CHG), if you move your camcorder, you set DISPLAY to V-OUT/LCD in the menu settings when using mirror mode. c Uninstall the incorrect USB driver and reinstall the USB driver (p. 155). ...Charging is completed. • The battery pack is open. c Connect it properly (P. 17). • Something is not a malfunction. Types of the USB driver was completed. The buttons do not work. c Set it properly (p. 17). c Press the LCD screen lightly. This is not properly installed. camcorder (p. ...


