Operating Instructions
Page 2
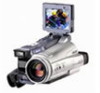
...may not cause harmful interference, and (2) this product will soon be producing home video that may cause undesired operation. RECYCLING LITHIUM-ION BATTERIES Lithium-Ion batteries are ...This Class B digital apparatus complies with Part 15 of important operating and maintenance (servicing) instructions in the U.S.A. Welcome! Congratulations on your used in this Sony Handycam. This ...use network functions are recyclable. "Memory Stick" This device complies with Canadian ICES-003. For details, refer to qualified personnel only. DCR-IP220 only Countries and areas where you...
...may not cause harmful interference, and (2) this product will soon be producing home video that may cause undesired operation. RECYCLING LITHIUM-ION BATTERIES Lithium-Ion batteries are ...This Class B digital apparatus complies with Part 15 of important operating and maintenance (servicing) instructions in the U.S.A. Welcome! Congratulations on your used in this Sony Handycam. This ...use network functions are recyclable. "Memory Stick" This device complies with Canadian ICES-003. For details, refer to qualified personnel only. DCR-IP220 only Countries and areas where you...

Operating Instructions
Page 4
... pictures on tapes (p. 29) •Playing back tapes (p. 42) •Recording still images on a "Memory Stick" (p. 47, 111) •Recording moving pictures on a "Memory Stick" (p. 130) •Viewing still images recorded on a "Memory Stick" (p. 136) •Viewing moving pictures recorded on a "Memory Stick" (p. 139) Main Features •Viewing moving pictures recorded on tapes using the USB cable (p. 164) •Capturing images on your...
... pictures on tapes (p. 29) •Playing back tapes (p. 42) •Recording still images on a "Memory Stick" (p. 47, 111) •Recording moving pictures on a "Memory Stick" (p. 130) •Viewing still images recorded on a "Memory Stick" (p. 136) •Viewing moving pictures recorded on a "Memory Stick" (p. 139) Main Features •Viewing moving pictures recorded on tapes using the USB cable (p. 164) •Capturing images on your...
Operating Instructions
Page 6
... digital effects 71 Enlarging images recorded on a "Memory Stick" in CAMERA "Memory Stick" mode 47 - Table of recorded tape by date - Basic operations 8 Quick Start Guide - Memory ...recording by title - BACK LIGHT 37 Recording video or TV programs ....... 83 Shooting in a "Memory Stick" on an image Operations - END SEARCH 41 Using a "Memory Stick" Playback - NightShot/ Superimposing a title 88 Super NightShot/Color Slow Making your own titles 94 Shutter 37 The micro Cassette Memory 97 Self-timer recording 40 Checking the recording "Memory Stick...
... digital effects 71 Enlarging images recorded on a "Memory Stick" in CAMERA "Memory Stick" mode 47 - Table of recorded tape by date - Basic operations 8 Quick Start Guide - Memory ...recording by title - BACK LIGHT 37 Recording video or TV programs ....... 83 Shooting in a "Memory Stick" on an image Operations - END SEARCH 41 Using a "Memory Stick" Playback - NightShot/ Superimposing a title 88 Super NightShot/Color Slow Making your own titles 94 Shutter 37 The micro Cassette Memory 97 Self-timer recording 40 Checking the recording "Memory Stick...
Operating Instructions
Page 7
...For Macintosh users 172 Viewing images recorded on a "Memory Stick" on your Computer Viewing images on a "Memory Stick" - USB Streaming (For Windows users 164 Viewing images recorded on a "Memory Stick" on your computer (For Windows ...DCR-IP220 only) Accessing the network 175 For the details, refer to the Network Function Operating Instructions supplied with your computer - Image protection 146 Deleting images - Customizing Your Camcorder Changing the menu settings 177 Troubleshooting Types of contents Getting Started Enlarging still images recorded on your camcorder. Memory...
...For Macintosh users 172 Viewing images recorded on a "Memory Stick" on your Computer Viewing images on a "Memory Stick" - USB Streaming (For Windows users 164 Viewing images recorded on a "Memory Stick" on your computer (For Windows ...DCR-IP220 only) Accessing the network 175 For the details, refer to the Network Function Operating Instructions supplied with your computer - Image protection 146 Deleting images - Customizing Your Camcorder Changing the menu settings 177 Troubleshooting Types of contents Getting Started Enlarging still images recorded on your camcorder. Memory...
Operating Instructions
Page 8
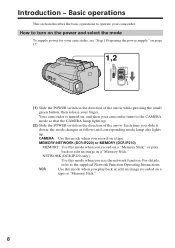
...CAMERA mode so that the CAMERA lamp lights up . NETWORK (DCR-IP220 only): Use this mode when you use the network function. VCR Use this mode when you play back or edit an image in a "Memory Stick." Each time you record on page 17. 1,2 POWER CAMERA (CHG)OFF ON MODE VCR MEMORY...the supplied Network Function Operating Instructions. Your camcorder is turned on a "Memory Stick," or play back or edit an image recorded on a tape or "Memory Stick." 8 MEMORY/NETWORK (DCR-IP220) or MEMORY (DCR-IP210) MEMORY: Use this mode when you slide it down, the mode changes as ...
...CAMERA mode so that the CAMERA lamp lights up . NETWORK (DCR-IP220 only): Use this mode when you use the network function. VCR Use this mode when you play back or edit an image in a "Memory Stick." Each time you record on page 17. 1,2 POWER CAMERA (CHG)OFF ON MODE VCR MEMORY...the supplied Network Function Operating Instructions. Your camcorder is turned on a "Memory Stick," or play back or edit an image recorded on a tape or "Memory Stick." 8 MEMORY/NETWORK (DCR-IP220) or MEMORY (DCR-IP210) MEMORY: Use this mode when you slide it down, the mode changes as ...
Operating Instructions
Page 12
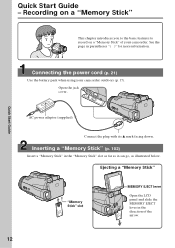
... the plug with its v mark facing down. Ejecting a "Memory Stick" "Memory Stick" slot MEMORY EJECT lever Open the LCD panel and slide the MEMORY EJECT lever in the direction of your camcorder outdoors (p. 17). Quick Start Guide - Open the jack cover. Recording on a "Memory Stick" This chapter introduces you to the basic features to record on a "Memory Stick" of the arrow. 12
... the plug with its v mark facing down. Ejecting a "Memory Stick" "Memory Stick" slot MEMORY EJECT lever Open the LCD panel and slide the MEMORY EJECT lever in the direction of your camcorder outdoors (p. 17). Quick Start Guide - Open the jack cover. Recording on a "Memory Stick" This chapter introduces you to the basic features to record on a "Memory Stick" of the arrow. 12

Operating Instructions
Page 13
.... When the green z mark stops flashing, then lights up your eyesight (p. 32). 4 Press PHOTO lightly. The MEMORY or VCR lamp lights up. Quick Start Guide Recording a still image on a "Memory Stick" (p. 111) 2 Set the POWER CAMERA switch to record the date and time for a picture, set up . (CHG)OFF ON MODE 1 Remove the lens cap. 3 Open...
.... When the green z mark stops flashing, then lights up your eyesight (p. 32). 4 Press PHOTO lightly. The MEMORY or VCR lamp lights up. Quick Start Guide Recording a still image on a "Memory Stick" (p. 111) 2 Set the POWER CAMERA switch to record the date and time for a picture, set up . (CHG)OFF ON MODE 1 Remove the lens cap. 3 Open...
Operating Instructions
Page 16
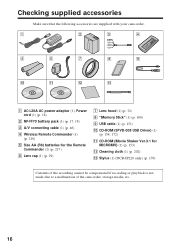
... 154, 172) qa CD-ROM (Movie Shaker Ver.3.1 for the Remote Commander (2) (p. 217) 6 Lens cap (1) (p. 29) 7 Lens hood (1) (p. 32) 8 "Memory Stick" (1) (p. 100) 9 USB cable (1) (p. 151) q; Checking supplied accessories Make sure that the following accessories are supplied with your camcorder. 1 2 3 4 5 6 7...(1) (p. 216) 5 Size AA (R6) batteries for MICROMV) (1) (p. 153) qs Cleaning cloth (1) (p. 202) qd Stylus (1) (DCR-IP220 only) (p. 176) Contents of the recording cannot be compensated if recording or playback is not made due to a malfunction of the camcorder, storage media, etc. 16
... 154, 172) qa CD-ROM (Movie Shaker Ver.3.1 for the Remote Commander (2) (p. 217) 6 Lens cap (1) (p. 29) 7 Lens hood (1) (p. 32) 8 "Memory Stick" (1) (p. 100) 9 USB cable (1) (p. 151) q; Checking supplied accessories Make sure that the following accessories are supplied with your camcorder. 1 2 3 4 5 6 7...(1) (p. 216) 5 Size AA (R6) batteries for MICROMV) (1) (p. 153) qs Cleaning cloth (1) (p. 202) qd Stylus (1) (DCR-IP220 only) (p. 176) Contents of the recording cannot be compensated if recording or playback is not made due to a malfunction of the camcorder, storage media, etc. 16

Operating Instructions
Page 23
... RET. The year changes as the data code. Note on the time indicator The internal clock of your camcorder operates on the tape or the "Memory Stick" as follows: 2000 2002 2079 To return to FN (Function) Press EXIT. r R EXEC RET. 6 r R EXEC CLOCK SET AREA26 R GMT New... York, Bogota r DST OFF EXIT -5.0 DATE ---Y- --M- --D -- : -- If you do not set the date and time and "--:--:--" are recorded on a 12-hour cycle. •12:00 AM stands for midnight. •12:00 PM stands for noon. 23 When using your camcorder in a region...
... RET. The year changes as the data code. Note on the time indicator The internal clock of your camcorder operates on the tape or the "Memory Stick" as follows: 2000 2002 2079 To return to FN (Function) Press EXIT. r R EXEC RET. 6 r R EXEC CLOCK SET AREA26 R GMT New... York, Bogota r DST OFF EXIT -5.0 DATE ---Y- --M- --D -- : -- If you do not set the date and time and "--:--:--" are recorded on a 12-hour cycle. •12:00 AM stands for midnight. •12:00 PM stands for noon. 23 When using your camcorder in a region...

Operating Instructions
Page 47
... PHOTO deeper will be recorded on the "Memory Stick." 2 640 SFN 1 / 12 CAPTURE 3 FN 640 SFN FN Notes •Do not shake or strike your camcorder. (1) Set the POWER switch to CAMERA. (2) In the recording standby mode, keep pressing PHOTO lightly until a still image appears. Wide mode - Color Slow Shutter - Super NightShot - Picture effect - Digital effect -
... PHOTO deeper will be recorded on the "Memory Stick." 2 640 SFN 1 / 12 CAPTURE 3 FN 640 SFN FN Notes •Do not shake or strike your camcorder. (1) Set the POWER switch to CAMERA. (2) In the recording standby mode, keep pressing PHOTO lightly until a still image appears. Wide mode - Color Slow Shutter - Super NightShot - Picture effect - Digital effect -

Operating Instructions
Page 48
... FINE.) See page 105 for more information. Recording still images on a "Memory Stick" in different sizes, use the Memory Photo recording function (p. 111). You cannot record a title. 48 When you use the Memory Photo recording function (p. 111). To record images with higher quality We recommend you want to record still images in CAMERA mode Image size of still images Image size...
... FINE.) See page 105 for more information. Recording still images on a "Memory Stick" in different sizes, use the Memory Photo recording function (p. 111). You cannot record a title. 48 When you use the Memory Photo recording function (p. 111). To record images with higher quality We recommend you want to record still images in CAMERA mode Image size of still images Image size...
Operating Instructions
Page 49
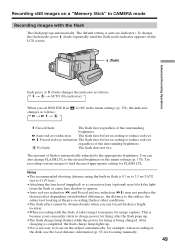
...reduction: The flash fires before recording to reduce red-eye regardless of flash is being charged. The default setting is not easy to focus on a "Memory Stick" in CAMERA mode Recording images with the flash, it is auto (no indicator). Recording still images on the subject ...automatically, for example, when recording in the dark, use forced flash in a bright location. • When recording with the flash The flash pops...
...reduction: The flash fires before recording to reduce red-eye regardless of flash is being charged. The default setting is not easy to focus on a "Memory Stick" in CAMERA mode Recording images with the flash, it is auto (no indicator). Recording still images on the subject ...automatically, for example, when recording in the dark, use forced flash in a bright location. • When recording with the flash The flash pops...

Operating Instructions
Page 50
Recording still images on the tape - Wide mode - Sunset & moon of PROGRAM AE - Super NightShot - MEMORY MIX The flash does not fire even if you leave your camcorder for five or more minutes after removing the power ...camcorder returns to the default setting (auto). NightShot - Landscape of PROGRAM AE - Spotlight of PROGRAM AE - Exposure - END SEARCH - Picture effect - Recording on a "Memory Stick" in CAMERA mode If you select auto (no indicator) and reduction) during the following operations: - Color Slow Shutter - You cannot shoot images with the flash during...
Recording still images on the tape - Wide mode - Sunset & moon of PROGRAM AE - Super NightShot - MEMORY MIX The flash does not fire even if you leave your camcorder for five or more minutes after removing the power ...camcorder returns to the default setting (auto). NightShot - Landscape of PROGRAM AE - Spotlight of PROGRAM AE - Exposure - END SEARCH - Picture effect - Recording on a "Memory Stick" in CAMERA mode If you select auto (no indicator) and reduction) during the following operations: - Color Slow Shutter - You cannot shoot images with the flash during...

Operating Instructions
Page 51
.... (1) Set the POWER switch to CAMERA. (2) Press FN to make PAGE1 disappear. (5) Press PHOTO deeper. During recording on the tape You cannot use the Remote Commander for this operation. Before operation Insert a "Memory Stick" into your camcorder is set to ...recording Press SELFTIMER so that the (self-timer) indicator disappears from about 10 with the self-timer. You can record still images with a beep. The POWER switch is in CAMERA mode Self-timer recording You can also use self-timer recording. 51 Advanced Recording Operations Recording still images on a "Memory Stick...
.... (1) Set the POWER switch to CAMERA. (2) Press FN to make PAGE1 disappear. (5) Press PHOTO deeper. During recording on the tape You cannot use the Remote Commander for this operation. Before operation Insert a "Memory Stick" into your camcorder is set to ...recording Press SELFTIMER so that the (self-timer) indicator disappears from about 10 with the self-timer. You can record still images with a beep. The POWER switch is in CAMERA mode Self-timer recording You can also use self-timer recording. 51 Advanced Recording Operations Recording still images on a "Memory Stick...
Operating Instructions
Page 63
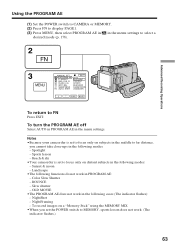
... - NightFraming - Notes •Because your camcorder is set to focus only on subjects in the middle to far distance, you set to MEMORY, sports lesson does not work in PROGRAM AE: - Color Slow Shutter - NightShot - BOUNCE - To turn the PROGRAM AE off Select AUTO... SPORTS BEACH&SKI SUNSETMOON LANDSCAPE EXEC RET. To record images on a "Memory Stick" using the MEMORY MIX. •When you cannot take close-ups in the following modes: - Advanced Recording Operations Using the PROGRAM AE (1) Set the POWER switch to CAMERA or MEMORY. (2) Press FN to display PAGE1. (3) Press...
... - NightFraming - Notes •Because your camcorder is set to focus only on subjects in the middle to far distance, you set to MEMORY, sports lesson does not work in PROGRAM AE: - Color Slow Shutter - NightShot - BOUNCE - To turn the PROGRAM AE off Select AUTO... SPORTS BEACH&SKI SUNSETMOON LANDSCAPE EXEC RET. To record images on a "Memory Stick" using the MEMORY MIX. •When you cannot take close-ups in the following modes: - Advanced Recording Operations Using the PROGRAM AE (1) Set the POWER switch to CAMERA or MEMORY. (2) Press FN to display PAGE1. (3) Press...

Operating Instructions
Page 70
... on a tape on a VCR using the picture effect functions: NEG. Playing back a tape with picture effects During playback, you can record images on a "Memory Stick" (p. 121, 133), or on your camcorder as a player. Advanced Playback Operations - - ART, SEPIA, B&W and SOLARIZE. (1) Set the POWER switch to select a desired picture effect mode (p. ...
... on a tape on a VCR using the picture effect functions: NEG. Playing back a tape with picture effects During playback, you can record images on a "Memory Stick" (p. 121, 133), or on your camcorder as a player. Advanced Playback Operations - - ART, SEPIA, B&W and SOLARIZE. (1) Set the POWER switch to select a desired picture effect mode (p. ...

Operating Instructions
Page 71
... POWER switch to PAGE2. The display returns to VCR. Notes • You cannot process externally input scenes using the digital effect function. • You cannot record images on a tape on a VCR using your camcorder while you are not output through the i.LINK (MICROMV Interface).... mode. When you select the mode is automatically canceled. 71 Advanced Playback Operations Playing back a tape with digital effects During playback, you can record images on a "Memory Stick" (p. 121, 133), or on your camcorder as a still image. (4) Press -/+ to PAGE2. (2) Press DIG EFFT. In the...
... POWER switch to PAGE2. The display returns to VCR. Notes • You cannot process externally input scenes using the digital effect function. • You cannot record images on a tape on a VCR using your camcorder while you are not output through the i.LINK (MICROMV Interface).... mode. When you select the mode is automatically canceled. 71 Advanced Playback Operations Playing back a tape with digital effects During playback, you can record images on a "Memory Stick" (p. 121, 133), or on your camcorder as a still image. (4) Press -/+ to PAGE2. (2) Press DIG EFFT. In the...

Operating Instructions
Page 72
...can enlarge still images recorded on the PB ZOOM screen. "T" side: Increase the zoom ratio. 4 PB ZOOM × 2.1 WT END 1 FN PAGE2 2,3 PB ZOOM PB ZOOM END To cancel the PB ZOOM function Press END. 72 The area you want to enlarge in the frame on a "Memory Stick" (p. 143). (1)...center of the LCD screen. (4) Adjust the zoom ratio by the zoom lever. Tape PB ZOOM You can enlarge playback moving pictures recorded on tapes - Enlarging images recorded on tapes. Besides the operation described here, your camcorder can enlarge the image from 1.1 times up to PAGE2. (2) Press PB ...
...can enlarge still images recorded on the PB ZOOM screen. "T" side: Increase the zoom ratio. 4 PB ZOOM × 2.1 WT END 1 FN PAGE2 2,3 PB ZOOM PB ZOOM END To cancel the PB ZOOM function Press END. 72 The area you want to enlarge in the frame on a "Memory Stick" (p. 143). (1)...center of the LCD screen. (4) Adjust the zoom ratio by the zoom lever. Tape PB ZOOM You can enlarge playback moving pictures recorded on tapes - Enlarging images recorded on tapes. Besides the operation described here, your camcorder can enlarge the image from 1.1 times up to PAGE2. (2) Press PB ...

Operating Instructions
Page 73
Advanced Playback Operations Enlarging images recorded on your camcorder while you are processing the image using the tape PB ZOOM function. The PB ZOOM function is set to ZOOM You can record images on a "Memory Stick" (p. 121), or on a VCR using your camcorder while you press DISPLAY/TOUCH ...PANEL, the frame on your camcorder as a player. •You cannot record moving pictures on a "Memory Stick" on the PB ZOOM screen disappears. Turn the POWER switch to the center of the LCD screen. When FOCUS is automatically ...
Advanced Playback Operations Enlarging images recorded on your camcorder while you are processing the image using the tape PB ZOOM function. The PB ZOOM function is set to ZOOM You can record images on a "Memory Stick" (p. 121), or on a VCR using your camcorder while you press DISPLAY/TOUCH ...PANEL, the frame on your camcorder as a player. •You cannot record moving pictures on a "Memory Stick" on the PB ZOOM screen disappears. Turn the POWER switch to the center of the LCD screen. When FOCUS is automatically ...

Operating Instructions
Page 82
... Prepare the VCR for recording. (3) Set the POWER switch to VCR. (4) Play back the recorded tape on your camcorder. (5) Start recording on the "Memory Stick" index screen. (1) Insert a blank tape (or a tape you record a playback pause picture: •The recorded picture becomes rough when recorded through the i.LINK (...optional) to the i.LINK (MICROMV Interface) of your camcorder and to the i.LINK (MICROMV Interface) of the VCR. With digital-to-digital connection, video and audio signals are not output through the i.LINK (MICROMV Interface). •The picture may be a time-lag when you...
... Prepare the VCR for recording. (3) Set the POWER switch to VCR. (4) Play back the recorded tape on your camcorder. (5) Start recording on the "Memory Stick" index screen. (1) Insert a blank tape (or a tape you record a playback pause picture: •The recorded picture becomes rough when recorded through the i.LINK (...optional) to the i.LINK (MICROMV Interface) of your camcorder and to the i.LINK (MICROMV Interface) of the VCR. With digital-to-digital connection, video and audio signals are not output through the i.LINK (MICROMV Interface). •The picture may be a time-lag when you...


