Operating Instructions
Page 1
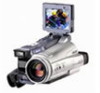
Serial No. Serial No. Record the serial number in the space provided below. DCR-IP220 DCR-IP210/IP220 ©2002 Sony Corporation AC- Refer to these numbers whenever you call upon your Sony dealer regarding this manual thoroughly, and retain it for future reference. Model No. DCR-IP Model No. 3-076-897-11 (1) Digital Video Camera Recorder Operating Instructions Before operating the unit, please read this product. Owner's Record The model and serial numbers are located on the bottom.
Serial No. Serial No. Record the serial number in the space provided below. DCR-IP220 DCR-IP210/IP220 ©2002 Sony Corporation AC- Refer to these numbers whenever you call upon your Sony dealer regarding this manual thoroughly, and retain it for future reference. Model No. DCR-IP Model No. 3-076-897-11 (1) Digital Video Camera Recorder Operating Instructions Before operating the unit, please read this product. Owner's Record The model and serial numbers are located on the bottom.
Operating Instructions
Page 6
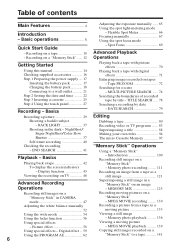
... picture 133 Using the wide mode 54 Using the fader function 56 Viewing a still image - Digital effect ... 59 Copying still images recorded on a "Memory Stick" in the dark - Spot Focus 69 Advanced Playback Operations Getting Started Using this manual 14 Checking supplied accessories 16 Step 1 Preparing the power supply .... 17 Inserting the battery pack 17 Charging the battery pack 18 Connecting to a tape 141 6 BACK LIGHT 37 Recording video or TV programs ....... 83 Shooting in CAMERA "Memory Stick" mode 47 - Picture effect 58 - Memory photo recording...
... picture 133 Using the wide mode 54 Using the fader function 56 Viewing a still image - Digital effect ... 59 Copying still images recorded on a "Memory Stick" in the dark - Spot Focus 69 Advanced Playback Operations Getting Started Using this manual 14 Checking supplied accessories 16 Step 1 Preparing the power supply .... 17 Inserting the battery pack 17 Charging the battery pack 18 Connecting to a tape 141 6 BACK LIGHT 37 Recording video or TV programs ....... 83 Shooting in CAMERA "Memory Stick" mode 47 - Picture effect 58 - Memory photo recording...
Operating Instructions
Page 14
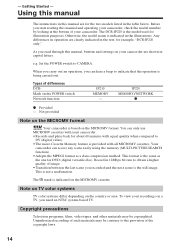
... POWER switch to DV (digital video). •The micro Cassette Memory feature is the same as a data compression method. This format is provided with all MICROMV cassettes. Record in capital letters. To view your recordings on a TV, you read through this manual, buttons and settings on your camcorder are for DVD (digital versatile disc). When you carry out an operation, you can only use MICROMV cassettes with your camcorder. Using this manual The instructions in this manual...
... POWER switch to DV (digital video). •The micro Cassette Memory feature is the same as a data compression method. This format is provided with all MICROMV cassettes. Record in capital letters. To view your recordings on a TV, you read through this manual, buttons and settings on your camcorder are for DVD (digital versatile disc). When you carry out an operation, you can only use MICROMV cassettes with your camcorder. Using this manual The instructions in this manual...
Operating Instructions
Page 46
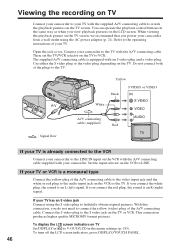
... can operate the playback control buttons in the menu settings (p. 185). When viewing the playback picture on the TV. Open the jack cover. Use either the S video plug or the video plug depending on the TV screen, we recommend that you power your camcorder from a wall outlet using the S video plug to faithfully obtain original pictures. Set the input selector on the TV to VCR. This connection produces higher quality MICROMV format pictures. To display the LCD screen indicators on TV Set DISPLAY...
... can operate the playback control buttons in the menu settings (p. 185). When viewing the playback picture on the TV. Open the jack cover. Use either the S video plug or the video plug depending on the TV screen, we recommend that you power your camcorder from a wall outlet using the S video plug to faithfully obtain original pictures. Set the input selector on the TV to VCR. This connection produces higher quality MICROMV format pictures. To display the LCD screen indicators on TV Set DISPLAY...

Operating Instructions
Page 112
... this operation (p. 43). Sports lesson of the subject. 112 However, they are recording a still image You cannot turn off the power or press PHOTO. Wide mode - Picture effect - Super NightShot - Fader - SteadyShot While you press PHOTO lightly in CAMERA mode. To display the recording data, press DATA CODE during playback. Recording data The recording data (date/time or various settings when recorded) are not displayed while recording. When the POWER switch is set to MEMORY The following functions do not work: - Recording still images on a "Memory Stick" - Title...
... this operation (p. 43). Sports lesson of the subject. 112 However, they are recording a still image You cannot turn off the power or press PHOTO. Wide mode - Picture effect - Super NightShot - Fader - SteadyShot While you press PHOTO lightly in CAMERA mode. To display the recording data, press DATA CODE during playback. Recording data The recording data (date/time or various settings when recorded) are not displayed while recording. When the POWER switch is set to MEMORY The following functions do not work: - Recording still images on a "Memory Stick" - Title...

Operating Instructions
Page 131
... POWER switch is not recorded on a "Memory Stick." Super NightShot - Picture effect - SteadyShot When using an external flash (optional) Turn the power of the external flash off when recording moving pictures on a digital still camera or a camcorder that has no MPEG MOVIE AD function. •Cannot be played back on a "Memory Stick" - Recording date/time The date/time are automatically recorded onto the "Memory Stick." You can also use the Remote Commander for this operation (p. 43). While ejecting the tape, sound is set to MEMORY The following functions do not work...
... POWER switch is not recorded on a "Memory Stick." Super NightShot - Picture effect - SteadyShot When using an external flash (optional) Turn the power of the external flash off when recording moving pictures on a digital still camera or a camcorder that has no MPEG MOVIE AD function. •Cannot be played back on a "Memory Stick" - Recording date/time The date/time are automatically recorded onto the "Memory Stick." You can also use the Remote Commander for this operation (p. 43). While ejecting the tape, sound is set to MEMORY The following functions do not work...

Operating Instructions
Page 156
... Windows users) Installing the USB driver Start the following operation without connecting the USB cable to load. (2) Insert the supplied CD-ROM in the CD-ROM drive of administrators. If you are using Windows 2000 Professional, log in with permission of your computer. If you are using Windows XP, log in with permission of computer administrators. (1) Turn on page 161. •The title screen is not displayed if the screen size...
... Windows users) Installing the USB driver Start the following operation without connecting the USB cable to load. (2) Insert the supplied CD-ROM in the CD-ROM drive of administrators. If you are using Windows 2000 Professional, log in with permission of your computer. If you are using Windows XP, log in with permission of computer administrators. (1) Turn on page 161. •The title screen is not displayed if the screen size...

Operating Instructions
Page 160
... install the USB driver if a "Memory Stick" is not in your camcorder Be sure to insert a "Memory Stick" into your camcorder. (2) Connect the AC power adaptor and set the POWER switch to MEMORY. (3) Connect the (USB) jack on your camcorder to the USB connector on your camcorder, and the Add Hardware Wizard starts. (USB) jack USB connector USB cable (supplied) (4) Follow the on a "Memory Stick" (1) Insert a "Memory Stick" into your camcorder. Your computer recognizes your computer using the USB cable (For Windows users) Viewing images recorded on -screen messages...
... install the USB driver if a "Memory Stick" is not in your camcorder Be sure to insert a "Memory Stick" into your camcorder. (2) Connect the AC power adaptor and set the POWER switch to MEMORY. (3) Connect the (USB) jack on your camcorder to the USB connector on your camcorder, and the Add Hardware Wizard starts. (USB) jack USB connector USB cable (supplied) (4) Follow the on a "Memory Stick" (1) Insert a "Memory Stick" into your camcorder. Your computer recognizes your computer using the USB cable (For Windows users) Viewing images recorded on -screen messages...

Operating Instructions
Page 161
... click "Device Manager". 5 Select and delete the underlined devices below. Viewing Images Using your Computer Windows 98SE Windows Me 161 Perform the following procedure to classic view" instead. Viewing images recorded on a tape Step 1: Uninstall the incorrect USB driver 1 Turn on your computer and allow Windows to load. 2 Connect the AC power adaptor, and set the POWER switch to VCR. 3 Connect the USB connector on your camcorder using the USB cable (For Windows users) If you cannot install the USB driver The USB driver has been...
... click "Device Manager". 5 Select and delete the underlined devices below. Viewing Images Using your Computer Windows 98SE Windows Me 161 Perform the following procedure to classic view" instead. Viewing images recorded on a tape Step 1: Uninstall the incorrect USB driver 1 Turn on your computer and allow Windows to load. 2 Connect the AC power adaptor, and set the POWER switch to VCR. 3 Connect the USB connector on your camcorder using the USB cable (For Windows users) If you cannot install the USB driver The USB driver has been...

Operating Instructions
Page 163
..." button. mark and delete. Other OS: Select "My Computer" t "Control Panel" t "System", and click "Device Manager". 6 Select "Other devices". Ex: (?)Sony Handycam 7 Turn the POWER switch to the (USB) jack on your camcorder, and then disconnect the USB cable. 8 Restart your computer's "Device Manager". Select the device prefixed with your camcorder. 5 Open your computer. Viewing Images Using your Computer Connecting your camcorder to your computer using the USB cable (For Windows users) Viewing images recorded on a "Memory Stick" Step1: Uninstall the incorrect USB driver 1 Turn...
..." button. mark and delete. Other OS: Select "My Computer" t "Control Panel" t "System", and click "Device Manager". 6 Select "Other devices". Ex: (?)Sony Handycam 7 Turn the POWER switch to the (USB) jack on your camcorder, and then disconnect the USB cable. 8 Restart your computer's "Device Manager". Select the device prefixed with your camcorder. 5 Open your computer. Viewing Images Using your Computer Connecting your camcorder to your computer using the USB cable (For Windows users) Viewing images recorded on a "Memory Stick" Step1: Uninstall the incorrect USB driver 1 Turn...

Operating Instructions
Page 164
Viewing images recorded on a tape (1) Turn on your computer and allow Windows to load. (2) Connect the AC power adaptor, and insert a cassette into your camcorder. (3) Set the POWER switch to VCR on your computer - The "PIXELA ImageMixer Ver.1.0 for Sony" You need to install the USB driver and PIXELA ImageMixer to ON in the menu settings (p. 184). (4) Select "Start" t "Programs" t "PIXELA" t "ImageMixer" t "PIXELA ImageMixer Ver.1.0 for Sony". USB Streaming (For Windows users) Capturing images with "PIXELA ImageMixer Ver...
Viewing images recorded on a tape (1) Turn on your computer and allow Windows to load. (2) Connect the AC power adaptor, and insert a cassette into your camcorder. (3) Set the POWER switch to VCR on your computer - The "PIXELA ImageMixer Ver.1.0 for Sony" You need to install the USB driver and PIXELA ImageMixer to ON in the menu settings (p. 184). (4) Select "Start" t "Programs" t "PIXELA" t "ImageMixer" t "PIXELA ImageMixer Ver.1.0 for Sony". USB Streaming (For Windows users) Capturing images with "PIXELA ImageMixer Ver...
Operating Instructions
Page 170
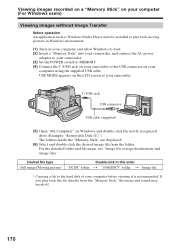
...(3) Set the POWER switch to MEMORY. (4) Connect the (USB) jack on your camcorder to the hard disk of your camcorder. (USB) jack USB connector USB cable (supplied) (5) Open "My Computer" on Windows and double-click the newly recognized drive (Example: "Removable Disk (E:)"). For the detailed folder and file name, see "Image file storage destinations and image files." Viewing images recorded on a "Memory Stick" on your computer (For Windows users) Viewing images without Image Transfer Before operation An application such as Windows Media Player must be installed to play back the file...
...(3) Set the POWER switch to MEMORY. (4) Connect the (USB) jack on your camcorder to the hard disk of your camcorder. (USB) jack USB connector USB cable (supplied) (5) Open "My Computer" on Windows and double-click the newly recognized drive (Example: "Removable Disk (E:)"). For the detailed folder and file name, see "Image file storage destinations and image files." Viewing images recorded on a "Memory Stick" on your computer (For Windows users) Viewing images without Image Transfer Before operation An application such as Windows Media Player must be installed to play back the file...

Operating Instructions
Page 174
...camcorder. (3) Set the POWER switch to MEMORY. (4) Connect the (USB) jack on your camcorder. (5) Double-click the "Memory Stick" icon on the LCD screen of your computer using the supplied USB cable. Viewing images recorded on a "Memory Stick" on your computer (For Macintosh users) Viewing images Before operation You need to install the USB driver to (CHG) OFF. Disconnect the USB cable and remove the "Memory Stick" or set the POWER switch to view the "Memory Stick" images on your camcorder is recommended. QuickTime 3.0 or newer must be installed to play back the file directly...
...camcorder. (3) Set the POWER switch to MEMORY. (4) Connect the (USB) jack on your camcorder. (5) Double-click the "Memory Stick" icon on the LCD screen of your computer using the supplied USB cable. Viewing images recorded on a "Memory Stick" on your computer (For Macintosh users) Viewing images Before operation You need to install the USB driver to (CHG) OFF. Disconnect the USB cable and remove the "Memory Stick" or set the POWER switch to view the "Memory Stick" images on your camcorder is recommended. QuickTime 3.0 or newer must be installed to play back the file directly...

Operating Instructions
Page 178
... Press EXIT. Meaning POWER switch To suit your specific shooting requirement (p. 62) To add special effects like those in bright conditions CAMERA FLASH LVL You cannot adjust FLASH LVL if the external flash (optional) is the default setting. To make the flash level higher than normal. To use the normal setting. Menu items are displayed as the following icons: MANUAL SET CAMERA SET VCR SET LCD/VF SET MEMORY SET CM SET TAPE SET SETUP MENU OTHERS Selecting the mode setting of each item...
... Press EXIT. Meaning POWER switch To suit your specific shooting requirement (p. 62) To add special effects like those in bright conditions CAMERA FLASH LVL You cannot adjust FLASH LVL if the external flash (optional) is the default setting. To make the flash level higher than normal. To use the normal setting. Menu items are displayed as the following icons: MANUAL SET CAMERA SET VCR SET LCD/VF SET MEMORY SET CM SET TAPE SET SETUP MENU OTHERS Selecting the mode setting of each item...

Operating Instructions
Page 185
...of recording MEMORY VCR CAMERA MEMORY CAMERA MEMORY CAMERA MEMORY VCR CAMERA MEMORY VCR CAMERA MEMORY VCR CAMERA MEMORY * Instead of your camcorder may reflect on the screen for some models. Changing the menu settings Customizing Your Camcorder Icon/item Mode OTHERS DATA CODE z DATE/CAM (On the Remote Commander) DATE AREA SET -- DST SET* z OFF ON BEEP z MELODY COMMANDER NORMAL OFF z ON OFF DISPLAY REC LAMP z LCD V-OUT/LCD z ON OFF Meaning POWER switch When you set to OFF. The date and time are displayed during playback (p. 43). Note If you start/stop recording or...
...of recording MEMORY VCR CAMERA MEMORY CAMERA MEMORY CAMERA MEMORY VCR CAMERA MEMORY VCR CAMERA MEMORY VCR CAMERA MEMORY * Instead of your camcorder may reflect on the screen for some models. Changing the menu settings Customizing Your Camcorder Icon/item Mode OTHERS DATA CODE z DATE/CAM (On the Remote Commander) DATE AREA SET -- DST SET* z OFF ON BEEP z MELODY COMMANDER NORMAL OFF z ON OFF DISPLAY REC LAMP z LCD V-OUT/LCD z ON OFF Meaning POWER switch When you set to OFF. The date and time are displayed during playback (p. 43). Note If you start/stop recording or...
Operating Instructions
Page 186
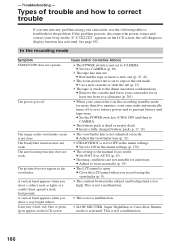
... on the LCD screen. c Use a new cassette or slide the tab (p. 25). • The tape is too high. c Adjust the viewfinder lens (p. 32). • STEADYSHOT is open. In the recording mode Symptom START/STOP does not operate. The SteadyShot function does not work . A vertical band appears when you shoot a subject such as lights or a candle flame against a dark background. c Adjust to CAMERA. The power goes off to save battery power and to...
... on the LCD screen. c Use a new cassette or slide the tab (p. 25). • The tape is too high. c Adjust the viewfinder lens (p. 32). • STEADYSHOT is open. In the recording mode Symptom START/STOP does not operate. The SteadyShot function does not work . A vertical band appears when you shoot a subject such as lights or a candle flame against a dark background. c Adjust to CAMERA. The power goes off to save battery power and to...
Operating Instructions
Page 208
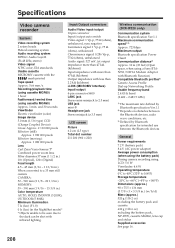
...(in the NightShot mode)* * Objects unable to be shot with the mark printed Tape speed Approx. 5.66 mm/s Recording/playback time (using cassette MGR60) 1 hour Fastforward/rewind time (using cassette MGR60) Approx. 1 min. Specifications Video camera recorder System Video recording system 2 rotary heads Helical scanning system Audio recording system MPEG1 Audio Layer2 (Fs 48 kHz, stereo) Video signal NTSC color, EIA standards Usable cassette MICROMV cassette with infrared lighting. Input/Output connectors Audio/Video input/output 10-pin connector Input/output auto switch Video signal: 1 Vp...
...(in the NightShot mode)* * Objects unable to be shot with the mark printed Tape speed Approx. 5.66 mm/s Recording/playback time (using cassette MGR60) 1 hour Fastforward/rewind time (using cassette MGR60) Approx. 1 min. Specifications Video camera recorder System Video recording system 2 rotary heads Helical scanning system Audio recording system MPEG1 Audio Layer2 (Fs 48 kHz, stereo) Video signal NTSC color, EIA standards Usable cassette MICROMV cassette with infrared lighting. Input/Output connectors Audio/Video input/output 10-pin connector Input/output auto switch Video signal: 1 Vp...

Operating Instructions
Page 219
... 59 M, N Manual focus 67 Memory chroma key 125 Memory luminance key ....... 125 MEMORY MIX 125 Memory overlap 125 Memory PB ZOOM 143 Memory photo playback ..... 136 Memory photo recording .... 111 "Memory Stick 100 Menu settings 177 M. ART 58 NETWORK 175 NIGHTFRAMING 119 NIGHTSHOT 37 NTSC system 200 O, P, Q OLD MOVIE 59 Operation indicators 218 PASTEL 58 Picture effect 58, 70 Picture quality mode 107 Playback pause 45 Playing time 19 Print mark 150 PROGRAM AE 62 R Recording time 19 Remaining battery time indicator...
... 59 M, N Manual focus 67 Memory chroma key 125 Memory luminance key ....... 125 MEMORY MIX 125 Memory overlap 125 Memory PB ZOOM 143 Memory photo playback ..... 136 Memory photo recording .... 111 "Memory Stick 100 Menu settings 177 M. ART 58 NETWORK 175 NIGHTFRAMING 119 NIGHTSHOT 37 NTSC system 200 O, P, Q OLD MOVIE 59 Operation indicators 218 PASTEL 58 Picture effect 58, 70 Picture quality mode 107 Playback pause 45 Playing time 19 Print mark 150 PROGRAM AE 62 R Recording time 19 Remaining battery time indicator...
Marketing Specifications
Page 1
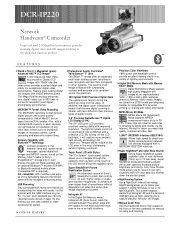
... previous types of receiving email. These clips are 70% smaller. Color Slow Shutter mode allows you to capture beautiful, full-color still images. ➤Manual Zoom Ring Use the traditional focus ring located on your PC. Realize great looking digital still images with the USB interface on the front of lighting environments. ➤Digital Still Memory Mode with full color detail by broadcasting live video with audio, via the internet. AOL compatible. By turning...
... previous types of receiving email. These clips are 70% smaller. Color Slow Shutter mode allows you to capture beautiful, full-color still images. ➤Manual Zoom Ring Use the traditional focus ring located on your PC. Realize great looking digital still images with the USB interface on the front of lighting environments. ➤Digital Still Memory Mode with full color detail by broadcasting live video with audio, via the internet. AOL compatible. By turning...
Marketing Specifications
Page 2
...) Power Consumption (VF/LCD/VF+LCD): 4.4W/5.0W/5.3W Software OS Compatibility: Microsoft® Windows® 2000, Me, XP Dimensions (WHD): 3 7/8" x 3 x 5 3/8" (98 x 75.5x 136mm) Weight: 1 lb. 2 oz (520g) without tape and battery Supplied Accessories: AC-L20 Power Adapter/In Camera Charger, NP-FF70 InfoLithium Rechargeable Battery, RMT-817 Wireless Remote Commander® Remote Control, 2 AA Batteries, Stereo A/V and S-Video Cable, Lens Cap, Wrist Strap, 8MB Memory Stick® Media, Stylus, Cleaning Cloth, USB Cable, CD-ROM...
...) Power Consumption (VF/LCD/VF+LCD): 4.4W/5.0W/5.3W Software OS Compatibility: Microsoft® Windows® 2000, Me, XP Dimensions (WHD): 3 7/8" x 3 x 5 3/8" (98 x 75.5x 136mm) Weight: 1 lb. 2 oz (520g) without tape and battery Supplied Accessories: AC-L20 Power Adapter/In Camera Charger, NP-FF70 InfoLithium Rechargeable Battery, RMT-817 Wireless Remote Commander® Remote Control, 2 AA Batteries, Stereo A/V and S-Video Cable, Lens Cap, Wrist Strap, 8MB Memory Stick® Media, Stylus, Cleaning Cloth, USB Cable, CD-ROM...


