
Operating Instructions
Page 151
... manufacturer. Introduction There are the following ways of the i.LINK driver, the USB driver or the application softwares before connecting your camcorder to view images saved on a "Memory Stick" or recorded on a tape on your computer first, you connect your camcorder... image USB jack* Connection cable USB cable (supplied) i.LINK cable (optional) USB cable (supplied) Computer environment requirements Reference pages For Windows users For Macintosh users USB connector, editing software i.LINK (IEEE 1394), connector editing software USB connector, editing software 154 - 156 158...
... manufacturer. Introduction There are the following ways of the i.LINK driver, the USB driver or the application softwares before connecting your camcorder to view images saved on a "Memory Stick" or recorded on a tape on your computer first, you connect your camcorder... image USB jack* Connection cable USB cable (supplied) i.LINK cable (optional) USB cable (supplied) Computer environment requirements Reference pages For Windows users For Macintosh users USB connector, editing software i.LINK (IEEE 1394), connector editing software USB connector, editing software 154 - 156 158...

Operating Instructions
Page 153
...to the operating instructions supplied with the computer on your computer. You can view or edit the images recorded on your computer, you have to install the i.LINK driver and the application software into your computer, be equipped. CPU: Pentium III 600 MHz or faster (... is not assured if the above . 153 Note To view images on a tape using the i.LINK cable (For Windows users) You can also record images edited with MovieShaker Ver.3.1 for all the recommended computer environments mentioned above environment is required. Standard installation is an upgraded...
...to the operating instructions supplied with the computer on your computer. You can view or edit the images recorded on your computer, you have to install the i.LINK driver and the application software into your computer, be equipped. CPU: Pentium III 600 MHz or faster (... is not assured if the above . 153 Note To view images on a tape using the i.LINK cable (For Windows users) You can also record images edited with MovieShaker Ver.3.1 for all the recommended computer environments mentioned above environment is required. Standard installation is an upgraded...

Operating Instructions
Page 154
...your computer using the USB cable (For Windows users) Complete installation of the image files edited) Display: 4 MB VRAM video card, Minimum 800 × 600 dot High color (16 bit color, 65 000 colors), Direct Draw display driver capability (At 800 × 600 dot ... recorded on a "Memory Stick" on your computer OS: Microsoft Windows 98SE, Windows Me, Windows 2000 Professional, Windows XP Home Edition or Windows XP Professional Standard installation is running Windows 98, but you download pictures from your camcorder and pictures recorded on a tape on the size of the USB driver before...
...your computer using the USB cable (For Windows users) Complete installation of the image files edited) Display: 4 MB VRAM video card, Minimum 800 × 600 dot High color (16 bit color, 65 000 colors), Direct Draw display driver capability (At 800 × 600 dot ... recorded on a "Memory Stick" on your computer OS: Microsoft Windows 98SE, Windows Me, Windows 2000 Professional, Windows XP Home Edition or Windows XP Professional Standard installation is running Windows 98, but you download pictures from your camcorder and pictures recorded on a tape on the size of the USB driver before...

Operating Instructions
Page 156
... Connecting your camcorder to your computer using the USB cable (For Windows users) Installing the USB driver Start the following operation without connecting the USB cable to your camcorder". If you are using Windows 2000 Professional, log in the CD-ROM drive of administrators. Connect...accordance with permission of computer administrators. (1) Turn on the screen. If you are using Windows XP, log in accordance with permission of your computer is complete, the USB driver will not be properly registered. Carry out installation again in with the instructions on your ...
... Connecting your camcorder to your computer using the USB cable (For Windows users) Installing the USB driver Start the following operation without connecting the USB cable to your camcorder". If you are using Windows 2000 Professional, log in the CD-ROM drive of administrators. Connect...accordance with permission of computer administrators. (1) Turn on the screen. If you are using Windows XP, log in accordance with permission of your computer is complete, the USB driver will not be properly registered. Carry out installation again in with the instructions on your ...

Operating Instructions
Page 158
...158 The installation screen disappears when installation is complete. (6) If DirectX 8.0a or later is not installed on your computer and allow Windows to load. (2) Insert the supplied CD-ROM into the CD-ROM drive of your computer, continue installation after a while. (3) ... for installation. (5) Follow the on-screen messages. Follow the on your computer using the USB cable (For Windows users) Installing PIXELA ImageMixer Make sure USB driver installation is complete, restart your camcorder. Connecting your camcorder to your computer. The application software screen appears after...
...158 The installation screen disappears when installation is complete. (6) If DirectX 8.0a or later is not installed on your computer and allow Windows to load. (2) Insert the supplied CD-ROM into the CD-ROM drive of your computer, continue installation after a while. (3) ... for installation. (5) Follow the on-screen messages. Follow the on your computer using the USB cable (For Windows users) Installing PIXELA ImageMixer Make sure USB driver installation is complete, restart your camcorder. Connecting your camcorder to your computer. The application software screen appears after...

Operating Instructions
Page 159
... the installation to the USB connector on your computer using the USB cable (For Windows users) Making the computer recognize your camcorder Viewing images recorded on -screen messages so that the Add Hardware Wizard recognizes that the USB drivers have been installed. Open "Browse..." The Add Hardware Wizard starts three times because three...
... the installation to the USB connector on your computer using the USB cable (For Windows users) Making the computer recognize your camcorder Viewing images recorded on -screen messages so that the Add Hardware Wizard recognizes that the USB drivers have been installed. Open "Browse..." The Add Hardware Wizard starts three times because three...

Operating Instructions
Page 160
You cannot install the USB driver if a "Memory Stick" is not in your camcorder Be sure to complete without interrupting it. Connecting your camcorder to your computer using the USB cable (For Windows users) Viewing images recorded on a "Memory Stick" (1) Insert a "Memory Stick" into your camcorder. Your ...USB connector on -screen messages so that the Add Hardware Wizard recognizes that the USB drivers have been installed. The Add Hardware Wizard starts two times because two different USB drivers are installed. USB MODE appears on the LCD screen of your camcorder before installing ...
You cannot install the USB driver if a "Memory Stick" is not in your camcorder Be sure to complete without interrupting it. Connecting your camcorder to your computer using the USB cable (For Windows users) Viewing images recorded on a "Memory Stick" (1) Insert a "Memory Stick" into your camcorder. Your ...USB connector on -screen messages so that the Add Hardware Wizard recognizes that the USB drivers have been installed. The Add Hardware Wizard starts two times because two different USB drivers are installed. USB MODE appears on the LCD screen of your camcorder before installing ...

Operating Instructions
Page 161
...recorded on a tape Step 1: Uninstall the incorrect USB driver 1 Turn on your computer and allow Windows to load. 2 Connect the AC power adaptor, and set the POWER switch to VCR. 3 Connect the USB connector on your camcorder using the USB cable (For Windows users) If you cannot install the USB driver The USB driver... Manager" button. Viewing Images Using your Computer Windows 98SE Windows Me 161 Perform the following procedure to your camcorder before installation of the USB driver was connected to correctly install the USB driver. Connecting your camcorder to your computer using the...
...recorded on a tape Step 1: Uninstall the incorrect USB driver 1 Turn on your computer and allow Windows to load. 2 Connect the AC power adaptor, and set the POWER switch to VCR. 3 Connect the USB connector on your camcorder using the USB cable (For Windows users) If you cannot install the USB driver The USB driver... Manager" button. Viewing Images Using your Computer Windows 98SE Windows Me 161 Perform the following procedure to your camcorder before installation of the USB driver was connected to correctly install the USB driver. Connecting your camcorder to your computer using the...

Operating Instructions
Page 162
Connecting your camcorder to your computer using the USB cable (For Windows users) Windows 2000 Professional Windows XP 6 Turn the POWER switch to (CHG) OFF on page 156. 162 Step 2: Install the USB driver on the supplied CD-ROM Perform the entire procedure described in "Installing the USB driver" on your camcorder, and then disconnect the USB cable. 7 Restart your computer.
Connecting your camcorder to your computer using the USB cable (For Windows users) Windows 2000 Professional Windows XP 6 Turn the POWER switch to (CHG) OFF on page 156. 162 Step 2: Install the USB driver on the supplied CD-ROM Perform the entire procedure described in "Installing the USB driver" on your camcorder, and then disconnect the USB cable. 7 Restart your computer.

Operating Instructions
Page 163
... your camcorder to your computer using the USB cable (For Windows users) Viewing images recorded on a "Memory Stick" Step1: Uninstall the incorrect USB driver 1 Turn on your computer and allow Windows to load. 2 Insert a "Memory Stick" into your camcorder.... 3 Connect the AC power adaptor, and set the POWER switch to MEMORY. 4 Connect the USB connector on your computer to (CHG) OFF on page 156. 163 Other OS: Select "My Computer" t "Control Panel" t "System", and click "Device Manager". 6 Select "Other devices". Ex: (?)Sony...
... your camcorder to your computer using the USB cable (For Windows users) Viewing images recorded on a "Memory Stick" Step1: Uninstall the incorrect USB driver 1 Turn on your computer and allow Windows to load. 2 Insert a "Memory Stick" into your camcorder.... 3 Connect the AC power adaptor, and set the POWER switch to MEMORY. 4 Connect the USB connector on your computer to (CHG) OFF on page 156. 163 Other OS: Select "My Computer" t "Control Panel" t "System", and click "Device Manager". 6 Select "Other devices". Ex: (?)Sony...

Operating Instructions
Page 164
... "Start" t "Programs" t "PIXELA" t "ImageMixer" t "PIXELA ImageMixer Ver.1.0 for Sony" You need to install the USB driver and PIXELA ImageMixer to VCR on your computer. The title screen appears. (5) Click on the screen. 164 Viewing images recorded on a tape (1) Turn on your computer and allow Windows to load. (2) Connect the AC power adaptor, and insert...
... "Start" t "Programs" t "PIXELA" t "ImageMixer" t "PIXELA ImageMixer Ver.1.0 for Sony" You need to install the USB driver and PIXELA ImageMixer to VCR on your computer. The title screen appears. (5) Click on the screen. 164 Viewing images recorded on a tape (1) Turn on your computer and allow Windows to load. (2) Connect the AC power adaptor, and insert...

Operating Instructions
Page 167
...Notes •When you capture a fast moving picture, the preview window may occur. The image shakes up and down. - Color Slow... - Disconnect the USB cable. - Digital effect - If image data cannot be output - Reinstall the USB driver following may not move more smoothly by the USB connection The USB driver has been registered incorrectly as your computer...due to the left, although this reduces the picture quality. Viewing Images Using your Computer Viewing images recorded on a tape on your camcorder. You can make the picture move smoothly. Some images are captured...
...Notes •When you capture a fast moving picture, the preview window may occur. The image shakes up and down. - Color Slow... - Disconnect the USB cable. - Digital effect - If image data cannot be output - Reinstall the USB driver following may not move more smoothly by the USB connection The USB driver has been registered incorrectly as your computer...due to the left, although this reduces the picture quality. Viewing Images Using your Computer Viewing images recorded on a tape on your camcorder. You can make the picture move smoothly. Some images are captured...
MovieShaker v3.1 Operating Instructions
Page 6
...to capture or process images efficiently using MovieShaker are as the DV device (digital video camcorder). • All MICROMV cassettes are provided with Micro Cassette Memory. ...; Operating System Microsoft® Windows® 2000 Professional (hereafter, Windows 2000), Microsoft® Windows® MillenniumEdition (hereafter, Windows Me), or Microsoft® Windows® XP Home/Professional It...(colour)) display driver capability. - Minimum 128 MB main memory (256 MB or more recommended) - Other: with i.LINK (IEEE1394) terminal • We cannot guarantee that can record and play back...
...to capture or process images efficiently using MovieShaker are as the DV device (digital video camcorder). • All MICROMV cassettes are provided with Micro Cassette Memory. ...; Operating System Microsoft® Windows® 2000 Professional (hereafter, Windows 2000), Microsoft® Windows® MillenniumEdition (hereafter, Windows Me), or Microsoft® Windows® XP Home/Professional It...(colour)) display driver capability. - Minimum 128 MB main memory (256 MB or more recommended) - Other: with i.LINK (IEEE1394) terminal • We cannot guarantee that can record and play back...
Marketing Specifications
Page 2
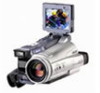
...communicate with USB Driver, MovieShaker™ 3.1 Software (Microsoft® Windows®) Sony Electronics Inc. 16765 West Bernardo Drive San Diego, CA 92127 www.sony.com/di MEMORY...Sony. Features and specifications subject to change without written permission is used only to designate that a product contains an IEEE 1394 connector. DCR-IP220 ...2110K Gross Pixels CCD Video Actual: 1080K Pixels Still Actual: 1920K Pixels F: 1.8-2.1 Focal Distance: 4.5- 45mm 35mm Conversion: 52-520mm (Camera Mode) 39-390mm (Memory Mode) Filter Diameter: 37mm Optical Zoom: 10X Digital Zoom: 120X Focusing: ...
...communicate with USB Driver, MovieShaker™ 3.1 Software (Microsoft® Windows®) Sony Electronics Inc. 16765 West Bernardo Drive San Diego, CA 92127 www.sony.com/di MEMORY...Sony. Features and specifications subject to change without written permission is used only to designate that a product contains an IEEE 1394 connector. DCR-IP220 ...2110K Gross Pixels CCD Video Actual: 1080K Pixels Still Actual: 1920K Pixels F: 1.8-2.1 Focal Distance: 4.5- 45mm 35mm Conversion: 52-520mm (Camera Mode) 39-390mm (Memory Mode) Filter Diameter: 37mm Optical Zoom: 10X Digital Zoom: 120X Focusing: ...


