
Computer Applications Guide
Page 9
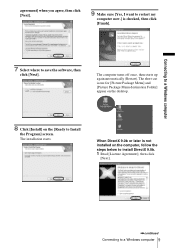
.... 1 Read [License Agreement], then click [Next]. ,continued Connecting to a Windows computer 9 Connecting to a Windows computer agreement] when you agree, then click [Next]. 9 Make sure [Yes, I want to restart my computer now.] is not installed on the [Ready to save the software, then click [Next]. The computer turns off once, then starts...
.... 1 Read [License Agreement], then click [Next]. ,continued Connecting to a Windows computer 9 Connecting to a Windows computer agreement] when you agree, then click [Next]. 9 Make sure [Yes, I want to restart my computer now.] is not installed on the [Ready to save the software, then click [Next]. The computer turns off once, then starts...
Computer Applications Guide
Page 18
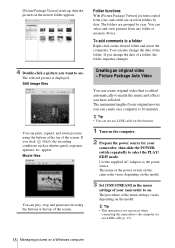
... then the pictures in the newest folder appears. 4 Double-click a picture you have selected. appear. You can select and view pictures from your camcorder are grouped by date. Creating an original video - Use the supplied AC Adaptor as shutter speed, exposure, aperture, etc. z Tip • ...folder, the folder sequence changes. The procedure of the screen. The selected picture is edited automatically to match the music and effects you want to the computer via an i.LINK cable (p. 15). 18 Managing pictures on the desired folder and insert the comments. Still image files...
... then the pictures in the newest folder appears. 4 Double-click a picture you have selected. appear. You can select and view pictures from your camcorder are grouped by date. Creating an original video - Use the supplied AC Adaptor as shutter speed, exposure, aperture, etc. z Tip • ...folder, the folder sequence changes. The procedure of the screen. The selected picture is edited automatically to match the music and effects you want to the computer via an i.LINK cable (p. 15). 18 Managing pictures on the desired folder and insert the comments. Still image files...

Computer Applications Guide
Page 19
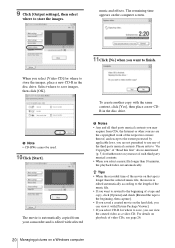
You can select one of the 5 effects. music on the tape where you want to start copying. 5 Connect your camcorder to the computer using a USB cable (supplied) or i.LINK cable (optional) (p. 11, 15). [Picture Package Menu] starts up automatically. 6 Click [Automatic Video Producer]. [Picture Package ...
You can select one of the 5 effects. music on the tape where you want to start copying. 5 Connect your camcorder to the computer using a USB cable (supplied) or i.LINK cable (optional) (p. 11, 15). [Picture Package Menu] starts up automatically. 6 Click [Automatic Video Producer]. [Picture Package ...
Computer Applications Guide
Page 20
... • When you select a music file longer than the selected music file, the movie is edited with [Picture Package Viewer]. • If you want to save images, then click [OK]. . For details on playback of video CDs, see page 26. 20 Managing pictures on the computer screen. . ... owners thereof, and except to the extent protected by applicable laws, you are not permitted to save , you saved a created movie on your camcorder and is edited automatically according to the length of "Read this first" above-mentioned (p. 3) for where to store the images. Please refer to...
... • When you select a music file longer than the selected music file, the movie is edited with [Picture Package Viewer]. • If you want to save images, then click [OK]. . For details on playback of video CDs, see page 26. 20 Managing pictures on the computer screen. . ... owners thereof, and except to the extent protected by applicable laws, you are not permitted to save , you saved a created movie on your camcorder and is edited automatically according to the length of "Read this first" above-mentioned (p. 3) for where to store the images. Please refer to...

Computer Applications Guide
Page 23
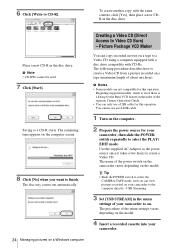
...the images on CD-R]. [Picture Package CD Backup] starts up. 4 Open the desired folder on the left side of the screen, select pictures you want to use any of the respective owners thereof, and except to save. Managing pictures on a Windows computer Slide show on the hard disk, you are... movie file with [Picture Package Viewer]. • If you select CD-R for further note on playback of such third party musical contents. • When you want to the extent protected by applicable laws, you can view the created slide show as a video CD. The remaining time appears on CD-R - z Tips &#...
...the images on CD-R]. [Picture Package CD Backup] starts up. 4 Open the desired folder on the left side of the screen, select pictures you want to use any of the respective owners thereof, and except to save. Managing pictures on a Windows computer Slide show on the hard disk, you are... movie file with [Picture Package Viewer]. • If you select CD-R for further note on playback of such third party musical contents. • When you want to the extent protected by applicable laws, you can view the created slide show as a video CD. The remaining time appears on CD-R - z Tips &#...
Computer Applications Guide
Page 24
...check to see if there is a listing for this operation. z Tip • Slide the POWER switch to select the CAMERA-TAPE mode, and you want to Video CD Burn) - b Notes • Some models are not compatible for the Burn VCD feature in the disc drive. b Note • ...Click [Start]. Picture Package VCD Maker You can only use an i.LINK cable. 1 Turn on a tape (maximum length of the power switch on the camcorder varies depending on a Windows computer Creating a Video CD (Direct Access to finish. The following procedure describes how to create a Video CD from a picture recorded...
...check to see if there is a listing for this operation. z Tip • Slide the POWER switch to select the CAMERA-TAPE mode, and you want to Video CD Burn) - b Notes • Some models are not compatible for the Burn VCD feature in the disc drive. b Note • ...Click [Start]. Picture Package VCD Maker You can only use an i.LINK cable. 1 Turn on a tape (maximum length of the power switch on the camcorder varies depending on a Windows computer Creating a Video CD (Direct Access to finish. The following procedure describes how to create a Video CD from a picture recorded...
Camera Operations Guide
Page 17
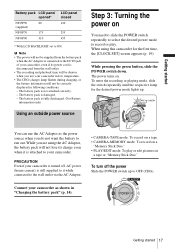
... to ON. While you are using this camcorder for the desired power mode lights up to run out. b Note • The power will not be supplied from the wall outlet. • The recording and playback time will not be shorter when you do not want the battery to OFF (CHG). The power... turns on You need to slide the POWER switch repeatedly to select the desired power mode to your camcorder in low temperature. • The CHG (charge) lamp flashes during charging, or...
... to ON. While you are using this camcorder for the desired power mode lights up to run out. b Note • The power will not be supplied from the wall outlet. • The recording and playback time will not be shorter when you do not want the battery to OFF (CHG). The power... turns on You need to slide the POWER switch repeatedly to select the desired power mode to your camcorder in low temperature. • The CHG (charge) lamp flashes during charging, or...

Camera Operations Guide
Page 19
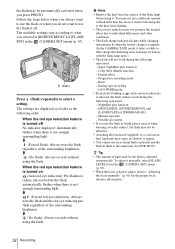
...set the clock for the first time. 3 Touch . 60min MENU -:--:-- SURE 1/3 FADER SPOT FOCUS SPOT PRGRAM METER AE ,continued Getting started To use your camcorder. Getting started 19 TAPE mode). • : The LCD screen lights up. If you do not set the date and time, the [CLOCK SET] ...the LCD panel with / and touch . • [FADER]: Touch it repeatedly to step 7 when you are recording on a tape or a "Memory Stick Duo," you want to set. • [EXPOSURE]: Adjust with the screen facing out. Step 5: Setting the date and time Set the date and time when using the battery...
...set the clock for the first time. 3 Touch . 60min MENU -:--:-- SURE 1/3 FADER SPOT FOCUS SPOT PRGRAM METER AE ,continued Getting started To use your camcorder. Getting started 19 TAPE mode). • : The LCD screen lights up. If you do not set the date and time, the [CLOCK SET] ...the LCD panel with / and touch . • [FADER]: Touch it repeatedly to step 7 when you are recording on a tape or a "Memory Stick Duo," you want to set. • [EXPOSURE]: Adjust with the screen facing out. Step 5: Setting the date and time Set the date and time when using the battery...
Camera Operations Guide
Page 32
...light used by the flash is complete. (In the CAMERA-TAPE mode, it charges its shadow to "Adjusting the focus manually" (p. 41) for DCR-HC85). Super NightShot plus function - [SPOTLIGHT], [SUNSET&MOON], and [LANDSCAPE] of flash if the dust discolors or sticks to the lamp due to ...the flash lamp since it takes a while to select a setting. m (No flash): Always records without using the flash. Digital effect - Flexible spot meter • If you always want to use the flash at the same time (for the proper focal distance information. 32 Recording NightShot plus function - m ...
...light used by the flash is complete. (In the CAMERA-TAPE mode, it charges its shadow to "Adjusting the focus manually" (p. 41) for DCR-HC85). Super NightShot plus function - [SPOTLIGHT], [SUNSET&MOON], and [LANDSCAPE] of flash if the dust discolors or sticks to the lamp due to ...the flash lamp since it takes a while to select a setting. m (No flash): Always records without using the flash. Digital effect - Flexible spot meter • If you always want to use the flash at the same time (for the proper focal distance information. 32 Recording NightShot plus function - m ...
Camera Operations Guide
Page 34
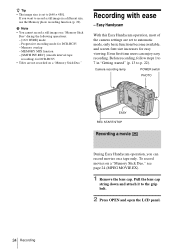
Camera recording lamp POWER switch PHOTO EASY REC START/STOP Recording a movie During Easy Handycam operation, you want to record a still image in "Getting started" (p. 13 to [640 × 480]. To record movies on a "Memory Stick Duo" ...Handycam With this Easy Handycam operation, most of the camera settings are not recorded on a tape only. Before recording, follow steps 1 to 7 in a different size, use the Memory photo recording function (p. 29). Progressive recording mode for easy viewing. MEMORY MIX function - [SMTH INT.REC] (smooth interval tape recording) for DCR-HC85...
Camera recording lamp POWER switch PHOTO EASY REC START/STOP Recording a movie During Easy Handycam operation, you want to record a still image in "Getting started" (p. 13 to [640 × 480]. To record movies on a "Memory Stick Duo" ...Handycam With this Easy Handycam operation, most of the camera settings are not recorded on a tape only. Before recording, follow steps 1 to 7 in a different size, use the Memory photo recording function (p. 29). Progressive recording mode for easy viewing. MEMORY MIX function - [SMTH INT.REC] (smooth interval tape recording) for DCR-HC85...

Camera Operations Guide
Page 37
... Recording 37 b Note • The back light function is canceled when you set [EXPOSURE] to the subject, so that it from becoming shadowed. If you want to automatic exposure Follow steps 1 and 2, then select [AUTO] in the default setting. To cancel the back light function, press BACK LIGHT again. To return...
... Recording 37 b Note • The back light function is canceled when you set [EXPOSURE] to the subject, so that it from becoming shadowed. If you want to automatic exposure Follow steps 1 and 2, then select [AUTO] in the default setting. To cancel the back light function, press BACK LIGHT again. To return...
Camera Operations Guide
Page 40
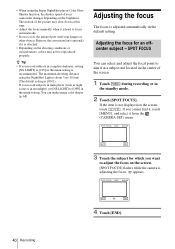
...it is attached. • Depending on the shooting conditions or circumstances, colors may slow down at a subject not located in the center of your camcorder changes depending on the screen. [SPOT FOCUS] flashes while the camera is hard to focus automatically. • Do not cover the infrared port with ...the default setting. Adjusting the focus for which you cannot find it, touch [MENU], and select it is adjusting the focus. 9 appears. If you want to aim it at this time. • Adjust the focus manually when it from the (CAMERA SET) menu. • When using the NightShot Light...
...it is attached. • Depending on the shooting conditions or circumstances, colors may slow down at a subject not located in the center of your camcorder changes depending on the screen. [SPOT FOCUS] flashes while the camera is hard to focus automatically. • Do not cover the infrared port with ...the default setting. Adjusting the focus for which you cannot find it, touch [MENU], and select it is adjusting the focus. 9 appears. If you want to aim it at this time. • Adjust the focus manually when it from the (CAMERA SET) menu. • When using the NightShot Light...

Camera Operations Guide
Page 41
...angle) to focus on a subject in the following cases. (It will be displayed at twice its background. - To use the expanded focus For DCR-HC85: It will not be displayed. Recording 41 Or press FOCUS after step 4. To record a subject behind a window covered with little contrast between the... subject using a conversion lens (optional).) - When you rotate the focus ring, appears and the image will not be displayed correctly if you want to fully magnify the image, then adjust the focus. b Note • You cannot use the zoom function. To adjust the focus automatically ...
...angle) to focus on a subject in the following cases. (It will be displayed at twice its background. - To use the expanded focus For DCR-HC85: It will not be displayed. Recording 41 Or press FOCUS after step 4. To record a subject behind a window covered with little contrast between the... subject using a conversion lens (optional).) - When you rotate the focus ring, appears and the image will not be displayed correctly if you want to fully magnify the image, then adjust the focus. b Note • You cannot use the zoom function. To adjust the focus automatically ...
Camera Operations Guide
Page 44
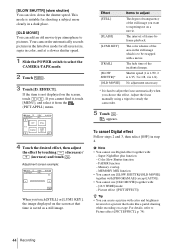
If you want to superimpose on a tape. Adjustment screen example: 60min D. KEY] [TRAIL]...movie-type atmosphere to adjust the focus automatically when you touch [STILL] or [LUMI. FADER function - Your camcorder automatically records pictures in the letterbox mode for shooting a subject more clearly in the still image which is ... plus function - Memory overlap - For details, refer to steady the camcorder. 5 Touch . If the item is suitable for all screen size, sepia in step 4. To cancel Digital effect Follow steps 2 and 3, then select [OFF] in color, and...
If you want to superimpose on a tape. Adjustment screen example: 60min D. KEY] [TRAIL]...movie-type atmosphere to adjust the focus automatically when you touch [STILL] or [LUMI. FADER function - Your camcorder automatically records pictures in the letterbox mode for shooting a subject more clearly in the still image which is ... plus function - Memory overlap - For details, refer to steady the camcorder. 5 Touch . If the item is suitable for all screen size, sepia in step 4. To cancel Digital effect Follow steps 2 and 3, then select [OFF] in color, and...
Camera Operations Guide
Page 46
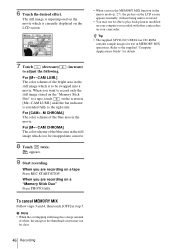
...image is superimposed on the movie which is extended fully to play back pictures modified on your camcorder. z Tip • The supplied SPVD-012 USB Driver CD-ROM contains sample images for... 8 Touch twice. For [MTCAM CHROMA] The color scheme of the blue area in step 5. When you want to record only the still image stored on the "Memory Stick Duo" to a tape, touch on the screen... in the mirror mode (p. 27), the picture on your computer or recorded with other camcorders on the LCD screen appears normally, without being mirror-reversed. • You may not be able to the...
...image is superimposed on the movie which is extended fully to play back pictures modified on your camcorder. z Tip • The supplied SPVD-012 USB Driver CD-ROM contains sample images for... 8 Touch twice. For [MTCAM CHROMA] The color scheme of the blue area in step 5. When you want to record only the still image stored on the "Memory Stick Duo" to a tape, touch on the screen... in the mirror mode (p. 27), the picture on your computer or recorded with other camcorders on the LCD screen appears normally, without being mirror-reversed. • You may not be able to the...

Camera Operations Guide
Page 47
.... 2 Touch . 60min STBY 0:00:00 EDIT ,continued Recording 47 When PLAY/EDIT mode is handy when you have played back the tape, for example, but want to select the CAMERA-TAPE mode. 2 Touch . 60min STBY 0:00:00 EDIT The last scene of the most recent recording is played back for about... 5 seconds, and the camcorder enters the standby mode at the point where the last recording has finished. EDIT SEARCH You can do this operation also by selecting [END SEARCH...
.... 2 Touch . 60min STBY 0:00:00 EDIT ,continued Recording 47 When PLAY/EDIT mode is handy when you have played back the tape, for example, but want to select the CAMERA-TAPE mode. 2 Touch . 60min STBY 0:00:00 EDIT The last scene of the most recent recording is played back for about... 5 seconds, and the camcorder enters the standby mode at the point where the last recording has finished. EDIT SEARCH You can do this operation also by selecting [END SEARCH...
Camera Operations Guide
Page 48
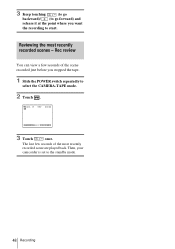
3 Keep touching (to go backward)/ (to go forward) and release it at the point where you stopped the tape. 1 Slide the POWER switch repeatedly to select the CAMERA-TAPE mode. 2 Touch . 60min STBY 0:00:00 EDIT 3 Touch once. The last few seconds of the most recently recorded scenes - Then, your camcorder is set to start. Rec review You can view a few seconds of the scene recorded just before you want the recording to the standby mode. 48 Recording Reviewing the most recently recorded scene are played back.
3 Keep touching (to go backward)/ (to go forward) and release it at the point where you stopped the tape. 1 Slide the POWER switch repeatedly to select the CAMERA-TAPE mode. 2 Touch . 60min STBY 0:00:00 EDIT 3 Touch once. The last few seconds of the most recently recorded scenes - Then, your camcorder is set to start. Rec review You can view a few seconds of the scene recorded just before you want the recording to the standby mode. 48 Recording Reviewing the most recently recorded scene are played back.
Camera Operations Guide
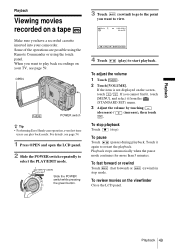
Page 49
... by touching (decrease) / (increase), then touch . OPEN POWER switch z Tip • Performing Easy Handycam operation, even first time users can play back recordings on a tape Make sure you want to start playback. If the item is not displayed on the viewfinder Close the LCD panel. Playback stops... easily. To fast forward or rewind Touch (fast forward) or stop ). Playback 49 Playback Playback Viewing movies recorded on your camcorder. For details, see page 59. To adjust the volume 1 Touch . 2 Touch [VOLUME]. To pause Touch (pause) during playback.
... by touching (decrease) / (increase), then touch . OPEN POWER switch z Tip • Performing Easy Handycam operation, even first time users can play back recordings on a tape Make sure you want to start playback. If the item is not displayed on the viewfinder Close the LCD panel. Playback stops... easily. To fast forward or rewind Touch (fast forward) or stop ). Playback 49 Playback Playback Viewing movies recorded on your camcorder. For details, see page 59. To adjust the volume 1 Touch . 2 Touch [VOLUME]. To pause Touch (pause) during playback.

Camera Operations Guide
Page 51
... steps 2 to externally input pictures. b Note • You cannot add effects to 4, then select [OFF] in your camcorder, but you can apply [STILL], [FLASH], [LUMI. Digital effect You can copy them to is displayed. 3 Touch [MENU]. 4 Select (PICT.APPLI.), then [D.EFFECT] by touching .../ and touch . 5 Select an effect, then adjust the effect by touching (decrease)/ (increase). 6 Touch twice, then . appears. For details on the tape in step 5. Also, you want...
... steps 2 to externally input pictures. b Note • You cannot add effects to 4, then select [OFF] in your camcorder, but you can apply [STILL], [FLASH], [LUMI. Digital effect You can copy them to is displayed. 3 Touch [MENU]. 4 Select (PICT.APPLI.), then [D.EFFECT] by touching .../ and touch . 5 Select an effect, then adjust the effect by touching (decrease)/ (increase). 6 Touch twice, then . appears. For details on the tape in step 5. Also, you want...

Camera Operations Guide
Page 52
The most recently recorded picture appears on the screen, touch / . P-MENU When you want to restart the playback. Screen example (movies): 60min 320 MOV00002 MPEG 2 / 10 101 MEMORY PLAY (next) to POWER switch 1 Press OPEN and open the LCD... See "Deleting recorded pictures" (p. 107). 52 Playback If you cannot find it, touch [MENU], and select it again to play back a recorded picture on your camcorder. Touch it from the (STANDARD SET) menu. 3 Adjust the volume by touching (decrease) / (increase), then touch . Slide the POWER switch while pressing the green ...
The most recently recorded picture appears on the screen, touch / . P-MENU When you want to restart the playback. Screen example (movies): 60min 320 MOV00002 MPEG 2 / 10 101 MEMORY PLAY (next) to POWER switch 1 Press OPEN and open the LCD... See "Deleting recorded pictures" (p. 107). 52 Playback If you cannot find it, touch [MENU], and select it again to play back a recorded picture on your camcorder. Touch it from the (STANDARD SET) menu. 3 Adjust the volume by touching (decrease) / (increase), then touch . Slide the POWER switch while pressing the green ...


