
Computer Applications Guide
Page 24
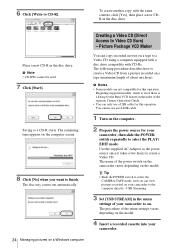
...). Regarding supported models, check to the computer directly - The procedure of the menu settings varies depending on a tape (maximum length of your camcorder, then slide the POWER switch repeatedly to finish. Use the supplied AC Adaptor as the power source since it takes a few hours to a...another copy with CD-Rs. The following procedure describes how to create a Video CD from a picture recorded on the model. 4 Insert a recorded cassette into your camcorder to see if there is a listing for this operation. USB Streaming. 3 Set [USB STREAM] in the index of the power switch on ...
...). Regarding supported models, check to the computer directly - The procedure of the menu settings varies depending on a tape (maximum length of your camcorder, then slide the POWER switch repeatedly to finish. Use the supplied AC Adaptor as the power source since it takes a few hours to a...another copy with CD-Rs. The following procedure describes how to create a Video CD from a picture recorded on the model. 4 Insert a recorded cassette into your camcorder to see if there is a listing for this operation. USB Streaming. 3 Set [USB STREAM] in the index of the power switch on ...
Computer Applications Guide
Page 31
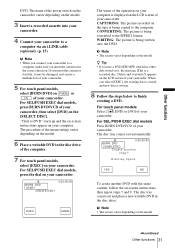
... NO To create another copy? The name of the power switch on the camcorder varies depending on the model. 3 Insert a recorded cassette into your camcorder. 4 Connect your camcorder to a computer via an i.LINK cable (optional). (p. 15) b Note • When you connect your camcorder to a computer, make sure you use a DVD-RW/+RW which has other...
... NO To create another copy? The name of the power switch on the camcorder varies depending on the model. 3 Insert a recorded cassette into your camcorder. 4 Connect your camcorder to a computer via an i.LINK cable (optional). (p. 15) b Note • When you connect your camcorder to a computer, make sure you use a DVD-RW/+RW which has other...
Camera Operations Guide
Page 3
...Name: SONY Model No.: DCR-HC30 Responsible Party: Sony Electronics Inc. Reorient or relocate the receiving antenna. - Consult a Sony dealer or an experienced radio/TV technician for a digital device ...HC40 3 Owner's Record The model and serial numbers are marked with Part 15 of the FCC Rules. The mark is recommended as you call : Sony Customer Information Center 1-800-222-SONY (7669) The number below . For customers in the U.S.A. Address: 680 Kinderkamack Road, Oradell, NJ 07649 U.S.A. Cassettes with Cassette Memory are located on Cassette Memory Your camcorder...
...Name: SONY Model No.: DCR-HC30 Responsible Party: Sony Electronics Inc. Reorient or relocate the receiving antenna. - Consult a Sony dealer or an experienced radio/TV technician for a digital device ...HC40 3 Owner's Record The model and serial numbers are marked with Part 15 of the FCC Rules. The mark is recommended as you call : Sony Customer Information Center 1-800-222-SONY (7669) The number below . For customers in the U.S.A. Address: 680 Kinderkamack Road, Oradell, NJ 07649 U.S.A. Cassettes with Cassette Memory are located on Cassette Memory Your camcorder...
Camera Operations Guide
Page 6
Easy Handycam 34 Recording a movie 34 Recording a still image 35 Making full use of Contents : Features available for tape only. : Features available for a longer time 28 Using ... viewfinder 20 Adjusting the LCD panel 20 Adjusting the viewfinder 21 Step 5: Setting the date and time 22 Step 6: Inserting the recording media 23 Inserting a cassette tape 23 Inserting a "Memory Stick Duo 24 Step 7: Setting the screen language 25 Recording Recording movies 26 Recording for "Memory Stick Duo" only. Table of...
Easy Handycam 34 Recording a movie 34 Recording a still image 35 Making full use of Contents : Features available for tape only. : Features available for a longer time 28 Using ... viewfinder 20 Adjusting the LCD panel 20 Adjusting the viewfinder 21 Step 5: Setting the date and time 22 Step 6: Inserting the recording media 23 Inserting a cassette tape 23 Inserting a "Memory Stick Duo 24 Step 7: Setting the screen language 25 Recording Recording movies 26 Recording for "Memory Stick Duo" only. Table of...
Camera Operations Guide
Page 7
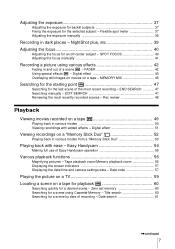
SPOT FOCUS 40 Adjusting the focus manually 41 Recording a picture using Cassette Memory - Rec review 48 Playback Viewing movies recorded on a "Memory Stick Duo 52 Playing back in dark places - Zero set memory 60 Searching for a ...59 Locating a scene on a tape - MEMORY MIX 45 Searching for the starting point 47 Searching for a scene by date of Easy Handycam operation 55 Various playback functions 56 Magnifying pictures - Digital effect 51 Viewing recordings on a tape 49 Playing back in and out of the most recently recorded scenes - Title search 60...
SPOT FOCUS 40 Adjusting the focus manually 41 Recording a picture using Cassette Memory - Rec review 48 Playback Viewing movies recorded on a "Memory Stick Duo 52 Playing back in dark places - Zero set memory 60 Searching for a ...59 Locating a scene on a tape - MEMORY MIX 45 Searching for the starting point 47 Searching for a scene by date of Easy Handycam operation 55 Various playback functions 56 Magnifying pictures - Digital effect 51 Viewing recordings on a tape 49 Playing back in and out of the most recently recorded scenes - Title search 60...
Camera Operations Guide
Page 9
Troubleshooting Troubleshooting 112 Warning indicators and messages ...120 Additional Information Using your camcorder abroad ..........124 Usable cassette tapes 125 About the "Memory Stick 126 About the "InfoLITHIUM" battery pack 129 About i.LINK 130 Maintenance and precautions ..........131 Specification 134 Quick Reference Identifying parts and controls ...........137 Index 144 Refer also to other operating instructions supplied with your camcorder: • Editing images with your computer cComputer Applications Guide 9
Troubleshooting Troubleshooting 112 Warning indicators and messages ...120 Additional Information Using your camcorder abroad ..........124 Usable cassette tapes 125 About the "Memory Stick 126 About the "InfoLITHIUM" battery pack 129 About i.LINK 130 Maintenance and precautions ..........131 Specification 134 Quick Reference Identifying parts and controls ...........137 Index 144 Refer also to other operating instructions supplied with your camcorder: • Editing images with your computer cComputer Applications Guide 9
Camera Operations Guide
Page 10
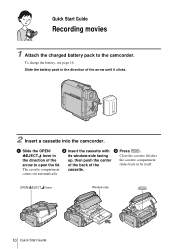
... pack in its window-side facing Close the cassette lid after the direction of the arrow to the camcorder. The cassette compartment cassette. OPEN/ZEJECT lever Window-side 10 Quick Start Guide ZEJECT lever in the direction of the the cassette compartment slides back in by itself. comes out... automatically. up, then push the center of the back of the arrow until it clicks. 2 Insert a cassette into the camcorder. Quick Start Guide Recording movies 1 Attach the ...
... pack in its window-side facing Close the cassette lid after the direction of the arrow to the camcorder. The cassette compartment cassette. OPEN/ZEJECT lever Window-side 10 Quick Start Guide ZEJECT lever in the direction of the the cassette compartment slides back in by itself. comes out... automatically. up, then push the center of the back of the arrow until it clicks. 2 Insert a cassette into the camcorder. Quick Start Guide Recording movies 1 Attach the ...
Camera Operations Guide
Page 23
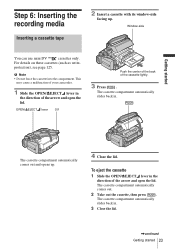
.... protection), see page 125. This may cause a malfunction of the arrow and open the lid. The cassette compartment automatically comes out and opens up . The cassette compartment automatically slides back in the direction of your camcorder. 1 Slide the OPEN/ZEJECT lever in . 3 Close the lid. ,continued Getting started Step 6: Inserting the recording media...
.... protection), see page 125. This may cause a malfunction of the arrow and open the lid. The cassette compartment automatically comes out and opens up . The cassette compartment automatically slides back in the direction of your camcorder. 1 Slide the OPEN/ZEJECT lever in . 3 Close the lid. ,continued Getting started Step 6: Inserting the recording media...
Camera Operations Guide
Page 27
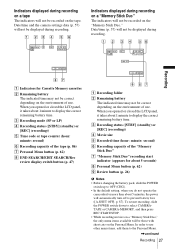
... ([A.SHUT OFF], p. 87). Indicators displayed during recording on a tape The indicators will not be recorded on the tape. When you do not operate the camcorder for Cassette Memory cassettes B Remaining battery The indicated time may not be correct depending on the Personal Menu. When you opened or closed the LCD panel, it takes...
... ([A.SHUT OFF], p. 87). Indicators displayed during recording on a tape The indicators will not be recorded on the tape. When you do not operate the camcorder for Cassette Memory cassettes B Remaining battery The indicated time may not be correct depending on the Personal Menu. When you opened or closed the LCD panel, it takes...

Camera Operations Guide
Page 28
... time, date, and the camera settings data (for a longer time on the screen. You can view this camcorder. Recording for a longer time To record for a long time, remove the cassette and store it is recommended when you use the large capacity battery pack (NP-FP70/FP90). • To ... "Memory Stick Duo" In the (MEMORY SET) menu, select [MOVIE SET], [ IMAGE SIZE], then [160 × 112] (p. 71). Do not remove the cassette. (The picture will be played back only on the same tape. - Refer to record moving pictures. z Tips • If you can when recording in the...
... time, date, and the camera settings data (for a longer time on the screen. You can view this camcorder. Recording for a longer time To record for a long time, remove the cassette and store it is recommended when you use the large capacity battery pack (NP-FP70/FP90). • To ... "Memory Stick Duo" In the (MEMORY SET) menu, select [MOVIE SET], [ IMAGE SIZE], then [160 × 112] (p. 71). Do not remove the cassette. (The picture will be played back only on the same tape. - Refer to record moving pictures. z Tips • If you can when recording in the...

Camera Operations Guide
Page 47
... pictures on (p. 62). POWER switch Searching for the last scene of the most recent recording is played back for about 5 seconds, and the camcorder enters the standby mode at the point where the last recording has finished. Searching manually - z Tip • You can do this operation also... by selecting [END SEARCH] short-cut on the screen. If you use a cassette without Cassette Memory, the END SEARCH function will not work correctly when there is a blank section between recorded sections on the tape. EDIT SEARCH You can do...
... pictures on (p. 62). POWER switch Searching for the last scene of the most recent recording is played back for about 5 seconds, and the camcorder enters the standby mode at the point where the last recording has finished. Searching manually - z Tip • You can do this operation also... by selecting [END SEARCH] short-cut on the screen. If you use a cassette without Cassette Memory, the END SEARCH function will not work correctly when there is a blank section between recorded sections on the tape. EDIT SEARCH You can do...
Camera Operations Guide
Page 49
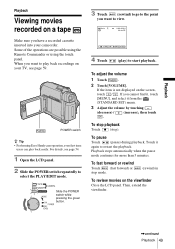
POWER switch z Tip • Performing Easy Handycam operation, even first time users can play ) to start playback. If...Slide the POWER switch while pressing the green button. 3 Touch (rewind) to go to the point you have a recorded cassette inserted into your TV, see page 54. 1 Open the LCD panel. 2 Slide the POWER switch repeatedly to restart the... page 59. Playback Playback Viewing movies recorded on a tape Make sure you want to play back recordings on your camcorder. When you cannot find it, touch [MENU], and select it again to select the PLAY/EDIT mode. To ...
POWER switch z Tip • Performing Easy Handycam operation, even first time users can play ) to start playback. If...Slide the POWER switch while pressing the green button. 3 Touch (rewind) to go to the point you have a recorded cassette inserted into your TV, see page 54. 1 Open the LCD panel. 2 Slide the POWER switch repeatedly to restart the... page 59. Playback Playback Viewing movies recorded on a tape Make sure you want to play back recordings on your camcorder. When you cannot find it, touch [MENU], and select it again to select the PLAY/EDIT mode. To ...
Camera Operations Guide
Page 54
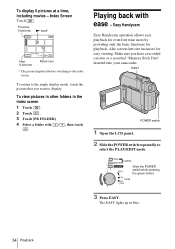
... the LCD panel. 2 Slide the POWER switch repeatedly to the index screen. Slide the POWER switch while pressing the green button. 3 Press EASY. Easy Handycam Easy Handycam operation allows easy playback for even first time users by providing only the basic functions for easy viewing. Also screen font size increases for playback...]. 4 Select a folder with . / , then touch Playing back with ease - Make sure you want to the single display mode, touch the picture that you have a recorded cassette or a recorded "Memory Stick Duo" inserted into your camcorder.
... the LCD panel. 2 Slide the POWER switch repeatedly to the index screen. Slide the POWER switch while pressing the green button. 3 Press EASY. Easy Handycam Easy Handycam operation allows easy playback for even first time users by providing only the basic functions for easy viewing. Also screen font size increases for playback...]. 4 Select a folder with . / , then touch Playing back with ease - Make sure you want to the single display mode, touch the picture that you have a recorded cassette or a recorded "Memory Stick Duo" inserted into your camcorder.
Camera Operations Guide
Page 60
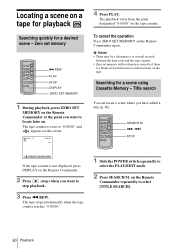
... Remote Commander repeatedly to stop ) when you want to locate later on the tape. Locating a scene on a tape for playback Searching quickly for a scene using Cassette Memory - b Notes • There may be a discrepancy of several seconds between recorded sections on . The tape stops automatically when the tape counter reaches "0:00:00...
... Remote Commander repeatedly to stop ) when you want to locate later on the tape. Locating a scene on a tape for playback Searching quickly for a scene using Cassette Memory - b Notes • There may be a discrepancy of several seconds between recorded sections on . The tape stops automatically when the tape counter reaches "0:00:00...

Camera Operations Guide
Page 61
...[ SEARCH], and then [OFF] (p. 80). Playback starts automatically from the point where the date changes. Searching for more than 2 minutes, your cassette has Cassette Memory, you can select the previous or the next date of recording - on the Remote Commander repeatedly to select [DATE SEARCH]. 3 Press . ...STOP on the Remote Commander. SEARCH M. . / > STOP 1 Slide the POWER switch repeatedly to select a recording date. When your camcorder may not accurately find the point where the recording date changes. • The Date search will not function correctly when there is less ...
...[ SEARCH], and then [OFF] (p. 80). Playback starts automatically from the point where the date changes. Searching for more than 2 minutes, your cassette has Cassette Memory, you can select the previous or the next date of recording - on the Remote Commander repeatedly to select [DATE SEARCH]. 3 Press . ...STOP on the Remote Commander. SEARCH M. . / > STOP 1 Slide the POWER switch repeatedly to select a recording date. When your camcorder may not accurately find the point where the recording date changes. • The Date search will not function correctly when there is less ...
Camera Operations Guide
Page 78
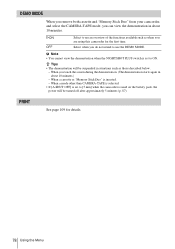
DEMO MODE When you remove both cassette and "Memory Stick Duo" from your camcorder, and select the CAMERA-TAPE mode, you touch the screen during the demonstration. (The ...a mode other than CAMERA-TAPE is selected. • If [A.SHUT OFF] is set to [5 min] when the camcorder is set to ON. PRINT See page 109 for the first time. When you can view the demonstration in situations such ...pack, the power will be turned off after approximately 5 minutes (p. 87). When a cassette or "Memory Stick Duo" is inserted. - GON OFF Select to use the DEMO MODE. Select when you are using this...
DEMO MODE When you remove both cassette and "Memory Stick Duo" from your camcorder, and select the CAMERA-TAPE mode, you touch the screen during the demonstration. (The ...a mode other than CAMERA-TAPE is selected. • If [A.SHUT OFF] is set to [5 min] when the camcorder is set to ON. PRINT See page 109 for the first time. When you can view the demonstration in situations such ...pack, the power will be turned off after approximately 5 minutes (p. 87). When a cassette or "Memory Stick Duo" is inserted. - GON OFF Select to use the DEMO MODE. Select when you are using this...
Camera Operations Guide
Page 80
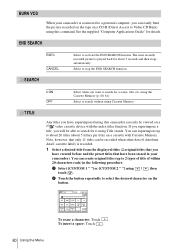
... can superimpose up to 2 types of title of within 20 characters each) in your camcorder is played back for it using this camcorder can only be recorded when other data (6 date/time data/1 cassette label) is recorded. 1 Select a desired title from the displayed titles (2 original titles...about 5 seconds and then stops automatically. BURN VCD When your camcorder). You can create original titles (up to Video CD Burn) using Title search. The most recently recorded picture is connected to search without using the Cassette Memory (p. 60, 61). Select to a personal computer, you ...
... can superimpose up to 2 types of title of within 20 characters each) in your camcorder is played back for it using this camcorder can only be recorded when other data (6 date/time data/1 cassette label) is recorded. 1 Select a desired title from the displayed titles (2 original titles...about 5 seconds and then stops automatically. BURN VCD When your camcorder). You can create original titles (up to Video CD Burn) using Title search. The most recently recorded picture is connected to search without using the Cassette Memory (p. 60, 61). Select to a personal computer, you ...
Camera Operations Guide
Page 82
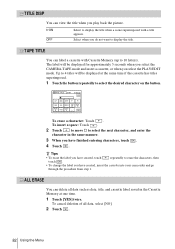
...the label you have created, touch repeatedly to display the title. TITLE DISP You can view the title when you have created, insert the cassette into your camcorder and go through the procedure from step 1. To insert a space: Touch . 2 Touch to move s to select the next character, ...and enter the character in the Cassette Memory at the same time if the cassette has titles superimposed. 1 Touch the button repeatedly to 4 titles will be displayed at ...
...the label you have created, touch repeatedly to display the title. TITLE DISP You can view the title when you have created, insert the cassette into your camcorder and go through the procedure from step 1. To insert a space: Touch . 2 Touch to move s to select the next character, ...and enter the character in the Cassette Memory at the same time if the cassette has titles superimposed. 1 Touch the button repeatedly to 4 titles will be displayed at ...
Camera Operations Guide
Page 83
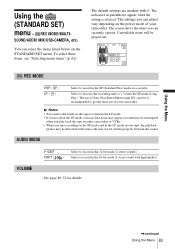
...(1 stereo sound with G. Using the Menu ,continued Using the Menu 83 The use of Sony Excellence/Master mini DV cassette is selected. Unavailable items will be interrupted when you play back the tape on other camcorders or VCRs. • When you can adjust vary depending on the STANDARD SET menu. b...If you record in the LP mode on a cassette. REC MODE/MULTI- SOUND/AUDIO MIX/USB-CAMERA, etc. See page 49, 52 for details. The screen shows the items you can select the items listed below on the power mode of your camcorder. Using the (STANDARD SET) menu - The settings...
...(1 stereo sound with G. Using the Menu ,continued Using the Menu 83 The use of Sony Excellence/Master mini DV cassette is selected. Unavailable items will be interrupted when you play back the tape on other camcorders or VCRs. • When you can adjust vary depending on the STANDARD SET menu. b...If you record in the LP mode on a cassette. REC MODE/MULTI- SOUND/AUDIO MIX/USB-CAMERA, etc. See page 49, 52 for details. The screen shows the items you can select the items listed below on the power mode of your camcorder. Using the (STANDARD SET) menu - The settings...
Camera Operations Guide
Page 84
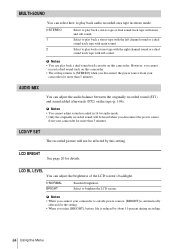
...play back a stereo tape with the left channel sound or a dual sound track tape with sub sound. b Notes • When you connect your camcorder to outside power sources, [BRIGHT] is reduced by this setting. Select to play back a stereo tape or dual sound track tape with main and...the brightness of the LCD screen's backlight. MULTI-SOUND You can play back a dual sound track cassette on this camcorder. • The setting returns to [STEREO] when you cannot record a dual sound track on this camcorder. GSTEREO 1 2 Select to play back a stereo tape with the right channel sound or a ...
...play back a stereo tape with the left channel sound or a dual sound track tape with sub sound. b Notes • When you connect your camcorder to outside power sources, [BRIGHT] is reduced by this setting. Select to play back a stereo tape or dual sound track tape with main and...the brightness of the LCD screen's backlight. MULTI-SOUND You can play back a dual sound track cassette on this camcorder. • The setting returns to [STEREO] when you cannot record a dual sound track on this camcorder. GSTEREO 1 2 Select to play back a stereo tape with the right channel sound or a ...


