
Camera Operations Guide
Page 7
... various modes from a "Memory Stick Duo 53 Playing back with added effects - EDIT SEARCH 47 Reviewing the most recent recording - Digital effect 51 Viewing recordings on a tape - Adjusting the exposure 37 Adjusting the exposure for backlit subjects 37 Fixing the exposure for an...and out of the most recently recorded scenes - Easy Handycam 54 Making full use of recording - FADER 42 Using special effects - Zero set memory 60 Searching for the last scene of a scene - SPOT FOCUS 40 Adjusting the focus manually 41 Recording a picture using Cassette Memory - Flexible...
... various modes from a "Memory Stick Duo 53 Playing back with added effects - EDIT SEARCH 47 Reviewing the most recent recording - Digital effect 51 Viewing recordings on a tape - Adjusting the exposure 37 Adjusting the exposure for backlit subjects 37 Fixing the exposure for an...and out of the most recently recorded scenes - Easy Handycam 54 Making full use of recording - FADER 42 Using special effects - Zero set memory 60 Searching for the last scene of a scene - SPOT FOCUS 40 Adjusting the focus manually 41 Recording a picture using Cassette Memory - Flexible...

Camera Operations Guide
Page 13
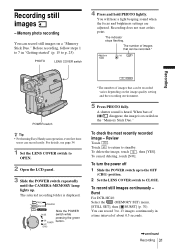
a Set the LENS COVER switch to view images in the default setting. A short beep sound is heard when the focus is displayed. b Touch . The most recently recorded image is adjusted. c Touch (next) or (previous) to OPEN. d Press PHOTO lightly. e Press PHOTO fully. To turn off ...
a Set the LENS COVER switch to view images in the default setting. A short beep sound is heard when the focus is displayed. b Touch . The most recently recorded image is adjusted. c Touch (next) or (previous) to OPEN. d Press PHOTO lightly. e Press PHOTO fully. To turn off ...
Camera Operations Guide
Page 22
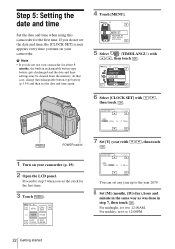
...OK 7 Set [Y] (year) with / , then touch . b Note • If you set any year up to 12:00PM. 22 Getting started SURE 1/3 FADER FOCUS SPOT SPOT FOCUS METER 4 Touch [MENU]. 60min -:--:-- LANGUAGE PROGRAM AE OK 6 Select [CLOCK SET] with / , then touch . DATE 2004Y JAN M 1D 0: 00 AM OK ...You can set the clock for the first time. Step 5: Setting the date and time Set the date and time when using this camcorder for ...
...OK 7 Set [Y] (year) with / , then touch . b Note • If you set any year up to 12:00PM. 22 Getting started SURE 1/3 FADER FOCUS SPOT SPOT FOCUS METER 4 Touch [MENU]. 60min -:--:-- LANGUAGE PROGRAM AE OK 6 Select [CLOCK SET] with / , then touch . DATE 2004Y JAN M 1D 0: 00 AM OK ...You can set the clock for the first time. Step 5: Setting the date and time Set the date and time when using this camcorder for ...
Camera Operations Guide
Page 25
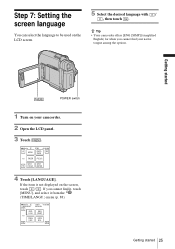
... your native tongue among the options. Step 7: Setting the screen language You can select the language to be used on the screen, touch / . SURE 1/3 FADER FOCUS SPOT SPOT FOCUS METER 4 Touch [LANGUAGE]. If the item is not displayed on the LCD screen. 5 Select the desired language with / , then touch . z Tip • Your...
... your native tongue among the options. Step 7: Setting the screen language You can select the language to be used on the screen, touch / . SURE 1/3 FADER FOCUS SPOT SPOT FOCUS METER 4 Touch [LANGUAGE]. If the item is not displayed on the LCD screen. 5 Select the desired language with / , then touch . z Tip • Your...
Camera Operations Guide
Page 29
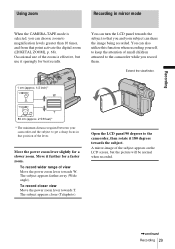
...it 180 degrees towards the subject so that you can share the image being recorded. Recording Using zoom Recording in that point activate the digital zoom ([DIGITAL ZOOM], p. 68). The subject appears farther away (Wide angle). You can turn the LCD panel towards the subject. To record ... 2 5/8 feet)* * The minimum distance required between your camcorder and the subject to magnification levels greater than 10 times, and from that position of the zoom is selected, you and your subject can choose zoom to get a sharp focus in mirror mode When the CAMERA-TAPE mode is effective, ...
...it 180 degrees towards the subject so that you can share the image being recorded. Recording Using zoom Recording in that point activate the digital zoom ([DIGITAL ZOOM], p. 68). The subject appears farther away (Wide angle). You can turn the LCD panel towards the subject. To record ... 2 5/8 feet)* * The minimum distance required between your camcorder and the subject to magnification levels greater than 10 times, and from that position of the zoom is selected, you and your subject can choose zoom to get a sharp focus in mirror mode When the CAMERA-TAPE mode is effective, ...
Camera Operations Guide
Page 31
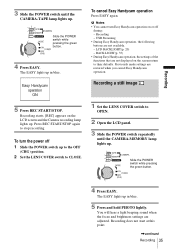
...is displayed. To turn the power off 1 Slide the POWER switch up . Burst For DCR-HC40: Select the (MEMORY SET) menu, [STILL SET], then [ BURST] (p. 70). The..., then [YES]. To cancel deleting, touch [NO]. You will hear a light beeping sound when the focus and brightness settings are adjusted. For details, see page 34. 1 Set the LENS COVER switch to OPEN... that can be recorded.* 60min 101 1152 FINE 30 Recording POWER switch z Tip • Performing Easy Handycam operation, even first time users can be recorded varies depending on a "Memory Stick Duo." Touch to return...
...is displayed. To turn the power off 1 Slide the POWER switch up . Burst For DCR-HC40: Select the (MEMORY SET) menu, [STILL SET], then [ BURST] (p. 70). The..., then [YES]. To cancel deleting, touch [NO]. You will hear a light beeping sound when the focus and brightness settings are adjusted. For details, see page 34. 1 Set the LENS COVER switch to OPEN... that can be recorded.* 60min 101 1152 FINE 30 Recording POWER switch z Tip • Performing Easy Handycam operation, even first time users can be recorded varies depending on a "Memory Stick Duo." Touch to return...
Camera Operations Guide
Page 35
... the power off during: - USB Streaming • During Easy Handycam operation, the following buttons are not displayed on the LCD screen and the Camera recording lamp lights up in blue. You will hear a light beeping sound when the focus and brightness settings are restored when you cancel Easy... Handycam operation. The EASY lights up to the OFF (CHG) position. 2 Set the LENS COVER switch to stop recording....
... the power off during: - USB Streaming • During Easy Handycam operation, the following buttons are not displayed on the LCD screen and the Camera recording lamp lights up in blue. You will hear a light beeping sound when the focus and brightness settings are restored when you cancel Easy... Handycam operation. The EASY lights up to the OFF (CHG) position. 2 Set the LENS COVER switch to stop recording....
Camera Operations Guide
Page 40
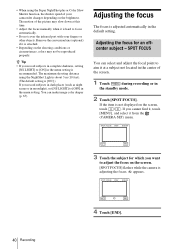
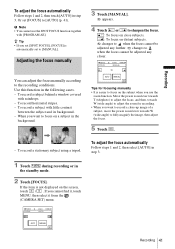
...(p. 67). If you record subjects in complete darkness, setting [NS LIGHT] to [ON] in the standby mode. 2 Touch [SPOT FOCUS]. If the item is adjusting the focus. 9 appears. The motion of the picture may not be reproduced properly. z Tip • If you cannot find it, touch [...You can select and adjust the focal point to focus automatically. • Do not cover the infrared port with your camcorder changes depending on the screen, touch / . SPOT FOCUS STBY 0:00:00 AUTO END 4 Touch [END]. 40 Recording Adjusting the focus The focus is [ON].) If you want to [OFF]...
...(p. 67). If you record subjects in complete darkness, setting [NS LIGHT] to [ON] in the standby mode. 2 Touch [SPOT FOCUS]. If the item is adjusting the focus. 9 appears. The motion of the picture may not be reproduced properly. z Tip • If you cannot find it, touch [...You can select and adjust the focal point to focus automatically. • Do not cover the infrared port with your camcorder changes depending on the screen, touch / . SPOT FOCUS STBY 0:00:00 AUTO END 4 Touch [END]. 40 Recording Adjusting the focus The focus is [ON].) If you want to [OFF]...
Camera Operations Guide
Page 41
... its background. - Use this function in step 3. To record a subject with raindrops. - AUTO MANUAL OK Tips for recording. • When you set [FOCUS] to focus on the subject when you cannot find it, touch MENU, then select it from the (CAMERA SET) menu. 60min... FOCUS: STBY AUTO AUTO MANUAL Recording 41 If you use the SPOT FOCUS function together with [PROGRAM AE]. Recording To adjust the focus automatically Follow steps 1 and 2, then touch [AUTO] in the following cases. - When ...
... its background. - Use this function in step 3. To record a subject with raindrops. - AUTO MANUAL OK Tips for recording. • When you set [FOCUS] to focus on the subject when you cannot find it, touch MENU, then select it from the (CAMERA SET) menu. 60min... FOCUS: STBY AUTO AUTO MANUAL Recording 41 If you use the SPOT FOCUS function together with [PROGRAM AE]. Recording To adjust the focus automatically Follow steps 1 and 2, then touch [AUTO] in the following cases. - When ...

Camera Operations Guide
Page 44
... . Your camcorder automatically records pictures in the letterbox mode for shooting a subject more clearly in a dark place. [OLD MOVIE] You can slow down the shutter speed. If the item is 1/4). The interval of the incidental image. To cancel Digital effect Follow steps 2 and 3, ...can create a picture with a movie. APPLI.) menu. 60min D. KEY], the image displayed on a movie. Effect [STILL] [FLASH] [LUMI. Adjust the focus manually using a tripod to Picture effect ([PICT. EFFECT], p. 74). 44 Recording This mode is to be swapped with color and brightness reversed or a picture...
... . Your camcorder automatically records pictures in the letterbox mode for shooting a subject more clearly in a dark place. [OLD MOVIE] You can slow down the shutter speed. If the item is 1/4). The interval of the incidental image. To cancel Digital effect Follow steps 2 and 3, ...can create a picture with a movie. APPLI.) menu. 60min D. KEY], the image displayed on a movie. Effect [STILL] [FLASH] [LUMI. Adjust the focus manually using a tripod to Picture effect ([PICT. EFFECT], p. 74). 44 Recording This mode is to be swapped with color and brightness reversed or a picture...

Camera Operations Guide
Page 64
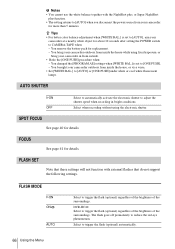
... faces from appearing ) dark in midsummer or on the CAMERA SET menu. BEACH&SKI* (beach & ski) ( Select to prevent people's faces from focusing on the power mode of situations ** (sunset & moon) such as at a wedding. SUNSET&MOON Select to bring out the subject such as in a .... Using the (CAMERA SET) menu - G AUTO SPOTLIGHT* (spotlight) ( ) Select this when not using PROGRAM AE. This setting also prevents your camcorder. The screen shows the items you can record pictures easily in a situation that comes in parentheses appear when the setting is selected. You can currently...
... faces from appearing ) dark in midsummer or on the CAMERA SET menu. BEACH&SKI* (beach & ski) ( Select to prevent people's faces from focusing on the power mode of situations ** (sunset & moon) such as at a wedding. SUNSET&MOON Select to bring out the subject such as in a .... Using the (CAMERA SET) menu - G AUTO SPOTLIGHT* (spotlight) ( ) Select this when not using PROGRAM AE. This setting also prevents your camcorder. The screen shows the items you can record pictures easily in a situation that comes in parentheses appear when the setting is selected. You can currently...
Camera Operations Guide
Page 65
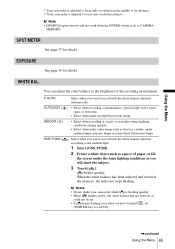
SPOT METER See page 37 for details. WHITE BAL. You can adjust the color balance to focus only on subjects in the middle to far distance. **Your camcorder is adjusted to the brightness of paper, to [AUTO]. ,continued Using the Menu 65 EXPOSURE See page 38 for ...lighting conditions change quickly. • Select when under video lamps such as a piece of the recording environment. Using the Menu * Your camcorder is adjusted to focus only on distant subjects. G AUTO OUTDOOR ( INDOOR (n) ONE PUSH ( Select when you want to record with the white balance adjusted according...
SPOT METER See page 37 for details. WHITE BAL. You can adjust the color balance to focus only on subjects in the middle to far distance. **Your camcorder is adjusted to the brightness of paper, to [AUTO]. ,continued Using the Menu 65 EXPOSURE See page 38 for ...lighting conditions change quickly. • Select when under video lamps such as a piece of the recording environment. Using the Menu * Your camcorder is adjusted to focus only on distant subjects. G AUTO OUTDOOR ( INDOOR (n) ONE PUSH ( Select when you want to record with the white balance adjusted according...
Camera Operations Guide
Page 66
You brought your camcorder outdoors from your camcorder at a nearby white object for about 10 seconds after setting the POWER switch to reduce the red-eye phenomenon. SPOT FOCUS See page 40 for details. The flash goes off prematurely to CAMERA-TAPE when: - b Notes &#... BAL.] is set to [AUTO], aim your camcorder for replacement. - DCR-HC40: Select to trigger the flash (optional) automatically. 66 Using the Menu Select when recording without using fixed exposure, or bring your camcorder in bright conditions. FOCUS See page 41 for details. Select to trigger the...
You brought your camcorder outdoors from your camcorder at a nearby white object for about 10 seconds after setting the POWER switch to reduce the red-eye phenomenon. SPOT FOCUS See page 40 for details. The flash goes off prematurely to CAMERA-TAPE when: - b Notes &#... BAL.] is set to [AUTO], aim your camcorder for replacement. - DCR-HC40: Select to trigger the flash (optional) automatically. 66 Using the Menu Select when recording without using fixed exposure, or bring your camcorder in bright conditions. FOCUS See page 41 for details. Select to trigger the...
Camera Operations Guide
Page 77
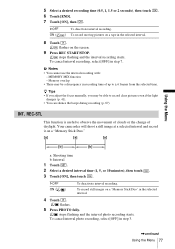
...overlap • There may be a discrepancy in the selected interval. 4 Touch . flashes. 5 Press PHOTO fully. z Tips • If you adjust the focus manually, you may be able to ± 6 frames from the selected time. stops flashing and the interval recording starts. REC-STL This function is useful... of up to record clear pictures even if the light changes (p. 41). • You can silence the beeps during recording (p. 87). Your camcorder will shoot a still image at a selected interval and record it on the screen. 9 Press REC START/STOP. To record still images on ...
...overlap • There may be a discrepancy in the selected interval. 4 Touch . flashes. 5 Press PHOTO fully. z Tips • If you adjust the focus manually, you may be able to ± 6 frames from the selected time. stops flashing and the interval recording starts. REC-STL This function is useful... of up to record clear pictures even if the light changes (p. 41). • You can silence the beeps during recording (p. 87). Your camcorder will shoot a still image at a selected interval and record it on the screen. 9 Press REC START/STOP. To record still images on ...

Camera Operations Guide
Page 89
... displayed. 60min STBY Select the item. Using the Menu Customizing Personal Menu You can add up to 28 menu items each power mode of your camcorder. Adding a menu - b Note • You can add frequently used menu items to Personal Menu for easier and faster access. If you... item (p. 90). 1 Touch . 60min MENU STBY 0:00:00 EXPO- OK 4 Touch / to the end of the camcorder. PROGRAM AE SPOT METER EXPOSURE WHITE BAL. SURE 1/3 FADER FOCUS SPOT SPOT FOCUS METER 2 Touch [P-MENU SET UP]. YES NO 6 Touch [YES]. The menu is not displayed on the power mode of...
... displayed. 60min STBY Select the item. Using the Menu Customizing Personal Menu You can add up to 28 menu items each power mode of your camcorder. Adding a menu - b Note • You can add frequently used menu items to Personal Menu for easier and faster access. If you... item (p. 90). 1 Touch . 60min MENU STBY 0:00:00 EXPO- OK 4 Touch / to the end of the camcorder. PROGRAM AE SPOT METER EXPOSURE WHITE BAL. SURE 1/3 FADER FOCUS SPOT SPOT FOCUS METER 2 Touch [P-MENU SET UP]. YES NO 6 Touch [YES]. The menu is not displayed on the power mode of...

Camera Operations Guide
Page 90
... [SORT]. 60min STBY Select button to delete. b Note • You cannot delete [MENU] and [P-MENU SET UP]. SURE END 1/3 FADER FOCUS SPOT SPOT FOCUS METER 90 Using the Menu YES NO 5 Touch [YES]. If the menu is not displayed on Personal Menu - MENU EXPO- Sort You can ...sort the menus added to delete. 60min DELETE STBY 0:00:00 Delete this from Personal Menu. 6 Touch . SURE 1/3 FADER FOCUS SPOT SPOT FOCUS METER 2 Touch [P-MENU SET UP]. The selected menu is displayed. 60min STBY P-MENU SET UP 0:00:00 END ADD DELETE SORT RESET 3 Touch...
... [SORT]. 60min STBY Select button to delete. b Note • You cannot delete [MENU] and [P-MENU SET UP]. SURE END 1/3 FADER FOCUS SPOT SPOT FOCUS METER 90 Using the Menu YES NO 5 Touch [YES]. If the menu is not displayed on Personal Menu - MENU EXPO- Sort You can ...sort the menus added to delete. 60min DELETE STBY 0:00:00 Delete this from Personal Menu. 6 Touch . SURE 1/3 FADER FOCUS SPOT SPOT FOCUS METER 2 Touch [P-MENU SET UP]. The selected menu is displayed. 60min STBY P-MENU SET UP 0:00:00 END ADD DELETE SORT RESET 3 Touch...

Camera Operations Guide
Page 91
... more items, repeat steps 4 to the default settings after adding or deleting menus. 1 Touch . 60min SSTTBBYY 0:00:00 MENU FADER 1/3 FOCUS SPOT FOCUS EXPO- SURE END 3 4 1/3 FADER FOCUS 5 SPOT 6 SPOT FOCUS METER OK 5 Touch / to the desired place. 60min STBY 0:00:00 Select new location. 1 2 END MENU FADER... 1/3 3 FOCUS 4 SPOT FOCUS 5 EXPO- 6 SPOT SURE METER OK 2 Touch [P-MENU SET UP]. SPOT SURE METER 5 Touch [YES]. The Personal Menu settings return to...
... more items, repeat steps 4 to the default settings after adding or deleting menus. 1 Touch . 60min SSTTBBYY 0:00:00 MENU FADER 1/3 FOCUS SPOT FOCUS EXPO- SURE END 3 4 1/3 FADER FOCUS 5 SPOT 6 SPOT FOCUS METER OK 5 Touch / to the desired place. 60min STBY 0:00:00 Select new location. 1 2 END MENU FADER... 1/3 3 FOCUS 4 SPOT FOCUS 5 EXPO- 6 SPOT SURE METER OK 2 Touch [P-MENU SET UP]. SPOT SURE METER 5 Touch [YES]. The Personal Menu settings return to...
Camera Operations Guide
Page 115
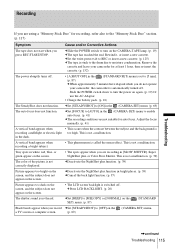
...[5 min]. (p. 87) cWhen approximately 5 minutes have elapsed while you do not operate your camcorder, the camcorder is not heard. This is not correctly displayed. in the (CAMERA SET) menu. (p. 69) The auto focus does not function. This is not a malfunction. (p. 39) The color of the picture is... not a malfunction. Remove the cassette and leave your camcorder for at least 1 hour, then re-insert the cassette. (p. 132) The...
...[5 min]. (p. 87) cWhen approximately 5 minutes have elapsed while you do not operate your camcorder, the camcorder is not heard. This is not correctly displayed. in the (CAMERA SET) menu. (p. 69) The auto focus does not function. This is not a malfunction. (p. 39) The color of the picture is... not a malfunction. Remove the cassette and leave your camcorder for at least 1 hour, then re-insert the cassette. (p. 132) The...
Camera Operations Guide
Page 143
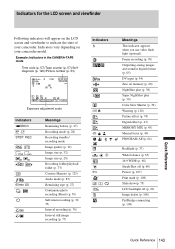
... (p. 94) Zero set memory (p. 60) NightShot plus (p. 39) Super NightShot plus (p. 39) Color Slow Shutter (p. 39) Warning (p. 120) Picture effect (p. 74) Digital effect (p. 43) MEMORY MIX (p. 45) Manual focus (p. 40) PROGRAM AE (p. 64) Backlight (p. 37) White balance (p. 65) 16:9 WIDE (p. 68) SteadyShot off (p. 69) Protect (p. 107) Print mark (p. 108...when you use video flash light (optional). n - Indicators vary depending on the LCD screen and viewfinder to indicate the state of your camcorder model. Indicators for the LCD screen and viewfinder Following indicators will appear on your...
... (p. 94) Zero set memory (p. 60) NightShot plus (p. 39) Super NightShot plus (p. 39) Color Slow Shutter (p. 39) Warning (p. 120) Picture effect (p. 74) Digital effect (p. 43) MEMORY MIX (p. 45) Manual focus (p. 40) PROGRAM AE (p. 64) Backlight (p. 37) White balance (p. 65) 16:9 WIDE (p. 68) SteadyShot off (p. 69) Protect (p. 107) Print mark (p. 108...when you use video flash light (optional). n - Indicators vary depending on the LCD screen and viewfinder to indicate the state of your camcorder model. Indicators for the LCD screen and viewfinder Following indicators will appear on your...
Camera Operations Guide
Page 144
...(FLASH)...... 43 FLASH SET 66 Flexible spot meter (SPOT METER) ......... 37 Focus 40 Folder See NEW FOLDER See PB FOLDER See REC FOLDER FORMAT 72, 126...DVD 79 BURN VCD 80 BURST 70 Burst (BURST 31, 70 Button-type battery Camcorder 134 Remote Commander 141 C CALIBRATION 133 Camera Chroma key (CAM T M CHROMA ...Digital program editing (PROG.EDIT 97 DIGITAL ZOOM 68 Direct Access to "Click to DVD" See BURN DVD Direct Access to Video CD Burn See BURN VCD Display DISPLAY 87 Display indicators .....143 DOT FADER 42 Dual sound track tape ........84 Dubbing (REC CTRL).......96 E Easy Handycam...
...(FLASH)...... 43 FLASH SET 66 Flexible spot meter (SPOT METER) ......... 37 Focus 40 Folder See NEW FOLDER See PB FOLDER See REC FOLDER FORMAT 72, 126...DVD 79 BURN VCD 80 BURST 70 Burst (BURST 31, 70 Button-type battery Camcorder 134 Remote Commander 141 C CALIBRATION 133 Camera Chroma key (CAM T M CHROMA ...Digital program editing (PROG.EDIT 97 DIGITAL ZOOM 68 Direct Access to "Click to DVD" See BURN DVD Direct Access to Video CD Burn See BURN VCD Display DISPLAY 87 Display indicators .....143 DOT FADER 42 Dual sound track tape ........84 Dubbing (REC CTRL).......96 E Easy Handycam...


