Camera Operations Guide
Page 12
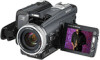
...half the size of a standard "Memory Stick," in parentheses indicates the number of the devices compatible with your camcorder. Rechargeable battery pack NP-FF71 (1) CD-ROM "SPVD-012 USB Driver" (1) Cleaning cloth (1) Camera Operations Guide (This manual) (1) Computer Applications Guide (1) 12 Getting started Step...installed. Also, if you force the lens hood on the screen. Lens hood (1) Use the lens hood to the camcorder. A/V connecting cable (1) AC Adaptor (1) USB cable (1) Power cord (1) Lens cap (1) Attached to record under strong light, such as under the sun. Getting...
...half the size of a standard "Memory Stick," in parentheses indicates the number of the devices compatible with your camcorder. Rechargeable battery pack NP-FF71 (1) CD-ROM "SPVD-012 USB Driver" (1) Cleaning cloth (1) Camera Operations Guide (This manual) (1) Computer Applications Guide (1) 12 Getting started Step...installed. Also, if you force the lens hood on the screen. Lens hood (1) Use the lens hood to the camcorder. A/V connecting cable (1) AC Adaptor (1) USB cable (1) Power cord (1) Lens cap (1) Attached to record under strong light, such as under the sun. Getting...
Camera Operations Guide
Page 41
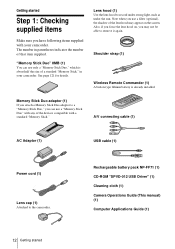
...scheme of white, the image in the thumbnail screen may not be swapped into a movie. 8 Touch twice. z Tip • The supplied SPVD-012 USB Driver CD-ROM contains sample images for details. 7 Touch (decrease)/ to adjust the following. (increase) For [MTCAM LUMI.] The color scheme of the blue area...the blue area in the still image which is to play back pictures modified on your computer or recorded with other camcorders on the movie which is superimposed on your camcorder. The still image is to be able to be clear. appears. 9 Start recording. When you use in [...
...scheme of white, the image in the thumbnail screen may not be swapped into a movie. 8 Touch twice. z Tip • The supplied SPVD-012 USB Driver CD-ROM contains sample images for details. 7 Touch (decrease)/ to adjust the following. (increase) For [MTCAM LUMI.] The color scheme of the blue area...the blue area in the still image which is to play back pictures modified on your computer or recorded with other camcorders on the movie which is superimposed on your camcorder. The still image is to be able to be clear. appears. 9 Start recording. When you use in [...

Computer Applications Guide
Page 2
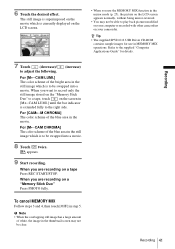
... • Application: DirectX 9.0b or later (This product is required. To copy pictures, connect your camcorder to a Macintosh computer using ImageMixer VCD2 • OS: Mac OS X (v10.1.5 or later) Standard...8226; Application: QuickTime 4.0 or later (this must be installed to play back movies.) • Others: USB port (this must be provided as standard), DV Interface (IEEE1394, i.LINK) (to connect via an i.LINK...; 600 dots, High color (16 bit color, 65 000 colors), DirectDraw display driver capability (this product will not operate correctly at 800 × 600 dots or less, and 256 ...
... • Application: DirectX 9.0b or later (This product is required. To copy pictures, connect your camcorder to a Macintosh computer using ImageMixer VCD2 • OS: Mac OS X (v10.1.5 or later) Standard...8226; Application: QuickTime 4.0 or later (this must be installed to play back movies.) • Others: USB port (this must be provided as standard), DV Interface (IEEE1394, i.LINK) (to connect via an i.LINK...; 600 dots, High color (16 bit color, 65 000 colors), DirectDraw display driver capability (this product will not operate correctly at 800 × 600 dots or less, and 256 ...
Computer Applications Guide
Page 36
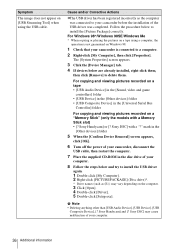
... devices] folder 5 When the [Confirm Device Removal] screen appears, click [OK]. 6 Turn off the power of your camcorder, disconnect the USB cable, then restart the computer. 7 Place the supplied CD-ROM in the [Universal Serial Bus Controller] folder For copying ... Click [Open]. 4 Double-click [Driver]. 5 Double-click [Setup.exe]. b Note • Deleting anything other than [USB Audio Device], [USB Device], [USB Composite Device], [? Cause and/or Corrective Actions cThe USB driver has been registered incorrectly as the computer was completed. Sony Handycam] or [? Symptom The image does not...
... devices] folder 5 When the [Confirm Device Removal] screen appears, click [OK]. 6 Turn off the power of your camcorder, disconnect the USB cable, then restart the computer. 7 Place the supplied CD-ROM in the [Universal Serial Bus Controller] folder For copying ... Click [Open]. 4 Double-click [Driver]. 5 Double-click [Setup.exe]. b Note • Deleting anything other than [USB Audio Device], [USB Device], [USB Composite Device], [? Cause and/or Corrective Actions cThe USB driver has been registered incorrectly as the computer was completed. Sony Handycam] or [? Symptom The image does not...

Computer Applications Guide
Page 37
... of your camcorder is connected to delete them. The [System Properties] screen appears. 3 Click the [Hardware] tab. 4 Click [Device Manager]. 5 Click [View], then click [Devices by type]. 6 If devices below and try to install the USB driver again. 1... Double-click [My Computer]. 2 Right-click [PICTUREPACKAGE] (Disc drive)*. * Drive names (such as Administrators. 1 Check that your computer. 10 Follow the steps below are already installed, right-click them, then click [Uninstall] to a computer. 2 Right-click [My Computer], then click [Properties]. Sony Handycam...
... of your camcorder is connected to delete them. The [System Properties] screen appears. 3 Click the [Hardware] tab. 4 Click [Device Manager]. 5 Click [View], then click [Devices by type]. 6 If devices below and try to install the USB driver again. 1... Double-click [My Computer]. 2 Right-click [PICTUREPACKAGE] (Disc drive)*. * Drive names (such as Administrators. 1 Check that your computer. 10 Follow the steps below are already installed, right-click them, then click [Uninstall] to a computer. 2 Right-click [My Computer], then click [Properties]. Sony Handycam...

Computer Applications Guide
Page 38
... Right-click [My Computer], then click [Properties]. Sony Handycam] and [? Sony Handycam] or [? b Note • Deleting anything other than [USB Composite Device], [USB Audio Device], [USB Device], [? Sony DSC] may vary depending on the computer. 3 Click [Open]. 4 Double-click [Driver]. 5 Double-click [Setup.exe]. The [System ...If devices below and try to install the USB driver again. 1 Double-click [My Computer]. 2 Right-click [PICTUREPACKAGE] (Disc drive)*. * Drive names (such as Administrators. 1 Check that your camcorder is connected to delete them. Symptom Cause and...
... Right-click [My Computer], then click [Properties]. Sony Handycam] and [? Sony Handycam] or [? b Note • Deleting anything other than [USB Composite Device], [USB Audio Device], [USB Device], [? Sony DSC] may vary depending on the computer. 3 Click [Open]. 4 Double-click [Driver]. 5 Double-click [Setup.exe]. The [System ...If devices below and try to install the USB driver again. 1 Double-click [My Computer]. 2 Right-click [PICTUREPACKAGE] (Disc drive)*. * Drive names (such as Administrators. 1 Check that your camcorder is connected to delete them. Symptom Cause and...
Computer Applications Guide
Page 39
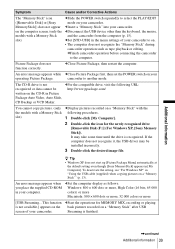
... computer does not recognize it, the USB driver may take some time until the drive is not available.] appears on the back pictures recorded on a "Memory Stick" after USB screen of your camcorder. This function cStart the operations for the newly recognized drive [Removable Disk (F:)] (For Windows XP, [Sony Memory Stick]). An error message appears...
... computer does not recognize it, the USB driver may take some time until the drive is not available.] appears on the back pictures recorded on a "Memory Stick" after USB screen of your camcorder. This function cStart the operations for the newly recognized drive [Removable Disk (F:)] (For Windows XP, [Sony Memory Stick]). An error message appears...


