
Camera Operations Guide
Page 2
...electromagnetic interference causes data transfer to rain or moisture. For customers in the U.S.A. and CANADA RECYCLING LITHIUM-ION BATTERIES Lithium-Ion batteries are recyclable. If you have any questions about this device must accept any interference received, including interference that ...FCC related matters only. "Memory Stick" This device complies with Part 15 of Conformity Trade Name: SONY Model No.: DCR-HC1000 Responsible Party: Sony Electronics Inc. This Class B digital apparatus complies with Canadian ICES-003. Bernardo Dr, San Diego, CA 92127 U.S.A. Operation is subject...
...electromagnetic interference causes data transfer to rain or moisture. For customers in the U.S.A. and CANADA RECYCLING LITHIUM-ION BATTERIES Lithium-Ion batteries are recyclable. If you have any questions about this device must accept any interference received, including interference that ...FCC related matters only. "Memory Stick" This device complies with Part 15 of Conformity Trade Name: SONY Model No.: DCR-HC1000 Responsible Party: Sony Electronics Inc. This Class B digital apparatus complies with Canadian ICES-003. Bernardo Dr, San Diego, CA 92127 U.S.A. Operation is subject...

Camera Operations Guide
Page 4
... used in illustrating the operating procedures. Flash LCD panel • Rotate the Multi-Angle Grip to other device Before connecting your camcorder if necessary (p. 21). Battery compartment lid • Do not rotate the Multi-Angle Grip forcefully or subject it to shock, as shown in each local... connecting other device such as a VCR or a computer with a USB or i.LINK cable, be damaged, or this manual are captured using a digital still camera, and thus may appear different from what you see. • The on-screen displays in the following parts. Change the screen language ...
... used in illustrating the operating procedures. Flash LCD panel • Rotate the Multi-Angle Grip to other device Before connecting your camcorder if necessary (p. 21). Battery compartment lid • Do not rotate the Multi-Angle Grip forcefully or subject it to shock, as shown in each local... connecting other device such as a VCR or a computer with a USB or i.LINK cable, be damaged, or this manual are captured using a digital still camera, and thus may appear different from what you see. • The on-screen displays in the following parts. Change the screen language ...

Camera Operations Guide
Page 5
... Stick Duo" only. Read this first 2 Quick Start Guide Recording movies 8 Recording still images 10 Getting started Step 1: Checking supplied items 12 Step 2: Charging the battery pack 13 Using an outside power source 15 Step 3: Turning the power on a tape ...33 ,continued 5
... Stick Duo" only. Read this first 2 Quick Start Guide Recording movies 8 Recording still images 10 Getting started Step 1: Checking supplied items 12 Step 2: Charging the battery pack 13 Using an outside power source 15 Step 3: Turning the power on a tape ...33 ,continued 5

Camera Operations Guide
Page 7
... Troubleshooting 106 Warning indicators and messages 114 Additional Information Using your camcorder abroad ..........119 Usable cassette tapes 120 About the "Memory Stick 121 About the "InfoLITHIUM" battery pack 123 About i.LINK 125 Maintenance and precautions ..........126 Specification ...recorded tape 98 Deleting recorded pictures .........100 Marking recorded images with your camcorder: • Editing images with specific information - APPLI.) menu - REC-STL, etc 67 Using the (EDIT/PLAY) menu - Digital program editing 91 Dubbing sound to a tape 90 Dubbing selected scenes...
... Troubleshooting 106 Warning indicators and messages 114 Additional Information Using your camcorder abroad ..........119 Usable cassette tapes 120 About the "Memory Stick 121 About the "InfoLITHIUM" battery pack 123 About i.LINK 125 Maintenance and precautions ..........126 Specification ...recorded tape 98 Deleting recorded pictures .........100 Marking recorded images with your camcorder: • Editing images with specific information - APPLI.) menu - REC-STL, etc 67 Using the (EDIT/PLAY) menu - Digital program editing 91 Dubbing sound to a tape 90 Dubbing selected scenes...

Camera Operations Guide
Page 8
... cassette with c Press . lid. Quick Start Guide Recording movies 1 Insert the charged battery pack into the camcorder. the arrow 1 to open the lid. 2 Insert a cassette into the camcorder. To charge the battery, see page 13. a Push the catch on the b Insert the battery pack in the direction of the out, then push the cassette compartment...
... cassette with c Press . lid. Quick Start Guide Recording movies 1 Insert the charged battery pack into the camcorder. the arrow 1 to open the lid. 2 Insert a cassette into the camcorder. To charge the battery, see page 13. a Push the catch on the b Insert the battery pack in the direction of the out, then push the cassette compartment...

Camera Operations Guide
Page 10
b Insert a "Memory Stick Duo" with its terminal facing up until it clicks. To charge the battery, see page 13. the arrow 1 to open the lid. 2 Insert a "Memory Stick Duo" into the camcorder. c Close the "Memory Stick Duo" cover. 10 Quick Start Guide a Open the "Memory Stick Duo" cover. lid in c Close the battery battery compartment the direction of until it clicks. Recording still images 1 Insert the charged battery pack into the camcorder. a Push the catch on the b Insert the battery pack in the direction of the arrow compartment lid.
b Insert a "Memory Stick Duo" with its terminal facing up until it clicks. To charge the battery, see page 13. the arrow 1 to open the lid. 2 Insert a "Memory Stick Duo" into the camcorder. c Close the "Memory Stick Duo" cover. 10 Quick Start Guide a Open the "Memory Stick Duo" cover. lid in c Close the battery battery compartment the direction of until it clicks. Recording still images 1 Insert the charged battery pack into the camcorder. a Push the catch on the b Insert the battery pack in the direction of the arrow compartment lid.
Camera Operations Guide
Page 12
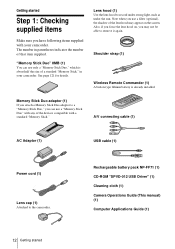
Also, if you force the lens hood on, you may appear on the screen. Rechargeable battery pack NP-FF71 (1) CD-ROM "SPVD-012 USB Driver" (1) Cleaning cloth (1) Camera Operations Guide (This manual) (1) Computer Applications Guide (1) 12 Getting started Step 1: ...Stick Duo adaptor to remove it again. Shoulder strap (1) Wireless Remote Commander (1) A button-type lithium battery is about half the size of a standard "Memory Stick," in parentheses indicates the number of the devices compatible with your camcorder. See page 121 for details. "Memory Stick Duo" 8MB (1) You can use a "Memory ...
Also, if you force the lens hood on, you may appear on the screen. Rechargeable battery pack NP-FF71 (1) CD-ROM "SPVD-012 USB Driver" (1) Cleaning cloth (1) Camera Operations Guide (This manual) (1) Computer Applications Guide (1) 12 Getting started Step 1: ...Stick Duo adaptor to remove it again. Shoulder strap (1) Wireless Remote Commander (1) A button-type lithium battery is about half the size of a standard "Memory Stick," in parentheses indicates the number of the devices compatible with your camcorder. See page 121 for details. "Memory Stick Duo" 8MB (1) You can use a "Memory ...
Camera Operations Guide
Page 13
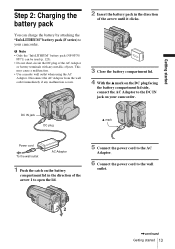
...started Step 2: Charging the battery pack You can be used (p. 123). • Do not short-circuit the DC plug of the arrow until it clicks. 3 Close the battery compartment lid. 4 With the v mark on your camcorder. b Note • Only the "InfoLITHIUM" battery pack (NP-FF70/ FF71...) can charge the battery by attaching the "InfoLITHIUM" battery pack (F series) to your camcorder. This may cause a malfunction. • Use a...
...started Step 2: Charging the battery pack You can be used (p. 123). • Do not short-circuit the DC plug of the arrow until it clicks. 3 Close the battery compartment lid. 4 With the v mark on your camcorder. b Note • Only the "InfoLITHIUM" battery pack (NP-FF70/ FF71...) can charge the battery by attaching the "InfoLITHIUM" battery pack (F series) to your camcorder. This may cause a malfunction. • Use a...

Camera Operations Guide
Page 14
.... See page 124 about storage of power left in the direction of the arrow and remove the battery pack. Keep the button pressed to (CHG) OFF. 2 Open the battery compartment lid. 3 Unlatch the battery release tab in the battery pack. B Approximate possible recording time using the viewfinder. 14 Getting started To check the remaining...
.... See page 124 about storage of power left in the direction of the arrow and remove the battery pack. Keep the button pressed to (CHG) OFF. 2 Open the battery compartment lid. 3 Unlatch the battery release tab in the battery pack. B Approximate possible recording time using the viewfinder. 14 Getting started To check the remaining...
Camera Operations Guide
Page 15
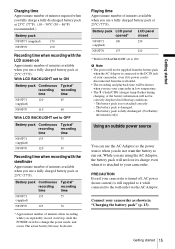
... the POWER switch to run out. The battery pack is damaged. - Connect your camcorder in low temperature. • The (flash)/CHG (charge) lamp flashes during charging, or the battery information will not be supplied from the battery pack when the AC Adaptor is connected to...AC Adaptor. b Note • The power will not be correctly displayed in "Charging the battery pack" (p. 13). The battery pack is not attached correctly. - PRECAUTION Even if your camcorder. Battery pack Continuous Typical* recording recording time time NP-FF71 135 75 (supplied) NP-FF70 125 70...
... the POWER switch to run out. The battery pack is damaged. - Connect your camcorder in low temperature. • The (flash)/CHG (charge) lamp flashes during charging, or the battery information will not be supplied from the battery pack when the AC Adaptor is connected to...AC Adaptor. b Note • The power will not be correctly displayed in "Charging the battery pack" (p. 13). The battery pack is not attached correctly. - PRECAUTION Even if your camcorder. Battery pack Continuous Typical* recording recording time time NP-FF71 135 75 (supplied) NP-FF70 125 70...

Camera Operations Guide
Page 17
... appears on the screen. 3 Touch . [Set LCD off . 5 Touch the LCD screen while checking the display in the viewfinder. [EXPOSURE], etc. This setting saves battery power. • Even if you adjust the LCD screen backlight, the recorded picture will not be affected. • You can turn off the LCD screen... the viewfinder lens adjustment lever until the picture is turned off ?] appears on the LCD screen, touch . Getting started 17 To use your camcorder in bright conditions, press LCD BACKLIGHT to select a desired effect (only in the (STANDARD SET) menu to [OFF] (p. 80).
... appears on the screen. 3 Touch . [Set LCD off . 5 Touch the LCD screen while checking the display in the viewfinder. [EXPOSURE], etc. This setting saves battery power. • Even if you adjust the LCD screen backlight, the recorded picture will not be affected. • You can turn off the LCD screen... the viewfinder lens adjustment lever until the picture is turned off ?] appears on the LCD screen, touch . Getting started 17 To use your camcorder in bright conditions, press LCD BACKLIGHT to select a desired effect (only in the (STANDARD SET) menu to [OFF] (p. 80).

Camera Operations Guide
Page 18
... PROGRAM AE OK 6 Select [CLOCK SET] with / , then touch . DISPLAY MENU ROTATE A. If you do not use your camcorder for the first time. In that case, charge the rechargeable button-type battery (p. 128) and then set it to the year 2079. 8 Set [M] (month), [D] (day), hour and minute in the ...same way as was done in rechargeable button-type battery gets discharged and the date and time settings may be cleared from the memory. SHUT OFF CLOCK SET WORLD --:--:-- For midday, set the date and...
... PROGRAM AE OK 6 Select [CLOCK SET] with / , then touch . DISPLAY MENU ROTATE A. If you do not use your camcorder for the first time. In that case, charge the rechargeable button-type battery (p. 128) and then set it to the year 2079. 8 Set [M] (month), [D] (day), hour and minute in the ...same way as was done in rechargeable button-type battery gets discharged and the date and time settings may be cleared from the memory. SHUT OFF CLOCK SET WORLD --:--:-- For midday, set the date and...

Camera Operations Guide
Page 20
... the "Memory Stick Duo" slot may cause a malfunction of "Memory Stick" into the "Memory Stick Duo" slot in your camcorder, turn the power off, eject the "Memory Stick Duo," or remove the battery pack. b Note • If you force the "Memory Stick Duo" into the "Memory Stick Duo" slot. 1 Open the... Stick Duo" in the "Memory Stick Duo" may be damaged. • Do not insert anything other type of your camcorder. • When the access lamp is lit or flashing, your camcorder is reading/writing data from/to force any other than a "Memory Stick Duo" into the "Memory Stick Duo" slot....
... the "Memory Stick Duo" slot may cause a malfunction of "Memory Stick" into the "Memory Stick Duo" slot in your camcorder, turn the power off, eject the "Memory Stick Duo," or remove the battery pack. b Note • If you force the "Memory Stick Duo" into the "Memory Stick Duo" slot. 1 Open the... Stick Duo" in the "Memory Stick Duo" may be damaged. • Do not insert anything other type of your camcorder. • When the access lamp is lit or flashing, your camcorder is reading/writing data from/to force any other than a "Memory Stick Duo" into the "Memory Stick Duo" slot....

Camera Operations Guide
Page 23
... 1 minute to display the correct remaining battery time. To restart recording, slide the POWER switch down to prevent battery loss ([A.SHUT OFF], p. 81). When you do not operate the camcorder for Cassette Memory cassettes B Remaining battery The indicated time may not be correct ... (CHG) OFF. • In the default setting, when you opened or closed the LCD panel, it takes about 1 minute to display the correct remaining battery time. C Recording status ([REC] (recording)) D Movie size E Recorded time (hour: minute: second) F Recording capacity of use . C Recording mode ...
... 1 minute to display the correct remaining battery time. To restart recording, slide the POWER switch down to prevent battery loss ([A.SHUT OFF], p. 81). When you do not operate the camcorder for Cassette Memory cassettes B Remaining battery The indicated time may not be correct ... (CHG) OFF. • In the default setting, when you opened or closed the LCD panel, it takes about 1 minute to display the correct remaining battery time. C Recording status ([REC] (recording)) D Movie size E Recorded time (hour: minute: second) F Recording capacity of use . C Recording mode ...

Camera Operations Guide
Page 28
... the front input sound or the rear input sound. If you cannot find it, touch [MENU], and select it only supports 2ch audio output. Your camcorder cannot output 4ch audio simultaneously as it from the (STANDARD SET) menu. 60min AUDIO MIX 0:00:00:00 ST1/ FRONT ST2/ REAR 4 Adjust the balance... . Using headphones is heard. To monitor the sound during recording - 4CH Audio Check You can listen to the default setting in about 5 minutes after the battery pack or other power sources have been disconnected. If the item is not displayed on the screen, touch / .
... the front input sound or the rear input sound. If you cannot find it, touch [MENU], and select it only supports 2ch audio output. Your camcorder cannot output 4ch audio simultaneously as it from the (STANDARD SET) menu. 60min AUDIO MIX 0:00:00:00 ST1/ FRONT ST2/ REAR 4 Adjust the balance... . Using headphones is heard. To monitor the sound during recording - 4CH Audio Check You can listen to the default setting in about 5 minutes after the battery pack or other power sources have been disconnected. If the item is not displayed on the screen, touch / .

Camera Operations Guide
Page 31
...and other conditions. • The flash charge indicator flickers while charging, and remains lit when the battery charge is set to auto flashing by default, so according to the lighting conditions, the flash ...may not get a sufficient amount of the surrounding brightness. Digital effect - Follow the steps below when you always want to use the flash at all. m (.... Burst - Shutter speed 1/30 second or slower ,continued Recording 31 Your camcorder is complete. (In the CAMERA-TAPE mode, it takes a while to the heat from the surface ...
...and other conditions. • The flash charge indicator flickers while charging, and remains lit when the battery charge is set to auto flashing by default, so according to the lighting conditions, the flash ...may not get a sufficient amount of the surrounding brightness. Digital effect - Follow the steps below when you always want to use the flash at all. m (.... Burst - Shutter speed 1/30 second or slower ,continued Recording 31 Your camcorder is complete. (In the CAMERA-TAPE mode, it takes a while to the heat from the surface ...

Camera Operations Guide
Page 44
...review movies on the viewfinder Close the LCD panel. When you want to play ) to view. 60min 0:00:00:00 60min P-MENU P-MENU A Remaining battery B Recording mode (SP or LP) C Tape transport indicator 44 Playback OPEN POWER switch 1 Press OPEN and open the LCD panel. 2 Slide the ...POWER switch repeatedly to restart the playback. If the item is not displayed on your camcorder. Playback stops automatically when the pause mode continues for more than 5 minutes. Touch it from the (STANDARD SET) menu. 3 Adjust the volume by...
...review movies on the viewfinder Close the LCD panel. When you want to play ) to view. 60min 0:00:00:00 60min P-MENU P-MENU A Remaining battery B Recording mode (SP or LP) C Tape transport indicator 44 Playback OPEN POWER switch 1 Press OPEN and open the LCD panel. 2 Slide the ...POWER switch repeatedly to restart the playback. If the item is not displayed on your camcorder. Playback stops automatically when the pause mode continues for more than 5 minutes. Touch it from the (STANDARD SET) menu. 3 Adjust the volume by...

Camera Operations Guide
Page 47
... Duo." : Touch to move to the previous folder. : Touch to move to the next folder. : Touch / to move to use ,continued Playback 47 P-MENU A Remaining battery B Image size C Picture number/Total number of recorded pictures in the current playback folder D Playback folder E Playing time (movies only) F Previous/next folder icon The...
... Duo." : Touch to move to the previous folder. : Touch to move to the next folder. : Touch / to move to use ,continued Playback 47 P-MENU A Remaining battery B Image size C Picture number/Total number of recorded pictures in the current playback folder D Playback folder E Playing time (movies only) F Previous/next folder icon The...

Camera Operations Guide
Page 58
...been adjusted and stored in from inside the house, or vice versa. • Set [WHITE BAL.] to CAMERA-TAPE when: - You brought your camcorder at a nearby white object for replacement. - This is flashing quickly. • When flashes slowly, the white balance has not been set, or could... to fill the screen under white or cool white fluorescent lamps. You bring your camcorder in the memory, the indicator stops flashing. ONE PUSH ( ) Select when you want to OFF beforehand (p. 55). You remove the battery pack for about 10 seconds after you have touched , set [WHITE BAL.] to...
...been adjusted and stored in from inside the house, or vice versa. • Set [WHITE BAL.] to CAMERA-TAPE when: - You brought your camcorder at a nearby white object for replacement. - This is flashing quickly. • When flashes slowly, the white balance has not been set, or could... to fill the screen under white or cool white fluorescent lamps. You bring your camcorder in the memory, the indicator stops flashing. ONE PUSH ( ) Select when you want to OFF beforehand (p. 55). You remove the battery pack for about 10 seconds after you have touched , set [WHITE BAL.] to...

Camera Operations Guide
Page 71
...the Menu Using the Menu 71 DEMO MODE When you remove both cassette and "Memory Stick Duo" from your camcorder, and select the CAMERA-TAPE mode, you are using this camcorder for details. GON OFF Select to see an overview of the functions available such as those described below. - ...When you do not intend to [5 min] when the camcorder is used on the battery pack, the power will be turned off after approximately 5 minutes (p. 81). When a mode other than CAMERA-TAPE is selected. • ...
...the Menu Using the Menu 71 DEMO MODE When you remove both cassette and "Memory Stick Duo" from your camcorder, and select the CAMERA-TAPE mode, you are using this camcorder for details. GON OFF Select to see an overview of the functions available such as those described below. - ...When you do not intend to [5 min] when the camcorder is used on the battery pack, the power will be turned off after approximately 5 minutes (p. 81). When a mode other than CAMERA-TAPE is selected. • ...


