Operating Guide
Page 3
... never be blocked or covered. - Cleaning Unplug the set from the wall outlet before cleaning or polishing it is exposed to direct sunlight. Use a cloth lightly dampened with a cloth or other controls may fall, causing serious injury to a child or an adult, and serious damage to the set exhibits a distinct change...
... never be blocked or covered. - Cleaning Unplug the set from the wall outlet before cleaning or polishing it is exposed to direct sunlight. Use a cloth lightly dampened with a cloth or other controls may fall, causing serious injury to a child or an adult, and serious damage to the set exhibits a distinct change...
Operating Guide
Page 7
...cannot be contrary to malfunction. DCR-DVD810 Make trial recording on your camcorder (p. 72), data may cause malfunctions. • Do not aim at dusk. In such a case, save your camcorder to the copyright laws. •...cannot be some tiny black points and/or bright points (white, red, blue, or green in low light conditions, such as at the sun. About disposal/transfer (DCRDVD810) Even if you need an NTSC system-... images of data occurs on -screen displays in Germany, and Sony Corporation, and produces superior images. About language setting The on the internal memory (DCRDVD810) or a ...
...cannot be contrary to malfunction. DCR-DVD810 Make trial recording on your camcorder (p. 72), data may cause malfunctions. • Do not aim at dusk. In such a case, save your camcorder to the copyright laws. •...cannot be some tiny black points and/or bright points (white, red, blue, or green in low light conditions, such as at the sun. About disposal/transfer (DCRDVD810) Even if you need an NTSC system-... images of data occurs on -screen displays in Germany, and Sony Corporation, and produces superior images. About language setting The on the internal memory (DCRDVD810) or a ...
Operating Guide
Page 8
...are based on the media used. The number value indicates the amount of light from what you can use for a particular operation. The following marks are used in this before operating your camcorder (Continued) MTF = Modulation Transfer Function. About the marks used to ...indicate the type of media you actually see. • Discs in this manual refers to change without notice. Internal Memory Disc "Memory Stick PRO Duo" 8 Read this manual • The operations available depend on DCR-DVD810...
...are based on the media used. The number value indicates the amount of light from what you can use for a particular operation. The following marks are used in this before operating your camcorder (Continued) MTF = Modulation Transfer Function. About the marks used to ...indicate the type of media you actually see. • Discs in this manual refers to change without notice. Internal Memory Disc "Memory Stick PRO Duo" 8 Read this manual • The operations available depend on DCR-DVD810...
Operating Guide
Page 11
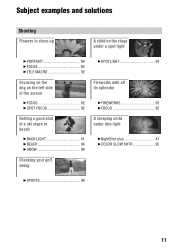
Subject examples and solutions Shooting Flowers in close-up A child on the stage under a spot light B PORTRAIT 94 B FOCUS 92 B TELE MACRO 92 Focusing on the dog on the left side of the screen B FOCUS 92 B SPOT FOCUS 92 Getting a good shot of a ski slope or beach B BACK LIGHT 41 B BEACH 94 B SNOW 94 Checking your golf swing B SPOTLIGHT 94 Fireworks with all its splendor B FIREWORKS 93 B FOCUS 92 A sleeping child under dim light B NightShot plus 41 B COLOR SLOW SHTR 95 B SPORTS 94 11
Subject examples and solutions Shooting Flowers in close-up A child on the stage under a spot light B PORTRAIT 94 B FOCUS 92 B TELE MACRO 92 Focusing on the dog on the left side of the screen B FOCUS 92 B SPOT FOCUS 92 Getting a good shot of a ski slope or beach B BACK LIGHT 41 B BEACH 94 B SNOW 94 Checking your golf swing B SPOTLIGHT 94 Fireworks with all its splendor B FIREWORKS 93 B FOCUS 92 A sleeping child under dim light B NightShot plus 41 B COLOR SLOW SHTR 95 B SPORTS 94 11
Operating Guide
Page 21
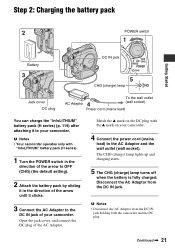
... power cord (mains lead) to the DC IN jack of the AC Adaptor. Disconnect the AC Adaptor from the DC IN jack holding both the camcorder and the DC plug. Step 2: Charging the battery pack POWER switch Getting Started Battery DC IN jack CHG (charge) lamp Jack cover DC plug AC... (H series) (p. 119) after attaching it clicks. 3 Connect the AC Adaptor to the AC Adaptor and the wall outlet (wall socket). Match the v mark on your camcorder. The CHG (charge) lamp lights up and charging starts. 5 The CHG (charge) lamp turns off when the battery is fully charged. Continued , 21
... power cord (mains lead) to the DC IN jack of the AC Adaptor. Disconnect the AC Adaptor from the DC IN jack holding both the camcorder and the DC plug. Step 2: Charging the battery pack POWER switch Getting Started Battery DC IN jack CHG (charge) lamp Jack cover DC plug AC... (H series) (p. 119) after attaching it clicks. 3 Connect the AC Adaptor to the AC Adaptor and the wall outlet (wall socket). Match the v mark on your camcorder. The CHG (charge) lamp lights up and charging starts. 5 The CHG (charge) lamp turns off when the battery is fully charged. Continued , 21

Operating Guide
Page 24
...) lamp flashes during charging, or Battery Info (p. 22) will not be correctly displayed under which you use an NP-FH70/NPFH100 battery pack (DCR-DVD710/DVD810). • We do not recommend using an NP-FH30, which only allows short recording and playback times, with any metallic objects. Step 2: ... the AC Adaptor from the wall outlet (wall socket). • When attaching an optional video light, it while connected to the DC IN jack of the AC Adaptor or battery terminal with your camcorder, even when the power cord (mains lead) is on the conditions under the following conditions: ...
...) lamp flashes during charging, or Battery Info (p. 22) will not be correctly displayed under which you use an NP-FH70/NPFH100 battery pack (DCR-DVD710/DVD810). • We do not recommend using an NP-FH30, which only allows short recording and playback times, with any metallic objects. Step 2: ... the AC Adaptor from the wall outlet (wall socket). • When attaching an optional video light, it while connected to the DC IN jack of the AC Adaptor or battery terminal with your camcorder, even when the power cord (mains lead) is on the conditions under the following conditions: ...

Operating Guide
Page 25
..., set it to 12:00 AM. Step 3: Turning the power on, and setting the date and time Set the date and time when using this camcorder for the first time. 2 Touch (HOME) t (SETTINGS) t [CLOCK/ LANG] t [CLOCK SET]. You can set the date and time, the [CLOCK SET] screen ...NEXT]. 5 Set [Y] (year) with / . 7 Set [D] (day), hour and minute in the direction of the arrow until the respective lamp lights up to OFF (CHG). Touch the button on your camcorder or change the POWER switch position. Getting Started POWER switch 1 While pressing the green button, turn the POWER switch repeatedly in...
..., set it to 12:00 AM. Step 3: Turning the power on, and setting the date and time Set the date and time when using this camcorder for the first time. 2 Touch (HOME) t (SETTINGS) t [CLOCK/ LANG] t [CLOCK SET]. You can set the date and time, the [CLOCK SET] screen ...NEXT]. 5 Set [Y] (year) with / . 7 Set [D] (day), hour and minute in the direction of the arrow until the respective lamp lights up to OFF (CHG). Touch the button on your camcorder or change the POWER switch position. Getting Started POWER switch 1 While pressing the green button, turn the POWER switch repeatedly in...

Operating Guide
Page 27
... information is displayed or hidden (display y no display) each time you open the LCD panel 90 degrees to the camcorder, then rotate it until disappears. Fastening the grip belt Adjust and fasten the grip belt as illustrated, and hold DISP... for a few seconds until the image becomes clear. 27 Viewfinder lens adjustment lever Move it 180 degrees to your camcorder properly. Getting Started to avoid wearing down the battery, or when the image seen on the LCD screen is convenient... will not be affected by touching (HOME) t (SETTINGS) t [SOUND/DISP SET] t [VF B.LIGHT] (p. 86).
... information is displayed or hidden (display y no display) each time you open the LCD panel 90 degrees to the camcorder, then rotate it until disappears. Fastening the grip belt Adjust and fasten the grip belt as illustrated, and hold DISP... for a few seconds until the image becomes clear. 27 Viewfinder lens adjustment lever Move it 180 degrees to your camcorder properly. Getting Started to avoid wearing down the battery, or when the image seen on the LCD screen is convenient... will not be affected by touching (HOME) t (SETTINGS) t [SOUND/DISP SET] t [VF B.LIGHT] (p. 86).

Operating Guide
Page 32
... a new Image Database File.] screen appears on while pressing the green button. If the POWER switch is necessary only when you can use with your camcorder. z Tips • If you record only still images on the "Memory Stick PRO Duo," operations after step 3 are unnecessary. 1 Open the LCD panel. 2 Insert the... movie recording, slide the POWER switch repeatedly until it on the screen when you select [MEMORY STICK] in the right direction until the (Movie) lamp lights up. Access lamp Face the b mark towards the LCD screen. 4 Touch [YES]. 32
... a new Image Database File.] screen appears on while pressing the green button. If the POWER switch is necessary only when you can use with your camcorder. z Tips • If you record only still images on the "Memory Stick PRO Duo," operations after step 3 are unnecessary. 1 Open the LCD panel. 2 Insert the... movie recording, slide the POWER switch repeatedly until it on the screen when you select [MEMORY STICK] in the right direction until the (Movie) lamp lights up. Access lamp Face the b mark towards the LCD screen. 4 Touch [YES]. 32
Operating Guide
Page 33
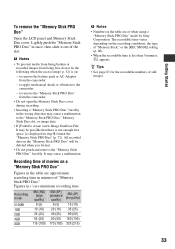
Lightly push the "Memory Stick PRO Duo" in step 4, format the "Memory Stick PRO Duo"...Memory Stick Duo slot, or image data. • If [Failed to remove the "Memory Stick PRO Duo" from the camcorder • Do not open the Memory Stick Duo cover during recording. • Inserting a "Memory Stick PRO Duo" ... the recordable numbers of when using a "Memory Stick PRO Duo" made by Sony Corporation. b Notes • To prevent media from being broken or recorded images from the camcorder - to the camcorder - to create a new Image Database File. The recordable time varies depending on...
Lightly push the "Memory Stick PRO Duo" in step 4, format the "Memory Stick PRO Duo"...Memory Stick Duo slot, or image data. • If [Failed to remove the "Memory Stick PRO Duo" from the camcorder • Do not open the Memory Stick Duo cover during recording. • Inserting a "Memory Stick PRO Duo" ... the recordable numbers of when using a "Memory Stick PRO Duo" made by Sony Corporation. b Notes • To prevent media from being broken or recorded images from the camcorder - to the camcorder - to create a new Image Database File. The recordable time varies depending on...

Operating Guide
Page 34
...REC] To stop recording, press START/STOP again. * Movies are recorded on the screen. , Still Images 1 Turn the POWER switch G until the (Movie) lamp lights up. 2 Press EASY A. If the POWER switch is set to adjust the focus A (a beep sounds), then press it while pressing the green button. It also... makes the screen font size larger for easy viewing. Recording/Playback Recording and playing back with ease (Easy Handycam operation) Easy Handycam operation makes nearly all settings automatic so that you can perform recording or playing back operation without detailed settings.
...REC] To stop recording, press START/STOP again. * Movies are recorded on the screen. , Still Images 1 Turn the POWER switch G until the (Movie) lamp lights up. 2 Press EASY A. If the POWER switch is set to adjust the focus A (a beep sounds), then press it while pressing the green button. It also... makes the screen font size larger for easy viewing. Recording/Playback Recording and playing back with ease (Easy Handycam operation) Easy Handycam operation makes nearly all settings automatic so that you can perform recording or playing back operation without detailed settings.

Operating Guide
Page 39
...[MOVIE] or [PHOTO]. • You can create still images from recorded movies (p. 53). Recording/Playback Movies 1 Turn the POWER switch A until the (Still) lamp lights up. 2 Press PHOTO F lightly to adjust the focus A (a beep sounds), then press it fully B (a shutter click sounds). [STBY] t [REC] To stop recording, press START/STOP again. ...still images. • appears when [ INDEX SET] is set to or . Continued , 39 Still Images 1 Turn the POWER switch A until the (Movie) lamp lights up. 2 Press START/STOP B (or C). b Notes • You cannot record still images on a disc.
...[MOVIE] or [PHOTO]. • You can create still images from recorded movies (p. 53). Recording/Playback Movies 1 Turn the POWER switch A until the (Still) lamp lights up. 2 Press PHOTO F lightly to adjust the focus A (a beep sounds), then press it fully B (a shutter click sounds). [STBY] t [REC] To stop recording, press START/STOP again. ...still images. • appears when [ INDEX SET] is set to or . Continued , 39 Still Images 1 Turn the POWER switch A until the (Movie) lamp lights up. 2 Press START/STOP B (or C). b Notes • You cannot record still images on a disc.
Operating Guide
Page 41
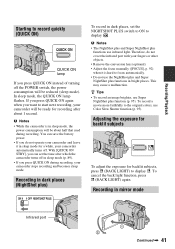
... to focus automatically. • Do not use infrared light. b Notes • The NightShot plus and Super NightShot plus ) To record in dark places, set the time after about half that used during recording, your camcorder automatically turns off the POWER switch, the power consumption will... in sleep mode for a while, your camcorder stops recording and becomes sleep mode. This may cause a malfunction. z Tips • To record an image brighter, use Color Slow Shutter function (p. 95). To cancel the back light function, press . (BACK LIGHT) again. If you press QUICK ON again...
... to focus automatically. • Do not use infrared light. b Notes • The NightShot plus and Super NightShot plus ) To record in dark places, set the time after about half that used during recording, your camcorder automatically turns off the POWER switch, the power consumption will... in sleep mode for a while, your camcorder stops recording and becomes sleep mode. This may cause a malfunction. z Tips • To record an image brighter, use Color Slow Shutter function (p. 95). To cancel the back light function, press . (BACK LIGHT) again. If you press QUICK ON again...
Operating Guide
Page 77
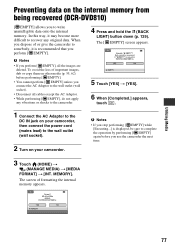
...are deleted. The screen of important images, dub or copy them on other media (p. 55, 62) before you to the camcorder. 4 Press and hold the . (BACK LIGHT) button down (p. 129). To avoid the loss of formatting the internal memory appears. Utilizing Media 77 MEMORY]. The [ ...Turn on the internal memory from being recovered (DCR-DVD810) [ EMPTY] allows you use the camcorder the next time. 3 Touch (HOME) t (MANAGE MEDIA) t [MEDIA FORMAT] t [INT. Preventing data on your camcorder. b Notes • If you dispose of or give the camcorder to somebody, it may become more difficult ...
...are deleted. The screen of important images, dub or copy them on other media (p. 55, 62) before you to the camcorder. 4 Press and hold the . (BACK LIGHT) button down (p. 129). To avoid the loss of formatting the internal memory appears. Utilizing Media 77 MEMORY]. The [ ...Turn on the internal memory from being recovered (DCR-DVD810) [ EMPTY] allows you use the camcorder the next time. 3 Touch (HOME) t (MANAGE MEDIA) t [MEDIA FORMAT] t [INT. Preventing data on your camcorder. b Notes • If you dispose of or give the camcorder to somebody, it may become more difficult ...
Operating Guide
Page 79
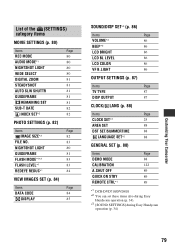
... 81 REMAINING SET 81 SUB-T DATE 82 INDEX SET*2 82 PHOTO SETTINGS (p. 82) Items Page IMAGE SIZE*2 82 FILE NO. 83 NIGHTSHOT LIGHT 80 GUIDEFRAME 81 FLASH MODE*1*2 83 FLASH LEVEL*1 83 REDEYE REDUC*1 84 VIEW IMAGES SET (p. 84) Items Page DATA CODE 84 DISPLAY 85... 88 GENERAL SET (p. 88) Items Page DEMO MODE 88 CALIBRATION 122 A.SHUT OFF 89 QUICK ON STBY 89 REMOTE CTRL*1 89 *1 DCR-DVD710/DVD810 *2 You can set these items also during Easy Handycam operation (p. 34). *3 [SOUND SETTINGS] during Easy Handycam operation (p. 34) Customizing Your Camcorder 79
... 81 REMAINING SET 81 SUB-T DATE 82 INDEX SET*2 82 PHOTO SETTINGS (p. 82) Items Page IMAGE SIZE*2 82 FILE NO. 83 NIGHTSHOT LIGHT 80 GUIDEFRAME 81 FLASH MODE*1*2 83 FLASH LEVEL*1 83 REDEYE REDUC*1 84 VIEW IMAGES SET (p. 84) Items Page DATA CODE 84 DISPLAY 85... 88 GENERAL SET (p. 88) Items Page DEMO MODE 88 CALIBRATION 122 A.SHUT OFF 89 QUICK ON STBY 89 REMOTE CTRL*1 89 *1 DCR-DVD710/DVD810 *2 You can set these items also during Easy Handycam operation (p. 34). *3 [SOUND SETTINGS] during Easy Handycam operation (p. 34) Customizing Your Camcorder 79
Operating Guide
Page 80
... emits infrared light (invisible). Refer also to set the recording mode separately for playback (p. 48). 80 WIDE SELECT When recording images, you play back the movie. How to the instruction manuals supplied with B. AUDIO MODE (DCRDVD710/DVD810) You can select a recording mode ... • Remove the conversion lens (optional). • The maximum shooting distance using either the NightShot plus (p. 41) or the [S. NIGHTSHOT LIGHT When using [NIGHTSHOT LIGHT] is [ON]. The default setting is about 3 m (10 feet). b Notes • Set [TV TYPE] correctly according to record ...
... emits infrared light (invisible). Refer also to set the recording mode separately for playback (p. 48). 80 WIDE SELECT When recording images, you play back the movie. How to the instruction manuals supplied with B. AUDIO MODE (DCRDVD710/DVD810) You can select a recording mode ... • Remove the conversion lens (optional). • The maximum shooting distance using either the NightShot plus (p. 41) or the [S. NIGHTSHOT LIGHT When using [NIGHTSHOT LIGHT] is [ON]. The default setting is about 3 m (10 feet). b Notes • Set [TV TYPE] correctly according to record ...
Operating Guide
Page 83
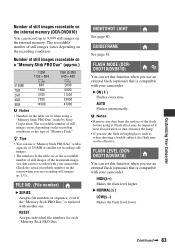
...flash in sequence, even if the "Memory Stick PRO Duo" is replaced with your camcorder. NIGHTSHOT LIGHT See page 80. Flash effect may not be impaired if heat discoloration or dust obscures...NORMAL( ) LOW( ) Makes the flash level lower. Customizing Your Camcorder Number of still images recordable on the internal memory (DCR-DVD810) You can record up to 9,999 still images on the recording ... PRO Duo" made by Sony Corporation. Continued , 83 GUIDEFRAME See page 81. B ON ( ) Flashes every time. FLASH LEVEL (DCRDVD710/DVD810) You can be recorded with your camcorder. FILE NO. (File number...
...flash in sequence, even if the "Memory Stick PRO Duo" is replaced with your camcorder. NIGHTSHOT LIGHT See page 80. Flash effect may not be impaired if heat discoloration or dust obscures...NORMAL( ) LOW( ) Makes the flash level lower. Customizing Your Camcorder Number of still images recordable on the internal memory (DCR-DVD810) You can record up to 9,999 still images on the recording ... PRO Duo" made by Sony Corporation. Continued , 83 GUIDEFRAME See page 81. B ON ( ) Flashes every time. FLASH LEVEL (DCRDVD710/DVD810) You can be recorded with your camcorder. FILE NO. (File number...
Operating Guide
Page 86
...8226; When you select [BRIGHT], battery life is not on the screen, touch / to the camcorder body, the setting becomes [NORMAL] automatically. b Notes • When you connect your camcorder to outside and close the LCD panel to change the page. Low intensity High intensity z Tips &#... item is slightly reduced during recording. • If you start/stop recording, or operate the touch panel. B NORMAL Standard brightness. VF B.LIGHT (Viewfinder backlight) You can adjust the brightness of the viewfinder. LCD COLOR You can adjust the brightness of the LCD screen with 2 Touch ...
...8226; When you select [BRIGHT], battery life is not on the screen, touch / to the camcorder body, the setting becomes [NORMAL] automatically. b Notes • When you connect your camcorder to outside and close the LCD panel to change the page. Low intensity High intensity z Tips &#... item is slightly reduced during recording. • If you start/stop recording, or operate the touch panel. B NORMAL Standard brightness. VF B.LIGHT (Viewfinder backlight) You can adjust the brightness of the viewfinder. LCD COLOR You can adjust the brightness of the LCD screen with 2 Touch ...
Operating Guide
Page 94
... a soft background. Indoors - When the white balance is adjusted automatically. This setting also prevents your camcorder from appearing excessively white when subjects are lit by strong light. SNOW** ( ) Select this to record distant subjects clearly. Under daylight fluorescent lamps INDOOR (n) The...set not to focus on nearby subjects. PORTRAIT ( ) Select this to prevent people's faces from focusing on distant subjects. ** Your camcorder is adjusted to be appropriate for the following recording conditions: - WHITE BAL. (White balance) You can adjust the color balance to the...
... a soft background. Indoors - When the white balance is adjusted automatically. This setting also prevents your camcorder from appearing excessively white when subjects are lit by strong light. SNOW** ( ) Select this to record distant subjects clearly. Under daylight fluorescent lamps INDOOR (n) The...set not to focus on nearby subjects. PORTRAIT ( ) Select this to prevent people's faces from focusing on distant subjects. ** Your camcorder is adjusted to be appropriate for the following recording conditions: - WHITE BAL. (White balance) You can adjust the color balance to the...
Operating Guide
Page 101
...Handycam operation/Remote Commander The power does not turn on and off your camcorder to be ready to OFF (CHG) for a few seconds for a while in a cool place. NIGHTSHOT PLS], - [BLT-IN ZOOM MIC] - [MICREF LEVEL] Continued , 101 Troubleshooting DUBBING button (DCR-DVD810...) (p. 55) The (OPTION) button is turned on . • It takes a few seconds) (p. 26) - . (BACK LIGHT) button (p. 41) - The menu settings have been changed automatically. • Most menu items automatically return to their default settings during Easy Handycam operation (p. 34...
...Handycam operation/Remote Commander The power does not turn on and off your camcorder to be ready to OFF (CHG) for a few seconds for a while in a cool place. NIGHTSHOT PLS], - [BLT-IN ZOOM MIC] - [MICREF LEVEL] Continued , 101 Troubleshooting DUBBING button (DCR-DVD810...) (p. 55) The (OPTION) button is turned on . • It takes a few seconds) (p. 26) - . (BACK LIGHT) button (p. 41) - The menu settings have been changed automatically. • Most menu items automatically return to their default settings during Easy Handycam operation (p. 34...


