
User Manual
Page 7
...Preparing for recording 25 Step 5: Inserting a disc or a "Memory Stick Duo 26 Recording/Playback Recording and playing back with ease (Easy Handycam 29 Recording 32 Zooming 34 Recording sound with your camcorder 10 Choosing a disc 12 Using your camcorder What you can do with more presence... (5.1ch surround recording) (DCRDVD109E/DVD306E/DVD308E/ DVD708E 34 Recording in dark places (NightShot plus 35 Adjusting the exposure for backlit subjects 35 Recording in mirror mode 35 Selecting the aspect...
...Preparing for recording 25 Step 5: Inserting a disc or a "Memory Stick Duo 26 Recording/Playback Recording and playing back with ease (Easy Handycam 29 Recording 32 Zooming 34 Recording sound with your camcorder 10 Choosing a disc 12 Using your camcorder What you can do with more presence... (5.1ch surround recording) (DCRDVD109E/DVD306E/DVD308E/ DVD708E 34 Recording in dark places (NightShot plus 35 Adjusting the exposure for backlit subjects 35 Recording in mirror mode 35 Selecting the aspect...

User Manual
Page 16
... 56 FORMAT* 57 FORMAT* 58 UNFINALIZE 58 DISC INFO 55 (SETTINGS) category To customize your camcorder (p. 60). * You can also set these items during Easy Handycam operation (p. 29). " HOME" and " OPTION" - the starting point for operations with your camcorder (HELP) Displays a description of the item (p. 17) Category B Categories and items of...
... 56 FORMAT* 57 FORMAT* 58 UNFINALIZE 58 DISC INFO 55 (SETTINGS) category To customize your camcorder (p. 60). * You can also set these items during Easy Handycam operation (p. 29). " HOME" and " OPTION" - the starting point for operations with your camcorder (HELP) Displays a description of the item (p. 17) Category B Categories and items of...

User Manual
Page 19
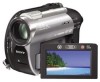
The number in the parentheses indicates the number of that you have the following items supplied with your camcorder. AC Adaptor (1) (p. 20) Rechargeable battery pack NP-FH40 (1) (p. 20) Mains lead (1) (p. 20) CD-ROM "Handycam Application Software" (1) (p. 78) Operating Guide (This manual) (1) A/V connecting cable (1) (p. 40, 52) USB cable (1) (p. 53) Wireless Remote Commander (DCRDVD306E/DVD308E/DVD708E) (1) (p. 113) A button-type lithium battery is already installed. 19 Getting Started Getting Started Step 1: Checking supplied items Make sure that item supplied.
The number in the parentheses indicates the number of that you have the following items supplied with your camcorder. AC Adaptor (1) (p. 20) Rechargeable battery pack NP-FH40 (1) (p. 20) Mains lead (1) (p. 20) CD-ROM "Handycam Application Software" (1) (p. 78) Operating Guide (This manual) (1) A/V connecting cable (1) (p. 40, 52) USB cable (1) (p. 53) Wireless Remote Commander (DCRDVD306E/DVD308E/DVD708E) (1) (p. 113) A button-type lithium battery is already installed. 19 Getting Started Getting Started Step 1: Checking supplied items Make sure that item supplied.

User Manual
Page 27
... not start recording on the disc. When the formatting is completed, you close the disc cover. • If you use a DVD-RW while the Easy Handycam operation (p. 29) is fixed to use only a "Memory Stick Duo" marked with fingerprints, etc. Move the belt to the bottom of the camcorder, then open...
... not start recording on the disc. When the formatting is completed, you close the disc cover. • If you use a DVD-RW while the Easy Handycam operation (p. 29) is fixed to use only a "Memory Stick Duo" marked with fingerprints, etc. Move the belt to the bottom of the camcorder, then open...

User Manual
Page 29
...adjust the focus. appears on the LCD screen. 3 Press PHOTO E to OFF (CHG), turn it while pressing the green button. * DCR-DVD106E/DVD108E/DVD109E/DVD608E ** DCR-DVD306E/DVD308E/DVD708E R Movies 1 Turn the POWER switch A until the (Still) lamp turns on the "Memory Stick Duo." Open the lens cover (p. 25...to record the still image. * Movies are recorded in the [SP] recording mode. ** Still images are recorded with ease (Easy Handycam) Easy Handycam operation makes nearly all settings automatic so that you can perform recording or playing back operation without detailed settings.
...adjust the focus. appears on the LCD screen. 3 Press PHOTO E to OFF (CHG), turn it while pressing the green button. * DCR-DVD106E/DVD108E/DVD109E/DVD608E ** DCR-DVD306E/DVD308E/DVD708E R Movies 1 Turn the POWER switch A until the (Still) lamp turns on the "Memory Stick Duo." Open the lens cover (p. 25...to record the still image. * Movies are recorded in the [SP] recording mode. ** Still images are recorded with ease (Easy Handycam) Easy Handycam operation makes nearly all settings automatic so that you can perform recording or playing back operation without detailed settings.

User Manual
Page 30
... INDEX screen.) Returns to the recording screen Previous 6 images Next 6 images Returns to the recording screen Displays the movies Disc type Appears with ease (Easy Handycam) (Continued) Viewing recorded movies/still images 1 Turn the POWER switch A to turn on each of the scene/ previous scene Stop (go to the VISUAL INDEX...
... INDEX screen.) Returns to the recording screen Previous 6 images Next 6 images Returns to the recording screen Displays the movies Disc type Appears with ease (Easy Handycam) (Continued) Viewing recorded movies/still images 1 Turn the POWER switch A to turn on each of the scene/ previous scene Stop (go to the VISUAL INDEX...

User Manual
Page 31
...+R DL, you cannot reuse the disc or record additional movies onto the disc once you need to "finalize" the disc. disappears Menu settings during Easy Handycam operation Press (HOME) H(or I) to [DATE/TIME] (p. 65). For details on a DVD device or a computer, you finalize the disc even if the...you want to add effects to images or change settings. Still images: Touch , then touch the still image you want to view. To cancel Easy Handycam operation Press EASY B again. To view movies on a disc on other devices (Finalize) To view movies stored on a disc on finalize operation, see...
...+R DL, you cannot reuse the disc or record additional movies onto the disc once you need to "finalize" the disc. disappears Menu settings during Easy Handycam operation Press (HOME) H(or I) to [DATE/TIME] (p. 65). For details on a DVD device or a computer, you finalize the disc even if the...you want to add effects to images or change settings. Still images: Touch , then touch the still image you want to view. To cancel Easy Handycam operation Press EASY B again. To view movies on a disc on other devices (Finalize) To view movies stored on a disc on finalize operation, see...

User Manual
Page 43
... disc after adding a recording (p.44) Playback on other DVD device Finalize Only in a DVD device after finalizing the disc during Easy Handycam operation. Continued , 43 To do so, cancel Easy Handycam operation (p. 31). When the DVD menu has been created, a confirmation screen prompts you to add a recording. To play back a disc in...
... disc after adding a recording (p.44) Playback on other DVD device Finalize Only in a DVD device after finalizing the disc during Easy Handycam operation. Continued , 43 To do so, cancel Easy Handycam operation (p. 31). When the DVD menu has been created, a confirmation screen prompts you to add a recording. To play back a disc in...

User Manual
Page 45
b Notes • The DVD menu style is fixed to [STYLE1] during the Easy Handycam operation. 45 Select [NO MENU] if you do not create a DVD menu. 3 Touch . Recording/Playback To select a DVD menu style DVD +RW 1 In step 4, touch (OPTION) t [DVD MENU]. 2 Select the desired style from 4 types of pattern with [T]/[t].
b Notes • The DVD menu style is fixed to [STYLE1] during the Easy Handycam operation. 45 Select [NO MENU] if you do not create a DVD menu. 3 Touch . Recording/Playback To select a DVD menu style DVD +RW 1 In step 4, touch (OPTION) t [DVD MENU]. 2 Select the desired style from 4 types of pattern with [T]/[t].

User Manual
Page 46
... You can print still images on a disc or a "Memory Stick Duo" using your camcorder. PRINT You can create and edit a Playlist (p. 49). Cancel the Easy Handycam operation first. Deleting images You can delete the images recorded on a connected PictBridge printer (p. 53). Insert a recorded disc or "Memory Stick Duo" into your camcorder...
... You can print still images on a disc or a "Memory Stick Duo" using your camcorder. PRINT You can create and edit a Playlist (p. 49). Cancel the Easy Handycam operation first. Deleting images You can delete the images recorded on a connected PictBridge printer (p. 53). Insert a recorded disc or "Memory Stick Duo" into your camcorder...

User Manual
Page 48
Cancel the Easy Handycam operation first. 1 Touch (OTHERS) of the selected movie. Play and pause toggles as you want to divide. Adjusts the dividing point more precisely after the ... the movie that you press . 5 Touch t [YES] t . 48 Returns to the still images by the other device. b Notes • You cannot divide movies during Easy Handycam operation. Deleting images (Continued) Dividing the image - The selected movie starts playing. 4 Touch at the point where you want to divide the movie into the...
Cancel the Easy Handycam operation first. 1 Touch (OTHERS) of the selected movie. Play and pause toggles as you want to divide. Adjusts the dividing point more precisely after the ... the movie that you press . 5 Touch t [YES] t . 48 Returns to the still images by the other device. b Notes • You cannot divide movies during Easy Handycam operation. Deleting images (Continued) Dividing the image - The selected movie starts playing. 4 Touch at the point where you want to divide the movie into the...

User Manual
Page 49
...]. 3 Touch the scene that you touch and the actual dividing point, as your camcorder. b Notes • You cannot add or edit movies during Easy Handycam operation. The selected scene is not divided in the Playlist. • A slight difference may damage the disc. • Even if the divided movie is ...divided. • Do not remove the battery pack or the AC Adaptor from the point where you have selected. Continued , 49 Cancel the Easy Handycam operation first. 1 Touch (OTHERS) of the movies that you want to add to confirm the image. Press and hold the image on about half...
...]. 3 Touch the scene that you touch and the actual dividing point, as your camcorder. b Notes • You cannot add or edit movies during Easy Handycam operation. The selected scene is not divided in the Playlist. • A slight difference may damage the disc. • Even if the divided movie is ...divided. • Do not remove the battery pack or the AC Adaptor from the point where you have selected. Continued , 49 Cancel the Easy Handycam operation first. 1 Touch (OTHERS) of the movies that you want to add to confirm the image. Press and hold the image on about half...

User Manual
Page 57
...; Do not apply shock or vibration to the wall socket. 2 Turn on your camcorder. 3 Insert the disc that you use a DVD-RW while the Easy Handycam operation (p. 29) is set, the recording format is displayed. x DVD-RW Select [VIDEO] or [VR] for the recording format (p. 12), then touch . b Notes • Use...
...; Do not apply shock or vibration to the wall socket. 2 Turn on your camcorder. 3 Insert the disc that you use a DVD-RW while the Easy Handycam operation (p. 29) is set, the recording format is displayed. x DVD-RW Select [VIDEO] or [VR] for the recording format (p. 12), then touch . b Notes • Use...

User Manual
Page 59
... each side of the disc. • You cannot record additional scenes on the (Movie) lamp. 3 Insert the finalized disc into your camcorder. Cancel the Easy Handycam operation. Utilizing recording media 4 Touch [YES] t [YES]. 5 When [Completed.] appears, touch . A confirmation screen appears to prompt you to confirm that you... wish to your camcorder, and do not disconnect the AC Adaptor during the operation. • A DVD menu created during the Easy Handycam operation. 1 Connect the AC Adaptor to the DC IN jack on your camcorder, then connect the mains lead to the wall socket. 2 Turn...
... each side of the disc. • You cannot record additional scenes on the (Movie) lamp. 3 Insert the finalized disc into your camcorder. Cancel the Easy Handycam operation. Utilizing recording media 4 Touch [YES] t [YES]. 5 When [Completed.] appears, touch . A confirmation screen appears to prompt you to confirm that you... wish to your camcorder, and do not disconnect the AC Adaptor during the operation. • A DVD menu created during the Easy Handycam operation. 1 Connect the AC Adaptor to the DC IN jack on your camcorder, then connect the mains lead to the wall socket. 2 Turn...

User Manual
Page 61
...*3 23 AREA SET 69 SUMMERTIME 69 LANGUAGE SET*3 69 GENERAL SET (p. 70) Items Page DEMO MODE 70 CALIBRATION 103 A.SHUT OFF 70 REMOTE CTRL*2 70 *1 DCR-DVD106E/DVD108E/DVD109E/ DVD608E *2 DCR-DVD306E/DVD308E/DVD708E *3 Also available during Easy Handycam operation. *4 Only [SOUND SETTINGS] is available during Easy...
...*3 23 AREA SET 69 SUMMERTIME 69 LANGUAGE SET*3 69 GENERAL SET (p. 70) Items Page DEMO MODE 70 CALIBRATION 103 A.SHUT OFF 70 REMOTE CTRL*2 70 *1 DCR-DVD106E/DVD108E/DVD109E/ DVD608E *2 DCR-DVD306E/DVD308E/DVD708E *3 Also available during Easy Handycam operation. *4 Only [SOUND SETTINGS] is available during Easy...

User Manual
Page 71
... displayed in the context of your camcorder at the time. • Some items appear without a tab. • The OPTION MENU cannot be used during Easy Handycam operation. (OPTION) 1 3 1 Tab 2 Touch the desired item. b Notes • The tabs and items that appears when you want is not on the screen Touch another...
... displayed in the context of your camcorder at the time. • Some items appear without a tab. • The OPTION MENU cannot be used during Easy Handycam operation. (OPTION) 1 3 1 Tab 2 Touch the desired item. b Notes • The tabs and items that appears when you want is not on the screen Touch another...

User Manual
Page 83
...[SPOT METER] - [SCENE SELECTION] - [WHITE BAL. ] - [MICREF LEVEL] Troubleshooting Continued , 83 Buttons do not work . • During Easy Handycam operation, the following menu items are reset.) • The temperature of the AC Adaptor to other devices ...........89 • Editing movies on . If the problem... persists, disconnect the power source and contact your Sony dealer. • Overall operations/Easy Handycam operation/ Remote Commander 83 • Batteries/Power sources 84 • LCD screen/viewfinder 85 • Discs...
...[SPOT METER] - [SCENE SELECTION] - [WHITE BAL. ] - [MICREF LEVEL] Troubleshooting Continued , 83 Buttons do not work . • During Easy Handycam operation, the following menu items are reset.) • The temperature of the AC Adaptor to other devices ...........89 • Editing movies on . If the problem... persists, disconnect the power source and contact your Sony dealer. • Overall operations/Easy Handycam operation/ Remote Commander 83 • Batteries/Power sources 84 • LCD screen/viewfinder 85 • Discs...
User Manual
Page 84
...as they were set even during operation. • This is not a malfunction. The supplied Remote Commander does not function (DCR-DVD306E/ DVD308E/DVD708E). • Set [REMOTE CTRL] to [ON] (p. 70). • Insert a battery into the battery holder with ...motor sound is heard during Easy Handycam operation. - [FILE NO. ] - [VOLUME] - [TV TYPE] - [ DISPLAY] - [BEEP] - [SUB-T DATE] - [CLOCK SET] - [AREA SET] - [SUMMERTIME] - [WIDE SELECT]* - [DEMO MODE] - [FLASH MODE]** - [ LANGUAGE SET] * DCR-DVD106E/DVD108E/DVD109E/ DVD608E ** DCR-DVD306E/DVD308E/DVD708E Your camcorder vibrates. •...
...as they were set even during operation. • This is not a malfunction. The supplied Remote Commander does not function (DCR-DVD306E/ DVD308E/DVD708E). • Set [REMOTE CTRL] to [ON] (p. 70). • Insert a battery into the battery holder with ...motor sound is heard during Easy Handycam operation. - [FILE NO. ] - [VOLUME] - [TV TYPE] - [ DISPLAY] - [BEEP] - [SUB-T DATE] - [CLOCK SET] - [AREA SET] - [SUMMERTIME] - [WIDE SELECT]* - [DEMO MODE] - [FLASH MODE]** - [ LANGUAGE SET] * DCR-DVD106E/DVD108E/DVD109E/ DVD608E ** DCR-DVD306E/DVD308E/DVD708E Your camcorder vibrates. •...

User Manual
Page 87
... a slight time difference between the point where you press START/ STOP and the point that recording movie starts/stops. The recording angle looks different (DCR-DVD306E/DVD308E/DVD708E). • The recording angle may look different depending on the mode of a disc. • Depending on the screen. • The spots appear when you... excessive vibrations. Adjust the focus manually (p. 73). [STEADYSHOT] does not function. • Set [STEADYSHOT] to [ON] (p. 63). • [STEADYSHOT] may not be used during Easy Handycam operation. NIGHTSHOT PLS] or [COLOR SLOW SHTR].
... a slight time difference between the point where you press START/ STOP and the point that recording movie starts/stops. The recording angle looks different (DCR-DVD306E/DVD308E/DVD708E). • The recording angle may look different depending on the mode of a disc. • Depending on the screen. • The spots appear when you... excessive vibrations. Adjust the focus manually (p. 73). [STEADYSHOT] does not function. • Set [STEADYSHOT] to [ON] (p. 63). • [STEADYSHOT] may not be used during Easy Handycam operation. NIGHTSHOT PLS] or [COLOR SLOW SHTR].

User Manual
Page 89
... disc was finalized. is not a malfunction. • In case of the playback device for deleting data (p. 13). • You cannot delete movie during the Easy Handycam operation. • A scene protected on an image in the instruction manual of additional recording (p. 58), then remake the DVD menu by your camcorder when . DVD...
... disc was finalized. is not a malfunction. • In case of the playback device for deleting data (p. 13). • You cannot delete movie during the Easy Handycam operation. • A scene protected on an image in the instruction manual of additional recording (p. 58), then remake the DVD menu by your camcorder when . DVD...


