User Manual
Page 4
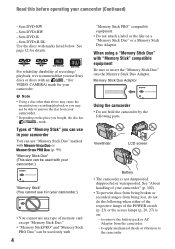
... durability of recording / playback, we recommend that you can be used with your camcorder.) "Memory Stick" (You cannot use any type of the POWER switch (p. 23) or the access lamps (p. 26, 27) is not dustproofed, dripproofed or waterproofed. Memory Stick Duo Adaptor Using the camcorder •... Stick" you use "Memory Stick Duo" marked with an *(for VIDEO CAMERA) mark for details. "Memory Stick Duo" (This size can use Sony discs or discs with or (p. 99). to the camcorder. Read this before operating your camcorder. See page 12 for your camcorder (Continued) - 8cm...
... durability of recording / playback, we recommend that you can be used with your camcorder.) "Memory Stick" (You cannot use any type of the POWER switch (p. 23) or the access lamps (p. 26, 27) is not dustproofed, dripproofed or waterproofed. Memory Stick Duo Adaptor Using the camcorder •... Stick" you use "Memory Stick Duo" marked with an *(for VIDEO CAMERA) mark for details. "Memory Stick Duo" (This size can use Sony discs or discs with or (p. 99). to the camcorder. Read this before operating your camcorder. See page 12 for your camcorder (Continued) - 8cm...

User Manual
Page 7
...Taking advantage of two types of menus 16 Getting Started Step 1: Checking supplied items 19 Step 2: Charging the battery pack 20 Step 3: Turning the power on, and setting the date and time 23 Changing the language setting 24 Step 4: Preparing for recording 25 Step 5: Inserting a disc or a... with ease (Easy Handycam 29 Recording 32 Zooming 34 Recording sound with more presence (5.1ch surround recording) (DCRDVD109E/DVD306E/DVD308E/ DVD708E 34 Recording in dark places (NightShot plus 35 Adjusting the exposure for backlit subjects 35 Recording in mirror mode 35 Selecting the aspect...
...Taking advantage of two types of menus 16 Getting Started Step 1: Checking supplied items 19 Step 2: Charging the battery pack 20 Step 3: Turning the power on, and setting the date and time 23 Changing the language setting 24 Step 4: Preparing for recording 25 Step 5: Inserting a disc or a... with ease (Easy Handycam 29 Recording 32 Zooming 34 Recording sound with more presence (5.1ch surround recording) (DCRDVD109E/DVD306E/DVD308E/ DVD708E 34 Recording in dark places (NightShot plus 35 Adjusting the exposure for backlit subjects 35 Recording in mirror mode 35 Selecting the aspect...

User Manual
Page 17
HELP 1 Press (HOME). Example: (OTHERS) category 2 Touch (HELP). Example: [EDIT] 2 Press (HOME) A (or B). (HOME) B 5 Continue operation by following the guidance on your camcorder Using the HOME MENU 1 Turn the POWER switch to use . The HOME MENU appears. (HOME) A 3 Touch the category you want to turn on the screen. The bottom of the turns orange. (HELP) button 4 Touch the item you want to use . To hide the HOME MENU screen Touch . Enjoying with your camcorder. Continued , 17 When you want to know something about the function of each item on the HOME MENU -
HELP 1 Press (HOME). Example: (OTHERS) category 2 Touch (HELP). Example: [EDIT] 2 Press (HOME) A (or B). (HOME) B 5 Continue operation by following the guidance on your camcorder Using the HOME MENU 1 Turn the POWER switch to use . The HOME MENU appears. (HOME) A 3 Touch the category you want to turn on the screen. The bottom of the turns orange. (HELP) button 4 Touch the item you want to use . To hide the HOME MENU screen Touch . Enjoying with your camcorder. Continued , 17 When you want to know something about the function of each item on the HOME MENU -

User Manual
Page 20
... remove the battery pack. 20 Match the v mark on the DC plug with the v mark on your camcorder. To remove the battery pack Turn the POWER switch to the DC IN jack of the AC Adaptor. b Notes • You can charge the "InfoLITHIUM" battery pack (H series) (p. 101) after attaching it ... the AC Adaptor to OFF(CHG). b Notes • Disconnect the AC Adaptor from the DC IN jack on your camcorder. Step 2: Charging the battery pack POWER switch 2 1 3 Battery AC Adaptor Jack cover DC plug DC IN jack 4 4 Mains lead To the wall socket CHG (charge) lamp You can use only "...
... remove the battery pack. 20 Match the v mark on the DC plug with the v mark on your camcorder. To remove the battery pack Turn the POWER switch to the DC IN jack of the AC Adaptor. b Notes • You can charge the "InfoLITHIUM" battery pack (H series) (p. 101) after attaching it ... the AC Adaptor to OFF(CHG). b Notes • Disconnect the AC Adaptor from the DC IN jack on your camcorder. Step 2: Charging the battery pack POWER switch 2 1 3 Battery AC Adaptor Jack cover DC plug DC IN jack 4 4 Mains lead To the wall socket CHG (charge) lamp You can use only "...

User Manual
Page 21
Recording capacity (approx.) Charging time Approximate time (min.) required when you do when charging the battery pack. DCR-DVD106E/DVD108E/DVD608E Battery pack NP-FH40 (supplied) NP-FH50 NP-FH70 NP-FH100 Continuous recording time 95 100 110 120 235 255 ...INFO again while the information is turned off. Getting Started Remaining battery (approx.) BATT (battery) release lever b Notes • When you use an outside power source Make the same connections as you fully charge a fully discharged battery pack. When storing the battery pack Fully discharge the battery before storing it...
Recording capacity (approx.) Charging time Approximate time (min.) required when you do when charging the battery pack. DCR-DVD106E/DVD108E/DVD608E Battery pack NP-FH40 (supplied) NP-FH50 NP-FH70 NP-FH100 Continuous recording time 95 100 110 120 235 255 ...INFO again while the information is turned off. Getting Started Remaining battery (approx.) BATT (battery) release lever b Notes • When you use an outside power source Make the same connections as you fully charge a fully discharged battery pack. When storing the battery pack Fully discharge the battery before storing it...

User Manual
Page 22
...pack NP-FH40 (supplied) NP-FH50 NP-FH70 NP-FH100 LCD panel opened 110 LCD panel closed 125 130 145 280 315 635 725 DCR-DVD306E/DVD308E/DVD708E Battery pack NP-FH40 (supplied) NP-FH50 NP-FH70 NP-FH100 LCD panel opened* 110 LCD panel closed . 22 Playing time Approximate ...time (min.) available when you repeat recording start/stop, turning the power on . On the battery pack • Before changing the battery pack, Turn the POWER switch...
...pack NP-FH40 (supplied) NP-FH50 NP-FH70 NP-FH100 LCD panel opened 110 LCD panel closed 125 130 145 280 315 635 725 DCR-DVD306E/DVD308E/DVD708E Battery pack NP-FH40 (supplied) NP-FH50 NP-FH70 NP-FH100 LCD panel opened* 110 LCD panel closed . 22 Playing time Approximate ...time (min.) available when you repeat recording start/stop, turning the power on . On the battery pack • Before changing the battery pack, Turn the POWER switch...

User Manual
Page 23
...with any metallic objects. On the AC Adaptor • Use the nearby wall socket when using this camcorder for the first time. Step 3: Turning the power on your camcorder. • Do not use the AC Adaptor placed in a narrow space, such as the AC Adaptor is connected to it is ...[NEXT]. On the charging/recording/playback time • Times measured when using an NP-FH30, which you use an NP-FH70/NPFH100 battery pack (DCR-DVD306E/ DVD308E/DVD708E). • We do not set the date and time, the [CLOCK SET] screen appears every time you do not recommend using the camcorder at...
...with any metallic objects. On the AC Adaptor • Use the nearby wall socket when using this camcorder for the first time. Step 3: Turning the power on your camcorder. • Do not use the AC Adaptor placed in a narrow space, such as the AC Adaptor is connected to it is ...[NEXT]. On the charging/recording/playback time • Times measured when using an NP-FH30, which you use an NP-FH70/NPFH100 battery pack (DCR-DVD306E/ DVD308E/DVD708E). • We do not set the date and time, the [CLOCK SET] screen appears every time you do not recommend using the camcorder at...

User Manual
Page 24
... and time. Changing the language setting You can be displayed during this time. • In the setting at the time of purchase, the power turns off the power Turn the POWER switch to OFF (CHG). To reset the date and time Select (HOME) t (SETTINGS) t [CLOCK/ LANG] t [CLOCK SET], and ... built-in rechargeable battery gets discharged and the date and time settings may be ready to shoot after the power is correctly set any operation attempted for approximately 5 minutes, to save battery power ([A.SHUT OFF], p. 70). You cannot operate your camcorder to be cleared from the memory. The clock ...
... and time. Changing the language setting You can be displayed during this time. • In the setting at the time of purchase, the power turns off the power Turn the POWER switch to OFF (CHG). To reset the date and time Select (HOME) t (SETTINGS) t [CLOCK/ LANG] t [CLOCK SET], and ... built-in rechargeable battery gets discharged and the date and time settings may be ready to shoot after the power is correctly set any operation attempted for approximately 5 minutes, to save battery power ([A.SHUT OFF], p. 70). You cannot operate your camcorder to be cleared from the memory. The clock ...

User Manual
Page 25
... 290 degrees camcorder (max.) BATT INFO for recording Opening the lens cover Slide the LENS COVER switch to make the battery last longer (DCR-DVD306E/DVD308E/DVD708E) Press and hold DISP/ Viewfinder lens adjustment lever Move it until the image becomes clear. Getting Started Step 4: Preparing for a few ...the HOME MENU (p. 67). 25 LCD panel Open the LCD panel 90 degrees to the camcorder (1), then rotate it 180 degrees to save battery power. This setting is displayed or hidden (display y no display) each time you want to the lens side, you open or adjust the LCD panel...
... 290 degrees camcorder (max.) BATT INFO for recording Opening the lens cover Slide the LENS COVER switch to make the battery last longer (DCR-DVD306E/DVD308E/DVD708E) Press and hold DISP/ Viewfinder lens adjustment lever Move it until the image becomes clear. Getting Started Step 4: Preparing for a few ...the HOME MENU (p. 67). 25 LCD panel Open the LCD panel 90 degrees to the camcorder (1), then rotate it 180 degrees to save battery power. This setting is displayed or hidden (display y no display) each time you want to the lens side, you open or adjust the LCD panel...
User Manual
Page 26
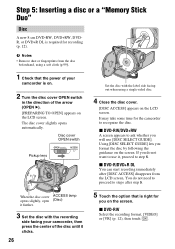
... OPEN switch in the direction of the disc until it , proceed to ask whether you will use it clicks. 26 5 Touch the option that the power of your camcorder, then press the center of the arrow (OPEN B). [PREPARING TO OPEN] appears on the screen. x DVD-RW/DVD+RW A screen appears to...
... OPEN switch in the direction of the disc until it , proceed to ask whether you will use it clicks. 26 5 Touch the option that the power of your camcorder, then press the center of the arrow (OPEN B). [PREPARING TO OPEN] appears on the screen. x DVD-RW/DVD+RW A screen appears to...

User Manual
Page 27
...operation (p. 29) is set incorrectly, it again to record new images, see page 64. z Tips • You can remove the disc when a power source is connected to your camcorder even when your camcorder to smudge the surface with your camcorder: - However, the disc recognition process (step 4) does ... disc (Formatting)" on the disc condition or recorded materials. • It may cause your camcorder to malfunction. • Do not disconnect the power sources during formatting. • Do not apply shock or vibration to open or close the disc cover with the disc set , the recording format...
...operation (p. 29) is set incorrectly, it again to record new images, see page 64. z Tips • You can remove the disc when a power source is connected to your camcorder even when your camcorder to smudge the surface with your camcorder: - However, the disc recognition process (step 4) does ... disc (Formatting)" on the disc condition or recorded materials. • It may cause your camcorder to malfunction. • Do not disconnect the power sources during formatting. • Do not apply shock or vibration to open or close the disc cover with the disc set , the recording format...

User Manual
Page 28
... Stick Duo" slot in once and then slide it clicks. Do not shake or knock your camcorder is lit or flashing, your camcorder, turn the power off, eject the "Memory Stick Duo," or remove the battery pack.
... Stick Duo" slot in once and then slide it clicks. Do not shake or knock your camcorder is lit or flashing, your camcorder, turn the power off, eject the "Memory Stick Duo," or remove the battery pack.

User Manual
Page 29
.../STOP again. Recording/Playback appears on the LCD screen. 3 Press START/STOP C or D to OFF (CHG), turn it while pressing the green button. * DCR-DVD106E/DVD108E/DVD109E/DVD608E ** DCR-DVD306E/DVD308E/DVD708E R Movies 1 Turn the POWER switch A until the (Still) lamp turns on. 2 Press EASY B. 2 Press EASY B. Open the lens cover (p. 25) If the...
.../STOP again. Recording/Playback appears on the LCD screen. 3 Press START/STOP C or D to OFF (CHG), turn it while pressing the green button. * DCR-DVD106E/DVD108E/DVD109E/DVD608E ** DCR-DVD306E/DVD308E/DVD708E R Movies 1 Turn the POWER switch A until the (Still) lamp turns on. 2 Press EASY B. 2 Press EASY B. Open the lens cover (p. 25) If the...

User Manual
Page 30
... movie you want to the recording screen Displays the movies Disc type Appears with ease (Easy Handycam) (Continued) Viewing recorded movies/still images 1 Turn the POWER switch A to the VISUAL INDEX screen) 1 1 2007 11:23:45 Toggles Play or Pause as you touch Next scene Reverse/ Forward 30 Return (to the...
... movie you want to the recording screen Displays the movies Disc type Appears with ease (Easy Handycam) (Continued) Viewing recorded movies/still images 1 Turn the POWER switch A to the VISUAL INDEX screen) 1 1 2007 11:23:45 Toggles Play or Pause as you touch Next scene Reverse/ Forward 30 Return (to the...

User Manual
Page 32
Do not apply shock or vibration to your camcorder properly. Recording DCR-DVD106E/DVD108E/ DVD109E/DVD608E (HOME) D POWER switch A (HOME) E PHOTO F Open the Lens cover (p. 25) START/STOP C DCR-DVD306E/DVD308E/ DVD708E START/STOP C (HOME) D START/STOP B Adjusting the grip belt Adjust and fasten the grip belt as illustrated, and hold your camcorder, and do not disconnect the battery or AC Adaptor. 32 b Notes • If the access lamps (page 26, 27) is on after recording is finished, it means data is still being written onto the disc or "Memory Stick Duo."
Do not apply shock or vibration to your camcorder properly. Recording DCR-DVD106E/DVD108E/ DVD109E/DVD608E (HOME) D POWER switch A (HOME) E PHOTO F Open the Lens cover (p. 25) START/STOP C DCR-DVD306E/DVD308E/ DVD708E START/STOP C (HOME) D START/STOP B Adjusting the grip belt Adjust and fasten the grip belt as illustrated, and hold your camcorder, and do not disconnect the battery or AC Adaptor. 32 b Notes • If the access lamps (page 26, 27) is on after recording is finished, it means data is still being written onto the disc or "Memory Stick Duo."

User Manual
Page 33
... using the (HOME) button D (or E) Touch (CAMERA) of recordable still images, see page 12. 1 Turn the POWER switch A until the (Still) lamp turns on the disc. For recordable time, see page 64. 1 Turn the POWER switch A until the (Movie) lamp turns on the "Memory Stick Duo." For the number of HOME MENU...
... using the (HOME) button D (or E) Touch (CAMERA) of recordable still images, see page 12. 1 Turn the POWER switch A until the (Still) lamp turns on the disc. For recordable time, see page 64. 1 Turn the POWER switch A until the (Movie) lamp turns on the "Memory Stick Duo." For the number of HOME MENU...

User Manual
Page 34
...converted to 5.1ch surround sound and recorded. Recording sound with more presence (5.1ch surround recording) (DCR-DVD109E/ DVD306E/DVD308E/DVD708E) Sound picked up to keep your finger off the power zoom lever, the operation sound of view: (Wide angle) • Be sure to the ...following table. (optical zoom) DCR-DVD106E/DVD108E/ DVD109E/DVD608E 40 × DCR-DVD306E/DVD308E/ DVD708E 25 × You can zoom in up by the built-in microphone Close view: (Telephoto) * DCR-DVD106E/DVD108E/DVD109E/ DVD608E ** DCR-DVD306E/DVD308E/DVD708E Move the power zoom lever slightly for a slower...
...converted to 5.1ch surround sound and recorded. Recording sound with more presence (5.1ch surround recording) (DCR-DVD109E/ DVD306E/DVD308E/DVD708E) Sound picked up to keep your finger off the power zoom lever, the operation sound of view: (Wide angle) • Be sure to the ...following table. (optical zoom) DCR-DVD106E/DVD108E/ DVD109E/DVD608E 40 × DCR-DVD306E/DVD308E/ DVD708E 25 × You can zoom in up by the built-in microphone Close view: (Telephoto) * DCR-DVD106E/DVD108E/DVD109E/ DVD608E ** DCR-DVD306E/DVD308E/DVD708E Move the power zoom lever slightly for a slower...

User Manual
Page 35
... side (2). z Tips • To record an image brighter, use Color Slow Shutter function (p. 76). Selecting the aspect ratio (16:9 or 4:3) (DCR-DVD306E/ DVD308E/DVD708E) POWER switch To adjust the exposure for backlit subjects Open the LCD panel 90 degrees to the camcorder (1), then rotate it is not displayed in..... To cancel the back light function, press BACK LIGHT again. Continued , 35 z Tips • A mirror-image of the movies 1 Turn the POWER switch until the (Movie) lamp turns on the LCD screen, but the image will be normal when recorded. • When recording in mirror mode, the...
... side (2). z Tips • To record an image brighter, use Color Slow Shutter function (p. 76). Selecting the aspect ratio (16:9 or 4:3) (DCR-DVD306E/ DVD308E/DVD708E) POWER switch To adjust the exposure for backlit subjects Open the LCD panel 90 degrees to the camcorder (1), then rotate it is not displayed in..... To cancel the back light function, press BACK LIGHT again. Continued , 35 z Tips • A mirror-image of the movies 1 Turn the POWER switch until the (Movie) lamp turns on the LCD screen, but the image will be normal when recorded. • When recording in mirror mode, the...

User Manual
Page 36
...WIDE SELECT repeatedly to [4:3], pictures may appear rough depending on . z Tips • See page 64 for the number of recordable still images. • With the DCR-DVD106E/DVD108E/ DVD109E/DVD608E, you view the movie on a TV, set [TV TYPE] to [16:9] or [4:3] according to your TV (16:9/4:3) (p. 40,...] set to select the desired screen aspect ratio. For details, see page 62. 36 To select the aspect ratio of the still images 1 Turn the POWER switch until the (Still) lamp turns on subjects (p. 40). Recording (Continued) z Tips • Differences in the angle of view between 16:9 (wide...
...WIDE SELECT repeatedly to [4:3], pictures may appear rough depending on . z Tips • See page 64 for the number of recordable still images. • With the DCR-DVD106E/DVD108E/ DVD109E/DVD608E, you view the movie on a TV, set [TV TYPE] to [16:9] or [4:3] according to your TV (16:9/4:3) (p. 40,...] set to select the desired screen aspect ratio. For details, see page 62. 36 To select the aspect ratio of the still images 1 Turn the POWER switch until the (Still) lamp turns on subjects (p. 40). Recording (Continued) z Tips • Differences in the angle of view between 16:9 (wide...

User Manual
Page 37
... the zoom lever F let you select whether to turn on the VISUAL INDEX screen. Playback DCR-DVD106E/DVD108E/ DVD109E/DVD608E (HOME) D (HOME) E Zoom lever F POWER switch A Recording/Playback (VIEW IMAGES) C DCR-DVD306E/ DVD308E/ DVD708E (VIEW IMAGES) B (HOME) D Turn the POWER switch A to display 6 or 12 images on your camcorder. Press (VIEW IMAGES) B (or C). Continued , 37...
... the zoom lever F let you select whether to turn on the VISUAL INDEX screen. Playback DCR-DVD106E/DVD108E/ DVD109E/DVD608E (HOME) D (HOME) E Zoom lever F POWER switch A Recording/Playback (VIEW IMAGES) C DCR-DVD306E/ DVD308E/ DVD708E (VIEW IMAGES) B (HOME) D Turn the POWER switch A to display 6 or 12 images on your camcorder. Press (VIEW IMAGES) B (or C). Continued , 37...

