User Manual
Page 4
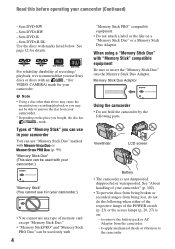
..." can use Sony discs or discs with or (p. 99). See "About handling of your camcorder" (p. 102). • To prevent discs from being broken or recorded images from your camcorder. * Depending on a "Memory Stick Duo" or a Memory Stick Duo Adaptor. Read this before operating your camcorder (Continued) - 8cm DVD-RW - 8cm DVD+RW - 8cm DVD-R - 8cm DVD+R DL Use...
..." can use Sony discs or discs with or (p. 99). See "About handling of your camcorder" (p. 102). • To prevent discs from being broken or recorded images from your camcorder. * Depending on a "Memory Stick Duo" or a Memory Stick Duo Adaptor. Read this before operating your camcorder (Continued) - 8cm DVD-RW - 8cm DVD+RW - 8cm DVD-R - 8cm DVD+R DL Use...

User Manual
Page 5
...items, LCD panel, viewfinder, and lens • A menu item that appear constantly on the model DCR-DVD308E. • Disc in this manual were taken with a digital still camera, and may cause malfunctions...8226; Exposing the LCD screen, the viewfinder, or the lens to 8cm DVD discs. Doing so might cause your camcorder to another device with a Carl Zeiss lens, which was developed jointly by...on the countries/regions. Use a DVD-RW/DVD+RW for trial recording (p. 12). • Compensation for long periods of the sun only in Germany, and Sony Corporation, and produces superior images. ...
...items, LCD panel, viewfinder, and lens • A menu item that appear constantly on the model DCR-DVD308E. • Disc in this manual were taken with a digital still camera, and may cause malfunctions...8226; Exposing the LCD screen, the viewfinder, or the lens to 8cm DVD discs. Doing so might cause your camcorder to another device with a Carl Zeiss lens, which was developed jointly by...on the countries/regions. Use a DVD-RW/DVD+RW for trial recording (p. 12). • Compensation for long periods of the sun only in Germany, and Sony Corporation, and produces superior images. ...

User Manual
Page 7
Table of Contents Read this before operating your camcorder 2 Subject examples and solutions 9 Enjoying with the (SETTINGS) category of still images (Slide show 39 Playing the picture on a TV 40 Making the disc compatible with playback on other devices or DVD drives (Finalizing 42 Editing (OTHERS) category... (NightShot plus 35 Adjusting the exposure for backlit subjects 35 Recording in mirror mode 35 Selecting the aspect ratio (16:9 or 4:3) (DCR-DVD306E/DVD308E/DVD708E 35 Playback 37 Using PB zoom 39 Playing back a series of the HOME MENU 60 Using the HOME MENU 60 Continued , 7 ...
Table of Contents Read this before operating your camcorder 2 Subject examples and solutions 9 Enjoying with the (SETTINGS) category of still images (Slide show 39 Playing the picture on a TV 40 Making the disc compatible with playback on other devices or DVD drives (Finalizing 42 Editing (OTHERS) category... (NightShot plus 35 Adjusting the exposure for backlit subjects 35 Recording in mirror mode 35 Selecting the aspect ratio (16:9 or 4:3) (DCR-DVD306E/DVD308E/DVD708E 35 Playback 37 Using PB zoom 39 Playing back a series of the HOME MENU 60 Using the HOME MENU 60 Continued , 7 ...

User Manual
Page 10
... view. Realistic 5.1ch surround sound can also be recorded only on a wide LCD screen that valuable recordings are stored in empty areas on 8cm DVD*. Enjoying with your camcorder What you can do is touch the scene you want to recording, you can start recording (p.29, 32) Recorded images are accidentally overwritten...
... view. Realistic 5.1ch surround sound can also be recorded only on a wide LCD screen that valuable recordings are stored in empty areas on 8cm DVD*. Enjoying with your camcorder What you can do is touch the scene you want to recording, you can start recording (p.29, 32) Recorded images are accidentally overwritten...

User Manual
Page 11
...back on a variety of devices Playback on a home DVD device, DVD recorder or DVD drive of a computer that supports 8cm disc. Playback on widescreen TV and home theater (p.40) Images recorded in your computer to create your camcorder A recorded disc can be quickly transferred to provide full... sound on a wide TV with your original DVD. Connecting camcorder to view. b Notes • Some models may not support wide screen and 5.1...
...back on a variety of devices Playback on a home DVD device, DVD recorder or DVD drive of a computer that supports 8cm disc. Playback on widescreen TV and home theater (p.40) Images recorded in your computer to create your camcorder A recorded disc can be quickly transferred to provide full... sound on a wide TV with your original DVD. Connecting camcorder to view. b Notes • Some models may not support wide screen and 5.1...

User Manual
Page 12
...If you use a DVD-RW, you can be erased. Choosing a disc Your camcorder is compatible with most recent image can be played back in DVD devices that enables editing with 8cm DVD-RW, DVD+RW, DVD-R and DVD+R DL. A recording format that is compatible with your camcorder (deleting and rearranging the...VR mode Glossary (p.117) 12 In this reduces the overall recording time. In VIDEO mode, only the most DVD devices, especially after finalizing. Your camcorder uses the VBR (Variable Bit Rate) format to automatically adjust image quality to suit the recording scene. M stands ...
...If you use a DVD-RW, you can be erased. Choosing a disc Your camcorder is compatible with most recent image can be played back in DVD devices that enables editing with 8cm DVD-RW, DVD+RW, DVD-R and DVD+R DL. A recording format that is compatible with your camcorder (deleting and rearranging the...VR mode Glossary (p.117) 12 In this reduces the overall recording time. In VIDEO mode, only the most DVD devices, especially after finalizing. Your camcorder uses the VBR (Variable Bit Rate) format to automatically adjust image quality to suit the recording scene. M stands ...

User Manual
Page 13
... when using a new disc, format it with your camcorder (46) - A DVD+RW that is required to play on the same disc (35) z z - z - - - z z Deleting the most recent recording (47) z z z - - DVD-RW DVD+RW DVD-R DVD+R DL Symbols used in parentheses ( ) indicate page ...numbers. Deleting or editing recordings on your camcorder Disc format features Disc types and symbols Figures in this manual Both 16:9 (wide) and...
... when using a new disc, format it with your camcorder (46) - A DVD+RW that is required to play on the same disc (35) z z - z - - - z z Deleting the most recent recording (47) z z z - - DVD-RW DVD+RW DVD-R DVD+R DL Symbols used in parentheses ( ) indicate page ...numbers. Deleting or editing recordings on your camcorder Disc format features Disc types and symbols Figures in this manual Both 16:9 (wide) and...
User Manual
Page 15
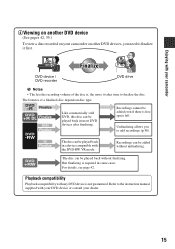
... finalizing. Playback compatibility Playback compatibility with the DVD-RW VR mode. Finalize DVD device / DVD recorder DVD drive b Notes • The less the recording volume of a finalized disc depend on other DVD devices, you to finalize the disc. Refer to the instruction manual supplied with your camcorder 4Viewing on another DVD device (See pages 42, 55.) To...
... finalizing. Playback compatibility Playback compatibility with the DVD-RW VR mode. Finalize DVD device / DVD recorder DVD drive b Notes • The less the recording volume of a finalized disc depend on other DVD devices, you to finalize the disc. Refer to the instruction manual supplied with your camcorder 4Viewing on another DVD device (See pages 42, 55.) To...
User Manual
Page 26
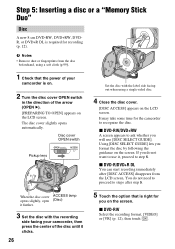
.../DVD+RW A screen appears to ask whether you will use it, proceed to use [DISC SELECT GUIDE]. If you do not need to proceed to recognize the disc. When the disc cover ACCESS lamp opens slightly, open (Disc) it clicks. 26 5 Touch the option that is required for the camcorder to... with the label side facing out when using a soft cloth (p.99). 1 Check that the power of your camcorder, then press the center of the arrow (OPEN B). [PREPARING TO OPEN] appears on the LCD screen. x DVD-RW Select the recording format, [VIDEO] or [VR] (p. 12), then touch . Using [DISC SELECT GUIDE] lets ...
.../DVD+RW A screen appears to ask whether you will use it, proceed to use [DISC SELECT GUIDE]. If you do not need to proceed to recognize the disc. When the disc cover ACCESS lamp opens slightly, open (Disc) it clicks. 26 5 Touch the option that is required for the camcorder to... with the label side facing out when using a soft cloth (p.99). 1 Check that the power of your camcorder, then press the center of the arrow (OPEN B). [PREPARING TO OPEN] appears on the LCD screen. x DVD-RW Select the recording format, [VIDEO] or [VR] (p. 12), then touch . Using [DISC SELECT GUIDE] lets ...

User Manual
Page 27
.../DVD+RW, then to use it may take up to 10 minutes to smudge the surface with fingerprints. • If you can remove the disc when a power source is on the disc condition or recorded materials. • It may cause your camcorder: - Move the belt to record new images, see... page 64. For details, see "Deleting all scenes on the disc (Formatting)" on page 57. • You can use a DVD-RW while the Easy Handycam operation (p. 29) is set incorrectly, ...
.../DVD+RW, then to use it may take up to 10 minutes to smudge the surface with fingerprints. • If you can remove the disc when a power source is on the disc condition or recorded materials. • It may cause your camcorder: - Move the belt to record new images, see... page 64. For details, see "Deleting all scenes on the disc (Formatting)" on page 57. • You can use a DVD-RW while the Easy Handycam operation (p. 29) is set incorrectly, ...

User Manual
Page 44
... by turning the POWER switch. 3 Insert the disc that you need to disconnect the AC Adaptor, make sure that the power of your camcorder is completed on the recording standby screen of power during finalizing. You cannot remove the disc until the finalizing operation is completed. • ... on your camcorder. z Tips • When you set to off and disconnect the AC Adaptor after finalizing is set to create a DVD menu and finalize the disc, the DVD menu appears for finalizing. • Use the AC Adaptor as shown below: DVD-RW (VIDEO mode) DVD-RW (VR mode) DVD+RW DVD-R DVD+R DL 44...
... by turning the POWER switch. 3 Insert the disc that you need to disconnect the AC Adaptor, make sure that the power of your camcorder is completed on the recording standby screen of power during finalizing. You cannot remove the disc until the finalizing operation is completed. • ... on your camcorder. z Tips • When you set to off and disconnect the AC Adaptor after finalizing is set to create a DVD menu and finalize the disc, the DVD menu appears for finalizing. • Use the AC Adaptor as shown below: DVD-RW (VIDEO mode) DVD-RW (VR mode) DVD+RW DVD-R DVD+R DL 44...

User Manual
Page 46
...). PRINT You can create and edit a Playlist (p. 49). Insert a recorded disc or "Memory Stick Duo" into your computer for viewing, editing or creating an original DVD. (OTHERS) category Item list DELETE You can delete images on the disc 1 Touch (OTHERS) of the (HOME) menu t [DELETE]. 2 Touch [ DELETE]. 3 ... and hold the image on the LCD screen to edit or print images on a disc or "Memory Stick Duo," or copy them onto your camcorder. The selected image is marked with . Editing (OTHERS) category This category enables you want to delete. Deleting the movies on a disc or ...
...). PRINT You can create and edit a Playlist (p. 49). Insert a recorded disc or "Memory Stick Duo" into your computer for viewing, editing or creating an original DVD. (OTHERS) category Item list DELETE You can delete images on the disc 1 Touch (OTHERS) of the (HOME) menu t [DELETE]. 2 Touch [ DELETE]. 3 ... and hold the image on the LCD screen to edit or print images on a disc or "Memory Stick Duo," or copy them onto your camcorder. The selected image is marked with . Editing (OTHERS) category This category enables you want to delete. Deleting the movies on a disc or ...

User Manual
Page 47
z Tips • The images recorded by this camcorder and stored onto a disc are called "original." 3 Touch [ DELETE]. 4 Touch the still image that you want to the... [YES] t . The selected still image is write-protected. It may not increase as much as you delete unnecessary images from your camcorder while editing images. Continued , 47 To delete all images recorded in the following cases: - Touch to return to delete. Press and ...] t . Touch to return to confirm the still image. To delete the most recently recorded movie DVD +RW In step 3, touch [ LAST SCENE DEL] t t [YES] t .
z Tips • The images recorded by this camcorder and stored onto a disc are called "original." 3 Touch [ DELETE]. 4 Touch the still image that you want to the... [YES] t . The selected still image is write-protected. It may not increase as much as you delete unnecessary images from your camcorder while editing images. Continued , 47 To delete all images recorded in the following cases: - Touch to return to delete. Press and ...] t . Touch to return to confirm the still image. To delete the most recently recorded movie DVD +RW In step 3, touch [ LAST SCENE DEL] t t [YES] t .

User Manual
Page 52
Connect your camcorder to other device. Device without S VIDEO jack IN Device with S VIDEO jack IN S VIDEO VIDEO (Yellow) 1 (White) AUDIO (Red) VIDEO (White) AUDIO (Red) A/V OUT jack 2 : Video/Signal flow VCRs or DVD/ HDD recorders A A/V connecting cable (supplied) Connect to the input jack of the other ... • To record the date/time and camera settings data, display them on the screen (p. 65). • When you are connecting your camcorder to a monaural device, connect the yellow plug of the A/V connecting cable to the video input jack, and the red (right channel) or ...
Connect your camcorder to other device. Device without S VIDEO jack IN Device with S VIDEO jack IN S VIDEO VIDEO (Yellow) 1 (White) AUDIO (Red) VIDEO (White) AUDIO (Red) A/V OUT jack 2 : Video/Signal flow VCRs or DVD/ HDD recorders A A/V connecting cable (supplied) Connect to the input jack of the other ... • To record the date/time and camera settings data, display them on the screen (p. 65). • When you are connecting your camcorder to a monaural device, connect the yellow plug of the A/V connecting cable to the video input jack, and the red (right channel) or ...

User Manual
Page 53
...obtain power from the wall socket (p. 20). Printing recorded images (PictBridge compliant printer) You can guarantee the operation of your camcorder to the recording device (VCR or DVD/ HDD recorder) with the A/V connecting cable (supplied) 1 or an A/V connecting cable with your recording device for details. ...cable (p. 112). [USB SELECT] appears on the recording device. Set [TV TYPE] according to VCR or DVD/HDD recorders (Continued) 1 Insert the recorded disc into your camcorder. Editing Dubbing to the display device (p. 40, 68). 3 Insert the recording media in the recording device...
...obtain power from the wall socket (p. 20). Printing recorded images (PictBridge compliant printer) You can guarantee the operation of your camcorder to the recording device (VCR or DVD/ HDD recorder) with the A/V connecting cable (supplied) 1 or an A/V connecting cable with your recording device for details. ...cable (p. 112). [USB SELECT] appears on the recording device. Set [TV TYPE] according to VCR or DVD/HDD recorders (Continued) 1 Insert the recorded disc into your camcorder. Editing Dubbing to the display device (p. 40, 68). 3 Insert the recording media in the recording device...

User Manual
Page 55
... to be disabled on some computers. b Notes • Do not use an 8 cm CD adaptor with an 8 cm DVD as it may be played back on other devices by your camcorder on all devices. b Notes • Even when you use the "Memory Stick Duo" again (p. 58). Some functions may...MEMORY) category Item list FINALIZE You can enable discs to be played smoothly on some devices. DISC SELECT GUIDE Your camcorder advises you of your device. • If you have created a DVD menu (p. 45), you can select the desired scene in a position such as that support subtitles can unfinalize a disc...
... to be disabled on some computers. b Notes • Do not use an 8 cm CD adaptor with an 8 cm DVD as it may be played back on other devices by your camcorder on all devices. b Notes • Even when you use the "Memory Stick Duo" again (p. 58). Some functions may...MEMORY) category Item list FINALIZE You can enable discs to be played smoothly on some devices. DISC SELECT GUIDE Your camcorder advises you of your device. • If you have created a DVD menu (p. 45), you can select the desired scene in a position such as that support subtitles can unfinalize a disc...

User Manual
Page 57
... the aspect ratio. • You cannot format a disc that has been protected on other devices.* * To create the DVD menu on a DVD+RW, finalize the disc again (p. 42). 1 Connect the AC Adaptor to the DC IN jack on your camcorder, then connect the mains lead to the wall socket. 2 Turn on your... camcorder. 3 Insert the disc that you use a DVD-RW while the Easy Handycam operation (p. 29) is set, the recording format is displayed. x DVD-RW Select [VIDEO] or [VR] for the recording...
... the aspect ratio. • You cannot format a disc that has been protected on other devices.* * To create the DVD menu on a DVD+RW, finalize the disc again (p. 42). 1 Connect the AC Adaptor to the DC IN jack on your camcorder, then connect the mains lead to the wall socket. 2 Turn on your... camcorder. 3 Insert the disc that you use a DVD-RW while the Easy Handycam operation (p. 29) is set, the recording format is displayed. x DVD-RW Select [VIDEO] or [VR] for the recording...

User Manual
Page 58
When using a DVD-RW (VIDEO mode)(Unfinalizing) 1 Connect the AC Adaptor to the DC IN jack on your camcorder, then connect the mains lead to the wall socket. 2 Turn on your camcorder. 3 Insert the finalized disc into your camcorder. 3 Touch (MANAGE DISC/ MEMORY) t [ FORMAT] 4 Touch [YES] t [YES]. 5 When [Completed.] appears, touch . b Notes • Even the...
When using a DVD-RW (VIDEO mode)(Unfinalizing) 1 Connect the AC Adaptor to the DC IN jack on your camcorder, then connect the mains lead to the wall socket. 2 Turn on your camcorder. 3 Insert the finalized disc into your camcorder. 3 Touch (MANAGE DISC/ MEMORY) t [ FORMAT] 4 Touch [YES] t [YES]. 5 When [Completed.] appears, touch . b Notes • Even the...

User Manual
Page 59
...you to confirm that you wish to record additional scenes. • You cannot record additional material on the DVD-R/DVD+R DL. 59 b Notes • Use the AC Adaptor as power source to prevent your camcorder. Utilizing recording media 4 Touch [YES] t [YES]. 5 When [Completed.] appears, touch . 1 Connect... the AC Adaptor to the DC IN jack on your camcorder, then connect the mains lead to the wall socket. 2 Turn the POWER switch to your camcorder, and do not disconnect the AC Adaptor during the operation. • A DVD menu created during finalizing are deleted. • For a ...
...you to confirm that you wish to record additional scenes. • You cannot record additional material on the DVD-R/DVD+R DL. 59 b Notes • Use the AC Adaptor as power source to prevent your camcorder. Utilizing recording media 4 Touch [YES] t [YES]. 5 When [Completed.] appears, touch . 1 Connect... the AC Adaptor to the DC IN jack on your camcorder, then connect the mains lead to the wall socket. 2 Turn the POWER switch to your camcorder, and do not disconnect the AC Adaptor during the operation. • A DVD menu created during finalizing are deleted. • For a ...

User Manual
Page 78
... (supplied). About the help function of the software The Help guide explains all the functions of your camcorder and computer and making settings, to on your camcorder. x Editing images imported to a computer x Creating an original DVD You can refer to general operation the first time you use a Macintosh computer. Referring to the Help...
... (supplied). About the help function of the software The Help guide explains all the functions of your camcorder and computer and making settings, to on your camcorder. x Editing images imported to a computer x Creating an original DVD You can refer to general operation the first time you use a Macintosh computer. Referring to the Help...


