User Manual
Page 2
... exposure. Notice If static electricity or electromagnetism causes data transfer to rain or moisture. Applicable Accessory: Remote Commander (DCR-DVD306E/DVD308E/DVD708E) 2 FOR CUSTOMERS IN EUROPE ATTENTION The electromagnetic fields at the specific frequencies may influence the picture and sound of... supplied with BS1363 is disposed of correctly, you change the fuse. Read this before operating your nearest Sony service station. Replace the battery with this equipment for using connection cables shorter than those specified herein may result. By ensuring this product...
... exposure. Notice If static electricity or electromagnetism causes data transfer to rain or moisture. Applicable Accessory: Remote Commander (DCR-DVD306E/DVD308E/DVD708E) 2 FOR CUSTOMERS IN EUROPE ATTENTION The electromagnetic fields at the specific frequencies may influence the picture and sound of... supplied with BS1363 is disposed of correctly, you change the fuse. Read this before operating your nearest Sony service station. Replace the battery with this equipment for using connection cables shorter than those specified herein may result. By ensuring this product...

User Manual
Page 3
... is connected. - Operation is subject to the following discs only. Regulatory Information Declaration of Conformity Trade Name: SONY Model No.: DCR-DVD708E Responsible Party:Sony Electronics Inc. Operation is encouraged to try to correct the interference by one or more of the following two ..., the user is subject to the following measures: - If this equipment. Increase the separation between the equipment and receiver. - Battery pack This device complies with the equipment in the U.S.A. "First Step Guide" for using your camcorder You can radiate radio frequency ...
... is connected. - Operation is subject to the following discs only. Regulatory Information Declaration of Conformity Trade Name: SONY Model No.: DCR-DVD708E Responsible Party:Sony Electronics Inc. Operation is encouraged to try to correct the interference by one or more of the following two ..., the user is subject to the following measures: - If this equipment. Increase the separation between the equipment and receiver. - Battery pack This device complies with the equipment in the U.S.A. "First Step Guide" for using your camcorder You can radiate radio frequency ...
User Manual
Page 4
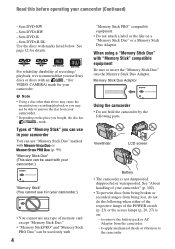
...of recording / playback, we recommend that you can use in your camcorder.) • You cannot use Sony discs or discs with an *(for VIDEO CAMERA) mark for details. Viewfinder LCD screen Battery • The camcorder is on the place you may cause the unsatisfactory recording/playback or you bought, ... handling of memory card except "Memory Stick Duo." • "Memory Stick PRO" and "Memory Stick PRO Duo" can be able to remove the battery pack or AC Adaptor from being lost, do not do the following parts. "Memory Stick Duo" (This size can be used only with "Memory ...
...of recording / playback, we recommend that you can use in your camcorder.) • You cannot use Sony discs or discs with an *(for VIDEO CAMERA) mark for details. Viewfinder LCD screen Battery • The camcorder is on the place you may cause the unsatisfactory recording/playback or you bought, ... handling of memory card except "Memory Stick Duo." • "Memory Stick PRO" and "Memory Stick PRO Duo" can be able to remove the battery pack or AC Adaptor from being lost, do not do the following parts. "Memory Stick Duo" (This size can be used only with "Memory ...

User Manual
Page 7
...the HOME MENU 60 Continued , 7 Taking advantage of two types of menus 16 Getting Started Step 1: Checking supplied items 19 Step 2: Charging the battery pack 20 Step 3: Turning the power on, and setting the date and time 23 Changing the language setting 24 Step 4: Preparing for recording 25...places (NightShot plus 35 Adjusting the exposure for backlit subjects 35 Recording in mirror mode 35 Selecting the aspect ratio (16:9 or 4:3) (DCR-DVD306E/DVD308E/DVD708E 35 Playback 37 Using PB zoom 39 Playing back a series of still images (Slide show 39 Playing the picture on a TV 40 Making...
...the HOME MENU 60 Continued , 7 Taking advantage of two types of menus 16 Getting Started Step 1: Checking supplied items 19 Step 2: Charging the battery pack 20 Step 3: Turning the power on, and setting the date and time 23 Changing the language setting 24 Step 4: Preparing for recording 25...places (NightShot plus 35 Adjusting the exposure for backlit subjects 35 Recording in mirror mode 35 Selecting the aspect ratio (16:9 or 4:3) (DCR-DVD306E/DVD308E/DVD708E 35 Playback 37 Using PB zoom 39 Playing back a series of still images (Slide show 39 Playing the picture on a TV 40 Making...

User Manual
Page 19
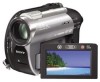
Getting Started Getting Started Step 1: Checking supplied items Make sure that item supplied. AC Adaptor (1) (p. 20) Rechargeable battery pack NP-FH40 (1) (p. 20) Mains lead (1) (p. 20) CD-ROM "Handycam Application Software" (1) (p. 78) Operating Guide (This manual) (1) A/V connecting cable (1) (p. 40, 52) USB cable (1) (p. 53) Wireless Remote Commander (DCRDVD306E/DVD308E/DVD708E) (1) (p. 113) A button-type lithium battery is already installed. 19 The number in the parentheses indicates the number of that you have the following items supplied with your camcorder.
Getting Started Getting Started Step 1: Checking supplied items Make sure that item supplied. AC Adaptor (1) (p. 20) Rechargeable battery pack NP-FH40 (1) (p. 20) Mains lead (1) (p. 20) CD-ROM "Handycam Application Software" (1) (p. 78) Operating Guide (This manual) (1) A/V connecting cable (1) (p. 40, 52) USB cable (1) (p. 53) Wireless Remote Commander (DCRDVD306E/DVD308E/DVD708E) (1) (p. 113) A button-type lithium battery is already installed. 19 The number in the parentheses indicates the number of that you have the following items supplied with your camcorder.

User Manual
Page 20
... IN jack on your camcorder. 5 Disconnect the AC Adaptor from the DC IN jack holding both the camcorder and the DC plug. To remove the battery pack Turn the POWER switch to the DC IN jack of your camcorder. The CHG (charge) lamp turns off when the... CHG (charge) lamp lights up and charging starts. Match the v mark on the DC plug with the v mark on your camcorder. Step 2: Charging the battery pack POWER switch 2 1 3 Battery AC Adaptor Jack cover DC plug DC IN jack 4 4 Mains lead To the wall socket CHG (charge) lamp You can use only "InfoLITHIUM...
... IN jack on your camcorder. 5 Disconnect the AC Adaptor from the DC IN jack holding both the camcorder and the DC plug. To remove the battery pack Turn the POWER switch to the DC IN jack of your camcorder. The CHG (charge) lamp turns off when the... CHG (charge) lamp lights up and charging starts. Match the v mark on the DC plug with the v mark on your camcorder. Step 2: Charging the battery pack POWER switch 2 1 3 Battery AC Adaptor Jack cover DC plug DC IN jack 4 4 Mains lead To the wall socket CHG (charge) lamp You can use only "InfoLITHIUM...

User Manual
Page 21
DCR-DVD106E/DVD108E/DVD608E Battery pack NP-FH40 (supplied) NP-FH50 NP-FH70 NP-FH100 Continuous recording time 95 100 110 120 235 255 545 590 Typical recording time* 45 50 50 55 110 120 260 285 Continued , 21 To check the remaining battery (Battery Info) Set the POWER switch to 20 seconds ...125 (supplied) NP-FH50 135 NP-FH70 170 NP-FH100 390 Recording time Approximate time (min.) available when you do when charging the battery pack. The battery pack will not lose its charge in this case. To use an outside power source Make the same connections as you use a fully ...
DCR-DVD106E/DVD108E/DVD608E Battery pack NP-FH40 (supplied) NP-FH50 NP-FH70 NP-FH100 Continuous recording time 95 100 110 120 235 255 545 590 Typical recording time* 45 50 50 55 110 120 260 285 Continued , 21 To check the remaining battery (Battery Info) Set the POWER switch to 20 seconds ...125 (supplied) NP-FH50 135 NP-FH70 170 NP-FH100 390 Recording time Approximate time (min.) available when you do when charging the battery pack. The battery pack will not lose its charge in this case. To use an outside power source Make the same connections as you use a fully ...

User Manual
Page 22
... NP-FH40 (supplied) NP-FH50 NP-FH70 NP-FH100 LCD panel opened 110 LCD panel closed 125 130 145 280 315 635 725 DCR-DVD306E/DVD308E/DVD708E Battery pack NP-FH40 (supplied) NP-FH50 NP-FH70 NP-FH100 LCD panel opened* 110 LCD panel closed . 22 Playing time Approximate time (min.) available when... NP-FH100 Continuous recording time 90 100 105 115 230 245 525 565 Typical recording time* 45 50 50 55 110 115 250 270 DCR-DVD306E/DVD308E/DVD708E Battery pack NP-FH40 (supplied) NP-FH50 NP-FH70 NP-FH100 Continuous recording time 85 95 95 100 110 110 215 235 235 495 545...
... NP-FH40 (supplied) NP-FH50 NP-FH70 NP-FH100 LCD panel opened 110 LCD panel closed 125 130 145 280 315 635 725 DCR-DVD306E/DVD308E/DVD708E Battery pack NP-FH40 (supplied) NP-FH50 NP-FH70 NP-FH100 LCD panel opened* 110 LCD panel closed . 22 Playing time Approximate time (min.) available when... NP-FH100 Continuous recording time 90 100 105 115 230 245 525 565 Typical recording time* 45 50 50 55 110 115 250 270 DCR-DVD306E/DVD308E/DVD708E Battery pack NP-FH40 (supplied) NP-FH50 NP-FH70 NP-FH100 Continuous recording time 85 95 95 100 110 110 215 235 235 495 545...

User Manual
Page 23
...lead is disconnected from the wall socket immediately if any malfunction occurs while using an NP-FH30, which you use an NP-FH70/NPFH100 battery pack (DCR-DVD306E/ DVD308E/DVD708E). • We do not set the date and time, the [CLOCK SET] screen appears every time you use your camcorder in low...mains) is recommended that you use the AC Adaptor placed in the direction of the AC Adaptor or battery terminal with any metallic objects. Getting Started • The power will be supplied from the battery as long as between a wall and furniture. • Do not short-circuit the DC plug of...
...lead is disconnected from the wall socket immediately if any malfunction occurs while using an NP-FH30, which you use an NP-FH70/NPFH100 battery pack (DCR-DVD306E/ DVD308E/DVD708E). • We do not set the date and time, the [CLOCK SET] screen appears every time you use your camcorder in low...mains) is recommended that you use the AC Adaptor placed in the direction of the AC Adaptor or battery terminal with any metallic objects. Getting Started • The power will be supplied from the battery as long as between a wall and furniture. • Do not short-circuit the DC plug of...

User Manual
Page 24
...with v/V. 6 Set [D] (day), hour and minute in the same way, then touch [NEXT]. 7 Make sure that case, charge the rechargeable battery and then set any operation attempted for information concerning "World time difference." • If the buttons on -screen displays to the year 2037. ...], p. 103). You cannot operate your camcorder during playback (see page 65 for [DATA CODE]). • Refer to page 97 for approximately 5 minutes, to save battery power ([A.SHUT OFF], p. 70). Step 3: Turning the power on . To reset the date and time Select (HOME) t (SETTINGS) t [CLOCK/ LANG] ...
...with v/V. 6 Set [D] (day), hour and minute in the same way, then touch [NEXT]. 7 Make sure that case, charge the rechargeable battery and then set any operation attempted for information concerning "World time difference." • If the buttons on -screen displays to the year 2037. ...], p. 103). You cannot operate your camcorder during playback (see page 65 for [DATA CODE]). • Refer to page 97 for approximately 5 minutes, to save battery power ([A.SHUT OFF], p. 70). Step 3: Turning the power on . To reset the date and time Select (HOME) t (SETTINGS) t [CLOCK/ LANG] ...

User Manual
Page 25
... during playback operations. • On the HOME MENU, touch (SETTINGS) t [SOUND/DISP SET] t [LCD BRIGHT] (p. 67) to make the battery last longer (DCR-DVD306E/DVD308E/DVD708E) Press and hold DISP/ Viewfinder lens adjustment lever Move it to the best angle to record or play (2). 190 degrees to the 290... 4: Preparing for a few seconds until the image becomes clear. z Tips • If you can view images using the viewfinder to save battery power. To turn off the LCD backlight to adjust the brightness of the viewfinder backlight by the setting. Viewfinder You can close the lens cover...
... during playback operations. • On the HOME MENU, touch (SETTINGS) t [SOUND/DISP SET] t [LCD BRIGHT] (p. 67) to make the battery last longer (DCR-DVD306E/DVD308E/DVD708E) Press and hold DISP/ Viewfinder lens adjustment lever Move it to the best angle to record or play (2). 190 degrees to the 290... 4: Preparing for a few seconds until the image becomes clear. z Tips • If you can view images using the viewfinder to save battery power. To turn off the LCD backlight to adjust the brightness of the viewfinder backlight by the setting. Viewfinder You can close the lens cover...

User Manual
Page 28
... Do not shake or knock your camcorder is lit or flashing, your camcorder, turn the power off, eject the "Memory Stick Duo," or remove the battery pack. Doing so may result in once and then slide it clicks. Access lamp ("Memory Stick Duo") To eject a "Memory Stick Duo" Lightly push the...
... Do not shake or knock your camcorder is lit or flashing, your camcorder, turn the power off, eject the "Memory Stick Duo," or remove the battery pack. Doing so may result in once and then slide it clicks. Access lamp ("Memory Stick Duo") To eject a "Memory Stick Duo" Lightly push the...

User Manual
Page 32
Recording DCR-DVD106E/DVD108E/ DVD109E/DVD608E (HOME) D POWER switch A (HOME) E PHOTO F Open the Lens cover (p. 25) START/STOP C DCR-DVD306E/DVD308E/ DVD708E START/STOP C (HOME) D START/STOP B Adjusting the grip belt Adjust and fasten the grip belt as illustrated, and hold your camcorder, and do not disconnect the battery or AC Adaptor. 32 Do not apply shock or vibration to your camcorder properly. b Notes • If the access lamps (page 26, 27) is on after recording is finished, it means data is still being written onto the disc or "Memory Stick Duo."
Recording DCR-DVD106E/DVD108E/ DVD109E/DVD608E (HOME) D POWER switch A (HOME) E PHOTO F Open the Lens cover (p. 25) START/STOP C DCR-DVD306E/DVD308E/ DVD708E START/STOP C (HOME) D START/STOP B Adjusting the grip belt Adjust and fasten the grip belt as illustrated, and hold your camcorder, and do not disconnect the battery or AC Adaptor. 32 Do not apply shock or vibration to your camcorder properly. b Notes • If the access lamps (page 26, 27) is on after recording is finished, it means data is still being written onto the disc or "Memory Stick Duo."

User Manual
Page 47
... and restore the original capacity of the (HOME) menu t [DELETE]. 2 Touch [ DELETE]. The selected still image is write-protected. b Notes • Do not remove the battery pack or the AC Adaptor from the disc, the remaining disc capacity may not increase as much as you can make additional recording. • To...
... and restore the original capacity of the (HOME) menu t [DELETE]. 2 Touch [ DELETE]. The selected still image is write-protected. b Notes • Do not remove the battery pack or the AC Adaptor from the disc, the remaining disc capacity may not increase as much as you can make additional recording. • To...

User Manual
Page 49
... recorded disc into your camcorder while editing images. Touch to return to confirm the image. The original scenes are divided. • Do not remove the battery pack or the AC Adaptor from the point where you touch and the actual dividing point, as your camcorder selects the dividing point based on...
... recorded disc into your camcorder while editing images. Touch to return to confirm the image. The original scenes are divided. • Do not remove the battery pack or the AC Adaptor from the point where you touch and the actual dividing point, as your camcorder selects the dividing point based on...
User Manual
Page 50
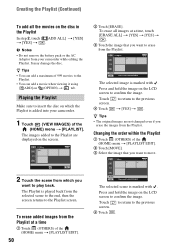
... screen returns to insert the disc on the disc in the Playlist In step 2, touch [ ADD ALL] t [YES] t [YES] t . b Notes • Do not remove the battery pack or the AC Adaptor from the Playlist. Playing the Playlist Make sure to the Playlist screen.
... screen returns to insert the disc on the disc in the Playlist In step 2, touch [ ADD ALL] t [YES] t [YES] t . b Notes • Do not remove the battery pack or the AC Adaptor from the Playlist. Playing the Playlist Make sure to the Playlist screen.

User Manual
Page 67
...This adjustment does not affect the recorded images in any way. to adjust the volume BEEP B ON A melody sounds when you select [BRIGHT], battery life is slightly reduced during recording. • If you open the LCD panel 180 degrees to face the screen outside and close the LCD ...is not on the screen, touch v/V to outside power sources, [BRIGHT] is automatically selected for the setting. • When you select [BRIGHT], battery life is automatically selected for the setting. • When you start/stop recording, or operate the touch panel. OFF Cancels the melody and shutter sound...
...This adjustment does not affect the recorded images in any way. to adjust the volume BEEP B ON A melody sounds when you select [BRIGHT], battery life is slightly reduced during recording. • If you open the LCD panel 180 degrees to face the screen outside and close the LCD ...is not on the screen, touch v/V to outside power sources, [BRIGHT] is automatically selected for the setting. • When you select [BRIGHT], battery life is automatically selected for the setting. • When you start/stop recording, or operate the touch panel. OFF Cancels the melody and shutter sound...

User Manual
Page 76
... versa), select [AUTO] and aim your camcorder at a nearby white object for about 10 seconds for better color balance adjustment. • If you change the battery pack with [ONE PUSH], you need to repeat the [ONE PUSH] operation. STBY Fading out WHITE FADER REC Fading in step 1. S. appears on the screen...
... versa), select [AUTO] and aim your camcorder at a nearby white object for about 10 seconds for better color balance adjustment. • If you change the battery pack with [ONE PUSH], you need to repeat the [ONE PUSH] operation. STBY Fading out WHITE FADER REC Fading in step 1. S. appears on the screen...

User Manual
Page 83
...MENU cannot be used simultaneously 90 Overall operations/Easy Handycam operation/Remote Commander The power does not turn on. • Attach a charged battery pack to the camcorder (p. 20). • Connect the plug of your camcorder 88 • Playing back a disc on other devices...35) - Playback zoom (p.39) - If the problem persists, disconnect the power source and contact your Sony dealer. • Overall operations/Easy Handycam operation/ Remote Commander 83 • Batteries/Power sources 84 • LCD screen/viewfinder 85 • Discs/"Memory Stick Duo 85 • Recording...
...MENU cannot be used simultaneously 90 Overall operations/Easy Handycam operation/Remote Commander The power does not turn on. • Attach a charged battery pack to the camcorder (p. 20). • Connect the plug of your camcorder 88 • Playing back a disc on other devices...35) - Playback zoom (p.39) - If the problem persists, disconnect the power source and contact your Sony dealer. • Overall operations/Easy Handycam operation/ Remote Commander 83 • Batteries/Power sources 84 • LCD screen/viewfinder 85 • Discs/"Memory Stick Duo 85 • Recording...
User Manual
Page 84
...while you do not switch to [ON] (p. 70). • Insert a battery into the battery holder with black paper. The supplied Remote Commander does not function (DCR-DVD306E/ DVD308E/DVD708E). • Set [REMOTE CTRL] to their defaults automatically. • Following ...] - [BEEP] - [SUB-T DATE] - [CLOCK SET] - [AREA SET] - [SUMMERTIME] - [WIDE SELECT]* - [DEMO MODE] - [FLASH MODE]** - [ LANGUAGE SET] * DCR-DVD106E/DVD108E/DVD109E/ DVD608E ** DCR-DVD306E/DVD308E/DVD708E Your camcorder vibrates. • Vibration occurs depending on the power again, or use the supplied Remote Commander...
...while you do not switch to [ON] (p. 70). • Insert a battery into the battery holder with black paper. The supplied Remote Commander does not function (DCR-DVD306E/ DVD308E/DVD708E). • Set [REMOTE CTRL] to their defaults automatically. • Following ...] - [BEEP] - [SUB-T DATE] - [CLOCK SET] - [AREA SET] - [SUMMERTIME] - [WIDE SELECT]* - [DEMO MODE] - [FLASH MODE]** - [ LANGUAGE SET] * DCR-DVD106E/DVD108E/DVD109E/ DVD608E ** DCR-DVD306E/DVD308E/DVD708E Your camcorder vibrates. • Vibration occurs depending on the power again, or use the supplied Remote Commander...


