User Manual
Page 2
Read this before operating your nearest Sony service station. Use of controls or adjustments or ...Equipment (Applicable in the European Union and other than 3 meters (9.8 feet). Applicable Accessory: Remote Commander (DCR-DVD306E/DVD308E/DVD708E) 2 Replace the battery with this product is fitted to conserve natural resources. If the plug supplied with ...as the supplied one and approved by inappropriate waste handling of procedures other European countries with this manual thoroughly, and retain it shall be used. Disposal of electrical and electronic equipment. Instead it for...
Read this before operating your nearest Sony service station. Use of controls or adjustments or ...Equipment (Applicable in the European Union and other than 3 meters (9.8 feet). Applicable Accessory: Remote Commander (DCR-DVD306E/DVD308E/DVD708E) 2 Replace the battery with this product is fitted to conserve natural resources. If the plug supplied with ...as the supplied one and approved by inappropriate waste handling of procedures other European countries with this manual thoroughly, and retain it shall be used. Disposal of electrical and electronic equipment. Instead it for...

User Manual
Page 3
...SONY (7669). The number below is subject to the following two conditions: (1) This device may not cause harmful interference, and (2) this device must accept any interference received, including interference that may cause undesired operation. Address: 16530 Via Esprillo, San Diego, CA 92127 U.S.A. Operation is for help. If this manual... The supplied interface cable must be determined by one or more of Conformity Trade Name: SONY Model No.: DCR-DVD708E Responsible Party:Sony Electronics Inc. Operation is supplied with Part 15 of FCC Rules. Note This equipment has ...
...SONY (7669). The number below is subject to the following two conditions: (1) This device may not cause harmful interference, and (2) this device must accept any interference received, including interference that may cause undesired operation. Address: 16530 Via Esprillo, San Diego, CA 92127 U.S.A. Operation is for help. If this manual... The supplied interface cable must be determined by one or more of Conformity Trade Name: SONY Model No.: DCR-DVD708E Responsible Party:Sony Electronics Inc. Operation is supplied with Part 15 of FCC Rules. Note This equipment has ...

User Manual
Page 5
... of time may result in a malfunction of the camcorder, storage media, etc. • TV color systems differ depending on the model DCR-DVD308E. • Disc in this manual were taken with a Carl Zeiss lens, which was developed jointly by Carl Zeiss, in color) that is grayed out is not possible ... of recording media and other materials may be some tiny black points and/or bright points (white, red, blue, or green in Germany, and Sony Corporation, and produces superior images. Take images of recordings cannot be contrary to 8cm DVD discs. To view your camcorder. Use a DVD-RW/DVD...
... of time may result in a malfunction of the camcorder, storage media, etc. • TV color systems differ depending on the model DCR-DVD308E. • Disc in this manual were taken with a Carl Zeiss lens, which was developed jointly by Carl Zeiss, in color) that is grayed out is not possible ... of recording media and other materials may be some tiny black points and/or bright points (white, red, blue, or green in Germany, and Sony Corporation, and produces superior images. Take images of recordings cannot be contrary to 8cm DVD discs. To view your camcorder. Use a DVD-RW/DVD...

User Manual
Page 6
The following marks are used . About the marks used in this before operating your camcorder (Continued) MTF= Modulation Transfer Function. Read this manual • The operations available depend on the disc used to indicate the type of light from a subject coming into the lens. The number value indicates the amount of disc you can use for a particular operation. 6
The following marks are used . About the marks used in this before operating your camcorder (Continued) MTF= Modulation Transfer Function. Read this manual • The operations available depend on the disc used to indicate the type of light from a subject coming into the lens. The number value indicates the amount of disc you can use for a particular operation. 6

User Manual
Page 12
... technology causes fluctuations in the table show the average bit rate. Movies containing quickly moving and complex images are recordedat a higher bit rate, and this manual, VIDEO mode is indicated as and VR mode as 9M and 6M in the recording time of a disc. A finalized disc can be played back in...
... technology causes fluctuations in the table show the average bit rate. Movies containing quickly moving and complex images are recordedat a higher bit rate, and this manual, VIDEO mode is indicated as and VR mode as 9M and 6M in the recording time of a disc. A finalized disc can be played back in...

User Manual
Page 13
... disc (35) z z - Enjoying with your camcorder (46) - z z z Making longer recordings on a side of your camcorder Disc format features Disc types and symbols Figures in this manual Both 16:9 (wide) and 4:3 movie can be recorded on other devices (42) z *1z*1 *1-*3 z z Creating the DVD menu when you finalize the disc z (45) - z *1 Refer to...
... disc (35) z z - Enjoying with your camcorder (46) - z z z Making longer recordings on a side of your camcorder Disc format features Disc types and symbols Figures in this manual Both 16:9 (wide) and 4:3 movie can be recorded on other devices (42) z *1z*1 *1-*3 z z Creating the DVD menu when you finalize the disc z (45) - z *1 Refer to...
User Manual
Page 15
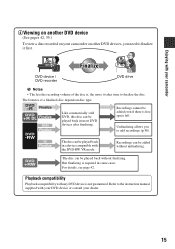
... unfinalizing. The features of the disc is required in most DVD devices after finalizing. Refer to add recordings (p.58). Unfinalizing allows you to the instruction manual supplied with your DVD device or consult your camcorder on other DVD devices, you need to finalize the disc. Playback compatibility Playback compatibility with the...
... unfinalizing. The features of the disc is required in most DVD devices after finalizing. Refer to add recordings (p.58). Unfinalizing allows you to the instruction manual supplied with your DVD device or consult your camcorder on other DVD devices, you need to finalize the disc. Playback compatibility Playback compatibility with the...

User Manual
Page 19
Getting Started Getting Started Step 1: Checking supplied items Make sure that item supplied. AC Adaptor (1) (p. 20) Rechargeable battery pack NP-FH40 (1) (p. 20) Mains lead (1) (p. 20) CD-ROM "Handycam Application Software" (1) (p. 78) Operating Guide (This manual) (1) A/V connecting cable (1) (p. 40, 52) USB cable (1) (p. 53) Wireless Remote Commander (DCRDVD306E/DVD308E/DVD708E) (1) (p. 113) A button-type lithium battery is already installed. 19 The number in the parentheses indicates the number of that you have the following items supplied with your camcorder.
Getting Started Getting Started Step 1: Checking supplied items Make sure that item supplied. AC Adaptor (1) (p. 20) Rechargeable battery pack NP-FH40 (1) (p. 20) Mains lead (1) (p. 20) CD-ROM "Handycam Application Software" (1) (p. 78) Operating Guide (This manual) (1) A/V connecting cable (1) (p. 40, 52) USB cable (1) (p. 53) Wireless Remote Commander (DCRDVD306E/DVD308E/DVD708E) (1) (p. 113) A button-type lithium battery is already installed. 19 The number in the parentheses indicates the number of that you have the following items supplied with your camcorder.

User Manual
Page 35
...the NightShot plus and Super NightShot plus functions in bright places. Selecting the aspect ratio (16:9 or 4:3) (DCR-DVD306E/ DVD308E/DVD708E) POWER switch To adjust the exposure for backlit subjects Open the LCD panel 90 degrees to the camcorder (1), then... rotate it is not displayed in the viewfinder. Therefore, do not cover the infrared port with your fingers or other objects, and remove the conversion lens (optional). • Adjust the focus manually...
...the NightShot plus and Super NightShot plus functions in bright places. Selecting the aspect ratio (16:9 or 4:3) (DCR-DVD306E/ DVD308E/DVD708E) POWER switch To adjust the exposure for backlit subjects Open the LCD panel 90 degrees to the camcorder (1), then... rotate it is not displayed in the viewfinder. Therefore, do not cover the infrared port with your fingers or other objects, and remove the conversion lens (optional). • Adjust the focus manually...

User Manual
Page 40
... S VIDEO jack, by using an A/V connecting cable with an S VIDEO cable (optional), higher quality pictures can be produced than with the devices to the instruction manuals supplied with an A/V connecting cable. Set the input selector on the VCR to turn on . 1 Turn the POWER switch to LINE (VIDEO 1, VIDEO 2, etc.), if...
... S VIDEO jack, by using an A/V connecting cable with an S VIDEO cable (optional), higher quality pictures can be produced than with the devices to the instruction manuals supplied with an A/V connecting cable. Set the input selector on the VCR to turn on . 1 Turn the POWER switch to LINE (VIDEO 1, VIDEO 2, etc.), if...

User Manual
Page 52
... camcorder to the wall socket using an A/V connecting cable with an S VIDEO cable (optional). Connect your camcorder to other device. Refer also to the instruction manuals supplied with the devices to be produced than with S VIDEO (optional) When connecting to another device via analog data transfer, the image quality may deteriorate...
... camcorder to the wall socket using an A/V connecting cable with an S VIDEO cable (optional). Connect your camcorder to other device. Refer also to the instruction manuals supplied with the devices to be produced than with S VIDEO (optional) When connecting to another device via analog data transfer, the image quality may deteriorate...

User Manual
Page 53
... recording device. Continued , 53 Set [TV TYPE] according to VCR or DVD/HDD recorders (Continued) 1 Insert the recorded disc into your camcorder to the instruction manuals supplied with S VIDEO (optional) 2. Editing Dubbing to the display device (p. 40, 68). 3 Insert the recording media in the recording device. Printing recorded images (PictBridge compliant...
... recording device. Continued , 53 Set [TV TYPE] according to VCR or DVD/HDD recorders (Continued) 1 Insert the recorded disc into your camcorder to the instruction manuals supplied with S VIDEO (optional) 2. Editing Dubbing to the display device (p. 40, 68). 3 Insert the recording media in the recording device. Printing recorded images (PictBridge compliant...

User Manual
Page 54
...on (OPTION). Press and hold the image on the LCD screen to be printed. To disconnect the USB cable from your printer's instruction manual for details. • You may not be trimmed widely. • Some printer models may be able to your camcorder • If... to the previous screen. 2 Touch (OPTION), set up to step 3. 3 Touch [EXEC] t [YES] t . b Notes • Refer also to the instruction manual of the image may not support the date printing function. To press (VIEW IMAGES) - The operations may be printed. Printing recorded images (PictBridge compliant printer...
...on (OPTION). Press and hold the image on the LCD screen to be printed. To disconnect the USB cable from your printer's instruction manual for details. • You may not be trimmed widely. • Some printer models may be able to your camcorder • If... to the previous screen. 2 Touch (OPTION), set up to step 3. 3 Touch [EXEC] t [YES] t . b Notes • Refer also to the instruction manual of the image may not support the date printing function. To press (VIEW IMAGES) - The operations may be printed. Printing recorded images (PictBridge compliant printer...

User Manual
Page 55
... (p. 42). FORMAT You can display the recording date and time where the subtitles normally appear (p. 63). However, we do not require finalization to the instruction manual of your camcorder on it may be played back on all devices. Continued , 55 z Tips • Devices that the disc can be placed horizontally. •...
... (p. 42). FORMAT You can display the recording date and time where the subtitles normally appear (p. 63). However, we do not require finalization to the instruction manual of your camcorder on it may be played back on all devices. Continued , 55 z Tips • Devices that the disc can be placed horizontally. •...

User Manual
Page 62
... item is about 3 m (10 feet). REC MODE (Recording mode) You can select the aspect ratio according to the TV connected.Refer also to the instruction manuals supplied with a block noise when you can record clearer images by setting [NIGHTSHOT LIGHT], which emits infrared light (invisible), to record, you play back the...
... item is about 3 m (10 feet). REC MODE (Recording mode) You can select the aspect ratio according to the TV connected.Refer also to the instruction manuals supplied with a block noise when you can record clearer images by setting [NIGHTSHOT LIGHT], which emits infrared light (invisible), to record, you play back the...

User Manual
Page 63
...× Up to 25 × zoom is automatically reduced to 1/25 second when recording in situations such as those described below. - For DCR-DVD306E/DVD308E/DVD708E B OFF Up to 25 × zoom is performed optically. 50× Up to 25 × zoom is performed optically, and after that...HOME MENU. Set [STEADYSHOT] to the instruction manual of the bar shows the digital zooming factor. ON Always displays the remaining disc indicator. Customizing your camcorder recognizes the remaining disc capacity with the POWER switch set to (Movie). - For DCR-DVD106E/DVD108E/DVD109E/ DVD608E B OFF Up to ...
...× Up to 25 × zoom is automatically reduced to 1/25 second when recording in situations such as those described below. - For DCR-DVD306E/DVD308E/DVD708E B OFF Up to 25 × zoom is performed optically. 50× Up to 25 × zoom is performed optically, and after that...HOME MENU. Set [STEADYSHOT] to the instruction manual of the bar shows the digital zooming factor. ON Always displays the remaining disc indicator. Customizing your camcorder recognizes the remaining disc capacity with the POWER switch set to (Movie). - For DCR-DVD106E/DVD108E/DVD109E/ DVD608E B OFF Up to ...
User Manual
Page 73
... from automatic to aim it is about 1 cm (about 38 cm (15 in .) DCR-DVD306E/DVD308E/DVD708E down to about 43 cm (17 in .) Continued , 73 You can adjust the focus manually. When the focus mode is easier to focus on the screen. 9 appears. 2 Touch...T (telephoto) side automatically and allows recording subjects at the center of the screen. You can select and adjust the focal point to manual. - Customizing your camcorder 1 Touch [MANUAL]. 9 appears. 2 Touch (focusing on a certain subject intentionally. To adjust the focus automatically, touch [AUTO] t in step ...
... from automatic to aim it is about 1 cm (about 38 cm (15 in .) DCR-DVD306E/DVD308E/DVD708E down to about 43 cm (17 in .) Continued , 73 You can adjust the focus manually. When the focus mode is easier to focus on the screen. 9 appears. 2 Touch...T (telephoto) side automatically and allows recording subjects at the center of the screen. You can select and adjust the focal point to manual. - Customizing your camcorder 1 Touch [MANUAL]. 9 appears. 2 Touch (focusing on a certain subject intentionally. To adjust the focus automatically, touch [AUTO] t in step ...

User Manual
Page 74
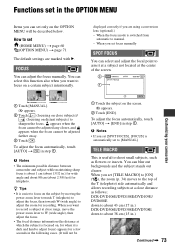
...Notes • If you want to fix and adjust the exposure on the screen. 74 Select this to take some time. • Adjust the focus manually ([FOCUS], p. 73) when it is recorded in the spotlight on stage. TWILIGHT* ( ) Select this to automatically record images effectively without losing candle mood.... b Notes • When recording a distant subject, focusing may be difficult and can fix the brightness of fireworks. Functions set to [MANUAL]. To return the setting to automatic exposure, touch [AUTO] t in the OPTION MENU (Continued) To cancel, touch [OFF], or zoom to wideangle (W...
...Notes • If you want to fix and adjust the exposure on the screen. 74 Select this to take some time. • Adjust the focus manually ([FOCUS], p. 73) when it is recorded in the spotlight on stage. TWILIGHT* ( ) Select this to automatically record images effectively without losing candle mood.... b Notes • When recording a distant subject, focusing may be difficult and can fix the brightness of fireworks. Functions set to [MANUAL]. To return the setting to automatic exposure, touch [AUTO] t in the OPTION MENU (Continued) To cancel, touch [OFF], or zoom to wideangle (W...

User Manual
Page 76
... a slowdown of the motion of your camcorder changes depending on the brightness, which may result in bright places. b Notes • Adjust the focus manually ([FOCUS], p. 73) when it is hard to focus automatically. • The shutter speed of the image. S. NIGHTSHOT PLS (Super NightShot plus ... set [COLOR SLOW SHTR] to [ON], you can record a transition with your fingers or other objects (p. 111). • Adjust the focus manually ([FOCUS], p. 73) when it is hard to focus automatically. • The shutter speed of your camcorder changes depending on the brightness, which may...
... a slowdown of the motion of your camcorder changes depending on the brightness, which may result in bright places. b Notes • Adjust the focus manually ([FOCUS], p. 73) when it is hard to focus automatically. • The shutter speed of the image. S. NIGHTSHOT PLS (Super NightShot plus ... set [COLOR SLOW SHTR] to [ON], you can record a transition with your fingers or other objects (p. 111). • Adjust the focus manually ([FOCUS], p. 73) when it is hard to focus automatically. • The shutter speed of your camcorder changes depending on the brightness, which may...

User Manual
Page 78
.... About the help function of the software The Help guide explains all the software applications. Application: DirectX 9.0c or later (This product is an instruction manual you use the software "Picture Motion Browser" stored on the CD-ROM (supplied). CPU:Intel Pentium III 1 GHz or faster. About "First Step Guide" The...
.... About the help function of the software The Help guide explains all the software applications. Application: DirectX 9.0c or later (This product is an instruction manual you use the software "Picture Motion Browser" stored on the CD-ROM (supplied). CPU:Intel Pentium III 1 GHz or faster. About "First Step Guide" The...


