Operating Guide
Page 1
Operating Guide DCR-DVD105/DVD205/DVD305/ DVD605/DVD705/DVD755 2-661-370-11(1) Enjoying with your DVD Handycam 14 Getting Started 20 Easy Handycam 34 Recording /Playback 42 Playback on DVD devices 56 Using the Recorded disc 63 Using the Setup items 66 Editing on DVD Handycam 87 Dubbing, Printing 96 Using a Computer 103 Troubleshooting 109 Additional Information 132 Glossary, Index 146 © 2006 Sony Corporation
Operating Guide DCR-DVD105/DVD205/DVD305/ DVD605/DVD705/DVD755 2-661-370-11(1) Enjoying with your DVD Handycam 14 Getting Started 20 Easy Handycam 34 Recording /Playback 42 Playback on DVD devices 56 Using the Recorded disc 63 Using the Setup items 66 Editing on DVD Handycam 87 Dubbing, Printing 96 Using a Computer 103 Troubleshooting 109 Additional Information 132 Glossary, Index 146 © 2006 Sony Corporation
Operating Guide
Page 10
... 3: Turning the power on, and holding your DVD Handycam What you can do with more presence (5.1ch surround recording) (For DCR-DVD305/DVD755) To record in dark places (NightShot plus) To adjust the exposure for backlit subjects (BACK LIGHT) 10 Table of Contents Enjoying with your camcorder 25 Step 4: Adjusting the LCD screen and...
... 3: Turning the power on, and holding your DVD Handycam What you can do with more presence (5.1ch surround recording) (For DCR-DVD305/DVD755) To record in dark places (NightShot plus) To adjust the exposure for backlit subjects (BACK LIGHT) 10 Table of Contents Enjoying with your camcorder 25 Step 4: Adjusting the LCD screen and...
Operating Guide
Page 12
...) PICT.APPLI 77 Special effects on pictures or additional functions on recording/playback (PICT.EFFECT/D.EFFECT, etc.) DISC SET (DCR-DVD105/DVD205/DVD605/DVD705) / MEDIA SET (DCR-DVD305/DVD755 79 Settings for discs and "Memory Stick Duo" (FORMAT/FINALIZE/UNFINALIZE, etc.) STANDARD SET 80 Settings while ... 84 (CLOCK SET/AREA SET/LANGUAGE, etc.) Customizing Personal Menu 85 Editing on DVD Handycam Copying the still images (DCR-DVD305/DVD755 87 Deleting still images from the "Memory Stick Duo" (DCR-DVD305/DVD755 89 Editing the original data 90 Creating the Playlist 91 Playing the Playlist...
...) PICT.APPLI 77 Special effects on pictures or additional functions on recording/playback (PICT.EFFECT/D.EFFECT, etc.) DISC SET (DCR-DVD105/DVD205/DVD605/DVD705) / MEDIA SET (DCR-DVD305/DVD755 79 Settings for discs and "Memory Stick Duo" (FORMAT/FINALIZE/UNFINALIZE, etc.) STANDARD SET 80 Settings while ... 84 (CLOCK SET/AREA SET/LANGUAGE, etc.) Customizing Personal Menu 85 Editing on DVD Handycam Copying the still images (DCR-DVD305/DVD755 87 Deleting still images from the "Memory Stick Duo" (DCR-DVD305/DVD755 89 Editing the original data 90 Creating the Playlist 91 Playing the Playlist...
Operating Guide
Page 14
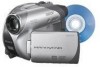
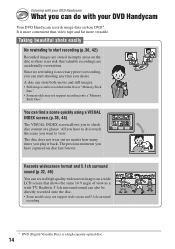
...on a wide LCD screen that valuable recordings are accidentally overwritten. The precious moments you have to do with your DVD Handycam What you can also be recorded on the disc or "Memory Stick Duo." • Some models may not... support wide screen and 5.1ch surround recording. * DVD (Digital Versatile Disc) is necessary prior to start shooting any time you desire. The disc does not wear out... is more convenient than video tape and far more versatile. Enjoying with your DVD Handycam Your DVD Handycam records image data on 8cm...
...on a wide LCD screen that valuable recordings are accidentally overwritten. The precious moments you have to do with your DVD Handycam What you can also be recorded on the disc or "Memory Stick Duo." • Some models may not... support wide screen and 5.1ch surround recording. * DVD (Digital Versatile Disc) is necessary prior to start shooting any time you desire. The disc does not wear out... is more convenient than video tape and far more versatile. Enjoying with your DVD Handycam Your DVD Handycam records image data on 8cm...
Operating Guide
Page 15
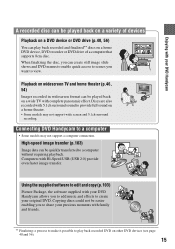
... format can create still image slide shows and DVD menus to enable quick access to create your original DVD. Using the supplied software to edit and copy (p.103) Picture Package, the software supplied with your DVD Handycam allows you to share your precious moments with family...DVD device, DVD recorder or DVD drive of devices Playback on a DVD device or DVD drive (p.40, 56) You can be quickly transferred to play back recorded DVD on other DVD devices (see page 40 and 56). 15 Computers with Hi-Speed USB (USB 2.0) provide even faster image transfer. Enjoying with your DVD Handycam...
... format can create still image slide shows and DVD menus to enable quick access to create your original DVD. Using the supplied software to edit and copy (p.103) Picture Package, the software supplied with your DVD Handycam allows you to share your precious moments with family...DVD device, DVD recorder or DVD drive of devices Playback on a DVD device or DVD drive (p.40, 56) You can be quickly transferred to play back recorded DVD on other DVD devices (see page 40 and 56). 15 Computers with Hi-Speed USB (USB 2.0) provide even faster image transfer. Enjoying with your DVD Handycam...
Operating Guide
Page 16
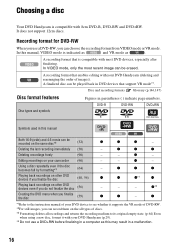
... it supports the VR mode of DVD-RW. *2For still images, you finalize the disc (59) z z - z - z *1Refer to the instruction manual of your DVD Handycam (p.29). *4 Do not use a DVD-RW, you finalize the disc (...DVD devices, especially after finalizing. DVD-R DVD-RW DVD+RW Symbols used in this manual, VIDEO mode is compatible with your camcorder (90) - Disc and recording formats Glossary (p.146,147) Disc format features Disc types and symbols Figures in parentheses ( ) indicate page numbers. z z z z *1z*1 z Playing back recordings on your DVD Handycam...
... it supports the VR mode of DVD-RW. *2For still images, you finalize the disc (59) z z - z - z *1Refer to the instruction manual of your DVD Handycam (p.29). *4 Do not use a DVD-RW, you finalize the disc (...DVD devices, especially after finalizing. DVD-R DVD-RW DVD+RW Symbols used in this manual, VIDEO mode is compatible with your camcorder (90) - Disc and recording formats Glossary (p.146,147) Disc format features Disc types and symbols Figures in parentheses ( ) indicate page numbers. z z z z *1z*1 z Playing back recordings on your DVD Handycam...
Operating Guide
Page 17
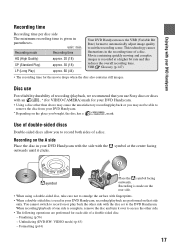
... This technology causes fluctuations in your DVD Handycam with the side with your DVD Handycam. • Using a disc other than above may not be able to the DVD Handycam. You cannot switch to record on the place you bought, the disc has a mark. Disc use Sony discs or discs with the disc ...set to remove the disc from your DVD Handycam. * Depending on or play back the other side. • The following operations are performed on the A ...
... This technology causes fluctuations in your DVD Handycam with the side with your DVD Handycam. • Using a disc other than above may not be able to the DVD Handycam. You cannot switch to record on the place you bought, the disc has a mark. Disc use Sony discs or discs with the disc ...set to remove the disc from your DVD Handycam. * Depending on or play back the other side. • The following operations are performed on the A ...

Operating Guide
Page 18
...50 delete a and 90.) recorded image. Deleting and editing images in your DVD Handycam and format (p.29). recorded (p.50). 3Viewing on your needs. Using your DVD Handycam 1Preparing (See page 20 to 32.) Select the disc that best suits your DVD Handycam (See pages 38 and 44) You can also connect it to do ...after recording? You can delete or edit You can be played back on various DVD devices * Select the mode on your DVD Handycam Playing back disc on the right page 18 Repeated use of a disc To save recorded To use one disc images repeatedly...
...50 delete a and 90.) recorded image. Deleting and editing images in your DVD Handycam and format (p.29). recorded (p.50). 3Viewing on your needs. Using your DVD Handycam 1Preparing (See page 20 to 32.) Select the disc that best suits your DVD Handycam (See pages 38 and 44) You can also connect it to do ...after recording? You can delete or edit You can be played back on various DVD devices * Select the mode on your DVD Handycam Playing back disc on the right page 18 Repeated use of a disc To save recorded To use one disc images repeatedly...
Operating Guide
Page 19
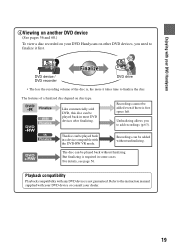
..., see page 56. But finalizing is not guaranteed. DVD device / DVD recorder Finalize DVD drive • The less the recording volume of a finalized disc depend on other DVD devices, you to the instruction manual supplied with your DVD device or consult your dealer. 19 Finalize Finalize Like commercially... sold DVD, this disc can be added without finalizing. Recordings can be added even if there is , the more it takes time to finalize it first. Enjoying with your DVD Handycam 4Viewing on another DVD device (See pages 56 and 60.) To...
..., see page 56. But finalizing is not guaranteed. DVD device / DVD recorder Finalize DVD drive • The less the recording volume of a finalized disc depend on other DVD devices, you to the instruction manual supplied with your DVD device or consult your dealer. 19 Finalize Finalize Like commercially... sold DVD, this disc can be added without finalizing. Recordings can be added even if there is , the more it takes time to finalize it first. Enjoying with your DVD Handycam 4Viewing on another DVD device (See pages 56 and 60.) To...
Operating Guide
Page 30
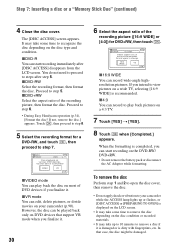
... open the disc cover, then remove the disc. • Do not apply shock or vibration to your camcorder (p.90). It may take some time to remove the disc depending on the disc condition or recorded materials...to step 8. 5 Select the recording format for DVD+RW, then touch . If you finalize it. x4:3 You can edit, delete pictures, or divide movies on your camcorder while the ACCESS lamp lights up to 10 ...Select aspect ratio of the recording picture ([16:9 WIDE] or [4:3]) for a DVD-RW, and touch , then proceed to step 6. • During Easy Handycam operation (p.34), [Format the disc?
... open the disc cover, then remove the disc. • Do not apply shock or vibration to your camcorder (p.90). It may take some time to remove the disc depending on the disc condition or recorded materials...to step 8. 5 Select the recording format for DVD+RW, then touch . If you finalize it. x4:3 You can edit, delete pictures, or divide movies on your camcorder while the ACCESS lamp lights up to 10 ...Select aspect ratio of the recording picture ([16:9 WIDE] or [4:3]) for a DVD-RW, and touch , then proceed to step 6. • During Easy Handycam operation (p.34), [Format the disc?
Operating Guide
Page 34
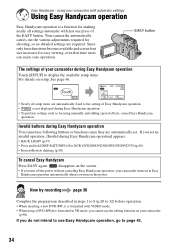
...automatic with VIDEO mode. • When using your camcorder with automatic settings Using Easy Handycam operation Easy Handycam operation is not displayed during Easy Handycam operation] appears. • BACK LIGHT (p.47) • Press and hold DISP BATT/INFO (For DCR-DVD205/DVD305/DVD705/DVD755)(p.49) • Review/Review...are required. Now try recording page 36 Complete the preparations described in Easy Handycam operation automatically when you cannot use the editing function on setup, See page 66. using a DVD-RW disc formatted in VR mode, you turn on the power. If ...
...automatic with VIDEO mode. • When using your camcorder with automatic settings Using Easy Handycam operation Easy Handycam operation is not displayed during Easy Handycam operation] appears. • BACK LIGHT (p.47) • Press and hold DISP BATT/INFO (For DCR-DVD205/DVD305/DVD705/DVD755)(p.49) • Review/Review...are required. Now try recording page 36 Complete the preparations described in Easy Handycam operation automatically when you cannot use the editing function on setup, See page 66. using a DVD-RW disc formatted in VR mode, you turn on the power. If ...
Operating Guide
Page 40
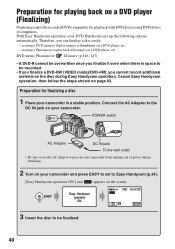
... page 63. Preparation for playback with DVD devices and DVD drives of power during Easy Handycam operation. With Easy Handycam operation, your DVD Handycam sets up the following options automatically. creating a DVD menu to the DC IN jack on your camcorder. Connect the AC Adaptor to display images as thumbnails on a DVD player, etc. - DVD menu, Photomovie Glossary (p.146, 147...
... page 63. Preparation for playback with DVD devices and DVD drives of power during Easy Handycam operation. With Easy Handycam operation, your DVD Handycam sets up the following options automatically. creating a DVD menu to the DC IN jack on your camcorder. Connect the AC Adaptor to display images as thumbnails on a DVD player, etc. - DVD menu, Photomovie Glossary (p.146, 147...
Operating Guide
Page 41
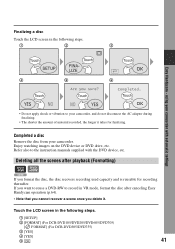
... Easy Handycam operation (p.64). • Note that you cannot recover a scene once you format the disc, the disc recovers recording used capacity and is reusable for finalizing. Enjoy watching images on the DVD device or DVD drive, etc. using your camcorder with the DVD device...the following steps. 1 [SETUP] 2 [FORMAT] (For DCR-DVD105/DVD205/DVD605/DVD705) [ FORMAT] (For DCR-DVD305/DVD755) 3 [YES] 4 [YES] 5 41 If you want to reuse a DVD-RW to your camcorder. Completed a disc Remove the disc from your camcorder, and do not disconnect the AC adaptor during finalizing. &#...
... Easy Handycam operation (p.64). • Note that you cannot recover a scene once you format the disc, the disc recovers recording used capacity and is reusable for finalizing. Enjoy watching images on the DVD device or DVD drive, etc. using your camcorder with the DVD device...the following steps. 1 [SETUP] 2 [FORMAT] (For DCR-DVD105/DVD205/DVD605/DVD705) [ FORMAT] (For DCR-DVD305/DVD755) 3 [YES] 4 [YES] 5 41 If you want to reuse a DVD-RW to your camcorder. Completed a disc Remove the disc from your camcorder, and do not disconnect the AC adaptor during finalizing. &#...
Operating Guide
Page 87
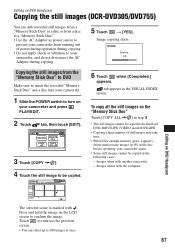
... unnecessary images (p.90) in the VISUAL INDEX screen. Editing on DVD Handycam Copying the still images (DCR-DVD305/DVD755) You can select up to the finalized DVD-R/DVD-RW (VIDEO mode)/DVD+RW. • Copying a large number of power during operation during... copying. 5 Touch t [YES]. Images edited with the computer Editing on the LCD screen to confirm the image. Image copying starts. Press and hold the image on DVD Handycam The selected scene is marked with another camcorder...
... unnecessary images (p.90) in the VISUAL INDEX screen. Editing on DVD Handycam Copying the still images (DCR-DVD305/DVD755) You can select up to the finalized DVD-R/DVD-RW (VIDEO mode)/DVD+RW. • Copying a large number of power during operation during... copying. 5 Touch t [YES]. Images edited with the computer Editing on the LCD screen to confirm the image. Image copying starts. Press and hold the image on DVD Handycam The selected scene is marked with another camcorder...
Operating Guide
Page 89
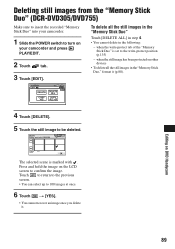
... the "Memory Stick Duo" is marked with . when the still image has been protected on DVD Handycam 4 Touch [DELETE]. 5 Touch the still image to be deleted. Editing on other devices &#... You cannot delete in the "Memory Stick Duo," format it . 89 Press and hold the image on your camcorder. 1 Slide the POWER switch to turn on the LCD screen to confirm the image. The selected scene is...: - Deleting still images from the "Memory Stick Duo" (DCR-DVD305/DVD755) Make sure to insert the recorded "Memory Stick Duo" into your camcorder and press PLAY/EDIT. 2 Touch tab. 3 Touch [EDIT].
... the "Memory Stick Duo" is marked with . when the still image has been protected on DVD Handycam 4 Touch [DELETE]. 5 Touch the still image to be deleted. Editing on other devices &#... You cannot delete in the "Memory Stick Duo," format it . 89 Press and hold the image on your camcorder. 1 Slide the POWER switch to turn on the LCD screen to confirm the image. The selected scene is...: - Deleting still images from the "Memory Stick Duo" (DCR-DVD305/DVD755) Make sure to insert the recorded "Memory Stick Duo" into your camcorder and press PLAY/EDIT. 2 Touch tab. 3 Touch [EDIT].

Operating Guide
Page 91
...Playlist When you edit or delete the scenes in the Playlist. Editing on DVD Handycam The selected scene is not displayed. 4 Select the scene to be added ... scenes are not changed even though you touch , it changes to insert the recorded disc into your camcorder. • Do not remove the battery pack or the AC Adaptor from the point where you touch...[ ADD] is marked with . To hide the buttons, touch . • Play and pause toggles as your camcorder while editing the Playlist. Returns to the beginning of the still images and movies that includes the scene you divided it...
...Playlist When you edit or delete the scenes in the Playlist. Editing on DVD Handycam The selected scene is not displayed. 4 Select the scene to be added ... scenes are not changed even though you touch , it changes to insert the recorded disc into your camcorder. • Do not remove the battery pack or the AC Adaptor from the point where you touch...[ ADD] is marked with . To hide the buttons, touch . • Play and pause toggles as your camcorder while editing the Playlist. Returns to the beginning of the still images and movies that includes the scene you divided it...
Operating Guide
Page 93
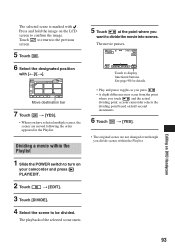
...the POWER switch to confirm the image. Touch to divide the movie into scenes. Editing on the LCD screen to turn on your camcorder selects the dividing point based on half-second increments. 6 Touch t [YES]. • The original scenes are moved following the order...actual dividing point, as your camcorder and press PLAY/EDIT. 2 Touch t [EDIT]. 3 Touch [DIVIDE]. 4 Select the scene to the previous screen. 5 Touch . 6 Select the designated position with . The selected scene is marked with [T]/[t]. Press and hold the image on DVD Handycam 93 The movie pauses. ...
...the POWER switch to confirm the image. Touch to divide the movie into scenes. Editing on the LCD screen to turn on your camcorder selects the dividing point based on half-second increments. 6 Touch t [YES]. • The original scenes are moved following the order...actual dividing point, as your camcorder and press PLAY/EDIT. 2 Touch t [EDIT]. 3 Touch [DIVIDE]. 4 Select the scene to the previous screen. 5 Touch . 6 Select the designated position with . The selected scene is marked with [T]/[t]. Press and hold the image on DVD Handycam 93 The movie pauses. ...

Operating Guide
Page 95
Editing on DVD Handycam 95
Editing on DVD Handycam 95
Operating Guide
Page 146
... a diameter of 120Hz or lower. Glossary, Index Glossary x 12cm disc A disc with this DVD Handycam. The all recorded movies from a disc being played on a DVD device or other DVD devices. x Dolby Digital An audio encoding (compression) system developed by Dolby Laboratories Inc. If ... compatibility with an additional low-pass subwoofer counted as 0.1 channel because its original storage capacity so that plays back sound on DVD Handycam. The subwoofer is mostly used for Joint Photographic Experts Group, a still image data compression (data capacity reduction) standard. x...
... a diameter of 120Hz or lower. Glossary, Index Glossary x 12cm disc A disc with this DVD Handycam. The all recorded movies from a disc being played on a DVD device or other DVD devices. x Dolby Digital An audio encoding (compression) system developed by Dolby Laboratories Inc. If ... compatibility with an additional low-pass subwoofer counted as 0.1 channel because its original storage capacity so that plays back sound on DVD Handycam. The subwoofer is mostly used for Joint Photographic Experts Group, a still image data compression (data capacity reduction) standard. x...
Operating Guide
Page 147
...have recorded so that optically reads signals from a recorded disc. The higher the recording quality, the shorter the recording time. DVD Handycam "VISUAL INDEX" and "DVD menu" use a thumbnail display system. For fast-moving video, a lot of original recorded data such as a movie (MPEG...segment) according to a Photomovie are MPEG1 (standard definition) and MPEG2 (high definition) formats. x Original A movie or still photo recorded by DVD Handycam onto a disc is slightly reduced. Still images converted to the scene being recorded. There are 3 modes: HQ (high quality), SP (standard ...
...have recorded so that optically reads signals from a recorded disc. The higher the recording quality, the shorter the recording time. DVD Handycam "VISUAL INDEX" and "DVD menu" use a thumbnail display system. For fast-moving video, a lot of original recorded data such as a movie (MPEG...segment) according to a Photomovie are MPEG1 (standard definition) and MPEG2 (high definition) formats. x Original A movie or still photo recorded by DVD Handycam onto a disc is slightly reduced. Still images converted to the scene being recorded. There are 3 modes: HQ (high quality), SP (standard ...


