
Operating Guide
Page 3
... the wall outlet before operating the appliance, and keep this can result in . Use Power Sources This set . The set may be operated only from battery power, or other similar surface. - Ventilation The slots and openings in a wet basement, or near water - Object and Liquid Entry Never push objects of power...
... the wall outlet before operating the appliance, and keep this can result in . Use Power Sources This set . The set may be operated only from battery power, or other similar surface. - Ventilation The slots and openings in a wet basement, or near water - Object and Liquid Entry Never push objects of power...
Operating Guide
Page 5
...device complies with the limits for a Class B digital device, pursuant to comply with Part 15 of rechargeable batteries, call : Sony Customer Information Center 1-800-222-SONY (7669). Operation is no guarantee that any questions about this product. Note This equipment has been tested and... cautioned that interference will increase eye hazard. Use of controls or adjustments or performance of Conformity Trade Name: SONY Model No.: DCR-DVD305 Responsible Party:Sony Electronics Inc. For customers in hazardous radiation exposure. Record the serial number in the U.S.A. Model No. If...
...device complies with the limits for a Class B digital device, pursuant to comply with Part 15 of rechargeable batteries, call : Sony Customer Information Center 1-800-222-SONY (7669). Operation is no guarantee that any questions about this product. Note This equipment has been tested and... cautioned that interference will increase eye hazard. Use of controls or adjustments or performance of Conformity Trade Name: SONY Model No.: DCR-DVD305 Responsible Party:Sony Electronics Inc. For customers in hazardous radiation exposure. Record the serial number in the U.S.A. Model No. If...
Operating Guide
Page 6
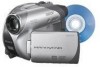
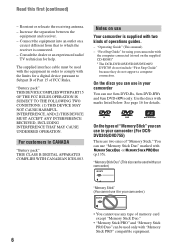
... DCRDVD305/DVD755) There are two sizes of operations guides. - On the discs you can use in your camcorder.) • You cannot use it in CANADA "Battery pack" THIS CLASS B DIGITAL APPARATUS COMPLIES WITH CANADIAN ICES-003. See page 16 for help. "Operating Guide" (This manual) ... your camcorder with marks listed below. Connect the equipment into an outlet on the supplied CD-ROM)* * The DCR-DVD105/DVD205/DVD605/ DVD705 do not include "First Step Guide" because they do not support a computer connection. Increase the separation between the equipment and receiver. - "Battery pack"...
... DCRDVD305/DVD755) There are two sizes of operations guides. - On the discs you can use in your camcorder.) • You cannot use it in CANADA "Battery pack" THIS CLASS B DIGITAL APPARATUS COMPLIES WITH CANADIAN ICES-003. See page 16 for help. "Operating Guide" (This manual) ... your camcorder with marks listed below. Connect the equipment into an outlet on the supplied CD-ROM)* * The DCR-DVD105/DVD205/DVD605/ DVD705 do not include "First Step Guide" because they do not support a computer connection. Increase the separation between the equipment and receiver. - "Battery pack"...
Operating Guide
Page 7
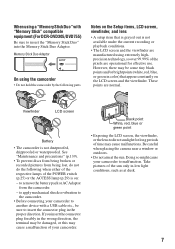
...mechanical shock or vibration to the camcorder. • Before connecting your camcorder. Black point White, red, blue or green point • Exposing the LCD screen, the viewfinder, or the lens to another device with "Memory Stick" compatible equipment (For DCR-DVD305/DVD755) Be sure to insert... However, there may be sure to insert the "Memory Stick Duo" into the Memory Stick Duo Adaptor. Viewfinder LCD screen Battery • The camcorder is not available under the current recording or playback conditions. • The LCD screen and the viewfinder are manufactured using extremely ...
...mechanical shock or vibration to the camcorder. • Before connecting your camcorder. Black point White, red, blue or green point • Exposing the LCD screen, the viewfinder, or the lens to another device with "Memory Stick" compatible equipment (For DCR-DVD305/DVD755) Be sure to insert... However, there may be sure to insert the "Memory Stick Duo" into the Memory Stick Duo Adaptor. Viewfinder LCD screen Battery • The camcorder is not available under the current recording or playback conditions. • The LCD screen and the viewfinder are manufactured using extremely ...
Operating Guide
Page 10
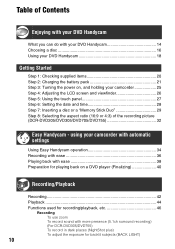
... picture (DCR-DVD205/DVD305/DVD705/DVD755 32 Easy Handycam - Table of Contents Enjoying with your DVD Handycam What you can do with your DVD Handycam 14 Choosing a disc 16 Using your DVD Handycam 18 Getting Started Step 1: Checking supplied items 20 Step 2: Charging the battery pack 21 Step 3: Turning the power on, and holding your camcorder with...
... picture (DCR-DVD205/DVD305/DVD705/DVD755 32 Easy Handycam - Table of Contents Enjoying with your DVD Handycam What you can do with your DVD Handycam 14 Choosing a disc 16 Using your DVD Handycam 18 Getting Started Step 1: Checking supplied items 20 Step 2: Charging the battery pack 21 Step 3: Turning the power on, and holding your camcorder with...
Operating Guide
Page 11
... To play back a series of still images (Slide show) Recording/playback To check the remaining battery To turn off the operation confirmation beep To initialize the settings (RESET) Other part names and ...Deleting the last scene (Review/Review deleting 50 Indicators displayed during recording/playback 51 Remote Commander (DCR-DVD305/DVD755 53 Playing the picture on a TV 54 Playback on DVD devices Making the disc...the Setup items 66 Setup items 68 CAMERA SET 70 Settings to adjust your camcorder to the recording conditions (EXPOSURE/WHITE BAL./STEADYSHOT, etc.) STILL SET 75 Settings for still images...
... To play back a series of still images (Slide show) Recording/playback To check the remaining battery To turn off the operation confirmation beep To initialize the settings (RESET) Other part names and ...Deleting the last scene (Review/Review deleting 50 Indicators displayed during recording/playback 51 Remote Commander (DCR-DVD305/DVD755 53 Playing the picture on a TV 54 Playback on DVD devices Making the disc...the Setup items 66 Setup items 68 CAMERA SET 70 Settings to adjust your camcorder to the recording conditions (EXPOSURE/WHITE BAL./STEADYSHOT, etc.) STILL SET 75 Settings for still images...
Operating Guide
Page 13
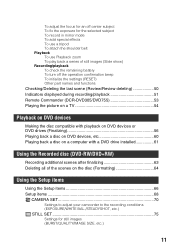
Troubleshooting Troubleshooting 109 Warning indicators and messages 127 Additional Information Using your camcorder abroad 132 About the disc 134 About the "Memory Stick" (DCR-DVD305/DVD755 135 About the "InfoLITHIUM" battery pack 137 Maintenance and precautions 139 Specifications 143 Glossary, Index Glossary 146 Index...148 13
Troubleshooting Troubleshooting 109 Warning indicators and messages 127 Additional Information Using your camcorder abroad 132 About the disc 134 About the "Memory Stick" (DCR-DVD305/DVD755 135 About the "InfoLITHIUM" battery pack 137 Maintenance and precautions 139 Specifications 143 Glossary, Index Glossary 146 Index...148 13
Operating Guide
Page 20
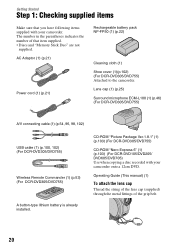
...-ROM "Nero Express 6" (1) (p.103) (For DCR-DVD105/DVD205/ DVD605/DVD705) Use when copying a disc recorded with your camcorder onto a 12cm DVD. Getting Started Step 1: Checking supplied items Make sure that item supplied. • Discs and "Memory Stick Duo" are not supplied. AC Adaptor (1) (p.21) Power cord (1) (p.21) Rechargeable battery pack NP-FP50 (1) (p.22) Cleaning...
...-ROM "Nero Express 6" (1) (p.103) (For DCR-DVD105/DVD205/ DVD605/DVD705) Use when copying a disc recorded with your camcorder onto a 12cm DVD. Getting Started Step 1: Checking supplied items Make sure that item supplied. • Discs and "Memory Stick Duo" are not supplied. AC Adaptor (1) (p.21) Power cord (1) (p.21) Rechargeable battery pack NP-FP50 (1) (p.22) Cleaning...
Operating Guide
Page 21
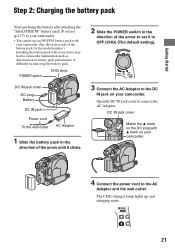
...arrow until it clicks. 2 Slide the POWER switch in the direction of the battery pack for the model number.) Installing the battery pack with excess force may lead to the DC IN jack on your camcorder. The CHG (charge) lamp lights up and charging starts. 21 Getting Started ...Step 2: Charging the battery pack You can charge the battery after attaching the "InfoLITHIUM" battery pack (P series) (p.137) to your camcorder. • You cannot use an NP-FP30 battery pack with your camcorder. (See the reverse side of the arrow to set it to ...
...arrow until it clicks. 2 Slide the POWER switch in the direction of the battery pack for the model number.) Installing the battery pack with excess force may lead to the DC IN jack on your camcorder. The CHG (charge) lamp lights up and charging starts. 21 Getting Started ...Step 2: Charging the battery pack You can charge the battery after attaching the "InfoLITHIUM" battery pack (P series) (p.137) to your camcorder. • You cannot use an NP-FP30 battery pack with your camcorder. (See the reverse side of the arrow to set it to ...
Operating Guide
Page 22
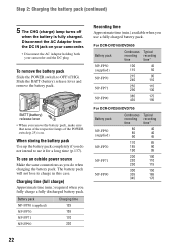
...both your camcorder and the DC plug. BATT (battery) release lever • When you remove the battery pack, make sure that none of the respective lamps of the POWER switch (p.25) is fully charged. The battery pack will not lose its charge in this case. For DCR-DVD105/DVD605 Battery pack ...Continuous Typical recording recording time time* NP-FP50 (supplied) 100 045 115 050 NP-FP70 215 095 240 110 NP-FP71 255 115 290 130 NP-FP90 385 175 435 195 For DCR-DVD205/DVD705 Battery pack Continuous Typical recording ...
...both your camcorder and the DC plug. BATT (battery) release lever • When you remove the battery pack, make sure that none of the respective lamps of the POWER switch (p.25) is fully charged. The battery pack will not lose its charge in this case. For DCR-DVD105/DVD605 Battery pack ...Continuous Typical recording recording time time* NP-FP50 (supplied) 100 045 115 050 NP-FP70 215 095 240 110 NP-FP71 255 115 290 130 NP-FP90 385 175 435 195 For DCR-DVD205/DVD705 Battery pack Continuous Typical recording ...
Operating Guide
Page 23
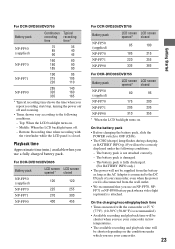
...176;C (50-86°F) is recommended.) • Available recording and playback time will be correctly displayed under which you use your camcorder. 23 Getting Started The battery pack is closed NP-FP50 (supplied) 080 095 NP-FP70 NP-FP71 175 200 205 235 NP-FP90 310 355 * When the.../ off . - Playback time Approximate time (min.) available when you use an NP-FP70, NPFP71 or NP-FP90 battery pack when a video light (optional) is damaged. - For DCR-DVD105/DVD605 Battery pack LCD screen LCD screen opened* closed NP-FP50 (supplied) 105 120 NP-FP70 225 255 NP-FP71 270 300...
...176;C (50-86°F) is recommended.) • Available recording and playback time will be correctly displayed under which you use your camcorder. 23 Getting Started The battery pack is closed NP-FP50 (supplied) 080 095 NP-FP70 NP-FP71 175 200 205 235 NP-FP90 310 355 * When the.../ off . - Playback time Approximate time (min.) available when you use an NP-FP70, NPFP71 or NP-FP90 battery pack when a video light (optional) is damaged. - For DCR-DVD105/DVD605 Battery pack LCD screen LCD screen opened* closed NP-FP50 (supplied) 105 120 NP-FP70 225 255 NP-FP71 270 300...
Operating Guide
Page 24
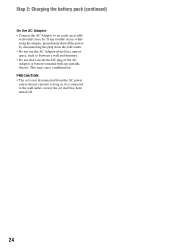
PRECAUTION • The set itself has been turned off the power by . Step 2: Charging the battery pack (continued) On the AC Adaptor • Connect the AC Adaptor to the wall outlet, even if the set is not disconnected from the wall ... AC power source (house current) as long as between a wall and furniture. • Do not short-circuit the DC plug of the AC Adaptor or battery terminal with any trouble occurs while using the adaptor, immediately shut off . 24 This may cause a malfunction. If any metallic objects.
PRECAUTION • The set itself has been turned off the power by . Step 2: Charging the battery pack (continued) On the AC Adaptor • Connect the AC Adaptor to the wall outlet, even if the set is not disconnected from the wall ... AC power source (house current) as long as between a wall and furniture. • Do not short-circuit the DC plug of the AC Adaptor or battery terminal with any trouble occurs while using the adaptor, immediately shut off . 24 This may cause a malfunction. If any metallic objects.
Operating Guide
Page 25
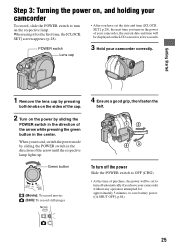
.... 2 Turn on the power by sliding the POWER switch in the center. POWER switch Lens cap 3 Hold your camcorder without any operation attempted for approximately 5 minutes, to turn off automatically if you turn on the respective lamp. Step ..., the power will be set the date and time ([CLOCK SET], p.28), the next time you leave your camcorder correctly. Green button (Movie): To record movies (Still): To record still images To turn off the power Slide the...the [CLOCK SET] screen appears (p.28). • After you have set to save battery power. ([A.SHUT OFF], p.84). 25
.... 2 Turn on the power by sliding the POWER switch in the center. POWER switch Lens cap 3 Hold your camcorder without any operation attempted for approximately 5 minutes, to turn off automatically if you turn on the respective lamp. Step ..., the power will be set the date and time ([CLOCK SET], p.28), the next time you leave your camcorder correctly. Green button (Movie): To record movies (Still): To record still images To turn off the power Slide the...the [CLOCK SET] screen appears (p.28). • After you have set to save battery power. ([A.SHUT OFF], p.84). 25
Operating Guide
Page 26
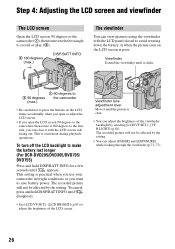
...you open or adjust the LCD screen. • If you open the LCD screen 90 degrees to the camcorder, then rotate it 180 degrees to the lens side, you want to save battery power. This setting is convenient during playback operations. The recorded picture will not be affected by the setting...To cancel, press and hold DISP/BATT INFO until disappears. • See [LCD/VF SET] - [LCD BRIGHT] (p.81) to make the battery last longer (For DCR-DVD205/DVD305/DVD705/ DVD755) Press and hold DISP/BATT INFO for a few seconds until the picture is poor. Step 4: Adjusting the LCD screen and...
...you open or adjust the LCD screen. • If you open the LCD screen 90 degrees to the camcorder, then rotate it 180 degrees to the lens side, you want to save battery power. This setting is convenient during playback operations. The recorded picture will not be affected by the setting...To cancel, press and hold DISP/BATT INFO until disappears. • See [LCD/VF SET] - [LCD BRIGHT] (p.81) to make the battery last longer (For DCR-DVD205/DVD305/DVD705/ DVD755) Press and hold DISP/BATT INFO for a few seconds until the picture is poor. Step 4: Adjusting the LCD screen and...
Operating Guide
Page 28
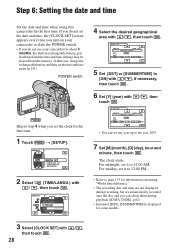
In that case, charge the rechargeable battery and then set the clock for some models. 3 Select [CLOCK SET] with touch . / , then ...the date and time, the [CLOCK SET] screen appears every time you turn on your camcorder for the first time. If you do not use your camcorder or slide the POWER switch. • If you set the date and time again (p.141...). Step 6: Setting the date and time Set the date and time when using this camcorder for about 3 months, the built-in rechargeable battery gets discharged and the date and time settings may be cleared from the memory. The clock ...
In that case, charge the rechargeable battery and then set the clock for some models. 3 Select [CLOCK SET] with touch . / , then ...the date and time, the [CLOCK SET] screen appears every time you turn on your camcorder for the first time. If you do not use your camcorder or slide the POWER switch. • If you set the date and time again (p.141...). Step 6: Setting the date and time Set the date and time when using this camcorder for about 3 months, the built-in rechargeable battery gets discharged and the date and time settings may be cleared from the memory. The clock ...
Operating Guide
Page 30
... ratio of DVD devices if you finalize it is damaged or is completed, you intend to step 6. • During Easy Handycam operation (p.34), [Format the disc? Cannot edit in Camcorder VIDEO VR OK xVIDEO mode You can play back pictures on the disc condition or recorded materials. • It may take...WIDE] or [4:3]) for a DVD-RW, and touch , then proceed to play back the disc on the DVD-RW/ DVD+RW. • Do not remove the battery pack or disconnect the AC Adaptor while formatting. When the formatting is dirty with fingerprints, etc. It may take some time to remove a disc if...
... ratio of DVD devices if you finalize it is damaged or is completed, you intend to step 6. • During Easy Handycam operation (p.34), [Format the disc? Cannot edit in Camcorder VIDEO VR OK xVIDEO mode You can play back pictures on the disc condition or recorded materials. • It may take...WIDE] or [4:3]) for a DVD-RW, and touch , then proceed to play back the disc on the DVD-RW/ DVD+RW. • Do not remove the battery pack or disconnect the AC Adaptor while formatting. When the formatting is dirty with fingerprints, etc. It may take some time to remove a disc if...
Operating Guide
Page 31
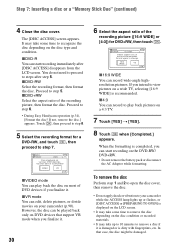
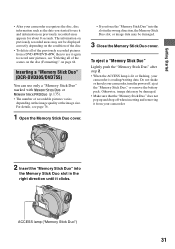
...cover. Inserting a "Memory Stick Duo" (DCR-DVD305/DVD755) You can use it and information on the image quality or the image size. For details, see "Deleting all of the previously recorded pictures from your camcorder. 2 Insert the "Memory Stick Duo" ... scenes on the disc (Formatting)" on page 64. ACCESS lamp ("Memory Stick Duo") 31 Getting Started • After your camcorder recognizes the disc, disc information such as the date you started to record new pictures, see page 76. 1 Open the ... not pop up and drop off , eject the "Memory Stick Duo," or remove the battery pack.
...cover. Inserting a "Memory Stick Duo" (DCR-DVD305/DVD755) You can use it and information on the image quality or the image size. For details, see "Deleting all of the previously recorded pictures from your camcorder. 2 Insert the "Memory Stick Duo" ... scenes on the disc (Formatting)" on page 64. ACCESS lamp ("Memory Stick Duo") 31 Getting Started • After your camcorder recognizes the disc, disc information such as the date you started to record new pictures, see page 76. 1 Open the ... not pop up and drop off , eject the "Memory Stick Duo," or remove the battery pack.
Operating Guide
Page 43
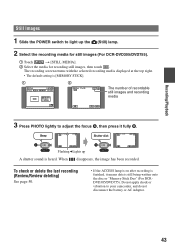
Flashing bLights up the (Still) lamp. 2 Select the recording media for still images (For DCR-DVD305/DVD755). 1 Touch t [STILL MEDIA]. 2 Select the media for recording still images, then touch . To check or delete the last recording (Review/Review deleting) See ... setting is still being written onto the disc or "Memory Stick Duo" (For DCRDVD305/DVD755). Do not apply shock or vibration to your camcorder, and do not disconnect the battery or AC Adaptor. 43 Recording/Playback Still Images 1 Slide the POWER switch to light up A shutter sound is heard. When disappears, the...
Flashing bLights up the (Still) lamp. 2 Select the recording media for still images (For DCR-DVD305/DVD755). 1 Touch t [STILL MEDIA]. 2 Select the media for recording still images, then touch . To check or delete the last recording (Review/Review deleting) See ... setting is still being written onto the disc or "Memory Stick Duo" (For DCRDVD305/DVD755). Do not apply shock or vibration to your camcorder, and do not disconnect the battery or AC Adaptor. 43 Recording/Playback Still Images 1 Slide the POWER switch to light up A shutter sound is heard. When disappears, the...
Operating Guide
Page 44
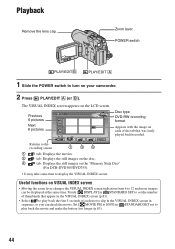
...each of the tab that appear in STANDARD SET not to play back the movie and make the battery last longer (p.83). 44 Zoom lever POWER switch PLAY/EDITB PLAY/EDIT A 1 Slide the POWER... from 6 to set the number of thumbnails that was lastly played back/recorded. Useful functions on your camcorder. 2 Press PLAY/EDIT A (or B). Touch [ DISPLAY] in STANDARD SET to 12 and more images...screen. Playback Remove the lens cap. The VISUAL INDEX screen appears on the "Memory Stick Duo" (For DCR-DVD305/DVD755). • It may take some time to the recording screen 1 23 1 tab: Displays the...
...each of the tab that appear in STANDARD SET not to play back the movie and make the battery last longer (p.83). 44 Zoom lever POWER switch PLAY/EDITB PLAY/EDIT A 1 Slide the POWER... from 6 to set the number of thumbnails that was lastly played back/recorded. Useful functions on your camcorder. 2 Press PLAY/EDIT A (or B). Touch [ DISPLAY] in STANDARD SET to 12 and more images...screen. Playback Remove the lens cap. The VISUAL INDEX screen appears on the "Memory Stick Duo" (For DCR-DVD305/DVD755). • It may take some time to the recording screen 1 23 1 tab: Displays the...

Operating Guide
Page 49
...the LCD frame. To initialize the settings (RESET).. qd Press RESET qd to operate your camcorder. A frame appears on the LCD screen. 3 Touch the portion that you press this button once, BATTERY INFO appears on the still image playback screen. Recording/playback To check the remaining...approx.) 49 Press the button while BATTERY INFO appears on page 83. qa Speaker Sounds come out from the selected image. The default setting is connected, it takes precedence over the internal microphone (For DCR-DVD305/ DVD755)(p.102). 8 Remote sensor (For DCR-DVD305/ DVD755) Point the Remote ...
...the LCD frame. To initialize the settings (RESET).. qd Press RESET qd to operate your camcorder. A frame appears on the LCD screen. 3 Touch the portion that you press this button once, BATTERY INFO appears on the still image playback screen. Recording/playback To check the remaining...approx.) 49 Press the button while BATTERY INFO appears on page 83. qa Speaker Sounds come out from the selected image. The default setting is connected, it takes precedence over the internal microphone (For DCR-DVD305/ DVD755)(p.102). 8 Remote sensor (For DCR-DVD305/ DVD755) Point the Remote ...


