
Child Safety: It Makes A Difference Where Your TV Stands
Page 1
... as VCRs and remotes that children can become excited while watching a program and can potentially push or pull a TV over. 7 Share our safety message on or play with your home. The home theater entertainment experience is large enough to support the weight of your television (and other electronic components). 2 Use appropriate angle braces, straps...
... as VCRs and remotes that children can become excited while watching a program and can potentially push or pull a TV over. 7 Share our safety message on or play with your home. The home theater entertainment experience is large enough to support the weight of your television (and other electronic components). 2 Use appropriate angle braces, straps...

HDMI control guide
Page 2
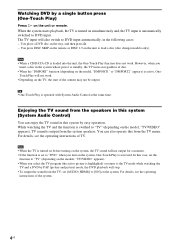
... the respective HDMI CONTROL functions to your TV so that are compatible with the HDMI CONTROL function with HDMI CONTROL) by HDMI CEC (Consumer Electronics Control) for DVD input mode automatically. - By connecting Sony components that the signal from the system appears on . One-Touch Play: By... pressing only H on the unit or remote, the TV turns on your TV (which is set the HDMI CONTROL function as ...
... the respective HDMI CONTROL functions to your TV so that are compatible with the HDMI CONTROL function with HDMI CONTROL) by HDMI CEC (Consumer Electronics Control) for DVD input mode automatically. - By connecting Sony components that the signal from the system appears on . One-Touch Play: By... pressing only H on the unit or remote, the TV turns on your TV (which is set the HDMI CONTROL function as ...
HDMI control guide
Page 4
... is automatically switched to load a disc (disc changer models only). You place a DVD disc on the unit to DVD input. However, when you turn on the TV, the start of the system. 4US Enjoying the TV sound from the system speakers. For details, see the operating instructions of disc. • When the "DMPORT" function (depending on...
... is automatically switched to load a disc (disc changer models only). You place a DVD disc on the unit to DVD input. However, when you turn on the TV, the start of the system. 4US Enjoying the TV sound from the system speakers. For details, see the operating instructions of disc. • When the "DMPORT" function (depending on...

HDMI control guide
Page 5
... to on STB or a digital satellite tuner which is in the following illustration are examples. Video signal Sound signal TV to HDMI 2 (HDMI cord) to HDMI 1 (HDMI cord) GUSB DAV STB Sets the [STB SYNCHRO] to the STB or digital satellite tuner. To Enjoy STB (Set Top Box) digital... the sound of the STB or digital satellite tuner from the speakers of the system. Connect to a TV with DIGITAL IN (COAXIAL or OPTICAL) jack only) You can enjoy Multi Channel Broadcasted Audio from the speakers of the system. The default setting is made. The names of this function on . 8 Press...
... to on STB or a digital satellite tuner which is in the following illustration are examples. Video signal Sound signal TV to HDMI 2 (HDMI cord) to HDMI 1 (HDMI cord) GUSB DAV STB Sets the [STB SYNCHRO] to the STB or digital satellite tuner. To Enjoy STB (Set Top Box) digital... the sound of the STB or digital satellite tuner from the speakers of the system. Connect to a TV with DIGITAL IN (COAXIAL or OPTICAL) jack only) You can enjoy Multi Channel Broadcasted Audio from the speakers of the system. The default setting is made. The names of this function on . 8 Press...

HDMI control guide
Page 6
Note • In order to set the [STB SYNCHRO] function, first set [HDMI CONTROL] to [ON] (see page 2). • Depending on the TV, this function may not work when STB or a digital satellite tuner is connected to the HDMI 1 jack of the TV. 6US
Note • In order to set the [STB SYNCHRO] function, first set [HDMI CONTROL] to [ON] (see page 2). • Depending on the TV, this function may not work when STB or a digital satellite tuner is connected to the HDMI 1 jack of the TV. 6US
Operating Instructions
Page 2
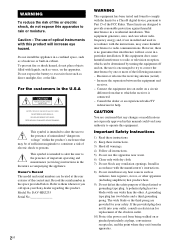
... block any changes or modifications not expressly approved in this manual could void your Sony dealer regarding this apparatus to the presence of important operating and maintenance (servicing) instructions... numbers are designed to comply with one or more of the following measures: - DAV-HDZ235 Serial No 2US WARNING This equipment has been tested and found to provide reasonable protection.... Reorient or relocate the receiving antenna (aerial). - Consult the dealer or an experienced radio/TV technician for a Class B digital device, pursuant to excessive heat such as a bookcase or ...
... block any changes or modifications not expressly approved in this manual could void your Sony dealer regarding this apparatus to the presence of important operating and maintenance (servicing) instructions... numbers are designed to comply with one or more of the following measures: - DAV-HDZ235 Serial No 2US WARNING This equipment has been tested and found to provide reasonable protection.... Reorient or relocate the receiving antenna (aerial). - Consult the dealer or an experienced radio/TV technician for a Class B digital device, pursuant to excessive heat such as a bookcase or ...

Operating Instructions
Page 4
...System and TV 10 Step 2: Positioning the System ...14 Step 3: Performing the Quick Setup 15 Getting Started - Turning off the Demonstration 18 Installing the Speakers on a Wall.......... 19 Connecting the TV (Advanced 20 Connecting Other Components 24 Basic Operations Playing Discs 26 Enjoying the Radio or Other Components 27 Enjoying TV...Delay Between the Picture and Sound 44 (A/V SYNC) About MP3 Audio Tracks and JPEG Image Files 45 Playing DATA CDs or DATA DVDs with MP3 Audio Tracks and JPEG Image Files 47 Playing Audio Tracks and Images as a Slide Show with Sound 49 Playing VIDEO ...
...System and TV 10 Step 2: Positioning the System ...14 Step 3: Performing the Quick Setup 15 Getting Started - Turning off the Demonstration 18 Installing the Speakers on a Wall.......... 19 Connecting the TV (Advanced 20 Connecting Other Components 24 Basic Operations Playing Discs 26 Enjoying the Radio or Other Components 27 Enjoying TV...Delay Between the Picture and Sound 44 (A/V SYNC) About MP3 Audio Tracks and JPEG Image Files 45 Playing DATA CDs or DATA DVDs with MP3 Audio Tracks and JPEG Image Files 47 Playing Audio Tracks and Images as a Slide Show with Sound 49 Playing VIDEO ...

Operating Instructions
Page 8
...system plays DVDs and VIDEO CDs according to read the operating instructions supplied with the DVDs or VIDEO CDs. DVD VIDEOs labeled ALL will also play any other DVD VIDEO, the message [Playback prohibited by area limitations.] will only play DVDs...DVD VIDEO is protected by Macrovision. patents and other limited viewing uses only unless otherwise authorized by U.S. This system incorporates with the same region code. Use of this system...is prohibited. Region code Your system has a region code printed on the rear of the unit and will appear on the TV screen. "Dolby", "Pro ...
...system plays DVDs and VIDEO CDs according to read the operating instructions supplied with the DVDs or VIDEO CDs. DVD VIDEOs labeled ALL will also play any other DVD VIDEO, the message [Playback prohibited by area limitations.] will only play DVDs...DVD VIDEO is protected by Macrovision. patents and other limited viewing uses only unless otherwise authorized by U.S. This system incorporates with the same region code. Use of this system...is prohibited. Region code Your system has a region code printed on the rear of the unit and will appear on the TV screen. "Dolby", "Pro ...
Operating Instructions
Page 10
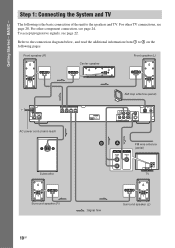
... R FRONT L SUR R SUR L AC power cord (mains lead) Subwoofer OUT (DVD ONLY) AM loop antenna (aerial) TV / VIDEO (DVD ONLY) R AUDIO IN L VIDEO Y PB/CB PR/CR COMPONENT VIDEO OUT S VIDEO (DVD ONLY) MONITOR OUT COAXIAL AM FM75 B A AUDIO OUT L VIDEO IN R FM wire... antenna (aerial) TV Surround speaker (R) 10US :Signal flow Surround speaker (L) For other TV connections, see page 24. Step 1: Connecting the System and TV The following is the basic connection...
... R FRONT L SUR R SUR L AC power cord (mains lead) Subwoofer OUT (DVD ONLY) AM loop antenna (aerial) TV / VIDEO (DVD ONLY) R AUDIO IN L VIDEO Y PB/CB PR/CR COMPONENT VIDEO OUT S VIDEO (DVD ONLY) MONITOR OUT COAXIAL AM FM75 B A AUDIO OUT L VIDEO IN R FM wire... antenna (aerial) TV Surround speaker (R) 10US :Signal flow Surround speaker (L) For other TV connections, see page 24. Step 1: Connecting the System and TV The following is the basic connection...

Operating Instructions
Page 12
...(aerial) for best AM broadcast sound. 4 Make sure the AM loop antenna (aerial) is connected firmly by pulling softly. 12US BASIC - 2 Connecting the TV Required cords A Video cord . Note • Do not place the AM loop antenna (aerial) near the unit or other AV equipment, as noise may ...or cord (B) can be connected to the AM antenna (aerial) terminals. Tip • Adjust the direction of the antenna (aerial) is designed to output the TV sound or stereo sound of a 2 channel source from the plastic stand. 2 Set up the AM loop antenna (aerial). 3 Connect the cords to either terminal...
...(aerial) for best AM broadcast sound. 4 Make sure the AM loop antenna (aerial) is connected firmly by pulling softly. 12US BASIC - 2 Connecting the TV Required cords A Video cord . Note • Do not place the AM loop antenna (aerial) near the unit or other AV equipment, as noise may ...or cord (B) can be connected to the AM antenna (aerial) terminals. Tip • Adjust the direction of the antenna (aerial) is designed to output the TV sound or stereo sound of a 2 channel source from the plastic stand. 2 Set up the AM loop antenna (aerial). 3 Connect the cords to either terminal...
Operating Instructions
Page 15
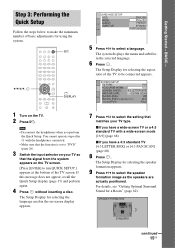
...Make sure that the function is set to "DVD" (page 26). 3 Switch the input selector on the TV. 2 Press [/1. If this message does not appear, recall the Quick Setup display (page 17) and perform again. 4 Press without inserting a disc. BASIC - The system displays the menu and subtitles in the on-screen... display appears. 7 Press X/x to select the setting that the signal from the system appears on the TV screen. [Press [ENTER] to run QUICK SETUP.] appears at the bottom of the TV to select the speaker formation image as the speakers are actually positioned. You cannot operate steps...
...Make sure that the function is set to "DVD" (page 26). 3 Switch the input selector on the TV. 2 Press [/1. If this message does not appear, recall the Quick Setup display (page 17) and perform again. 4 Press without inserting a disc. BASIC - The system displays the menu and subtitles in the on-screen... display appears. 7 Press X/x to select the setting that the signal from the system appears on the TV screen. [Press [ENTER] to run QUICK SETUP.] appears at the bottom of the TV to select the speaker formation image as the speakers are actually positioned. You cannot operate steps...

Operating Instructions
Page 20
... COMPONENT VIDEO OUT S VIDEO (DVD ONLY) MONITOR OUT COAXIAL AM FM75 To COMPONENT VIDEO OUT To S VIDEO C Y PB/CB PR/CR B S VIDEO IN A VIDEO IN TV with COMPONENT VIDEO IN jacks TV with S VIDEO IN jack TV with VIDEO IN jack :Signal flow * HDMI (high-definition multimedia interface) The system incorporates High-Definition Multimedia Interface...
... COMPONENT VIDEO OUT S VIDEO (DVD ONLY) MONITOR OUT COAXIAL AM FM75 To COMPONENT VIDEO OUT To S VIDEO C Y PB/CB PR/CR B S VIDEO IN A VIDEO IN TV with COMPONENT VIDEO IN jacks TV with S VIDEO IN jack TV with VIDEO IN jack :Signal flow * HDMI (high-definition multimedia interface) The system incorporates High-Definition Multimedia Interface...
Operating Instructions
Page 21
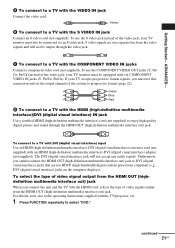
...that are on the computer displays). continued 21US A To connect to progressive format (page 22). To select the type of the system to a TV with the HDMI cord, selects the type of video signals output from the HDMI OUT (highdefinition multimedia interface out) jack When you ...TV/projector, etc. 1 Press FUNCTION repeatedly to the operating instructions supplied with via an S video jack. To use the S video jack instead of the video jack, your TV monitor must be connected via COMPONENT VIDEO IN jacks (Y, PB/CB, PR/CR). ADVANCED - For details, refer also to select "DVD...
...that are on the computer displays). continued 21US A To connect to progressive format (page 22). To select the type of the system to a TV with the HDMI cord, selects the type of video signals output from the HDMI OUT (highdefinition multimedia interface out) jack When you ...TV/projector, etc. 1 Press FUNCTION repeatedly to the operating instructions supplied with via an S video jack. To use the S video jack instead of the video jack, your TV monitor must be connected via COMPONENT VIDEO IN jacks (Y, PB/CB, PR/CR). ADVANCED - For details, refer also to select "DVD...

Operating Instructions
Page 22
...current type of video signals appears in the front panel display when the system outputs progressive signals. 1 Press FUNCTION repeatedly to a TV that accepts progressive signals. When connecting to a standard 4:3 screen TV Depending on the front panel lights up in the front panel display.... Note • When the HDMI indicator on the disc, the image may appear. 2 Press VIDEO FORMAT. Each time you need to connect to select "DVD...
...current type of video signals appears in the front panel display when the system outputs progressive signals. 1 Press FUNCTION repeatedly to a TV that accepts progressive signals. When connecting to a standard 4:3 screen TV Depending on the front panel lights up in the front panel display.... Note • When the HDMI indicator on the disc, the image may appear. 2 Press VIDEO FORMAT. Each time you need to connect to select "DVD...

Operating Instructions
Page 23
... current signal appears in progressive signal format, sections of some types of DVD software that the picture will appear if you connect the unit and the TV with the HDMI cord during the system is set to "NORMAL (INTERLACE)," the system is derived from the HDMI OUT jack. Video-based software is used for...
... current signal appears in progressive signal format, sections of some types of DVD software that the picture will appear if you connect the unit and the TV with the HDMI cord during the system is set to "NORMAL (INTERLACE)," the system is derived from the HDMI OUT jack. Video-based software is used for...
Operating Instructions
Page 24
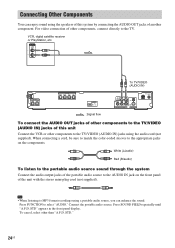
... the speakers of other components to the TV. AUDIO OUT L R To TV/VIDEO (AUDIO IN) SPEAKER CENTER WOOFER SPEAKER FRONT R FRONT L SUR R SUR L OUT (DVD ONLY) :Signal flow TV / VIDEO (DVD ONLY) R AUDIO IN L VIDEO Y PB/CB PR/CR COMPONENT VIDEO OUT S VIDEO (DVD ONLY) MONITOR OUT COAXIAL AM FM75 To...STD." 24US Connecting Other Components You can enhance the sound. For video connection of other components, connect directly to the TV/VIDEO (AUDIO IN) jacks of this system by connecting the AUDIO OUT jacks of the unit with the stereo mini-plug cord (not supplied). STD" appears in...
... the speakers of other components to the TV. AUDIO OUT L R To TV/VIDEO (AUDIO IN) SPEAKER CENTER WOOFER SPEAKER FRONT R FRONT L SUR R SUR L OUT (DVD ONLY) :Signal flow TV / VIDEO (DVD ONLY) R AUDIO IN L VIDEO Y PB/CB PR/CR COMPONENT VIDEO OUT S VIDEO (DVD ONLY) MONITOR OUT COAXIAL AM FM75 To...STD." 24US Connecting Other Components You can enhance the sound. For video connection of other components, connect directly to the TV/VIDEO (AUDIO IN) jacks of this system by connecting the AUDIO OUT jacks of the unit with the stereo mini-plug cord (not supplied). STD" appears in...

Operating Instructions
Page 26
... Guide (supplied separately). Place one disc on the tray, and then press A. Refer to select "DVD." 4 Press A. 26US Note • When you play ). Unless the system is set the HDMI CONTROL function to on (page 70), the TV that the disc is connected to this may not appear on the... TV screen. • When you set to "DVD," press FUNCTION to the operating instructions supplied with the system. For details, see the HDMI CONTROL Guide (supplied separately). Basic ...
... Guide (supplied separately). Place one disc on the tray, and then press A. Refer to select "DVD." 4 Press A. 26US Note • When you play ). Unless the system is set the HDMI CONTROL function to on (page 70), the TV that the disc is connected to this may not appear on the... TV screen. • When you set to "DVD," press FUNCTION to the operating instructions supplied with the system. For details, see the HDMI CONTROL Guide (supplied separately). Basic ...

Operating Instructions
Page 27
... scene** (instant advance) during playback. Refer to adjust the sound volume. DVD t TUNER FM t TUNER AM t TV/VIDEO t AUDIO t ... To cancel, press it again or VOLUME + to the operating instructions supplied with some scenes. Enjoying the Radio or Other Components X/x/c, FUNCTION SYSTEM MENU Selecting the connected component You can use the instant replay...
... scene** (instant advance) during playback. Refer to adjust the sound volume. DVD t TUNER FM t TUNER AM t TV/VIDEO t AUDIO t ... To cancel, press it again or VOLUME + to the operating instructions supplied with some scenes. Enjoying the Radio or Other Components X/x/c, FUNCTION SYSTEM MENU Selecting the connected component You can use the instant replay...

Operating Instructions
Page 28
... Press . For details, see page 30. The output level is made. 6 Press SYSTEM MENU. The system menu turns off. For details of sound field, see "Step 1: Connecting the System and TV" (page 10), "Connecting the TV (Advanced)" (page 20), and "Connecting Other Components" (page 24). This is not ... can change the input level from the sound of the other components. 1 Press FUNCTION repeatedly until "TV/ VIDEO" or "AUDIO" appears in the front panel display. 2 Press SYSTEM MENU. 3 Press X/x repeatedly until "ATTENUATE" appears in the front panel display. Basic Operations Changing...
... Press . For details, see page 30. The output level is made. 6 Press SYSTEM MENU. The system menu turns off. For details of sound field, see "Step 1: Connecting the System and TV" (page 10), "Connecting the TV (Advanced)" (page 20), and "Connecting Other Components" (page 24). This is not ... can change the input level from the sound of the other components. 1 Press FUNCTION repeatedly until "TV/ VIDEO" or "AUDIO" appears in the front panel display. 2 Press SYSTEM MENU. 3 Press X/x repeatedly until "ATTENUATE" appears in the front panel display. Basic Operations Changing...

Operating Instructions
Page 34
...] (VIDEO CD/ Super VCD only) 3 Press . you pressed x and "RESUME" appears in VR mode, VIDEO CDs, CDs, DATA CDs, and DATA DVDs, the system remembers the resume playback point for the current disc. • Resume Play does not work during Program Play and Shuffle Play. • This function may...you stop playback. Note • Depending on where you stop the disc, the system may not resume playback from the point where you change the function by Scene (Picture Navigation) You can divide the TV screen into 9 subscreens and find the desired scene quickly. 1 Press PICTURE NAVI ...
...] (VIDEO CD/ Super VCD only) 3 Press . you pressed x and "RESUME" appears in VR mode, VIDEO CDs, CDs, DATA CDs, and DATA DVDs, the system remembers the resume playback point for the current disc. • Resume Play does not work during Program Play and Shuffle Play. • This function may...you stop playback. Note • Depending on where you stop the disc, the system may not resume playback from the point where you change the function by Scene (Picture Navigation) You can divide the TV screen into 9 subscreens and find the desired scene quickly. 1 Press PICTURE NAVI ...


