Operating Instructions
Page 4
... the area. • "DVD" may be purchased as follows: • DAV-HDX277WC: Surround amplifier (optional) S-AIR receiver (supplied) • DAV-HDX279W: Surround amplifier (supplied) S-AIR receiver (optional) • DAV-HDX576WF: Surround amplifier (supplied) S-AIR receiver (supplied) The S-AIR product can enjoy system sound in feet (ft) for illustration purposes. DAV-HDX277WC is the model used for North American models. • The...
... the area. • "DVD" may be purchased as follows: • DAV-HDX277WC: Surround amplifier (optional) S-AIR receiver (supplied) • DAV-HDX279W: Surround amplifier (supplied) S-AIR receiver (optional) • DAV-HDX576WF: Surround amplifier (supplied) S-AIR receiver (supplied) The S-AIR product can enjoy system sound in feet (ft) for illustration purposes. DAV-HDX277WC is the model used for North American models. • The...
Operating Instructions
Page 5
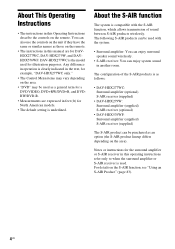
Table of Contents About This Operating Instructions..........4 About the S-AIR function 4 Playable Discs 6 Getting Started Step 1: Assembling the Speakers 13 Step 2: Positioning the System... 18 Step 3: Connecting the System... 22 Step 4: Setting up the Wireless System 42 Step 5: Performing the Quick Setup 44 Step 6: Enjoying...Radio 77 Control for HDMI/External Audio Device Using the Control for HDMI Function for "BRAVIA" Sync 79 Using the DIGITAL MEDIA PORT Adapter 82 Using an S-AIR Product 83 Other Operations Getting Optimal Surround Sound for a Room 89 Calibrating the Appropriate ...
Table of Contents About This Operating Instructions..........4 About the S-AIR function 4 Playable Discs 6 Getting Started Step 1: Assembling the Speakers 13 Step 2: Positioning the System... 18 Step 3: Connecting the System... 22 Step 4: Setting up the Wireless System 42 Step 5: Performing the Quick Setup 44 Step 6: Enjoying...Radio 77 Control for HDMI/External Audio Device Using the Control for HDMI Function for "BRAVIA" Sync 79 Using the DIGITAL MEDIA PORT Adapter 82 Using an S-AIR Product 83 Other Operations Getting Optimal Surround Sound for a Room 89 Calibrating the Appropriate ...
Operating Instructions
Page 8
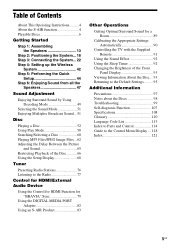
...limited viewing uses only unless otherwise authorized by Macrovision. Depending on the rear of Sony Corporation. 8US This system incorporates with the DVD or VIDEO CD. "S-AIR" and its logo are recorded in the first session. Copyrights This product incorporates ...copyright protection technology that is prohibited. Reverse engineering or disassembly is protected by U.S. This system incorporates High-Definition Multimedia Interface (HDMITM) technology. "BRAVIA" and are...
...limited viewing uses only unless otherwise authorized by Macrovision. Depending on the rear of Sony Corporation. 8US This system incorporates with the DVD or VIDEO CD. "S-AIR" and its logo are recorded in the first session. Copyrights This product incorporates ...copyright protection technology that is prohibited. Reverse engineering or disassembly is protected by U.S. This system incorporates High-Definition Multimedia Interface (HDMITM) technology. "BRAVIA" and are...
Operating Instructions
Page 9
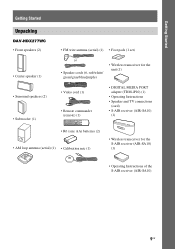
Getting Started Getting Started Unpacking DAV-HDX277WC • Front speakers (2) • Center speaker (1) • Surround speakers (2) • Subwoofer (1) • FM wire antenna (aerial) (1) • Foot pads (1 set) or • Speaker... Video cord (1) • Remote commander (remote) (1) • DIGITAL MEDIA PORT adapter (TDM-iP10) (1) • Operating Instructions • Speaker and TV connections (card) • S-AIR receiver (AIR-SA10) (1) • R6 (size AA) batteries (2) • AM loop antenna (aerial) (1) • Calibration mic (1) • Wireless transceiver for the...
Getting Started Getting Started Unpacking DAV-HDX277WC • Front speakers (2) • Center speaker (1) • Surround speakers (2) • Subwoofer (1) • FM wire antenna (aerial) (1) • Foot pads (1 set) or • Speaker... Video cord (1) • Remote commander (remote) (1) • DIGITAL MEDIA PORT adapter (TDM-iP10) (1) • Operating Instructions • Speaker and TV connections (card) • S-AIR receiver (AIR-SA10) (1) • R6 (size AA) batteries (2) • AM loop antenna (aerial) (1) • Calibration mic (1) • Wireless transceiver for the...
Operating Instructions
Page 11
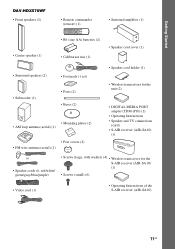
Getting Started DAV-HDX576WF • Front speakers (2) • Remote commander (remote) (1) • Surround amplifier (1) • Center speaker (1) • R6 (size AA) batteries (2) • Calibration mic (1) • Speaker ... holder (1) • Wireless transceivers for the unit (2) • DIGITAL MEDIA PORT adapter (TDM-iP10) (1) • Operating Instructions • Speaker and TV connections (card) • S-AIR receiver (AIR-SA10) (1) or • Speaker cords (6, red/white/ green/gray/blue/purple) • Screws (large, with washer) (4) • Wireless transceiver for the...
Getting Started DAV-HDX576WF • Front speakers (2) • Remote commander (remote) (1) • Surround amplifier (1) • Center speaker (1) • R6 (size AA) batteries (2) • Calibration mic (1) • Speaker ... holder (1) • Wireless transceivers for the unit (2) • DIGITAL MEDIA PORT adapter (TDM-iP10) (1) • Operating Instructions • Speaker and TV connections (card) • S-AIR receiver (AIR-SA10) (1) or • Speaker cords (6, red/white/ green/gray/blue/purple) • Screws (large, with washer) (4) • Wireless transceiver for the...
Operating Instructions
Page 22
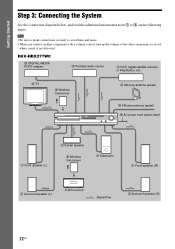
DAV-HDX277WC 3 DIGITAL MEDIA PORT adapter 3 Portable audio source 3 VCR, digital satellite receiver, or PlayStation, etc. 2 TV 5 Wireless transceiver 4 AM loop antenna (aerial) 4 FM wire antenna (aerial) 6 AC power cord (mains lead) 1 Front speaker (L) 1 Center speaker 5 Wireless transceiver 1 Subwoofer 1 Front speaker (R) 1 Surround speaker (L) S-AIR... receiver :Signal flow 1 Surround speaker (R) 22US Getting Started Step 3: Connecting the System See the connection diagram below, and read the additional ...
DAV-HDX277WC 3 DIGITAL MEDIA PORT adapter 3 Portable audio source 3 VCR, digital satellite receiver, or PlayStation, etc. 2 TV 5 Wireless transceiver 4 AM loop antenna (aerial) 4 FM wire antenna (aerial) 6 AC power cord (mains lead) 1 Front speaker (L) 1 Center speaker 5 Wireless transceiver 1 Subwoofer 1 Front speaker (R) 1 Surround speaker (L) S-AIR... receiver :Signal flow 1 Surround speaker (R) 22US Getting Started Step 3: Connecting the System See the connection diagram below, and read the additional ...
Operating Instructions
Page 26
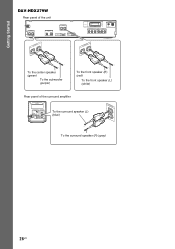
Getting Started DAV-HDX279W Rear panel of the unit SPEAKER CENTER SUBWOOFER SPEAKER TV/VIDEO DIGITAL IN COAXIAL OPTICAL FRONT R FRONT L HDMI OUT DMPORT DC5V 0.7A MAX SPEAKER ... center speaker (green) To the subwoofer (purple) To the front speaker (R) (red) To the front speaker (L) (white) Rear panel of the surround amplifier EZW-RT10 S-AIR ID A B C PAIRING SPEAKER L SURROUND SELECTOR R SURROUND SURROUND BACK To the surround speaker (L) (blue) SPEAKER L R To the surround speaker (R) (gray) 26US
Getting Started DAV-HDX279W Rear panel of the unit SPEAKER CENTER SUBWOOFER SPEAKER TV/VIDEO DIGITAL IN COAXIAL OPTICAL FRONT R FRONT L HDMI OUT DMPORT DC5V 0.7A MAX SPEAKER ... center speaker (green) To the subwoofer (purple) To the front speaker (R) (red) To the front speaker (L) (white) Rear panel of the surround amplifier EZW-RT10 S-AIR ID A B C PAIRING SPEAKER L SURROUND SELECTOR R SURROUND SURROUND BACK To the surround speaker (L) (blue) SPEAKER L R To the surround speaker (R) (gray) 26US
Operating Instructions
Page 27
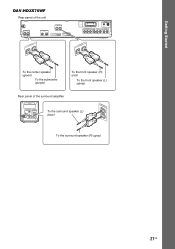
Getting Started DAV-HDX576WF Rear panel of the unit SPEAKER CENTER SUBWOOFER SPEAKER TV DIGITAL IN COAXIAL OPTICAL FRONT R FRONT L HDMI OUT DMPORT DC5V 0.7A MAX SPEAKER CENTER ... center speaker (green) To the subwoofer (purple) To the front speaker (R) (red) To the front speaker (L) (white) Rear panel of the surround amplifier EZW-RT10 S-AIR ID A B C PAIRING SPEAKER L SURROUND SELECTOR R SURROUND SURROUND BACK To the surround speaker (L) (blue) SPEAKER L R To the surround speaker (R) (gray) 27US
Getting Started DAV-HDX576WF Rear panel of the unit SPEAKER CENTER SUBWOOFER SPEAKER TV DIGITAL IN COAXIAL OPTICAL FRONT R FRONT L HDMI OUT DMPORT DC5V 0.7A MAX SPEAKER CENTER ... center speaker (green) To the subwoofer (purple) To the front speaker (R) (red) To the front speaker (L) (white) Rear panel of the surround amplifier EZW-RT10 S-AIR ID A B C PAIRING SPEAKER L SURROUND SELECTOR R SURROUND SURROUND BACK To the surround speaker (L) (blue) SPEAKER L R To the surround speaker (R) (gray) 27US
Operating Instructions
Page 38
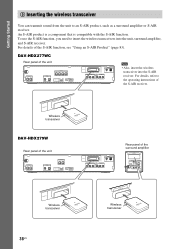
... the wireless transceivers into the S-AIR receiver. For details, refer to the operating instructions of the S-AIR function, see "Using an S-AIR Product" (page 83). For details of the S-AIR receiver. EZW-RT10 Wireless transceiver DAV-HDX279W Rear panel of the unit...8226; Also, insert the wireless transceiver into the unit, surround amplifier, and S-AIR receiver. An S-AIR product is a component that is compatible with the S-AIR function. DAV-HDX277WC Rear panel of the surround amplifier EZW-RT10 S-AIR ID A B C PAIRING SPEAKER L SURROUND SELECTOR R SURROUND SURROUND BACK EZW-...
... the wireless transceivers into the S-AIR receiver. For details, refer to the operating instructions of the S-AIR function, see "Using an S-AIR Product" (page 83). For details of the S-AIR receiver. EZW-RT10 Wireless transceiver DAV-HDX279W Rear panel of the unit...8226; Also, insert the wireless transceiver into the unit, surround amplifier, and S-AIR receiver. An S-AIR product is a component that is compatible with the S-AIR function. DAV-HDX277WC Rear panel of the surround amplifier EZW-RT10 S-AIR ID A B C PAIRING SPEAKER L SURROUND SELECTOR R SURROUND SURROUND BACK EZW-...
Operating Instructions
Page 39
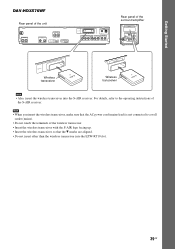
...DAV-HDX576WF Rear panel of the unit SPEAKER CENTER SUBWOOFER SPEAKER TV DIGITAL IN COAXIAL OPTICAL FRONT R FRONT L HDMI OUT DMPORT DC5V 0.7A MAX EZW-RT10 COMPONENT VIDEO OUT VIDEO OUT ANTENNA FM AM COAXIAL 75 TV SAT/CABLE Y PB/CB PR/CR R AUDIO IN L R AUDIO IN L Rear panel of the S-AIR..., make sure that the AC power cord (mains lead) is not connected to the operating instructions of the surround amplifier EZW-RT10 S-AIR ID A B C PAIRING SPEAKER L SURROUND SELECTOR R SURROUND SURROUND BACK EZW-RT10 Wireless transceiver EZW-RT10 Wireless transceiver Note • ...
...DAV-HDX576WF Rear panel of the unit SPEAKER CENTER SUBWOOFER SPEAKER TV DIGITAL IN COAXIAL OPTICAL FRONT R FRONT L HDMI OUT DMPORT DC5V 0.7A MAX EZW-RT10 COMPONENT VIDEO OUT VIDEO OUT ANTENNA FM AM COAXIAL 75 TV SAT/CABLE Y PB/CB PR/CR R AUDIO IN L R AUDIO IN L Rear panel of the S-AIR..., make sure that the AC power cord (mains lead) is not connected to the operating instructions of the surround amplifier EZW-RT10 S-AIR ID A B C PAIRING SPEAKER L SURROUND SELECTOR R SURROUND SURROUND BACK EZW-RT10 Wireless transceiver EZW-RT10 Wireless transceiver Note • ...
Operating Instructions
Page 40
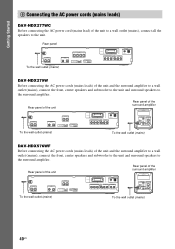
...VIDEO Y PB/CB PR/CR R AUDIO IN L Rear panel of the surround amplifier EZW-RT10 S-AIR ID A B C PAIRING SPEAKER L SURROUND SELECTOR R SURROUND SURROUND BACK To the wall outlet (mains) DAV-HDX576WF Before connecting the AC power cords (mains leads) of the unit and the surround amplifier to ...center speakers and subwoofer to the unit and surround speakers to the surround amplifier. Getting Started 6 Connecting the AC power cords (mains leads) DAV-HDX277WC Before connecting the AC power cord (mains lead) of the unit to a wall outlet (mains), connect all the speakers to the surround ...
...VIDEO Y PB/CB PR/CR R AUDIO IN L Rear panel of the surround amplifier EZW-RT10 S-AIR ID A B C PAIRING SPEAKER L SURROUND SELECTOR R SURROUND SURROUND BACK To the wall outlet (mains) DAV-HDX576WF Before connecting the AC power cords (mains leads) of the unit and the surround amplifier to ...center speakers and subwoofer to the unit and surround speakers to the surround amplifier. Getting Started 6 Connecting the AC power cords (mains leads) DAV-HDX277WC Before connecting the AC power cord (mains lead) of the unit to a wall outlet (mains), connect all the speakers to the surround ...
Operating Instructions
Page 42
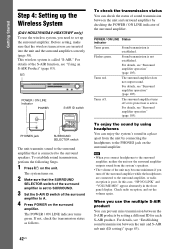
... off or its protection is established. Check radio reception, and set up the Wireless System (DAV-HDX279W/DAV-HDX576WF only) To use the multiple S-AIR product You can enjoy the system's sound in the front panel display. When you use the wireless system, you turn off . Getting Started Step 4: Setting up the surround amplifier. This wireless...
... off or its protection is established. Check radio reception, and set up the Wireless System (DAV-HDX279W/DAV-HDX576WF only) To use the multiple S-AIR product You can enjoy the system's sound in the front panel display. When you use the wireless system, you turn off . Getting Started Step 4: Setting up the surround amplifier. This wireless...
Operating Instructions
Page 43
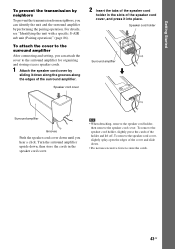
... surround amplifier by performing the pairing operation. Turn the surround amplifier upside down until you hear a click. For details, see "Identifying the unit with a specific S-AIR sub unit (Pairing operation)" (page 86). Getting Started To prevent the transmission by neighbors To prevent the transmission from neighbors, you can attach the cover...
... surround amplifier by performing the pairing operation. Turn the surround amplifier upside down until you hear a click. For details, see "Identifying the unit with a specific S-AIR sub unit (Pairing operation)" (page 86). Getting Started To prevent the transmission by neighbors To prevent the transmission from neighbors, you can attach the cover...
Operating Instructions
Page 50
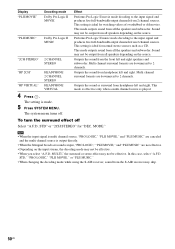
...STD," "PRO LOGIC," "PLII MOVIE," or "PLII MUSIC." • When changing the decoding mode while using the S-AIR receiver, sound from headphone left and right. The system menu turns off Select "A.F.D. This mode outputs sound from headphone left and right speakers and subwoofer. Multi channel surround formats... are downmixed to 2 channels. This mode is effective only when a multi channel source is made. 5 Press SYSTEM MENU. MODE." Sound may not be output from all the speakers and subwoofer. Sound may not be effective. Multi channel surround formats ...
...STD," "PRO LOGIC," "PLII MOVIE," or "PLII MUSIC." • When changing the decoding mode while using the S-AIR receiver, sound from headphone left and right. The system menu turns off Select "A.F.D. This mode outputs sound from headphone left and right speakers and subwoofer. Multi channel surround formats... are downmixed to 2 channels. This mode is effective only when a multi channel source is made. 5 Press SYSTEM MENU. MODE." Sound may not be output from all the speakers and subwoofer. Sound may not be effective. Multi channel surround formats ...
Operating Instructions
Page 51
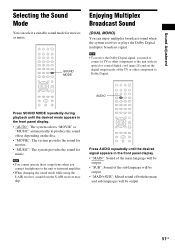
... of the TV or other component to produce the sound effect depending on the disc. • "MOVIE": The system provides the sound for movies. • "MUSIC": The system provides the sound for movies or music. Note • You cannot operate these setup items when you need to connect... a TV or other component to the unit or surround amplifier. • When changing the sound mode while using the S-AIR receiver, sound from the S-AIR receiver may skip...
... of the TV or other component to produce the sound effect depending on the disc. • "MOVIE": The system provides the sound for movies. • "MUSIC": The system provides the sound for movies or music. Note • You cannot operate these setup items when you need to connect... a TV or other component to the unit or surround amplifier. • When changing the sound mode while using the S-AIR receiver, sound from the S-AIR receiver may skip...
Operating Instructions
Page 53
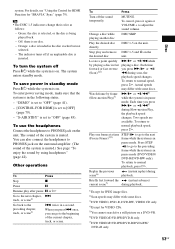
... Press "/1 while the system is set to PHONES jack on . When you press M/ or / (Scan)1)2) m during playback. Actual speeds may differ with some discs. 3)DVD VIDEO, DVD-R, DVD-RW, VIDEO CD only. 4)Except for VIDEO CDs. 5)You cannot search for "BRAVIA" Sync" (page 79). To use the...is in a second. To enter power saving mode, make sure that the system is no disc. - The indicator turns off the sound temporarily MUTING. To cancel, press it again or VOLUME + to normal playback speed, press H. "S-AIR STBY" is inserted. twice in the following status. - To Press Turn...
... Press "/1 while the system is set to PHONES jack on . When you press M/ or / (Scan)1)2) m during playback. Actual speeds may differ with some discs. 3)DVD VIDEO, DVD-R, DVD-RW, VIDEO CD only. 4)Except for VIDEO CDs. 5)You cannot search for "BRAVIA" Sync" (page 79). To use the...is in a second. To enter power saving mode, make sure that the system is no disc. - The indicator turns off the sound temporarily MUTING. To cancel, press it again or VOLUME + to normal playback speed, press H. "S-AIR STBY" is inserted. twice in the following status. - To Press Turn...
Operating Instructions
Page 72
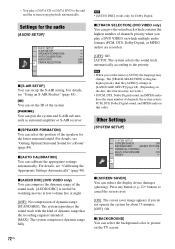
... SELECTION] (DVD VIDEO only) You can pair the system and S-AIR sub unit, such as surround amplifier or S-AIR receiver. x [AUTO CALIBRATION] You can reduce the display device damages (ghosting). Note • When you do not operate the system for about 15 minutes. [OFF]: Off. Press any... You can select the background color or picture on the disc, this order. x [BACKGROUND] You can set up the S-AIR setting. Other Settings [SYSTEM SETUP] SYSTEM SETUP SCREEN SAVER: ON BACKGROUND: JACKET PICTURE PARENTAL CONTROL: MULTI-DISC RESUME: ON RESET: x [SCREEN SAVER] You can calibrate...
... SELECTION] (DVD VIDEO only) You can pair the system and S-AIR sub unit, such as surround amplifier or S-AIR receiver. x [AUTO CALIBRATION] You can reduce the display device damages (ghosting). Note • When you do not operate the system for about 15 minutes. [OFF]: Off. Press any... You can select the background color or picture on the disc, this order. x [BACKGROUND] You can set up the S-AIR setting. Other Settings [SYSTEM SETUP] SYSTEM SETUP SCREEN SAVER: ON BACKGROUND: JACKET PICTURE PARENTAL CONTROL: MULTI-DISC RESUME: ON RESET: x [SCREEN SAVER] You can calibrate...
Operating Instructions
Page 83
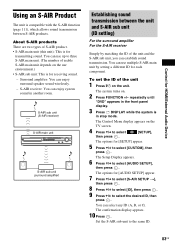
... ID (A, B, or C). Surround amplifier: You can enjoy system sound in stop mode. S-AIR sub unit (S-AIR receiver) S-AIR main unit S-AIR sub unit (surround amplifier) Establishing sound transmission between S-AIR products. The Control Menu display appears on the use multiple S-AIR main unit by matching the ID of S-AIR product. • S-AIR main unit (this unit): This is compatible...
... ID (A, B, or C). Surround amplifier: You can enjoy system sound in stop mode. S-AIR sub unit (S-AIR receiver) S-AIR main unit S-AIR sub unit (surround amplifier) Establishing sound transmission between S-AIR products. The Control Menu display appears on the use multiple S-AIR main unit by matching the ID of S-AIR product. • S-AIR main unit (this unit): This is compatible...

Operating Instructions
Page 84
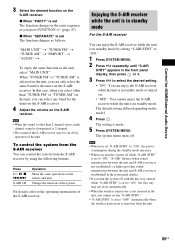
... match the ID (A, B, or C) of the unit. 3 Press POWER on the display for the unit and S-AIR sub unit to the operating instructions of the S-AIR receiver. Enjoying the system's sound in the front panel display. To set the ID of the surround amplifier 1 Make sure that of the ...remote. Sound transmission is established, the POWER / ON LINE indicator of the surround amplifier turns green. The S-AIR receiver can set the desired function for enjoying the system's sound in another S-AIR sub unit, such as a surround amplifier, by using another room. Set the ID of the POWER / ON...
... match the ID (A, B, or C) of the unit. 3 Press POWER on the display for the unit and S-AIR sub unit to the operating instructions of the S-AIR receiver. Enjoying the system's sound in the front panel display. To set the ID of the surround amplifier 1 Make sure that of the ...remote. Sound transmission is established, the POWER / ON LINE indicator of the surround amplifier turns green. The S-AIR receiver can set the desired function for enjoying the system's sound in another S-AIR sub unit, such as a surround amplifier, by using another room. Set the ID of the POWER / ON...
Operating Instructions
Page 85
... in the same sequence as you press FUNCTION +/- (page 47). Change the function of the S-AIR receiver. For details, refer to the operating instructions of the system. The system menu turns off while "S-AIR STBY" is set to "OFF" automatically when the wireless transceiver is removed from the... X/x to 2 channel. • The sound of the unit. To control the system from the S-AIR receiver You can enjoy the S-AIR receiver while the unit is in standby mode or turned on the S-AIR receiver. The default setting differs depending on the remote and unit. The setting is ...
... in the same sequence as you press FUNCTION +/- (page 47). Change the function of the S-AIR receiver. For details, refer to the operating instructions of the system. The system menu turns off while "S-AIR STBY" is set to "OFF" automatically when the wireless transceiver is removed from the... X/x to 2 channel. • The sound of the unit. To control the system from the S-AIR receiver You can enjoy the S-AIR receiver while the unit is in standby mode or turned on the S-AIR receiver. The default setting differs depending on the remote and unit. The setting is ...

