
Operating Instructions
Page 2
...trademarks and registered trademarks are cautioned that any changes or modifications not expressly approved in this manual could void your authority to operate this system so that the power cord can be determined by turning the equipment off and on, the user is a trademark of the following ... equipment has been tested and found to correct the interference by one or more of Apple Inc., registered in cabinet. This equipment generates, uses, and can be unplugged from that interference will not occur in Canada This class B digital apparatus complies with Canadian ICES-003. If this...
...trademarks and registered trademarks are cautioned that any changes or modifications not expressly approved in this manual could void your authority to operate this system so that the power cord can be determined by turning the equipment off and on, the user is a trademark of the following ... equipment has been tested and found to correct the interference by one or more of Apple Inc., registered in cabinet. This equipment generates, uses, and can be unplugged from that interference will not occur in Canada This class B digital apparatus complies with Canadian ICES-003. If this...

Operating Instructions
Page 3
...iPod 4th generation (color display) iPod 4th generation iPod mini 3US When you use other portable audio players. • Sony cannot accept responsibility in the event that data recorded to use the latest software before you use it. Update your iPod to iPod is designed for iPod 5th and iPod...are for iPod only. iPod nano 2nd generation (aluminum) iPod 5th generation (video) Notes • This unit is lost or damaged when using an iPod connected to meet Apple performance standards. will need to be purchased separately. • This product has been designed specifically to work ...
...iPod 4th generation (color display) iPod 4th generation iPod mini 3US When you use other portable audio players. • Sony cannot accept responsibility in the event that data recorded to use the latest software before you use it. Update your iPod to iPod is designed for iPod 5th and iPod...are for iPod only. iPod nano 2nd generation (aluminum) iPod 5th generation (video) Notes • This unit is lost or damaged when using an iPod connected to meet Apple performance standards. will need to be purchased separately. • This product has been designed specifically to work ...
Operating Instructions
Page 5
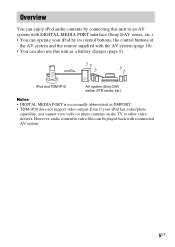
iPod and TDM-iP10 AV system (Sony DAV series, STR series, etc.) Notes • DIGITAL MEDIA PORT is occasionally abbreviated as a battery charger (page 9). However, audio content in video files can be played back with the AV system (page 10). • You can operate your iPod has video/photo ...control buttons, the control buttons of the AV system and the remote supplied with a connected AV system. 5US Even if your iPod by connecting this unit to an AV system with DIGITAL MEDIA PORT interface (Sony DAV series, etc.). • You can also use this unit as DMPORT. • TDM-iP10...
iPod and TDM-iP10 AV system (Sony DAV series, STR series, etc.) Notes • DIGITAL MEDIA PORT is occasionally abbreviated as a battery charger (page 9). However, audio content in video files can be played back with the AV system (page 10). • You can operate your iPod has video/photo ...control buttons, the control buttons of the AV system and the remote supplied with a connected AV system. 5US Even if your iPod by connecting this unit to an AV system with DIGITAL MEDIA PORT interface (Sony DAV series, etc.). • You can also use this unit as DMPORT. • TDM-iP10...
Operating Instructions
Page 6
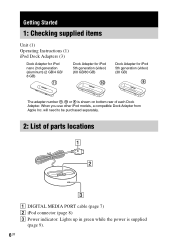
... parts locations 1 DIGITAL MEDIA PORT cable (page 7) 2 iPod connector (page 8) 3 Power indicator: Lights up in green while the power is supplied (page 9). 6US When you use other iPod models, a compatible Dock Adapter from Apple Inc.
... parts locations 1 DIGITAL MEDIA PORT cable (page 7) 2 iPod connector (page 8) 3 Power indicator: Lights up in green while the power is supplied (page 9). 6US When you use other iPod models, a compatible Dock Adapter from Apple Inc.

Operating Instructions
Page 9
..., pull it up , the battery is charging. While the POWER indicator lights up with an iPod set on the connector. To use the unit as a battery charger You can use the unit as that of the iPod connector on this unit and do not twist or sway the iPod to press the... controls of your fingernail or a flat object using the slot inside the adapter. 9US Notes • When placing or removing the iPod, handle the iPod in the iPod display. Doing so may cause...
..., pull it up , the battery is charging. While the POWER indicator lights up with an iPod set on the connector. To use the unit as a battery charger You can use the unit as that of the iPod connector on this unit and do not twist or sway the iPod to press the... controls of your fingernail or a flat object using the slot inside the adapter. 9US Notes • When placing or removing the iPod, handle the iPod in the iPod display. Doing so may cause...
Operating Instructions
Page 10
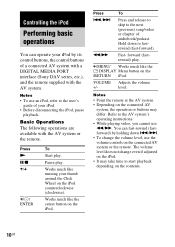
... Refer to the AV system's operating instructions. • While playing video, you cannot use an iPod, refer to the next (previous) song/video or chapter of a connected AV system with a DIGITAL MEDIA PORT interface (Sony DAV series, etc.), and the remote supplied with the AV system or the remote. The... volume level does not change the volume level, use the volume controls on the iPod. • It may ...
... Refer to the AV system's operating instructions. • While playing video, you cannot use an iPod, refer to the next (previous) song/video or chapter of a connected AV system with a DIGITAL MEDIA PORT interface (Sony DAV series, etc.), and the remote supplied with the AV system or the remote. The... volume level does not change the volume level, use the volume controls on the iPod. • It may ...

Operating Instructions
Page 12
...unit in an inclined position. • Do not place the unit in the unit. Do not use any type of abrasive pad, scouring powder or solvent such as staining or discoloration of the surface ...it any further. Very humid - Subject to vibrations - Dusty or dirty - Subject to direct sunlight. • Use caution when placing the unit on surfaces that have been specially treated (with wax, oil, polish, etc.) as...Precautions On safety Should any solid object or liquid fall into the system, unplug the system and have any questions or problems concerning your unit, please consult your nearest...
...unit in an inclined position. • Do not place the unit in the unit. Do not use any type of abrasive pad, scouring powder or solvent such as staining or discoloration of the surface ...it any further. Very humid - Subject to vibrations - Dusty or dirty - Subject to direct sunlight. • Use caution when placing the unit on surfaces that have been specially treated (with wax, oil, polish, etc.) as...Precautions On safety Should any solid object or liquid fall into the system, unplug the system and have any questions or problems concerning your unit, please consult your nearest...
Operating Instructions
Page 2
... install the appliance in a residential installation. In door use this model manufactured for help. Record the serial number in this manual could void your Sony dealer regarding this equipment does cause harmful interference to radio or television reception, which the receiver is connected. - DAV-HDX277WC/DAV-HDX279W/ DAV-HDX576WF Serial No Date of the polarized or...
... install the appliance in a residential installation. In door use this model manufactured for help. Record the serial number in this manual could void your Sony dealer regarding this equipment does cause harmful interference to radio or television reception, which the receiver is connected. - DAV-HDX277WC/DAV-HDX279W/ DAV-HDX576WF Serial No Date of the polarized or...
Operating Instructions
Page 3
...equipment and meets the FCC radio frequency (RF) Exposure Guidelines in Supplement C to OET65. Note to CATV system installer: This reminder is used, use attachments/accessories specified by the manufacturer. 12) Use only with the cart, stand, tripod, bracket, or table specified by the manufacturer, or sold with the ...the radiator and person's body (excluding extremities: hands, wrists, feet and ankles). 3US When a cart is provided to call the CATV system installer's attention to Article 820-40 of the NEC that the AC power cord (mains lead) can be installed and operated with any way...
...equipment and meets the FCC radio frequency (RF) Exposure Guidelines in Supplement C to OET65. Note to CATV system installer: This reminder is used, use attachments/accessories specified by the manufacturer. 12) Use only with the cart, stand, tripod, bracket, or table specified by the manufacturer, or sold with the ...the radiator and person's body (excluding extremities: hands, wrists, feet and ankles). 3US When a cart is provided to call the CATV system installer's attention to Article 820-40 of the NEC that the AC power cord (mains lead) can be installed and operated with any way...
Operating Instructions
Page 4
..." (page 83). 4US The following S-AIR products can enjoy system sound in another room. The configuration of sound between S-AIR products wirelessly. Any difference in operation is clearly indicated in the text, for example, "DAV-HDX277WC only." • The Control Menu items may be used with the S-AIR function, which allows transmission of the...
..." (page 83). 4US The following S-AIR products can enjoy system sound in another room. The configuration of sound between S-AIR products wirelessly. Any difference in operation is clearly indicated in the text, for example, "DAV-HDX277WC only." • The Control Menu items may be used with the S-AIR function, which allows transmission of the...
Operating Instructions
Page 5
...the S-AIR function 4 Playable Discs 6 Getting Started Step 1: Assembling the Speakers 13 Step 2: Positioning the System... 18 Step 3: Connecting the System... 22 Step 4: Setting up the Wireless System 42 Step 5: Performing the Quick Setup 44 Step 6: Enjoying Sound from all the Speakers 47 Sound Adjustment ...Presetting Radio Stations 76 Listening to the Radio 77 Control for HDMI/External Audio Device Using the Control for HDMI Function for "BRAVIA" Sync 79 Using the DIGITAL MEDIA PORT Adapter 82 Using an S-AIR Product 83 Other Operations Getting Optimal Surround Sound for a Room 89 ...
...the S-AIR function 4 Playable Discs 6 Getting Started Step 1: Assembling the Speakers 13 Step 2: Positioning the System... 18 Step 3: Connecting the System... 22 Step 4: Setting up the Wireless System 42 Step 5: Performing the Quick Setup 44 Step 6: Enjoying Sound from all the Speakers 47 Sound Adjustment ...Presetting Radio Stations 76 Listening to the Radio 77 Control for HDMI/External Audio Device Using the Control for HDMI Function for "BRAVIA" Sync 79 Using the DIGITAL MEDIA PORT Adapter 82 Using an S-AIR Product 83 Other Operations Getting Optimal Surround Sound for a Room 89 ...
Operating Instructions
Page 8
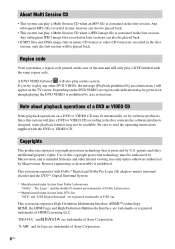
...the same region code. Since this system will be played back. • This system can also be played back. "DTS" and "DTS Digital Surround" are trademarks of DTS, Inc. "BRAVIA" and are registered trademarks of Sony Corporation. Region code Your system has a region code printed on ...HDMI, the HDMI logo and High-Definition Multimedia Interface are recorded in the first session. Note about playback operations of this system. Use of a DVD or VIDEO CD Some playback operations on this copyright protection technology must be intentionally set by area restrictions. ...
...the same region code. Since this system will be played back. • This system can also be played back. "DTS" and "DTS Digital Surround" are trademarks of DTS, Inc. "BRAVIA" and are registered trademarks of Sony Corporation. Region code Your system has a region code printed on ...HDMI, the HDMI logo and High-Definition Multimedia Interface are recorded in the first session. Note about playback operations of this system. Use of a DVD or VIDEO CD Some playback operations on this copyright protection technology must be intentionally set by area restrictions. ...
Operating Instructions
Page 12
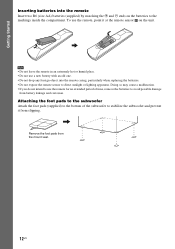
...Do not leave the remote in an extremely hot or humid place. • Do not use the remote for an extended period of the subwoofer to stabilize the subwoofer and prevent it at...the batteries to the markings inside the compartment. Doing so may cause a malfunction. • If you do not intend to use a new battery with an old one. • Do not drop any foreign object into the remote Insert two R6 (size...• Do not expose the remote sensor to direct sunlight or lighting apparatus. To use the remote, point it from slipping. , Remove the foot pads from battery leakage and corrosion.
...Do not leave the remote in an extremely hot or humid place. • Do not use the remote for an extended period of the subwoofer to stabilize the subwoofer and prevent it at...the batteries to the markings inside the compartment. Doing so may cause a malfunction. • If you do not intend to use a new battery with an old one. • Do not drop any foreign object into the remote Insert two R6 (size...• Do not expose the remote sensor to direct sunlight or lighting apparatus. To use the remote, point it from slipping. , Remove the foot pads from battery leakage and corrosion.
Operating Instructions
Page 13
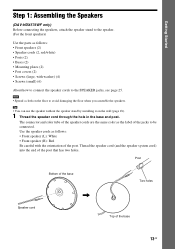
...the speaker cords to the SPEAKER jacks, see page 25. Thread the speaker cord (and the speaker system cord) into the end of the base 13US Tip • You can use the speaker without the speaker stand by installing it on the floor to avoid damaging the floor when ... the speaker cord through the hole in the base and post. Getting Started Step 1: Assembling the Speakers (DAV-HDX576WF only) Before connecting the speakers, attach the speaker stand to the speaker. (For the front speakers) Use the parts as follows: • Front speakers (2) • Speaker cords (2, red/white) • Posts ...
...the speaker cords to the SPEAKER jacks, see page 25. Thread the speaker cord (and the speaker system cord) into the end of the base 13US Tip • You can use the speaker without the speaker stand by installing it on the floor to avoid damaging the floor when ... the speaker cord through the hole in the base and post. Getting Started Step 1: Assembling the Speakers (DAV-HDX576WF only) Before connecting the speakers, attach the speaker stand to the speaker. (For the front speakers) Use the parts as follows: • Front speakers (2) • Speaker cords (2, red/white) • Posts ...
Operating Instructions
Page 20
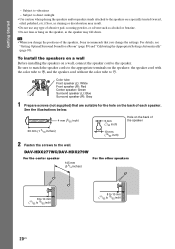
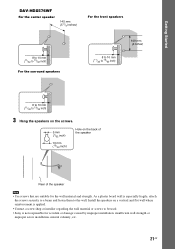
.... For details, see "Getting Optimal Surround Sound for the hole on the speaker, as the speaker may result. • Do not use any type of the speaker 2 Fasten the screws to 13/32 inch) 20US Be sure to match the speaker cords to the appropriate ... the speakers, Sony recommends that are suitable for a Room" (page 89) and "Calibrating the Appropriate Settings Automatically" (page 90). Getting Started - Subject to the speaker. To install the speakers on a wall Before installing the speakers on a wall, connect the speaker cord to vibrations - DAV-HDX277WC/DAV-HDX279W For the...
.... For details, see "Getting Optimal Surround Sound for the hole on the speaker, as the speaker may result. • Do not use any type of the speaker 2 Fasten the screws to 13/32 inch) 20US Be sure to match the speaker cords to the appropriate ... the speakers, Sony recommends that are suitable for a Room" (page 89) and "Calibrating the Appropriate Settings Automatically" (page 90). Getting Started - Subject to the speaker. To install the speakers on a wall Before installing the speakers on a wall, connect the speaker cord to vibrations - DAV-HDX277WC/DAV-HDX279W For the...
Operating Instructions
Page 21
Getting Started DAV-HDX576WF For the center speaker 145 mm (5 3/4 inches) For the front speakers 8 to 10 mm (11/32 to 13/32 inch) For the surround speakers 8 ...) Hole on a vertical and flat wall where reinforcement is applied. • Contact a screw shop or installer regarding the wall material or screws to be used. • Sony is especially fragile, attach the screws securely to a beam and fasten them to the wall. As a plaster board wall is not responsible for the wall...
Getting Started DAV-HDX576WF For the center speaker 145 mm (5 3/4 inches) For the front speakers 8 to 10 mm (11/32 to 13/32 inch) For the surround speakers 8 ...) Hole on a vertical and flat wall where reinforcement is applied. • Contact a screw shop or installer regarding the wall material or screws to be used. • Sony is especially fragile, attach the screws securely to a beam and fasten them to the wall. As a plaster board wall is not responsible for the wall...
Operating Instructions
Page 28
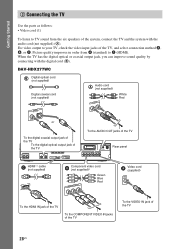
... C (HDMI). Getting Started 2 Connecting the TV Use the parts as follows: • Video cord (1) To listen to your TV, check the video input jacks of the TV, and select connection method A, B, or C. Picture quality improves in order from the six speakers of the TV 28US DAV-HDX277WC Digital optical cord (not supplied) Digital... jack of the TV To the COMPONENT VIDEO IN jacks of the TV Video cord (supplied) VIDEO OUT To the VIDEO IN jack of the system, connect the TV and the system with the digital cord (B).
... C (HDMI). Getting Started 2 Connecting the TV Use the parts as follows: • Video cord (1) To listen to your TV, check the video input jacks of the TV, and select connection method A, B, or C. Picture quality improves in order from the six speakers of the TV 28US DAV-HDX277WC Digital optical cord (not supplied) Digital... jack of the TV To the COMPONENT VIDEO IN jacks of the TV Video cord (supplied) VIDEO OUT To the VIDEO IN jack of the system, connect the TV and the system with the digital cord (B).
Operating Instructions
Page 30
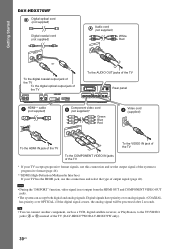
...your TV accepts progressive format signals, use this connection and select the type of the TV (DAV-HDX277WC/DAV-HDX279W only). 30US Note • During the "DMPORT" function, video signal is not output from the HDMI OUT and COMPONENT VIDEO OUT jacks. • The system can connect another component, such as ..., to progressive format (page 46). ** HDMI (High-Definition Multimedia Interface) If your TV has the HDMI jack, use this connection and set the output signal of the system to the TV/VIDEO jacks (A or B) instead of output signal (page 46). Digital signals have priority over analog ...
...your TV accepts progressive format signals, use this connection and select the type of the TV (DAV-HDX277WC/DAV-HDX279W only). 30US Note • During the "DMPORT" function, video signal is not output from the HDMI OUT and COMPONENT VIDEO OUT jacks. • The system can connect another component, such as ..., to progressive format (page 46). ** HDMI (High-Definition Multimedia Interface) If your TV has the HDMI jack, use this connection and set the output signal of the system to the TV/VIDEO jacks (A or B) instead of output signal (page 46). Digital signals have priority over analog ...
Operating Instructions
Page 31
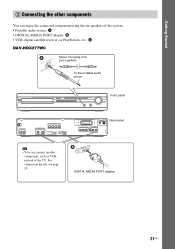
Getting Started 3 Connecting the other components You can enjoy the connected component using the six speakers of the system. • Portable audio source: A • DIGITAL MEDIA PORT adapter: B • VCR, digital satellite receiver, or PlayStation, etc.: C DAV-HDX277WC Stereo mini-plug cord (not supplied) To the portable audio source Front panel SPEAKER CENTER SUBWOOFER SPEAKER...
Getting Started 3 Connecting the other components You can enjoy the connected component using the six speakers of the system. • Portable audio source: A • DIGITAL MEDIA PORT adapter: B • VCR, digital satellite receiver, or PlayStation, etc.: C DAV-HDX277WC Stereo mini-plug cord (not supplied) To the portable audio source Front panel SPEAKER CENTER SUBWOOFER SPEAKER...

Operating Instructions
Page 33
Note • Connect the DIGITAL MEDIA PORT adapter so that the V marks are aligned. A 33US When disconnecting, pull out while pressing A. Getting Started DAV-HDX576WF Stereo mini-plug cord (not supplied) To the portable audio source Front panel SPEAKER CENTER SUBWOOFER SPEAKER TV DIGITAL IN COAXIAL OPTICAL FRONT R FRONT L ... another component To connect the DIGITAL MEDIA PORT adapter Connect a DIGITAL MEDIA PORT adapter (TDM-iP10 is supplied) to the DMPORT jack. For details, see "Using the DIGITAL MEDIA PORT Adapter" (page 82).
Note • Connect the DIGITAL MEDIA PORT adapter so that the V marks are aligned. A 33US When disconnecting, pull out while pressing A. Getting Started DAV-HDX576WF Stereo mini-plug cord (not supplied) To the portable audio source Front panel SPEAKER CENTER SUBWOOFER SPEAKER TV DIGITAL IN COAXIAL OPTICAL FRONT R FRONT L ... another component To connect the DIGITAL MEDIA PORT adapter Connect a DIGITAL MEDIA PORT adapter (TDM-iP10 is supplied) to the DMPORT jack. For details, see "Using the DIGITAL MEDIA PORT Adapter" (page 82).

