Operating Instructions
Page 11
... connected AV system. • Set the "EQ" setting of noise. The sound is severe hum or noise. • Move the unit away from the iPod does not appear on the TV screen. • The unit does not support video output. This product is a system product, and the entire system is needed to "Off" or "Flat". * See "Compatible iPod models" (page 3). Note that if service personnel changes some parts during repair...
... connected AV system. • Set the "EQ" setting of noise. The sound is severe hum or noise. • Move the unit away from the iPod does not appear on the TV screen. • The unit does not support video output. This product is a system product, and the entire system is needed to "Off" or "Flat". * See "Compatible iPod models" (page 3). Note that if service personnel changes some parts during repair...
Operating Instructions
Page 4
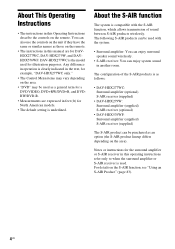
... for North American models. • The default setting is as follows: • DAV-HDX277WC: Surround amplifier (optional) S-AIR receiver (supplied) • DAV-HDX279W: Surround amplifier (supplied) S-AIR receiver (optional) • DAV-HDX576WF: Surround amplifier (supplied) S-AIR receiver (supplied) The S-AIR product can enjoy system sound in feet (ft) for DAVHDX277WC, DAV-HDX279W, and DAVHDX576WF. About the S-AIR function The system is compatible with the system: • Surround amplifier: You can enjoy surround speaker sound wirelessly. • S-AIR receiver: You can...
... for North American models. • The default setting is as follows: • DAV-HDX277WC: Surround amplifier (optional) S-AIR receiver (supplied) • DAV-HDX279W: Surround amplifier (supplied) S-AIR receiver (optional) • DAV-HDX576WF: Surround amplifier (supplied) S-AIR receiver (supplied) The S-AIR product can enjoy system sound in feet (ft) for DAVHDX277WC, DAV-HDX279W, and DAVHDX576WF. About the S-AIR function The system is compatible with the system: • Surround amplifier: You can enjoy surround speaker sound wirelessly. • S-AIR receiver: You can...
Operating Instructions
Page 5
... Selecting the Sound Mode 51 Enjoying Multiplex Broadcast Sound... 51 Disc Playing a Disc 52 Using Play Mode 58 Searching/Selecting a Disc 60 Playing MP3 Files/JPEG Image Files... 62 Adjusting the Delay Between the Picture and Sound 65 Restricting Playback of the Disc........... 66 Using the Setup Display 68 Tuner Presetting Radio Stations 76 Listening to the Radio 77 Control for HDMI/External Audio Device Using the Control for HDMI Function for "BRAVIA" Sync 79 Using the DIGITAL MEDIA PORT Adapter 82 Using an S-AIR Product 83 Other Operations Getting Optimal Surround Sound...
... Selecting the Sound Mode 51 Enjoying Multiplex Broadcast Sound... 51 Disc Playing a Disc 52 Using Play Mode 58 Searching/Selecting a Disc 60 Playing MP3 Files/JPEG Image Files... 62 Adjusting the Delay Between the Picture and Sound 65 Restricting Playback of the Disc........... 66 Using the Setup Display 68 Tuner Presetting Radio Stations 76 Listening to the Radio 77 Control for HDMI/External Audio Device Using the Control for HDMI Function for "BRAVIA" Sync 79 Using the DIGITAL MEDIA PORT Adapter 82 Using an S-AIR Product 83 Other Operations Getting Optimal Surround Sound...
Operating Instructions
Page 42
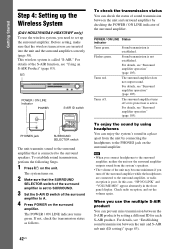
... A B C PAIRING SPEAKER L SURROUND SELECTOR R SURROUND SURROUND BACK PHONES jack SURROUND SELECTOR switch The unit transmits sound to set the volume again. The POWER / ON LINE indicator turns green. The surround amplifier does not output sound. To enjoy the sound by connecting the headphones to the surround speakers. Check radio reception, and set up the Wireless System (DAV-HDX279W/DAV-HDX576WF only) To use the multiple S-AIR product You can check the status of the S-AIR function, see "Using an...
... A B C PAIRING SPEAKER L SURROUND SELECTOR R SURROUND SURROUND BACK PHONES jack SURROUND SELECTOR switch The unit transmits sound to set the volume again. The POWER / ON LINE indicator turns green. The surround amplifier does not output sound. To enjoy the sound by connecting the headphones to the surround speakers. Check radio reception, and set up the Wireless System (DAV-HDX279W/DAV-HDX576WF only) To use the multiple S-AIR product You can check the status of the S-AIR function, see "Using an...
Operating Instructions
Page 44
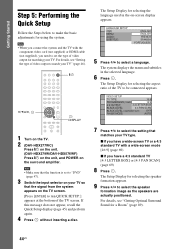
... select a language. LANGUAGE SETUP OSD: MENU: AUDIO: SUBTITLE: ENGLISH ENGLISH FRENCH SPANISH PORTUGUESE 5 Press X/x to make the basic adjustments for using the system. "/1 C/X/x/c, DISPLAY 1 Turn on the TV. 2 (DAV-HDX277WC) Press [/1 on the unit. (DAV-HDX279W/DAV-HDX576WF) Press [/1 on the unit, and POWER on -screen display appears. VIDEO SETUP TV TYPE: 16:9 PROGRESSIVE (COMPONENT OUT): 16:9 4:3 OUTPUT: 4:3 LETTER BOX BLACK LEVEL: 4:3 PAN SCAN BLACK LEVEL (COMPONENT OUT): OFF PAUSE MODE: AUTO 7 Press X/x to select the setting that the signal...
... select a language. LANGUAGE SETUP OSD: MENU: AUDIO: SUBTITLE: ENGLISH ENGLISH FRENCH SPANISH PORTUGUESE 5 Press X/x to make the basic adjustments for using the system. "/1 C/X/x/c, DISPLAY 1 Turn on the TV. 2 (DAV-HDX277WC) Press [/1 on the unit. (DAV-HDX279W/DAV-HDX576WF) Press [/1 on the unit, and POWER on -screen display appears. VIDEO SETUP TV TYPE: 16:9 PROGRESSIVE (COMPONENT OUT): 16:9 4:3 OUTPUT: 4:3 LETTER BOX BLACK LEVEL: 4:3 PAN SCAN BLACK LEVEL (COMPONENT OUT): OFF PAUSE MODE: AUTO 7 Press X/x to select the setting that the signal...
Operating Instructions
Page 45
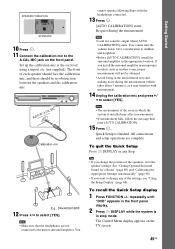
... measurement (which the system is output when [AUTO CALIBRATION] starts. Tip • If you change any Step. Note • Loud test sound is installed may interfere with the headphones connected. 13 Press . [AUTO CALIBRATION] starts. The Control Menu display appears on the front panel. Set up the calibration mic at the ear level using a tripod, etc. (not supplied). If you want to the A.CAL MIC jack on the TV screen. 45US Getting Started...
... measurement (which the system is output when [AUTO CALIBRATION] starts. Tip • If you change any Step. Note • Loud test sound is installed may interfere with the headphones connected. 13 Press . [AUTO CALIBRATION] starts. The Control Menu display appears on the front panel. Set up the calibration mic at the ear level using a tripod, etc. (not supplied). If you want to the A.CAL MIC jack on the TV screen. 45US Getting Started...

Operating Instructions
Page 46
... "HDMI" lights up in the front panel display. 2 Press DISPLAY while the system is the method for [VIDEO SETUP] appear. 6 Press X/x to select [PROGRESSIVE (COMPONENT OUT)], then press . 46US For details, refer also to the operating instructions supplied with the HDMI cable, select the type of video signal output from the HDMI OUT jack. The options for [HDMI SETUP] appear. 6 Press X/x to select [HDMI RESOLUTION], then press . 7 Press X/x to select the desired setting, then press . • [AUTO...
... "HDMI" lights up in the front panel display. 2 Press DISPLAY while the system is the method for [VIDEO SETUP] appear. 6 Press X/x to select [PROGRESSIVE (COMPONENT OUT)], then press . 46US For details, refer also to the operating instructions supplied with the HDMI cable, select the type of video signal output from the HDMI OUT jack. The options for [HDMI SETUP] appear. 6 Press X/x to select [HDMI RESOLUTION], then press . 7 Press X/x to select the desired setting, then press . • [AUTO...
Operating Instructions
Page 48
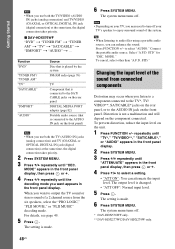
...*, TV/ VIDEO**, SAT/CABLE* jacks on the rear panel, or to select "AUDIO." STD." Changing the input level of a 2 channel source from connected components Distortion may occur when you want appears in the front panel display. 2 Press SYSTEM MENU. 3 Press X/x repeatedly until the decoding mode you may need to turn off your TV, you want to audio files using a portable audio source, you use both the TV/VIDEO (AUDIO IN) jacks (analog connection) and TV/VIDEO (COAXIAL or OPTICAL DIGITAL IN) jack (digital connection) at the...
...*, TV/ VIDEO**, SAT/CABLE* jacks on the rear panel, or to select "AUDIO." STD." Changing the input level of a 2 channel source from connected components Distortion may occur when you want appears in the front panel display. 2 Press SYSTEM MENU. 3 Press X/x repeatedly until the decoding mode you may need to turn off your TV, you want to audio files using a portable audio source, you use both the TV/VIDEO (AUDIO IN) jacks (analog connection) and TV/VIDEO (COAXIAL or OPTICAL DIGITAL IN) jack (digital connection) at the...
Operating Instructions
Page 51
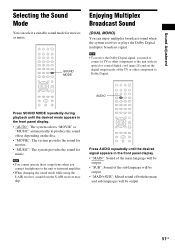
... receiver, sound from the S-AIR receiver may skip. Sound Adjustment Selecting the Sound Mode You can enjoy multiplex broadcast sound when the system receives or plays the Dolby Digital multiplex broadcast signal. Press AUDIO repeatedly until the desired mode appears in the front panel display. • "MAIN": Sound of the main language will be output. • "SUB": Sound of the sub language will be output. 51US Note • You cannot operate these setup items when you need to connect...
... receiver, sound from the S-AIR receiver may skip. Sound Adjustment Selecting the Sound Mode You can enjoy multiplex broadcast sound when the system receives or plays the Dolby Digital multiplex broadcast signal. Press AUDIO repeatedly until the desired mode appears in the front panel display. • "MAIN": Sound of the main language will be output. • "SUB": Sound of the sub language will be output. 51US Note • You cannot operate these setup items when you need to connect...
Operating Instructions
Page 53
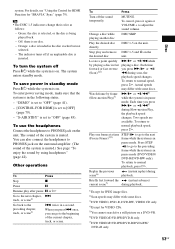
... a DVD-VR. 6)DVD VIDEO/DVD-RW/DVD-R only. 7)DVD VIDEO/DVD-RW/DVD-R/DVD+RW/ DVD+R only. 53US Change a disc while playing another disc DISC SKIP Play the desired disc directly DISC 1-5 on . Play one frame at a time STEP to go to the beginning of the current chapter, track, or scene. To save power in pause mode (DVD VIDEO/ DVD-R/DVD-RW only). To use the headphones Connect the headphones to PHONES jack on the surround amplifier. (The sound of the system is in standby mode...
... a DVD-VR. 6)DVD VIDEO/DVD-RW/DVD-R only. 7)DVD VIDEO/DVD-RW/DVD-R/DVD+RW/ DVD+R only. 53US Change a disc while playing another disc DISC SKIP Play the desired disc directly DISC 1-5 on . Play one frame at a time STEP to go to the beginning of the current chapter, track, or scene. To save power in pause mode (DVD VIDEO/ DVD-R/DVD-RW only). To use the headphones Connect the headphones to PHONES jack on the surround amplifier. (The sound of the system is in standby mode...
Operating Instructions
Page 56
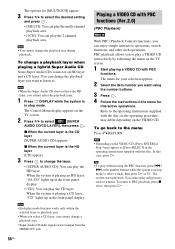
... VIDEO CD, [Press ENTER] in Step 3 may differ depending on the TV screen. 2 Press X/x to the operating instructions supplied with PBC functions (Ver.2.0) (PBC Playback) With PBC (Playback Control) functions, you want using the PBC function, press ./ > or the number buttons while the system is playing an HD layer, "SA-CD" lights up in stop mode. When the system is in the front panel display. Refer to select [SUPER AUDIO...
... VIDEO CD, [Press ENTER] in Step 3 may differ depending on the TV screen. 2 Press X/x to the operating instructions supplied with PBC functions (Ver.2.0) (PBC Playback) With PBC (Playback Control) functions, you want using the PBC function, press ./ > or the number buttons while the system is playing an HD layer, "SA-CD" lights up in stop mode. When the system is in the front panel display. Refer to select [SUPER AUDIO...
Operating Instructions
Page 67
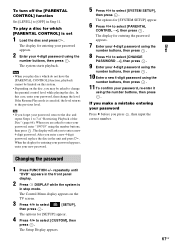
..." using the number buttons, then press . 11 To confirm your password Press C before you forget your password, then change the parental control level while playing the disc. If the Resume Play mode is in stop mode. Tip • If you press , then input the correct number. When you may be limited on this case, enter your password, remove the disc and repeat Steps 1 to enter a new 4-digit password. The Control Menu display appears...
..." using the number buttons, then press . 11 To confirm your password Press C before you forget your password, then change the parental control level while playing the disc. If the Resume Play mode is in stop mode. Tip • If you press , then input the correct number. When you may be limited on this case, enter your password, remove the disc and repeat Steps 1 to enter a new 4-digit password. The Control Menu display appears...
Operating Instructions
Page 68
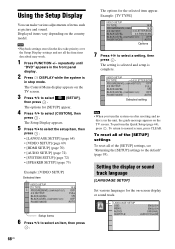
... . VIDEO SETUP TV TYPE: 4:3 LETTER BOX PROGRESSIVE (COMPONENT OUT): OFF 4:3 OUTPUT: FULL BLACK LEVEL: ON BLACK LEVEL (COMPONENT OUT): OFF PAUSE MODE: AUTO Selected setting Note • When you turn the system on after resetting and no disc is in stop mode. repeatedly until "DVD" appears in the front panel display. 2 Press DISPLAY while the system is complete. To return to select [SETUP], then press . Using the Setup Display You can make various adjustments of the [SETUP] settings, see "Returning the [SETUP] settings...
... . VIDEO SETUP TV TYPE: 4:3 LETTER BOX PROGRESSIVE (COMPONENT OUT): OFF 4:3 OUTPUT: FULL BLACK LEVEL: ON BLACK LEVEL (COMPONENT OUT): OFF PAUSE MODE: AUTO Selected setting Note • When you turn the system on after resetting and no disc is in stop mode. repeatedly until "DVD" appears in the front panel display. 2 Press DISPLAY while the system is complete. To return to select [SETUP], then press . Using the Setup Display You can make various adjustments of the [SETUP] settings, see "Returning the [SETUP] settings...
Operating Instructions
Page 70
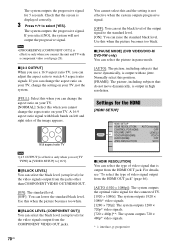
... system. [FULL]: Select this when you select [NO], the system will not output the progressive signal. Settings for the HDMI [HDMI SETUP] HDMI SETUP HDMI RESOLUTION: CONTROL FOR HDMI: VOLUME LIMIT: YCBCR/RGB(HDMI): AUDIO(HDMI): JPEG RESOLUTION: AUTO(1920x1080p) OFF LEVEL2 YCBCR OFF SD x [HDMI RESOLUTION] You can select the type of video signal output from the HDMI OUT jack" (page 46). [AUTO (1920 × 1080p)]: The system outputs the optimal video signal for the video signals output from the COMPONENT VIDEO OUT jacks. If you cannot change...
... system. [FULL]: Select this when you select [NO], the system will not output the progressive signal. Settings for the HDMI [HDMI SETUP] HDMI SETUP HDMI RESOLUTION: CONTROL FOR HDMI: VOLUME LIMIT: YCBCR/RGB(HDMI): AUDIO(HDMI): JPEG RESOLUTION: AUTO(1920x1080p) OFF LEVEL2 YCBCR OFF SD x [HDMI RESOLUTION] You can select the type of video signal output from the HDMI OUT jack" (page 46). [AUTO (1920 × 1080p)]: The system outputs the optimal video signal for the video signals output from the COMPONENT VIDEO OUT jacks. If you cannot change...
Operating Instructions
Page 71
... menu or by pressing THEATER, the System Audio Control (page 81) is effective only when you set [TV TYPE] in [VIDEO SETUP] to [16:9], and you set to [ON] without a black frame. This function is selected, [AUDIO DRC], [A/V SYNC], DYNAMIC BASS, "DEC. For details, see "Using the Control for HDMI Function for "BRAVIA" Sync" (page 79). [OFF]: Off. [ON]: On. x [VOLUME LIMIT] If you cannot set to [ON]. x [YCBCR/RGB (HDMI)] You can operate...
... menu or by pressing THEATER, the System Audio Control (page 81) is effective only when you set [TV TYPE] in [VIDEO SETUP] to [16:9], and you set to [ON] without a black frame. This function is selected, [AUDIO DRC], [A/V SYNC], DYNAMIC BASS, "DEC. For details, see "Using the Control for HDMI Function for "BRAVIA" Sync" (page 79). [OFF]: Off. [ON]: On. x [VOLUME LIMIT] If you cannot set to [ON]. x [YCBCR/RGB (HDMI)] You can operate...
Operating Instructions
Page 81
... TV sound in PAP (picture and picture) mode, the System Audio Control function will not be output for HDMI/External Audio Device function, or playing a CD), the system may be output depending on the system, TV sound will not work. TV sound is in this by pressing THEATER, loud sound may not turn the system off automatically. * DAV-HDX576WF only ** DAV-HDX277WC/DAV-HDX279W only Enjoying TV sound from the speakers in this system (System Audio Control) You can prevent this system by easy operation. Control...
... TV sound in PAP (picture and picture) mode, the System Audio Control function will not be output for HDMI/External Audio Device function, or playing a CD), the system may be output depending on the system, TV sound will not work. TV sound is in this by pressing THEATER, loud sound may not turn the system off automatically. * DAV-HDX576WF only ** DAV-HDX277WC/DAV-HDX279W only Enjoying TV sound from the speakers in this system (System Audio Control) You can prevent this system by easy operation. Control...
Operating Instructions
Page 90
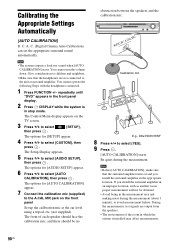
...8226; Make sure that the surround amplifier turns on the front panel Set up the calibration mic at the ear level using a tripod, etc. (not supplied). C. C. (Digital Cinema Auto Calibration) can set the appropriate surround sound automatically. The options for [AUDIO SETUP] appear. 6 Press X/x to select [YES]. 9 Press . [AUTO CALIBRATION] starts. A. Note • The system outputs a loud test sound when [AUTO CALIBRATION] starts. Calibrating the Appropriate Settings Automatically [AUTO CALIBRATION] D. The Control Menu display appears on the TV screen. 3 Press...
...8226; Make sure that the surround amplifier turns on the front panel Set up the calibration mic at the ear level using a tripod, etc. (not supplied). C. C. (Digital Cinema Auto Calibration) can set the appropriate surround sound automatically. The options for [AUDIO SETUP] appear. 6 Press X/x to select [YES]. 9 Press . [AUTO CALIBRATION] starts. A. Note • The system outputs a loud test sound when [AUTO CALIBRATION] starts. Calibrating the Appropriate Settings Automatically [AUTO CALIBRATION] D. The Control Menu display appears on the TV screen. 3 Press...
Operating Instructions
Page 101
...; Select "A.F.D. It may come from the center speaker only. The sound loses stereo effect • Set [AUDIO] to normal play a VIDEO CD, a • Make sure the unit is in pause mode or in Dolby Digital or MPEG audio format. speaker only. The sound comes from the HDMI OUT jack. • The component connected to the HDMI OUT jack does not conform to the audio signal format, in this case set or a fluorescent light. • Move your TV set [AUDIO (HDMI)] in [HDMI SETUP...
...; Select "A.F.D. It may come from the center speaker only. The sound loses stereo effect • Set [AUDIO] to normal play a VIDEO CD, a • Make sure the unit is in pause mode or in Dolby Digital or MPEG audio format. speaker only. The sound comes from the HDMI OUT jack. • The component connected to the HDMI OUT jack does not conform to the audio signal format, in this case set or a fluorescent light. • Move your TV set [AUDIO (HDMI)] in [HDMI SETUP...
Operating Instructions
Page 108
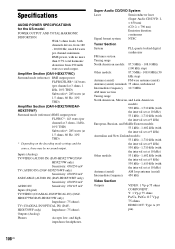
... interval set at 1.5 ohms, 80 Hz, 10% THD) Amplifier Section (DAV-HDX279W/DAVHDX576WF) Surround mode (reference) RMS output power FL/FR/C*: 143 watts (per channel minimum RMS power, with no sound output. Outputs (Analog) Phones Accepts low- Amplifier Section (DAV-HDX277WC) Surround mode (reference) RMS output power FL/FR/C/SL/SR*: 143 watts (per channel at 3 ohms, 1 kHz, 10% THD) Subwoofer*: 285 watts (at 10 kHz) Antenna (aerial) AM loop antenna (aerial) Intermediate frequency 450 kHz Video Section Outputs VIDEO: 1 Vp...
... interval set at 1.5 ohms, 80 Hz, 10% THD) Amplifier Section (DAV-HDX279W/DAVHDX576WF) Surround mode (reference) RMS output power FL/FR/C*: 143 watts (per channel minimum RMS power, with no sound output. Outputs (Analog) Phones Accepts low- Amplifier Section (DAV-HDX277WC) Surround mode (reference) RMS output power FL/FR/C/SL/SR*: 143 watts (per channel at 3 ohms, 1 kHz, 10% THD) Subwoofer*: 285 watts (at 10 kHz) Antenna (aerial) AM loop antenna (aerial) Intermediate frequency 450 kHz Video Section Outputs VIDEO: 1 Vp...
Operating Instructions
Page 121
..., 92, 93 SYSTEM SETUP 72 T TEST TONE 74 TIME 61 TRACK SELECTION 72 TV TYPE 69 V VIDEO SETUP 69 VOLUME LIMIT 71 121US C. Index Numerics 4:3 OUTPUT 70 5.1 Channel Surround 55 A A/V SYNC 65 ANGLE 54 ATTENUATE 48 AUDIO 69 AUDIO (HDMI) 71 AUDIO DRC 72 AUDIO SETUP 72 AUTO CALIBRATION 72, 90, 110 B BACKGROUND 72 BLACK LEVEL 70 BLACK LEVEL (COMPONENT OUT) 70 C COLD RESET 95 CONTROL FOR HDMI 71 Control for HDMI 79 Control Menu Display 118 CUSTOM 68, 95 D D. C. (Digital Cinema Auto Calibration) 90...
..., 92, 93 SYSTEM SETUP 72 T TEST TONE 74 TIME 61 TRACK SELECTION 72 TV TYPE 69 V VIDEO SETUP 69 VOLUME LIMIT 71 121US C. Index Numerics 4:3 OUTPUT 70 5.1 Channel Surround 55 A A/V SYNC 65 ANGLE 54 ATTENUATE 48 AUDIO 69 AUDIO (HDMI) 71 AUDIO DRC 72 AUDIO SETUP 72 AUTO CALIBRATION 72, 90, 110 B BACKGROUND 72 BLACK LEVEL 70 BLACK LEVEL (COMPONENT OUT) 70 C COLD RESET 95 CONTROL FOR HDMI 71 Control for HDMI 79 Control Menu Display 118 CUSTOM 68, 95 D D. C. (Digital Cinema Auto Calibration) 90...


