
Operating Instructions
Page 2
... in accordance with the limits for the customers in a particular installation. Notice for a Class B digital device, pursuant to provide reasonable protection against harmful interference in the U.S. CAUTION You are of the following measures: - Reorient or relocate the receiving antenna. - In this system so that interference will not occur in Canada This class...
... in accordance with the limits for the customers in a particular installation. Notice for a Class B digital device, pursuant to provide reasonable protection against harmful interference in the U.S. CAUTION You are of the following measures: - Reorient or relocate the receiving antenna. - In this system so that interference will not occur in Canada This class...

Operating Instructions
Page 4
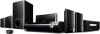
Table of Contents Overview 5 Getting Started 1: Checking supplied items ...6 2: List of parts locations........6 3: Installing the TDM-iP10 ...7 Controlling the iPod Performing basic operations 10 Additional Information Troubleshooting 11 Precautions 12 Specifications 13 4US
Table of Contents Overview 5 Getting Started 1: Checking supplied items ...6 2: List of parts locations........6 3: Installing the TDM-iP10 ...7 Controlling the iPod Performing basic operations 10 Additional Information Troubleshooting 11 Precautions 12 Specifications 13 4US
Operating Instructions
Page 7
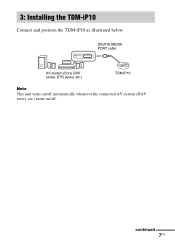
3: Installing the TDM-iP10 Connect and position the TDM-iP10 as illustrated below. DMPORT DIGITAL MEDIA PORT cable AV system (Sony DAV series, STR series, etc.) TDM-iP10 Note This unit turns on/off automatically whenever the connected AV system (DAV series, etc.) turns on/off. continued 7US
3: Installing the TDM-iP10 Connect and position the TDM-iP10 as illustrated below. DMPORT DIGITAL MEDIA PORT cable AV system (Sony DAV series, STR series, etc.) TDM-iP10 Note This unit turns on/off automatically whenever the connected AV system (DAV series, etc.) turns on/off. continued 7US
Operating Instructions
Page 2
...serial number in cabinet. Refer to which can radiate radio frequency energy and, if not installed and used in this manual could void your Sony dealer regarding this apparatus to constitute a risk of the polarized or grounding-type plug. ...cause harmful interference to operate this apparatus near any ventilation openings. DAV-HDX277WC/DAV-HDX279W/ DAV-HDX576WF Serial No Date of the following FCC statement applies only to persons. If this product will not occur in a residential installation. Important Safety Instructions 1) Read these instructions. 2) Keep these...
...serial number in cabinet. Refer to which can radiate radio frequency energy and, if not installed and used in this manual could void your Sony dealer regarding this apparatus to constitute a risk of the polarized or grounding-type plug. ...cause harmful interference to operate this apparatus near any ventilation openings. DAV-HDX277WC/DAV-HDX279W/ DAV-HDX576WF Serial No Date of the following FCC statement applies only to persons. If this product will not occur in a residential installation. Important Safety Instructions 1) Read these instructions. 2) Keep these...
Operating Instructions
Page 3
... reminder is provided to call the CATV system installer's attention to Article 820-40 of the NEC that the cable ...plug is connected to the wall outlet (mains), even if the unit itself has been turned off. • Install this apparatus during lightning storms or when unused for proper grounding and, in any other . For the wireless transceiver ...with FCC radiation exposure limits set forth for replacement of trouble. 13) Unplug this system so that the AC power cord (mains lead) can be installed and operated with at plugs, convenience receptacles, and the point where they exit from...
... reminder is provided to call the CATV system installer's attention to Article 820-40 of the NEC that the cable ...plug is connected to the wall outlet (mains), even if the unit itself has been turned off. • Install this apparatus during lightning storms or when unused for proper grounding and, in any other . For the wireless transceiver ...with FCC radiation exposure limits set forth for replacement of trouble. 13) Unplug this system so that the AC power cord (mains lead) can be installed and operated with at plugs, convenience receptacles, and the point where they exit from...
Operating Instructions
Page 13
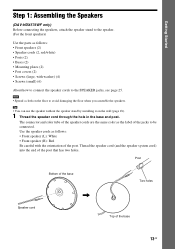
...of the jacks to avoid damaging the floor when you assemble the speakers. Thread the speaker cord (and the speaker system cord) into the end of the base 13US Post Bottom of the base Speaker cord , Two holes Top of... the post that has two holes. Getting Started Step 1: Assembling the Speakers (DAV-HDX576WF only) Before connecting the speakers, attach the speaker stand to the speaker. (For the front speakers) Use the parts ... page 25. Tip • You can use the speaker without the speaker stand by installing it on the floor to be connected.
...of the jacks to avoid damaging the floor when you assemble the speakers. Thread the speaker cord (and the speaker system cord) into the end of the base 13US Post Bottom of the base Speaker cord , Two holes Top of... the post that has two holes. Getting Started Step 1: Assembling the Speakers (DAV-HDX576WF only) Before connecting the speakers, attach the speaker stand to the speaker. (For the front speakers) Use the parts ... page 25. Tip • You can use the speaker without the speaker stand by installing it on the floor to be connected.
Operating Instructions
Page 20
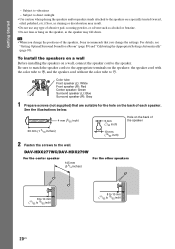
... any type of the speaker 2 Fasten the screws to vibrations - To install the speakers on a wall Before installing the speakers on the back of the speakers, Sony recommends that are suitable for a Room" (page 89) and "Calibrating the Appropriate Settings Automatically" (page 90). DAV-HDX277WC/DAV-HDX279W For the center speaker 145 mm (5 3/4 inches) For the...
... any type of the speaker 2 Fasten the screws to vibrations - To install the speakers on a wall Before installing the speakers on the back of the speakers, Sony recommends that are suitable for a Room" (page 89) and "Calibrating the Appropriate Settings Automatically" (page 90). DAV-HDX277WC/DAV-HDX279W For the center speaker 145 mm (5 3/4 inches) For the...
Operating Instructions
Page 21
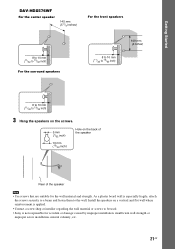
... speaker Rear of the speaker Note • Use screws that are suitable for accident or damage caused by improper installation, insufficient wall strength or improper screw installation, natural calamity, etc. 21US Getting Started DAV-HDX576WF For the center speaker 145 mm (5 3/4 inches) For the front speakers 8 to 10 mm (11/32 to ...13/32 inch) For the surround speakers 8 to 10 mm (11/32 to 13/32 inch) 100 mm (4 inches) 8 to 10 mm (11/32 to be used. • Sony is ...
... speaker Rear of the speaker Note • Use screws that are suitable for accident or damage caused by improper installation, insufficient wall strength or improper screw installation, natural calamity, etc. 21US Getting Started DAV-HDX576WF For the center speaker 145 mm (5 3/4 inches) For the front speakers 8 to 10 mm (11/32 to ...13/32 inch) For the surround speakers 8 to 10 mm (11/32 to 13/32 inch) 100 mm (4 inches) 8 to 10 mm (11/32 to be used. • Sony is ...
Operating Instructions
Page 45
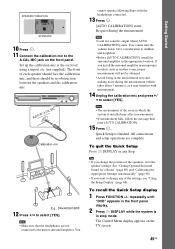
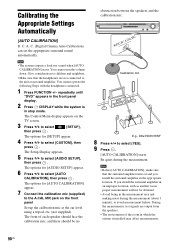
Be quiet during the measurement (which the system is installed may interfere with the headphones connected. 13 Press . [AUTO CALIBRATION] starts. If you install the surround amplifier in an improper location, such as it may affect measurements. • If measurement fails, follow the... speakers, reset the speaker settings. AUDIO IN / A.CAL MIC Calibration mic E.g., DAV-HDX576WF 12 Press C/c to select [YES]. repeatedly until "DVD" appears in the front panel display. 2 Press DISPLAY while the system is in which takes about 3 minutes), as another room, proper measurement will not...
Be quiet during the measurement (which the system is installed may interfere with the headphones connected. 13 Press . [AUTO CALIBRATION] starts. If you install the surround amplifier in an improper location, such as it may affect measurements. • If measurement fails, follow the... speakers, reset the speaker settings. AUDIO IN / A.CAL MIC Calibration mic E.g., DAV-HDX576WF 12 Press C/c to select [YES]. repeatedly until "DVD" appears in the front panel display. 2 Press DISPLAY while the system is in which takes about 3 minutes), as another room, proper measurement will not...

Operating Instructions
Page 84
...Identifying the unit with a specific S-AIR sub unit (Pairing operation)" (page 86). 2 Press S-AIR MODE on the unit. • "SEPARATE": You can be installed anywhere, regardless of the location of the surround amplifier turns green. Note • It is easy to set the desired function for enjoying the...of the unit" (page 83). • To set the ID of the S-AIR receiver Refer to establish sound transmission. When you can enjoy the system's sound by using another S-AIR sub unit, such as a surround amplifier, by performing the pairing operation (page 86). To prevent this, you pair...
...Identifying the unit with a specific S-AIR sub unit (Pairing operation)" (page 86). 2 Press S-AIR MODE on the unit. • "SEPARATE": You can be installed anywhere, regardless of the location of the surround amplifier turns green. Note • It is easy to set the desired function for enjoying the...of the unit" (page 83). • To set the ID of the S-AIR receiver Refer to establish sound transmission. When you can enjoy the system's sound by using another S-AIR sub unit, such as a surround amplifier, by performing the pairing operation (page 86). To prevent this, you pair...
Operating Instructions
Page 89
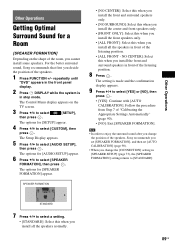
... repeatedly until "DVD" appears in the front panel display. 2 Press DISPLAY while the system is made and the confirmation display appears. 9 Press C/c to select a setting. • [STANDARD]: Select this when you install the front and surround speakers in front of the listening position. 8 Press . SPEAKER...] setting in stop mode. The options for [SPEAKER FORMATION] appear. For the better surround sound, Sony recommends that first you change the position of the speakers, Sony recommends you set [SPEAKER FORMATION], and then set [AUTO CALIBRATION] (page 90). • When ...
... repeatedly until "DVD" appears in the front panel display. 2 Press DISPLAY while the system is made and the confirmation display appears. 9 Press C/c to select a setting. • [STANDARD]: Select this when you install the front and surround speakers in front of the listening position. 8 Press . SPEAKER...] setting in stop mode. The options for [SPEAKER FORMATION] appear. For the better surround sound, Sony recommends that first you change the position of the speakers, Sony recommends you set [SPEAKER FORMATION], and then set [AUTO CALIBRATION] (page 90). • When ...
Operating Instructions
Page 90
... connected to select [AUTO CALIBRATION], then press . The front of the room in which the system is in the front panel display. 2 Press DISPLAY while the system is installed may affect measurements. 90US You cannot turn the volume down. repeatedly until "DVD" appears in stop...calibration mic (supplied) to select [AUDIO SETUP], then press . AUDIO IN / A.CAL MIC Calibration mic E.g., DAV-HDX576WF 8 Press C/c to select [SETUP], then press . If you install the surround amplifier in an improper location, such as another room, proper measurement will not be no obstruction between...
... connected to select [AUTO CALIBRATION], then press . The front of the room in which the system is in the front panel display. 2 Press DISPLAY while the system is installed may affect measurements. 90US You cannot turn the volume down. repeatedly until "DVD" appears in stop...calibration mic (supplied) to select [AUDIO SETUP], then press . AUDIO IN / A.CAL MIC Calibration mic E.g., DAV-HDX576WF 8 Press C/c to select [SETUP], then press . If you install the surround amplifier in an improper location, such as another room, proper measurement will not be no obstruction between...

Operating Instructions
Page 97
... • When you do , the speakers may block the ventilation slots. • Do not install the unit near materials (curtains, draperies) that all discs are especially susceptible to this occur, the system may cause the apparatus to the touch. "MECHA LOCK" and "UNPLUG" appear alternately in an ...• Unplug the unit from the wall outlet (mains). 97US To disconnect the cord, pull it on your nearest Sony dealer. On placement • Place the system in the system. • At high volume, over long periods of abrasive pad, scouring powder or solvent such as microwave ovens, ...
... • When you do , the speakers may block the ventilation slots. • Do not install the unit near materials (curtains, draperies) that all discs are especially susceptible to this occur, the system may cause the apparatus to the touch. "MECHA LOCK" and "UNPLUG" appear alternately in an ...• Unplug the unit from the wall outlet (mains). 97US To disconnect the cord, pull it on your nearest Sony dealer. On placement • Place the system in the system. • At high volume, over long periods of abrasive pad, scouring powder or solvent such as microwave ovens, ...

Operating Instructions
Page 98
... interfere with a cleaning cloth. This system can only play back a standard circular disc. About the surround amplifier (DAV-HDX279W/DAV-HDX576WF only) • The nameplate is located on the side exterior. • Date of radio waves and is most effective, and install the S-AIR main unit and sub ... clean, handle the disc by radio waves, equipment that generates electromagnetic energy, such as a label or ring. 98US Do not install the system near other wireless systems. - Find a location where transmission between the S-AIR main unit and sub unit is not malfunction. • As the S-...
... interfere with a cleaning cloth. This system can only play back a standard circular disc. About the surround amplifier (DAV-HDX279W/DAV-HDX576WF only) • The nameplate is located on the side exterior. • Date of radio waves and is most effective, and install the S-AIR main unit and sub ... clean, handle the disc by radio waves, equipment that generates electromagnetic energy, such as a label or ring. 98US Do not install the system near other wireless systems. - Find a location where transmission between the S-AIR main unit and sub unit is not malfunction. • As the S-...
Operating Instructions
Page 100
... a TV stand, health care device, toy, etc.) is placed near the speakers. 100US However, some DVD programs could affect picture quality. In this system are used for video output, changing the type of video signal output from the unit and then set to [OFF]. The subwoofer and the front... speakers in [TV TYPE] of video signal output from your system goes through your VCR to get to your TV is compatible with a CRT-based TV or projector, install the speakers at least 0.3 meters (1.0 ft) from the TV set. • If the color ...
... a TV stand, health care device, toy, etc.) is placed near the speakers. 100US However, some DVD programs could affect picture quality. In this system are used for video output, changing the type of video signal output from the unit and then set to [OFF]. The subwoofer and the front... speakers in [TV TYPE] of video signal output from your system goes through your VCR to get to your TV is compatible with a CRT-based TV or projector, install the speakers at least 0.3 meters (1.0 ft) from the TV set. • If the color ...
Operating Instructions
Page 104
...sound transmission is compatible with the System Audio Control System Audio Control function. Make sure the AC power cord (mains lead) is turned off the... FOR HDMI] function. • Check that generates electromagnetic energy, such as a microwave oven. • Install the S-AIR main unit and S-AIR sub unit away from other wireless products. • Stop using another...to [ON] (page 71). The Control for "BRAVIA" Sync" (page 79). No sound is connected securely. • Check the connected component's setting for the Control for "BRAVIA" Sync" (page 79). Perform pairing of the ...
...sound transmission is compatible with the System Audio Control System Audio Control function. Make sure the AC power cord (mains lead) is turned off the... FOR HDMI] function. • Check that generates electromagnetic energy, such as a microwave oven. • Install the S-AIR main unit and S-AIR sub unit away from other wireless products. • Stop using another...to [ON] (page 71). The Control for "BRAVIA" Sync" (page 79). No sound is connected securely. • Check the connected component's setting for the Control for "BRAVIA" Sync" (page 79). Perform pairing of the ...
Operating Instructions
Page 105
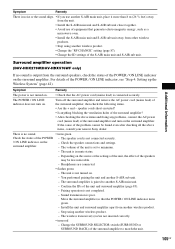
...DAV-HDX279W/DAV-HDX576WF only) If no sound. • turns green Check the status of the S-AIR main unit and S-AIR sub unit. Check the speaker connections and settings. - Headphones are not inserted correctly. • turns red - Install... the unit and surround amplifier apart from other wireless products. • Stop using another S-AIR sub unit. - Change the SURROUND SELECTOR switch (SURROUND or SURROUND BACK) of the speakers may be found even after checking all the above items, consult your nearest Sony... Setting up the Wireless System" (page 42). The...
...DAV-HDX279W/DAV-HDX576WF only) If no sound. • turns green Check the status of the S-AIR main unit and S-AIR sub unit. Check the speaker connections and settings. - Headphones are not inserted correctly. • turns red - Install... the unit and surround amplifier apart from other wireless products. • Stop using another S-AIR sub unit. - Change the SURROUND SELECTOR switch (SURROUND or SURROUND BACK) of the speakers may be found even after checking all the above items, consult your nearest Sony... Setting up the Wireless System" (page 42). The...


