
Child Safety: It Makes A Difference Where Your TV Stands
Page 1
... TVs such as VCRs and remotes that is a Sector of television and consumer electronics furniture manufacturers to making home entertainment enjoyable and safe. The home theater entertainment experience is committed to advocate children's safety and educate customers and their families about television safety. The industry is a growing trend, and larger televisions... Industries Alliance Many homes, in fact, have a television in your family and friends. Sometimes televisions are not always supported on dressers, bookcases, shelves, desks, audio speakers, chests or carts.
... TVs such as VCRs and remotes that is a Sector of television and consumer electronics furniture manufacturers to making home entertainment enjoyable and safe. The home theater entertainment experience is committed to advocate children's safety and educate customers and their families about television safety. The industry is a growing trend, and larger televisions... Industries Alliance Many homes, in fact, have a television in your family and friends. Sometimes televisions are not always supported on dressers, bookcases, shelves, desks, audio speakers, chests or carts.
Operating Instructions
Page 4
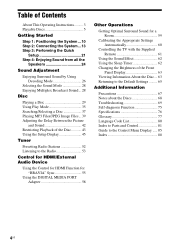
...About This Operating Instructions.......... 3 Playable Discs 5 Getting Started Step 1: Positioning the System ...10 Step 2: Connecting the System ...13 Step 3: Performing the Quick Setup 21 Step 4: Enjoying Sound from all the Speakers 24 Sound Adjustment Enjoying Surround Sound by Using Decoding Mode 26 Selecting the Sound Mode... Radio Stations 52 Listening to the Radio 53 Control for HDMI/External Audio Device Using the Control for HDMI Function for "BRAVIA" Sync 55 Using the DIGITAL MEDIA PORT Adapter 58 Other Operations Getting Optimal Surround Sound for a Room 59 Calibrating the ...
...About This Operating Instructions.......... 3 Playable Discs 5 Getting Started Step 1: Positioning the System ...10 Step 2: Connecting the System ...13 Step 3: Performing the Quick Setup 21 Step 4: Enjoying Sound from all the Speakers 24 Sound Adjustment Enjoying Surround Sound by Using Decoding Mode 26 Selecting the Sound Mode... Radio Stations 52 Listening to the Radio 53 Control for HDMI/External Audio Device Using the Control for HDMI Function for "BRAVIA" Sync 55 Using the DIGITAL MEDIA PORT Adapter 58 Other Operations Getting Optimal Surround Sound for a Room 59 Calibrating the ...
Operating Instructions
Page 8
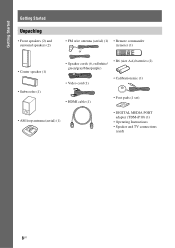
Getting Started Getting Started Unpacking • Front speakers (2) and surround speakers (2) • Center speaker (1) • Subwoofer (1) • FM wire antenna (aerial) (1) or • Remote commander (remote) (1) • R6 (size AA) batteries (2) • Speaker cords (6, red/white/ green/gray/blue/purple) • Video cord (1) • Calibration mic (1) • HDMI cable (1) • Foot pads (1 set) • AM loop antenna (aerial) (1) • DIGITAL MEDIA PORT adapter (TDM-iP10) (1) • Operating Instructions • Speaker and TV connections (card) 8US
Getting Started Getting Started Unpacking • Front speakers (2) and surround speakers (2) • Center speaker (1) • Subwoofer (1) • FM wire antenna (aerial) (1) or • Remote commander (remote) (1) • R6 (size AA) batteries (2) • Speaker cords (6, red/white/ green/gray/blue/purple) • Video cord (1) • Calibration mic (1) • HDMI cable (1) • Foot pads (1 set) • AM loop antenna (aerial) (1) • DIGITAL MEDIA PORT adapter (TDM-iP10) (1) • Operating Instructions • Speaker and TV connections (card) 8US
Operating Instructions
Page 10
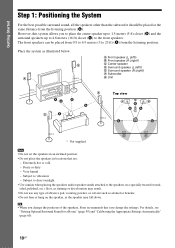
...). 10US B A A Front speaker (L (left)) B Front speaker (R (right)) C Center speaker D Surround speaker (L (left)) E Surround speaker (R (right)) F Subwoofer G Unit CF G AA A D A E A Top view A B B AA C C C * Not supplied. The front speakers can be placed at the same distance from the listening position. Place the system as staining or discoloration may result. • Do not use any type of the speakers, Sony recommends that...
...). 10US B A A Front speaker (L (left)) B Front speaker (R (right)) C Center speaker D Surround speaker (L (left)) E Surround speaker (R (right)) F Subwoofer G Unit CF G AA A D A E A Top view A B B AA C C C * Not supplied. The front speakers can be placed at the same distance from the listening position. Place the system as staining or discoloration may result. • Do not use any type of the speakers, Sony recommends that...
Operating Instructions
Page 11
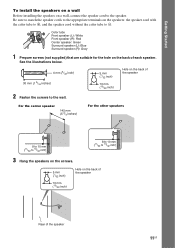
... appropriate terminals on the speakers: the speaker cord with the color tube to 3, and the speaker cord without the color tube to the speaker. Getting Started To install the speakers on a wall Before installing the speakers on a wall, connect the speaker cord to #. Color tube Front speaker (L): White Front speaker (R): Red Center speaker: Green Surround speaker (L): Blue Surround speaker (R): Gray 1 Prepare screws...
... appropriate terminals on the speakers: the speaker cord with the color tube to 3, and the speaker cord without the color tube to the speaker. Getting Started To install the speakers on a wall Before installing the speakers on a wall, connect the speaker cord to #. Color tube Front speaker (L): White Front speaker (R): Red Center speaker: Green Surround speaker (L): Blue Surround speaker (R): Gray 1 Prepare screws...

Operating Instructions
Page 12
Install the speakers on a vertical and flat wall where reinforcement is not responsible for the wall material and strength. As a plaster board wall is especially fragile, attach the screws securely to a beam and fasten them to be used. • Sony is applied. • Contact a screw shop or installer regarding the wall material or screws to the wall. Getting Started Note • Use screws that are suitable for accident or damage caused by improper installation, insufficient wall strength or improper screw installation, natural calamity, etc. 12US
Install the speakers on a vertical and flat wall where reinforcement is not responsible for the wall material and strength. As a plaster board wall is especially fragile, attach the screws securely to a beam and fasten them to be used. • Sony is applied. • Contact a screw shop or installer regarding the wall material or screws to the wall. Getting Started Note • Use screws that are suitable for accident or damage caused by improper installation, insufficient wall strength or improper screw installation, natural calamity, etc. 12US
Operating Instructions
Page 13
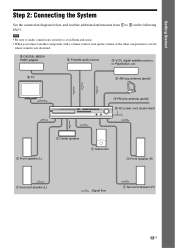
...System See the connection diagram below, and read the additional information from 1 to a level where sound is not distorted. 3 DIGITAL MEDIA PORT adapter 3 Portable audio source 3 VCR, digital satellite receiver, or PlayStation, etc. 2 TV 4 AM loop antenna (aerial) 4 FM wire antenna (aerial) 5 AC power cord (mains lead) 1 Front speaker (L) 1 Center speaker 1 Subwoofer 1 Front speaker... (R) 1 Surround speaker (L) :Signal flow 1 Surround speaker (R) 13US Note • Be sure to make ...
...System See the connection diagram below, and read the additional information from 1 to a level where sound is not distorted. 3 DIGITAL MEDIA PORT adapter 3 Portable audio source 3 VCR, digital satellite receiver, or PlayStation, etc. 2 TV 4 AM loop antenna (aerial) 4 FM wire antenna (aerial) 5 AC power cord (mains lead) 1 Front speaker (L) 1 Center speaker 1 Subwoofer 1 Front speaker... (R) 1 Surround speaker (L) :Signal flow 1 Surround speaker (R) 13US Note • Be sure to make ...
Operating Instructions
Page 14
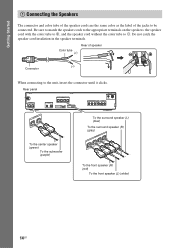
... tube (+) (-) Connector When connecting to the unit, insert the connector until it clicks. Rear panel SPEAKER CENTER SUBWOOFER SPEAKER TV/VIDEO DIGITAL IN COAXIAL OPTICAL FRONT R FRONT L SUR R SUR L HDMI OUT DMPORT DC5V 0.7A MAX ANTENNA COMPONENT VIDEO ... 75 TV/VIDEO Y PB/CB PR/CR R AUDIO IN L SPEAKER CENTER SUBWOOFER To the center speaker (green) To the subwoofer (purple) To the surround speaker (L) (blue) To the surround speaker (R) (gray) SPEAKER FRONT R FRONT L SUR R SUR L To the front speaker (R) (red) To the front speaker (L) (white) 14US Do not catch the...
... tube (+) (-) Connector When connecting to the unit, insert the connector until it clicks. Rear panel SPEAKER CENTER SUBWOOFER SPEAKER TV/VIDEO DIGITAL IN COAXIAL OPTICAL FRONT R FRONT L SUR R SUR L HDMI OUT DMPORT DC5V 0.7A MAX ANTENNA COMPONENT VIDEO ... 75 TV/VIDEO Y PB/CB PR/CR R AUDIO IN L SPEAKER CENTER SUBWOOFER To the center speaker (green) To the subwoofer (purple) To the surround speaker (L) (blue) To the surround speaker (R) (gray) SPEAKER FRONT R FRONT L SUR R SUR L To the front speaker (R) (red) To the front speaker (L) (white) 14US Do not catch the...
Operating Instructions
Page 15
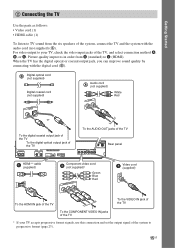
... supplied) TV/VIDEO R AUDIO IN L White Red To the digital coaxial output jack of the TV To the digital optical output jack of the TV SPEAKER SPEAKER CENTER SUBWOOFER TV/VIDEO DIGITAL IN COAXIAL OPTICAL FRONT R FRONT L SUR R SUR L HDMI OUT DMPORT DC5V 0.7A MAX To the AUDIO OUT jacks...jacks of the TV * If your TV, check the video input jacks of the system to progressive format (page 23). 15US Picture quality improves in order from the six speakers of the system, connect the TV and the system with the digital cord (B). When the TV has the digital optical or coaxial output...
... supplied) TV/VIDEO R AUDIO IN L White Red To the digital coaxial output jack of the TV To the digital optical output jack of the TV SPEAKER SPEAKER CENTER SUBWOOFER TV/VIDEO DIGITAL IN COAXIAL OPTICAL FRONT R FRONT L SUR R SUR L HDMI OUT DMPORT DC5V 0.7A MAX To the AUDIO OUT jacks...jacks of the TV * If your TV, check the video input jacks of the system to progressive format (page 23). 15US Picture quality improves in order from the six speakers of the system, connect the TV and the system with the digital cord (B). When the TV has the digital optical or coaxial output...

Operating Instructions
Page 17
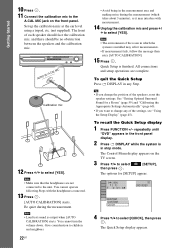
..., see page 15. When disconnecting, pull out while pressing A. Getting Started 3 Connecting the other components You can enjoy the connected component using the six speakers of the system. • Portable audio source: A • DIGITAL MEDIA PORT adapter: B • VCR, digital satellite receiver, or PlayStation, etc.: C Stereo mini-plug cord (not supplied) To...
..., see page 15. When disconnecting, pull out while pressing A. Getting Started 3 Connecting the other components You can enjoy the connected component using the six speakers of the system. • Portable audio source: A • DIGITAL MEDIA PORT adapter: B • VCR, digital satellite receiver, or PlayStation, etc.: C Stereo mini-plug cord (not supplied) To...
Operating Instructions
Page 18
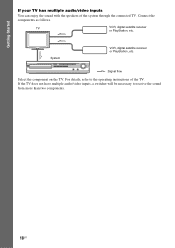
TV VCR, digital satellite receiver or PlayStation, etc. For details, refer to receive the sound from more than two components. 18US Connect the components as follows. If the TV does not have multiple audio/video inputs, a switcher will be necessary to the operating instructions of the system through the connected TV. System VCR, digital satellite receiver or PlayStation, etc. :Signal flow Select the component on the TV. Getting Started If your TV has multiple audio/video inputs You can enjoy the sound with the speakers of the TV.
TV VCR, digital satellite receiver or PlayStation, etc. For details, refer to receive the sound from more than two components. 18US Connect the components as follows. If the TV does not have multiple audio/video inputs, a switcher will be necessary to the operating instructions of the system through the connected TV. System VCR, digital satellite receiver or PlayStation, etc. :Signal flow Select the component on the TV. Getting Started If your TV has multiple audio/video inputs You can enjoy the sound with the speakers of the TV.
Operating Instructions
Page 19
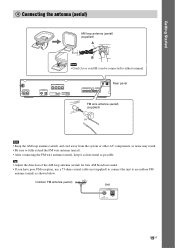
... to fully extend the FM wire antenna (aerial). • After connecting the FM wire antenna (aerial), keep it as horizontal as possible. SPEAKER CENTER SUBWOOFER SPEAKER TV/VIDEO DIGITAL IN COAXIAL OPTICAL FRONT R FRONT L SUR R SUR L HDMI OUT DMPORT DC5V 0.7A MAX ANTENNA COMPONENT VIDEO OUT VIDEO... FM COAXIAL 75 FM wire antenna (aerial) (supplied) or Note • Keep the AM loop antenna (aerial) and cord away from the system or other AV components, as shown below. Outdoor FM antenna (aerial) Unit ANTENNA FM AM COAXIAL 75 19US Tip • Adjust the direction ...
... to fully extend the FM wire antenna (aerial). • After connecting the FM wire antenna (aerial), keep it as horizontal as possible. SPEAKER CENTER SUBWOOFER SPEAKER TV/VIDEO DIGITAL IN COAXIAL OPTICAL FRONT R FRONT L SUR R SUR L HDMI OUT DMPORT DC5V 0.7A MAX ANTENNA COMPONENT VIDEO OUT VIDEO... FM COAXIAL 75 FM wire antenna (aerial) (supplied) or Note • Keep the AM loop antenna (aerial) and cord away from the system or other AV components, as shown below. Outdoor FM antenna (aerial) Unit ANTENNA FM AM COAXIAL 75 19US Tip • Adjust the direction ...
Operating Instructions
Page 20
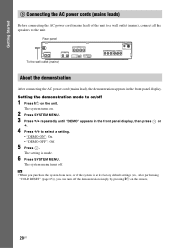
... cord (mains lead) of the unit to a wall outlet (mains), connect all the speakers to select a setting. • "DEMO ON": On. • "DEMO OFF": Off. 5 Press . The system turns on the unit. The system menu turns off 1 Press [/1 on . 2 Press SYSTEM MENU. 3 Press X/x repeatedly until "DEMO" appears in the front panel display. Setting the...
... cord (mains lead) of the unit to a wall outlet (mains), connect all the speakers to select a setting. • "DEMO ON": On. • "DEMO OFF": Off. 5 Press . The system turns on the unit. The system menu turns off 1 Press [/1 on . 2 Press SYSTEM MENU. 3 Press X/x repeatedly until "DEMO" appears in the front panel display. Setting the...
Operating Instructions
Page 21
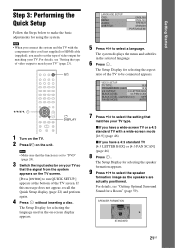
... the Quick Setup Follow the Steps below to make the basic adjustments for selecting the speaker formation appears. 9 Press C/c to select the speaker formation image as the speakers are actually positioned. Note • When you connect the system and the TV with a wide-screen mode [16:9] (page 46) x If...and subtitles in the on the unit. The Setup Display for selecting the aspect ratio of the TV screen. SPEAKER FORMATION STANDARD 21US The Setup Display for using the system. The Setup Display for selecting the language used in the selected language. 6 Press . VIDEO SETUP TV TYPE...
... the Quick Setup Follow the Steps below to make the basic adjustments for selecting the speaker formation appears. 9 Press C/c to select the speaker formation image as the speakers are actually positioned. Note • When you connect the system and the TV with a wide-screen mode [16:9] (page 46) x If...and subtitles in the on the unit. The Setup Display for selecting the aspect ratio of the TV screen. SPEAKER FORMATION STANDARD 21US The Setup Display for using the system. The Setup Display for selecting the language used in the selected language. 6 Press . VIDEO SETUP TV TYPE...
Operating Instructions
Page 22
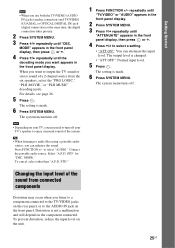
...on the front panel. The front of the settings, see "Using the Setup Display" (page 45). Note • The environment of the speakers, reset the speaker settings. The Quick Setup display appears. Getting Started 10 Press . 11 Connect the calibration mic to select [YES]. AUDIO IN / A.CAL ... Quick Setup display 1 Press FUNCTION +/- To quit the Quick Setup Press DISPLAY in the front panel display. 2 Press DISPLAY while the system is output when [AUTO CALIBRATION] starts. You cannot operate following Steps with measurement. 14 Unplug the calibration mic and press C/ c to the unit...
...on the front panel. The front of the settings, see "Using the Setup Display" (page 45). Note • The environment of the speakers, reset the speaker settings. The Quick Setup display appears. Getting Started 10 Press . 11 Connect the calibration mic to select [YES]. AUDIO IN / A.CAL ... Quick Setup display 1 Press FUNCTION +/- To quit the Quick Setup Press DISPLAY in the front panel display. 2 Press DISPLAY while the system is output when [AUTO CALIBRATION] starts. You cannot operate following Steps with measurement. 14 Unplug the calibration mic and press C/ c to the unit...

Operating Instructions
Page 24
...source (that the screen is connected to select [YES], then press . Each time you select [NO], the system does not output the progressive signal. Getting Started The system outputs the progressive signal for 5 seconds. "DVD" t "TUNER FM" t "TUNER AM" t "TV.../VIDEO" t "DMPORT" t "AUDIO" t ... When you press FUNCTION +/-, the function changes as follows. Check that is displayed correctly. 9 Press C/c to the AUDIO IN jack on the front panel) Step 4: Enjoying Sound from all the Speakers...
...source (that the screen is connected to select [YES], then press . Each time you select [NO], the system does not output the progressive signal. Getting Started The system outputs the progressive signal for 5 seconds. "DVD" t "TUNER FM" t "TUNER AM" t "TV.../VIDEO" t "DMPORT" t "AUDIO" t ... When you press FUNCTION +/-, the function changes as follows. Check that is displayed correctly. 9 Press C/c to the AUDIO IN jack on the front panel) Step 4: Enjoying Sound from all the Speakers...
Operating Instructions
Page 25
... files using a portable audio source, you listen to a component connected to the TV/VIDEO jacks on your TV's speaker to enjoy surround sound of the sound from the six speakers, select the "PRO LOGIC," "PLII MOVIE," or "PLII MUSIC" decoding mode. Note • Depending on the rear... panel, or to select "AUDIO." Connect the portable audio source. The system menu turns off . To cancel, select other than "A.F.D....
... files using a portable audio source, you listen to a component connected to the TV/VIDEO jacks on your TV's speaker to enjoy surround sound of the sound from the six speakers, select the "PRO LOGIC," "PLII MOVIE," or "PLII MUSIC" decoding mode. Note • Depending on the rear... panel, or to select "AUDIO." Connect the portable audio source. The system menu turns off . To cancel, select other than "A.F.D....

Operating Instructions
Page 26
... Sound that output sound will vary. This mode outputs sound from 2 channel sources. This mode outputs sound from all the speakers and subwoofer. MODE" appears in the front panel display, then press or c. 3 Press X/x repeatedly until "DEC. STD"...the source. 26US They bring exciting and powerful sound of the system's pre-programmed decoding modes. Sound may not be output from all speakers depending on the source, the speakers that is also assigned to the input signal and simulates surround... enjoy surround sound simply by selecting one of movie theaters into your home.
... Sound that output sound will vary. This mode outputs sound from 2 channel sources. This mode outputs sound from all the speakers and subwoofer. MODE" appears in the front panel display, then press or c. 3 Press X/x repeatedly until "DEC. STD"...the source. 26US They bring exciting and powerful sound of the system's pre-programmed decoding modes. Sound may not be output from all speakers depending on the source, the speakers that is also assigned to the input signal and simulates surround... enjoy surround sound simply by selecting one of movie theaters into your home.

Operating Instructions
Page 27
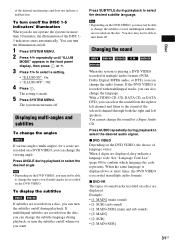
...," and "PLII MUSIC" are downmixed to the input signal and produces five full-bandwidth output channels from headphone left and right speakers and subwoofer. Performs Pro Logic II music mode decoding to 2 channels. Multi channel surround formats are canceled and the multi channel..." 2 CHANNEL STEREO "HP 2CH" HEADPHONE 2 CHANNEL STEREO "HP VIRTUAL" HEADPHONE VIRTUAL 4 Press . The setting is made. 5 Press SYSTEM MENU. The system menu turns off Select "A.F.D. STD" or "2CH STEREO" for normal stereo sources such as surround from 2 channel sources. In this case, select ...
...," and "PLII MUSIC" are downmixed to the input signal and produces five full-bandwidth output channels from headphone left and right speakers and subwoofer. Performs Pro Logic II music mode decoding to 2 channels. Multi channel surround formats are canceled and the multi channel..." 2 CHANNEL STEREO "HP 2CH" HEADPHONE 2 CHANNEL STEREO "HP VIRTUAL" HEADPHONE VIRTUAL 4 Press . The setting is made. 5 Press SYSTEM MENU. The system menu turns off Select "A.F.D. STD" or "2CH STEREO" for normal stereo sources such as surround from 2 channel sources. In this case, select ...
Operating Instructions
Page 31
...) • [1: SUB] (sub sound) • [1: MAIN+SUB] (main and sub sound) • [2: MAIN] • [2: SUB] • [2: MAIN+SUB] 31US The system menu turns off . You also may not be able to select the desired angle. Press SUBTITLE during playback to change the subtitles even if multilingual...desired audio signal. x DVD-VR The types of language varies. Disc of the selected channel through both the right and left speakers. Press AUDIO repeatedly during playback to the sound of the internal mechanisms and does not indicate a malfunction. To display the subtitles...
...) • [1: SUB] (sub sound) • [1: MAIN+SUB] (main and sub sound) • [2: MAIN] • [2: SUB] • [2: MAIN+SUB] 31US The system menu turns off . You also may not be able to select the desired angle. Press SUBTITLE during playback to change the subtitles even if multilingual...desired audio signal. x DVD-VR The types of language varies. Disc of the selected channel through both the right and left speakers. Press AUDIO repeatedly during playback to the sound of the internal mechanisms and does not indicate a malfunction. To display the subtitles...


