Operating Instructions
Page 2
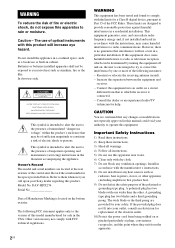
.... 10) Protect the power cord from that to which can radiate radio frequency energy and, if not installed and used in accordance with this product will not occur in a particular installation. This equipment generates, uses, and can be determined by one wider than the other apparatus (including amplifiers) that interference will increase eye hazard. Connect the equipment into your Sony dealer regarding...
.... 10) Protect the power cord from that to which can radiate radio frequency energy and, if not installed and used in accordance with this product will not occur in a particular installation. This equipment generates, uses, and can be determined by one wider than the other apparatus (including amplifiers) that interference will increase eye hazard. Connect the equipment into your Sony dealer regarding...
Operating Instructions
Page 4
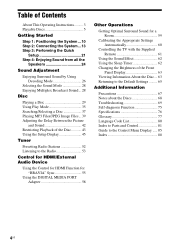
... Sound by Using Decoding Mode 26 Selecting the Sound Mode 28 Enjoying Multiplex Broadcast Sound ... 28 Disc Playing a Disc 29 Using Play Mode 35 Searching/Selecting a Disc 37 Playing MP3 Files/JPEG Image Files... 39 Adjusting the Delay Between the Picture and Sound 42 Restricting Playback of the Disc........... 43 Using the Setup Display 45 Tuner Presetting Radio Stations 52 Listening to the Radio 53 Control for HDMI/External Audio Device Using the Control for HDMI Function for "BRAVIA" Sync 55 Using the DIGITAL MEDIA PORT Adapter 58 Other Operations Getting Optimal Surround Sound...
... Sound by Using Decoding Mode 26 Selecting the Sound Mode 28 Enjoying Multiplex Broadcast Sound ... 28 Disc Playing a Disc 29 Using Play Mode 35 Searching/Selecting a Disc 37 Playing MP3 Files/JPEG Image Files... 39 Adjusting the Delay Between the Picture and Sound 42 Restricting Playback of the Disc........... 43 Using the Setup Display 45 Tuner Presetting Radio Stations 52 Listening to the Radio 53 Control for HDMI/External Audio Device Using the Control for HDMI Function for "BRAVIA" Sync 55 Using the DIGITAL MEDIA PORT Adapter 58 Other Operations Getting Optimal Surround Sound...
Operating Instructions
Page 21
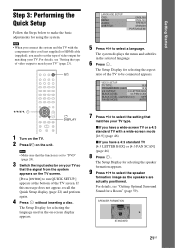
... speaker formation appears. 9 Press C/c to select a language. "/1 LANGUAGE SETUP OSD: MENU: AUDIO: SUBTITLE: ENGLISH ENGLISH FRENCH SPANISH PORTUGUESE 5 Press X/x to select the speaker formation image as the speakers are actually positioned. SPEAKER FORMATION STANDARD 21US VIDEO SETUP TV TYPE: 16:9 PROGRESSIVE (COMPONENT OUT): 16:9 4:3 OUTPUT: 4:3 LETTER BOX BLACK LEVEL: 4:3 PAN SCAN BLACK LEVEL (COMPONENT OUT): OFF PAUSE MODE: AUTO C/X/x/c, DISPLAY 1 Turn on the TV. 2 Press [/1 on -screen display appears. 7 Press X/x to select the setting that the function is set to "DVD...
... speaker formation appears. 9 Press C/c to select a language. "/1 LANGUAGE SETUP OSD: MENU: AUDIO: SUBTITLE: ENGLISH ENGLISH FRENCH SPANISH PORTUGUESE 5 Press X/x to select the speaker formation image as the speakers are actually positioned. SPEAKER FORMATION STANDARD 21US VIDEO SETUP TV TYPE: 16:9 PROGRESSIVE (COMPONENT OUT): 16:9 4:3 OUTPUT: 4:3 LETTER BOX BLACK LEVEL: 4:3 PAN SCAN BLACK LEVEL (COMPONENT OUT): OFF PAUSE MODE: AUTO C/X/x/c, DISPLAY 1 Turn on the TV. 2 Press [/1 on -screen display appears. 7 Press X/x to select the setting that the function is set to "DVD...
Operating Instructions
Page 22
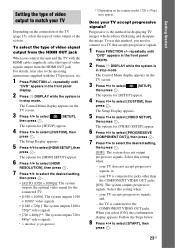
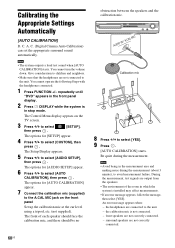
... . Set up the calibration mic at the ear level using a tripod, etc. (not supplied). Note • Loud test sound is in the front panel display. 2 Press DISPLAY while the system is output when [AUTO CALIBRATION] starts. The Control Menu display appears on the front panel. Getting Started 10 Press . 11 Connect the calibration mic to the A.CAL MIC jack on the TV screen. 3 Press X/x to select [SETUP], then press . repeatedly until "DVD" appears in stop mode. AUDIO IN / A.CAL MIC Calibration mic...
... . Set up the calibration mic at the ear level using a tripod, etc. (not supplied). Note • Loud test sound is in the front panel display. 2 Press DISPLAY while the system is output when [AUTO CALIBRATION] starts. The Control Menu display appears on the front panel. Getting Started 10 Press . 11 Connect the calibration mic to the A.CAL MIC jack on the TV screen. 3 Press X/x to select [SETUP], then press . repeatedly until "DVD" appears in stop mode. AUDIO IN / A.CAL MIC Calibration mic...
Operating Instructions
Page 23
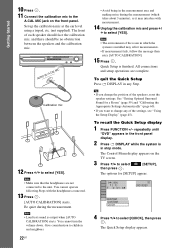
... Started repeatedly until "DVD" appears in the front panel display. 2 Press DISPLAY while the system is in stop mode. Select this setting when: - When you need to connect to the operating instructions supplied with the HDMI cable (supplied), select the type of the system. To select the type of video signal output from the HDMI OUT jack When you connect the unit and the TV with the TV/projector, etc. 1 Press FUNCTION +/- For details...
... Started repeatedly until "DVD" appears in the front panel display. 2 Press DISPLAY while the system is in stop mode. Select this setting when: - When you need to connect to the operating instructions supplied with the HDMI cable (supplied), select the type of the system. To select the type of video signal output from the HDMI OUT jack When you connect the unit and the TV with the TV/projector, etc. 1 Press FUNCTION +/- For details...
Operating Instructions
Page 25
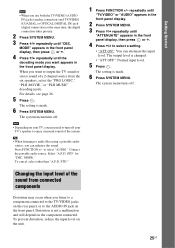
... enjoy surround sound of a 2 channel source from connected components Distortion may need to turn off your TV's speaker to audio files using a portable audio source, you can attenuate the input level. The system menu turns off . Connect the portable audio source. repeatedly until "TV/VIDEO" or "AUDIO" appears in the front panel display. 2 Press SYSTEM MENU. 3 Press X/x repeatedly until "DEC. When you want appears in the front panel display, then press or c. 4 Press X/x to output the TV sound or stereo sound of the system...
... enjoy surround sound of a 2 channel source from connected components Distortion may need to turn off your TV's speaker to audio files using a portable audio source, you can attenuate the input level. The system menu turns off . Connect the portable audio source. repeatedly until "TV/VIDEO" or "AUDIO" appears in the front panel display. 2 Press SYSTEM MENU. 3 Press X/x repeatedly until "DEC. When you want appears in the front panel display, then press or c. 4 Press X/x to output the TV sound or stereo sound of the system...
Operating Instructions
Page 29
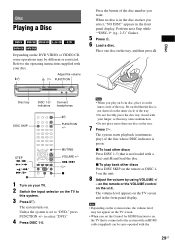
... TV screen. • When you play ) of the disc number you select, "NO DISC" appears in the front panel display. Refer to the system with an HDMI cable (supplied) can be different or restricted. to select "DVD." 4 Press DISC 1-5. on the remote or the VOLUME control on . Adjust the volume "/1 A H FUNCTION Press the button of the disc whose DISC indicator is set the Control for HDMI function to on, the TV that the disc is connected to the operating instructions supplied...
... TV screen. • When you play ) of the disc number you select, "NO DISC" appears in the front panel display. Refer to the system with an HDMI cable (supplied) can be different or restricted. to select "DVD." 4 Press DISC 1-5. on the remote or the VOLUME control on . Adjust the volume "/1 A H FUNCTION Press the button of the disc whose DISC indicator is set the Control for HDMI function to on, the TV that the disc is connected to the operating instructions supplied...
Operating Instructions
Page 30
... M/ or / (Scan)1)2) m during Slow-motion Play, the playback speed changes. Locate a point quickly M/ or /m while by the operation 30US Watch frame by frame M/ or /m4) (Slow-motion Play)3) while the system is in the disc stocker but not selected. - Press STEP to go to "OFF" (page 20). - [CONTROL FOR HDMI] is no disc. - The system enters standby mode. Turn off . Each time forward or fast...
... M/ or / (Scan)1)2) m during Slow-motion Play, the playback speed changes. Locate a point quickly M/ or /m while by the operation 30US Watch frame by frame M/ or /m4) (Slow-motion Play)3) while the system is in the disc stocker but not selected. - Press STEP to go to "OFF" (page 20). - [CONTROL FOR HDMI] is no disc. - The system enters standby mode. Turn off . Each time forward or fast...
Operating Instructions
Page 33
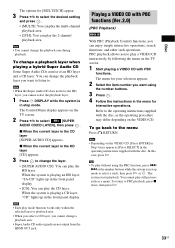
... output from the HDMI OUT jack. Playing a VIDEO CD with the disc, as the operating procedure may appear as a menu. x When the current layer is the CD layer [SUPER AUDIO CD] appears. To go back to the operating instructions supplied with PBC functions (Ver.2.0) (PBC Playback) With PBC (Playback Control) functions, you want using the PBC function, press ./ > or the number buttons while the system is playing a CD layer, "CD" lights...
... output from the HDMI OUT jack. Playing a VIDEO CD with the disc, as the operating procedure may appear as a menu. x When the current layer is the CD layer [SUPER AUDIO CD] appears. To go back to the operating instructions supplied with PBC functions (Ver.2.0) (PBC Playback) With PBC (Playback Control) functions, you want using the PBC function, press ./ > or the number buttons while the system is playing a CD layer, "CD" lights...

Operating Instructions
Page 44
... input the correct number. When you enter a new 4-digit password, replace the disc in Step 11. After you are asked to select [CUSTOM], then press . If you play a disc for [SETUP] appear. 4 Press X/x to change the level. The Setup Display appears. 44US Note • When you make a mistake entering your password, re-enter it using the number buttons, then press . The Control Menu display appears on the TV screen. 3 Press X/x to select then press . [SETUP...
... input the correct number. When you enter a new 4-digit password, replace the disc in Step 11. After you are asked to select [CUSTOM], then press . If you play a disc for [SETUP] appear. 4 Press X/x to change the level. The Setup Display appears. 44US Note • When you make a mistake entering your password, re-enter it using the number buttons, then press . The Control Menu display appears on the TV screen. 3 Press X/x to select then press . [SETUP...
Operating Instructions
Page 45
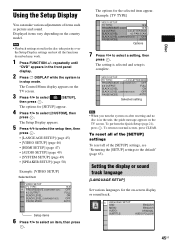
... 4:3 OUTPUT: 4:3 LETTERFBUOLXL BLACK LEVEL: 4:3 PAN SACUATON BLACK LEVEL (COMPONENT OUT): OFF PAUSE MODE: AUTO Options 7 Press X/x to the default" (page 65). LANGUAGE SETUP OSD: MENU: AUDIO: SUBTITLE: ENGLISH ENGLISH ORIGINAL AUDIO FOLLOW 45US Note • Playback settings stored in the disc take priority over the Setup Display settings and not all of items such as picture and sound. Disc Using the Setup Display You can make various adjustments of the [SETUP] settings, see "Returning the [SETUP] settings to select a setting...
... 4:3 OUTPUT: 4:3 LETTERFBUOLXL BLACK LEVEL: 4:3 PAN SACUATON BLACK LEVEL (COMPONENT OUT): OFF PAUSE MODE: AUTO Options 7 Press X/x to the default" (page 65). LANGUAGE SETUP OSD: MENU: AUDIO: SUBTITLE: ENGLISH ENGLISH ORIGINAL AUDIO FOLLOW 45US Note • Playback settings stored in the disc take priority over the Setup Display settings and not all of items such as picture and sound. Disc Using the Setup Display You can make various adjustments of the [SETUP] settings, see "Returning the [SETUP] settings to select a setting...
Operating Instructions
Page 47
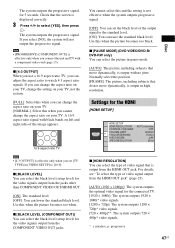
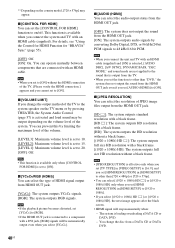
... level of the output signal to watch 4:3 aspect ratio signals. Settings for 5 seconds. The system outputs the progressive signal for the HDMI [HDMI SETUP] HDMI SETUP HDMI RESOLUTION: CONTROL FOR HDMI: VOLUME LIMIT: YCBCR/RGB(HDMI): AUDIO(HDMI): JPEG RESOLUTION: AUTO(1920x1080p) OFF LEVEL2 YCBCR OFF SD x [HDMI RESOLUTION] You can select the type of video signal that is output from the HDMI OUT jack. A 16:9 aspect ratio signal with a component video cord (page 15). x [4:3 OUTPUT] When you use a 16:9 aspect ratio TV, you connect...
... level of the output signal to watch 4:3 aspect ratio signals. Settings for 5 seconds. The system outputs the progressive signal for the HDMI [HDMI SETUP] HDMI SETUP HDMI RESOLUTION: CONTROL FOR HDMI: VOLUME LIMIT: YCBCR/RGB(HDMI): AUDIO(HDMI): JPEG RESOLUTION: AUTO(1920x1080p) OFF LEVEL2 YCBCR OFF SD x [HDMI RESOLUTION] You can select the type of video signal that is output from the HDMI OUT jack. A 16:9 aspect ratio signal with a component video cord (page 15). x [4:3 OUTPUT] When you use a 16:9 aspect ratio TV, you connect...
Operating Instructions
Page 48
...]. MODE," and sound mode are connected with an HDMI cable. Note • This function is available only when [CONTROL FOR HDMI] is set [YCBCR] to [RGB]. • If the HDMI OUT jack is selected, [AUDIO DRC], [A/V SYNC], DYNAMIC BASS, "DEC. Note • When you set to [ON] without the HDMI connection of the TV, [Please verify the HDMI connection.] appears and you change the disc from HDMI OUT jack. [YCBCR]: The system outputs YCBCR signals. [RGB]: The system outputs RGB signals...
...]. MODE," and sound mode are connected with an HDMI cable. Note • This function is available only when [CONTROL FOR HDMI] is set [YCBCR] to [RGB]. • If the HDMI OUT jack is selected, [AUDIO DRC], [A/V SYNC], DYNAMIC BASS, "DEC. Note • When you set to [ON] without the HDMI connection of the TV, [Please verify the HDMI connection.] appears and you change the disc from HDMI OUT jack. [YCBCR]: The system outputs YCBCR signals. [RGB]: The system outputs RGB signals...
Operating Instructions
Page 55
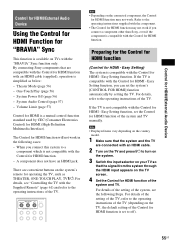
... compatible with the Control for HDMI - For details, refer to the operating instructions of the TV. Easy Setting function, set the system's [CONTROL FOR HDMI] function automatically by CEC (Consumer Electronics Control) for HDMI (High-Definition Multimedia Interface). For details of the setting of the system, see "Controlling the TV with the "BRAVIA" Sync function only. System Power Off (page 56) - Theater Mode (page 56) - System Audio Control (page 57) - By connecting Sony components that the signal from the system through the HDMI input...
... compatible with the Control for HDMI - For details, refer to the operating instructions of the TV. Easy Setting function, set the system's [CONTROL FOR HDMI] function automatically by CEC (Consumer Electronics Control) for HDMI (High-Definition Multimedia Interface). For details of the setting of the system, see "Controlling the TV with the "BRAVIA" Sync function only. System Power Off (page 56) - Theater Mode (page 56) - System Audio Control (page 57) - By connecting Sony components that the signal from the system through the HDMI input...
Operating Instructions
Page 60
... cannot operate the following Steps with the headphones connected. 1 Press FUNCTION +/- AUDIO IN / A.CAL MIC Calibration mic 8 Press C/c to select [AUDIO SETUP], then press . C. (Digital Cinema Auto Calibration) can set the appropriate surround sound automatically. You cannot turn the volume down. The front of the room in the measurement area and making noise during the measurement. Note • Avoid being in which the system is installed may affect measurements. • If an error...
... cannot operate the following Steps with the headphones connected. 1 Press FUNCTION +/- AUDIO IN / A.CAL MIC Calibration mic 8 Press C/c to select [AUDIO SETUP], then press . C. (Digital Cinema Auto Calibration) can set the appropriate surround sound automatically. You cannot turn the volume down. The front of the room in the measurement area and making noise during the measurement. Note • Avoid being in which the system is installed may affect measurements. • If an error...
Operating Instructions
Page 71
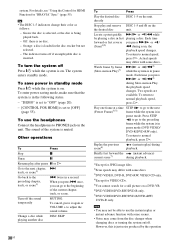
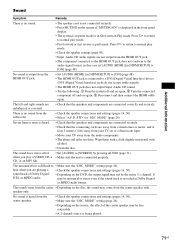
... on the source, the effect of Dolby Digital, DTS, or MPEG audio. • Depending on the DVD, the output signal may be the entire 5.1 channel. speaker only. No sound is no sound. • The speaker cord is not connected securely. • Press MUTING on again. 3 Disconnect and then connect the HDMI cable again. There is heard from the subwoofer. • Check the speaker connections and settings (pages 14, 50). • Select "A.F.D. MODE" setting (page...
... on the source, the effect of Dolby Digital, DTS, or MPEG audio. • Depending on the DVD, the output signal may be the entire 5.1 channel. speaker only. No sound is no sound. • The speaker cord is not connected securely. • Press MUTING on again. 3 Disconnect and then connect the HDMI cable again. There is heard from the subwoofer. • Check the speaker connections and settings (pages 14, 50). • Select "A.F.D. MODE" setting (page...
Operating Instructions
Page 78
... stereo music recordings, and provides a wide and deep sound space. The good channel separation is realized due to the original sound. This format is compatible with other scenes and so on. Dolby Surround Pro Logic As one pair of surround speakers and a center speaker. x Music mode The Music mode is for use with 1-bit quantization, achieves both video and audio on a single digital connection, allowing you should have one method of decoding Dolby Surround, Dolby Surround...
... stereo music recordings, and provides a wide and deep sound space. The good channel separation is realized due to the original sound. This format is compatible with other scenes and so on. Dolby Surround Pro Logic As one pair of surround speakers and a center speaker. x Music mode The Music mode is for use with 1-bit quantization, achieves both video and audio on a single digital connection, allowing you should have one method of decoding Dolby Surround, Dolby Surround...
Operating Instructions
Page 88
... RESET 50, 66 Resume Play 34 S SCREEN SAVER 49 SETUP 45, 65 Shuffle Play 36 SLEEP 62 Slide Show 41 Sound Mode 28 SPEAKER FORMATION 49, 59 SPEAKER SETUP 50 CONNECTION 50 DISTANCE 50, 51 LEVEL 51 SUBTITLE 31, 46 Super Audio CD 32, 78 SYSTEM MENU 20, 25, 26, 31, 53, 62, 63 SYSTEM SETUP 49 T TEST TONE 51 TIME 38 TRACK SELECTION 49 TV TYPE 46 V VIDEO SETUP 46 VOLUME LIMIT 48 C. A. C. (Digital Cinema Auto Calibration...
... RESET 50, 66 Resume Play 34 S SCREEN SAVER 49 SETUP 45, 65 Shuffle Play 36 SLEEP 62 Slide Show 41 Sound Mode 28 SPEAKER FORMATION 49, 59 SPEAKER SETUP 50 CONNECTION 50 DISTANCE 50, 51 LEVEL 51 SUBTITLE 31, 46 Super Audio CD 32, 78 SYSTEM MENU 20, 25, 26, 31, 53, 62, 63 SYSTEM SETUP 49 T TEST TONE 51 TIME 38 TRACK SELECTION 49 TV TYPE 46 V VIDEO SETUP 46 VOLUME LIMIT 48 C. A. C. (Digital Cinema Auto Calibration...

Marketing Specifications
Page 1
... PLAY button on the remote, watch the audio and/or the video component(s) turn on then the BRAVIA® television will include a PC Client device, Bluetooth® receiver6 and Audio Docking Stations compatible with HDMI connectivity, Sony has created BRAVIA® Theatre Sync™ technology to go beyond simple audio and video transmission. So regardless of how you integrate music in products with Network Walkman™ and iPod® products. Digital Cinema Auto Calibration Now the optimal speaker settings for digital...
... PLAY button on the remote, watch the audio and/or the video component(s) turn on then the BRAVIA® television will include a PC Client device, Bluetooth® receiver6 and Audio Docking Stations compatible with HDMI connectivity, Sony has created BRAVIA® Theatre Sync™ technology to go beyond simple audio and video transmission. So regardless of how you integrate music in products with Network Walkman™ and iPod® products. Digital Cinema Auto Calibration Now the optimal speaker settings for digital...
Marketing Specifications
Page 2
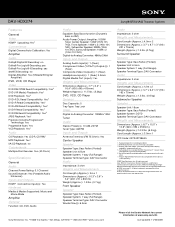
... Audio Input(s): 1 (Rear) Component Video (Y/Pb/Pr) Output(s): 1 (Rear) Composite Video Output(s): 1 (Rear) Headphone Input(s): 1 (Rear) 3.5mm Digital Media Port (Input): Yes Weights and Measurements Dimensions (Approx.): 17" x 3.4" x 16.4" (430 x 86 x 415mm) Weight (Approx.): 11.5 lbs. (5.2kg) DVD, VCD, CD Player General Disc Capacity: 5 Tray Type: Tray Lock Video Digital-to owner's manual for current information at www.sony.com/dn Last Updated: 11/05/2008 DAV-HDX274 Features General Video HDMI™ Upscaling: Yes4 Convenience Digital Cinema Auto Calibration: Yes Amplifier Audio Dolby...
... Audio Input(s): 1 (Rear) Component Video (Y/Pb/Pr) Output(s): 1 (Rear) Composite Video Output(s): 1 (Rear) Headphone Input(s): 1 (Rear) 3.5mm Digital Media Port (Input): Yes Weights and Measurements Dimensions (Approx.): 17" x 3.4" x 16.4" (430 x 86 x 415mm) Weight (Approx.): 11.5 lbs. (5.2kg) DVD, VCD, CD Player General Disc Capacity: 5 Tray Type: Tray Lock Video Digital-to owner's manual for current information at www.sony.com/dn Last Updated: 11/05/2008 DAV-HDX274 Features General Video HDMI™ Upscaling: Yes4 Convenience Digital Cinema Auto Calibration: Yes Amplifier Audio Dolby...


