
Quick Reference Guide
Page 14
... only) (English only) This is a software for setting the USB wireless LAN module. (When the projector is an application software for example, "VPL-CX86 only." For the VPL-CX80, read only the Operating Instructions for the VPL-CX86/ VPL-CX80). Note You must have to set up and operate the Air Shot. On Macintosh system, you have...
... only) (English only) This is a software for setting the USB wireless LAN module. (When the projector is an application software for example, "VPL-CX86 only." For the VPL-CX80, read only the Operating Instructions for the VPL-CX86/ VPL-CX80). Note You must have to set up and operate the Air Shot. On Macintosh system, you have...

Quick Reference Guide
Page 16
... Notes on Use Warning on Power Connection Use the supplied power cord when you use a proper power cord meeting the following illustrations. Otherwise, use the projector in the following specifications.
... Notes on Use Warning on Power Connection Use the supplied power cord when you use a proper power cord meeting the following illustrations. Otherwise, use the projector in the following specifications.

Quick Reference Guide
Page 17
Projecting Connecting the Projector/Projecting When you connect the projector, make sure to only the external monitor. 2 4 Input A Input B Input C* Video S Video * VPL-CX86 only 3 Power 1 5 F7 or Fx Fn Projecting 5 Refer also to the instruction manual of the computer to be sure to pull ...with a computer Wired connection 1 Connect the AC power cord to a wall outlet and connect the computer and the projector. 2 Press the ?/1 (on/standby) key. 3 Turn on the computer connected to the projector. 4 Press the INPUT key to select the input source. 5 Set it out from the plug, not the ...
Projecting Connecting the Projector/Projecting When you connect the projector, make sure to only the external monitor. 2 4 Input A Input B Input C* Video S Video * VPL-CX86 only 3 Power 1 5 F7 or Fx Fn Projecting 5 Refer also to the instruction manual of the computer to be sure to pull ...with a computer Wired connection 1 Connect the AC power cord to a wall outlet and connect the computer and the projector. 2 Press the ?/1 (on/standby) key. 3 Turn on the computer connected to the projector. 4 Press the INPUT key to select the input source. 5 Set it out from the plug, not the ...
Quick Reference Guide
Page 18
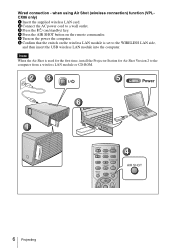
... remote commander. 5 Turn on the power the computer. 6 Confirm that the switch on the wireless LAN module is used for the first time, install the Projector Station for Air Shot Version 2 to the WIRELESS LAN side, and then insert the USB wireless LAN module into the computer. Wired connection -
... remote commander. 5 Turn on the power the computer. 6 Confirm that the switch on the wireless LAN module is used for the first time, install the Projector Station for Air Shot Version 2 to the WIRELESS LAN side, and then insert the USB wireless LAN module into the computer. Wired connection -

Quick Reference Guide
Page 19
... the ON/STANDBY indicator changes to select the appropriate aspect ratio of the picture. 3 Adjust the focus. Adjusting the Projector 1 Adjust the position of the picture. 2 Adjust the size of the picture. The projector is pressed to turn off the Power 1 Press the ?/1 (on/standby) key. 2 When a message appears, press the ?/1 (on...
... the ON/STANDBY indicator changes to select the appropriate aspect ratio of the picture. 3 Adjust the focus. Adjusting the Projector 1 Adjust the position of the picture. 2 Adjust the size of the picture. The projector is pressed to turn off the Power 1 Press the ?/1 (on/standby) key. 2 When a message appears, press the ?/1 (on...

Quick Reference Guide
Page 20
... out the handle (b), then pull out the lamp unit by holding the handle. Caution The lamp remains not after the projector is a consumable product. If you touch the lamp, you can see its underside. Replacing the Lamp The lamp used as the replacement lamp. Use of ... lamp unit with a Phillips screwdriver. Note For safety reasons, do not loosen any other screws. 4 Loosen the two screws on conditions of use. Turn the projector over . 3 Open the lamp cover by loosening the screw with the Phillips screwdriver (a). Do not tilt the lamp. Note Be sure that the...
... out the handle (b), then pull out the lamp unit by holding the handle. Caution The lamp remains not after the projector is a consumable product. If you touch the lamp, you can see its underside. Replacing the Lamp The lamp used as the replacement lamp. Use of ... lamp unit with a Phillips screwdriver. Note For safety reasons, do not loosen any other screws. 4 Loosen the two screws on conditions of use. Turn the projector over . 3 Open the lamp cover by loosening the screw with the Phillips screwdriver (a). Do not tilt the lamp. Note Be sure that the...

Quick Reference Guide
Page 21
... shock or fire. The ON/STANDBY indicator around the ?/1 key lights in red. 9 Press the following keys on . 7 Turn the projector back over. 8 Connect the power cord. If not, the projector cannot be regulated if sold in the following order for less than five seconds each: RESET, Tighten the two screws (b). For...
... shock or fire. The ON/STANDBY indicator around the ?/1 key lights in red. 9 Press the following keys on . 7 Turn the projector back over. 8 Connect the power cord. If not, the projector cannot be regulated if sold in the following order for less than five seconds each: RESET, Tighten the two screws (b). For...

Quick Reference Guide
Page 22
... the air filter and wash it. 1 Turn the power off and unplug the power cord. 2 Place a protective sheet (cloth) beneath the projector and turn the projector over. 3 Remove the air filter cover. 5 Wash the air filter with a vacuum cleaner. 1000 hours are approximate. Claws When it becomes difficult... to remove the dust from the outside of the projector or on the remote commander. 10 Cleaning the Air Filter the power can not be cleaned every 1000 hours. This value varies depending on ...
... the air filter and wash it. 1 Turn the power off and unplug the power cord. 2 Place a protective sheet (cloth) beneath the projector and turn the projector over. 3 Remove the air filter cover. 5 Wash the air filter with a vacuum cleaner. 1000 hours are approximate. Claws When it becomes difficult... to remove the dust from the outside of the projector or on the remote commander. 10 Cleaning the Air Filter the power can not be cleaned every 1000 hours. This value varies depending on ...

Quick Reference Guide
Page 23
... is incorrect. c Leave the projector for example a notebook, or an all-in the CD-ROM. c Adjust "Shift" on the symptoms, see the Operating Instructions contained in -one LCD type, you may appear on the background depending on the LCD panel. If the problem persists..." correctly according to an external monitor. The setting of focus. For details, refer to the computer's operating instructions supplied with qualified Sony personnel. Power/Picture Symptom Cause and Remedy The power is incorrect. c Adjust the focus. • Condensation has accumulated on the type...
... is incorrect. c Leave the projector for example a notebook, or an all-in the CD-ROM. c Adjust "Shift" on the symptoms, see the Operating Instructions contained in -one LCD type, you may appear on the background depending on the LCD panel. If the problem persists..." correctly according to an external monitor. The setting of focus. For details, refer to the computer's operating instructions supplied with qualified Sony personnel. Power/Picture Symptom Cause and Remedy The power is incorrect. c Adjust the focus. • Condensation has accumulated on the type...

Quick Reference Guide
Page 24
... electrical system may have broken down the lamp and turn on the projector with the qualified Sony personnel. Status and Remedy Lights up when the projector is in green from the projector is turned on until the projector is turned on the power again, or replace the lamp. Consult with... the ?/1 key. Wait to see if anything is turned off with qualified Sony personnel. You can turn on the projector. 12 Troubleshooting Indicators Indicators POWER SAVING TEMP/FAN LAMP/COVER I/1 indicator Cause and Remedy "Dot Phase" on the INPUT...
... electrical system may have broken down the lamp and turn on the projector with the qualified Sony personnel. Status and Remedy Lights up when the projector is in green from the projector is turned on until the projector is turned on the power again, or replace the lamp. Consult with... the ?/1 key. Wait to see if anything is turned off with qualified Sony personnel. You can turn on the projector. 12 Troubleshooting Indicators Indicators POWER SAVING TEMP/FAN LAMP/COVER I/1 indicator Cause and Remedy "Dot Phase" on the INPUT...

Quick Reference Guide
Page 25
...available in some areas. Optional accessories Projector Lamp LMP-C190 (for replacement) (1) CD-ROM (Software and Operating instructions) (1) Quick Reference Manual (1) Safety Regulations (1) Security Label (1) VPL-CX86 only Presentation tool (1) Size AAA...VPL-CX80) in standby (low): 0.5 W) Supplied accessories Remote Commander (1) Size AA (R6) batteries (2) HD D-sub 15 pin cable (2 m) (1) (1-791-992-xx) USB cable A type - For details, please consult your nearest Sony dealer. Specifications Projection system 3 LCD panels, 1 lens, projection system LCD panel 0.79-inch XGA...
...available in some areas. Optional accessories Projector Lamp LMP-C190 (for replacement) (1) CD-ROM (Software and Operating instructions) (1) Quick Reference Manual (1) Safety Regulations (1) Security Label (1) VPL-CX86 only Presentation tool (1) Size AAA...VPL-CX80) in standby (low): 0.5 W) Supplied accessories Remote Commander (1) Size AA (R6) batteries (2) HD D-sub 15 pin cable (2 m) (1) (1-791-992-xx) USB cable A type - For details, please consult your nearest Sony dealer. Specifications Projection system 3 LCD panels, 1 lens, projection system LCD panel 0.79-inch XGA...

Quick Reference Guide
Page 74
对于 VPL-CX80 VPL-CX86/ VPL-CX80 ⽤)。CD-ROM VPL-CX80 CD-ROM VPL-CX76/VPLCX70 Macintosh VPLCX86/VPL-CX80 ⼿册 VPL-CX86/VPL-CX80 CD-ROM VPL-CX86 VPLCX86"。 VPL-CX76/VPL-CX70 CD-ROM VPL-CX76/VPL-CX70 有关 "Memory Stick CD-ROM VPLCX86 Memory Stick Air Shot CD-ROM VPL-CX86 Air Shot。 ⽤于 USB Wireless LAN Module...
对于 VPL-CX80 VPL-CX86/ VPL-CX80 ⽤)。CD-ROM VPL-CX80 CD-ROM VPL-CX76/VPLCX70 Macintosh VPLCX86/VPL-CX80 ⼿册 VPL-CX86/VPL-CX80 CD-ROM VPL-CX86 VPLCX86"。 VPL-CX76/VPL-CX70 CD-ROM VPL-CX76/VPL-CX70 有关 "Memory Stick CD-ROM VPLCX86 Memory Stick Air Shot CD-ROM VPL-CX86 Air Shot。 ⽤于 USB Wireless LAN Module...

Quick Reference Guide
Page 78
Air Shot VPL-CX86) 1 2 3 按 I/1 4 AIR SHOT 按钮。 5 6 WIRELESS LAN 后,将 USB 算机。 Air Shot CD-ROM 将 Projector Station for Air Shot Version 2 23 5 Power 6 1 COMMAND OFF ON PIC PJ NETWORK MUTING AUDIO INPUT LENS APA TILT/KEYSTONE VOLUME MENU/ TAB AIR SHOT FREEZE 4 AIR SHOT 6 投影
Air Shot VPL-CX86) 1 2 3 按 I/1 4 AIR SHOT 按钮。 5 6 WIRELESS LAN 后,将 USB 算机。 Air Shot CD-ROM 将 Projector Station for Air Shot Version 2 23 5 Power 6 1 COMMAND OFF ON PIC PJ NETWORK MUTING AUDIO INPUT LENS APA TILT/KEYSTONE VOLUME MENU/ TAB AIR SHOT FREEZE 4 AIR SHOT 6 投影


