Operating Instructions
Page 2
... Controls .... 4 Top/Front/Left Side 4 Rear/Right Side/Bottom 4 Control/Connector Panel 5 Remote Commander 6 The Setup Menu 29 The Information Menu 30 Maintenance Replacing the Lamp 32 Cleaning the Air Filter 34 Projecting the Picture Installing the Projector 8 Connecting the Projector 9 Connecting a Computer 9 Connecting a VCR 10 Projecting 11 Turning Off the Power 14...
... Controls .... 4 Top/Front/Left Side 4 Rear/Right Side/Bottom 4 Control/Connector Panel 5 Remote Commander 6 The Setup Menu 29 The Information Menu 30 Maintenance Replacing the Lamp 32 Cleaning the Air Filter 34 Projecting the Picture Installing the Projector 8 Connecting the Projector 9 Connecting a Computer 9 Connecting a VCR 10 Projecting 11 Turning Off the Power 14...
Operating Instructions
Page 3
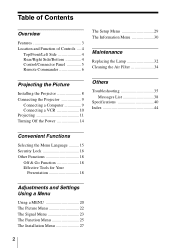
...VPL-CX20: Three super-high-aperture 0.63-inch XGA panels with approximately 790,000 effective pixels, produce a resolution of 800 × 600 dots (horizontal/ vertical) for RGB input, and 600 horizontal TV lines for video input. Off & Go feature The cooling fan built into the projector... quality High brightness Adopting Sony's unique new optical system that incorporates newly developed LCD panels provides a high-efficiency optical system. The projector corrects the V Keystone,... projection on the Remote Commander. It allows the 165 W UHP lamp to give a light output of...
...VPL-CX20: Three super-high-aperture 0.63-inch XGA panels with approximately 790,000 effective pixels, produce a resolution of 800 × 600 dots (horizontal/ vertical) for RGB input, and 600 horizontal TV lines for video input. Off & Go feature The cooling fan built into the projector... quality High brightness Adopting Sony's unique new optical system that incorporates newly developed LCD panels provides a high-efficiency optical system. The projector corrects the V Keystone,... projection on the Remote Commander. It allows the 165 W UHP lamp to give a light output of...

Operating Instructions
Page 4
a Front remote control detector b Lens c Powered tilt adjuster d Ventilation holes (exhaust) e Speaker f Security lock Connects to the right or left for minor tilt adjustment of Controls For ...: http://www.kensington.com/ 4 Location and Function of the projected picture. Location and Function of Controls Top/Front/Left Side Rear/Right Side/Bottom g Rear remote control detector h Ventilation holes (intake)/Lamp cover i Adjusters (hind pad) Turn the appropriate adjuster to an optional security cable (from Kensington). j Ventilation holes (intake) k Control...
a Front remote control detector b Lens c Powered tilt adjuster d Ventilation holes (exhaust) e Speaker f Security lock Connects to the right or left for minor tilt adjustment of Controls For ...: http://www.kensington.com/ 4 Location and Function of the projected picture. Location and Function of Controls Top/Front/Left Side Rear/Right Side/Bottom g Rear remote control detector h Ventilation holes (intake)/Lamp cover i Adjusters (hind pad) Turn the appropriate adjuster to an optional security cable (from Kensington). j Ventilation holes (intake) k Control...
Operating Instructions
Page 6
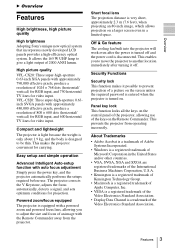
... keys Used to enter the settings of an item to its factory preset value or returns the enlarged image to its original size. Remote Commander The keys that have the same names as the ENTER key. keys Enlarge the image at a desired location on the connected equipment...from a computer. f Infrared transmitter g FREEZE key Freezes the projected picture. j TILT/KEYSTONE (Trapezoidal distortion correction) key Adjusts the tilt of the projector, or the trapezoidal distortion of Controls Use the arrow keys (v/V/b/B) for adjustment. To cancel the frozen picture, press the key again. k AC IN...
... keys Used to enter the settings of an item to its factory preset value or returns the enlarged image to its original size. Remote Commander The keys that have the same names as the ENTER key. keys Enlarge the image at a desired location on the connected equipment...from a computer. f Infrared transmitter g FREEZE key Freezes the projected picture. j TILT/KEYSTONE (Trapezoidal distortion correction) key Adjusts the tilt of the projector, or the trapezoidal distortion of Controls Use the arrow keys (v/V/b/B) for adjustment. To cancel the frozen picture, press the key again. k AC IN...

Operating Instructions
Page 7
... • The operation range is , the wider the angle within which the commander can control the projector becomes. 2 Install the lithium battery. Face the + side up. 3 Put the lithium battery holder back into the Remote Commander. Location and Function of children. • Should the battery be swallowed, immediately consult a doctor.... holder. Do not use batteries other than CR2025. • Keep the lithium battery out of the reach of Controls 7 Notes on the projector. Notes on Remote Commander operation • Make sure that nothing obstructs the infrared beam between the...
... • The operation range is , the wider the angle within which the commander can control the projector becomes. 2 Install the lithium battery. Face the + side up. 3 Put the lithium battery holder back into the Remote Commander. Location and Function of children. • Should the battery be swallowed, immediately consult a doctor.... holder. Do not use batteries other than CR2025. • Keep the lithium battery out of the reach of Controls 7 Notes on the projector. Notes on Remote Commander operation • Make sure that nothing obstructs the infrared beam between the...

Operating Instructions
Page 11
Projecting 11 To connect to a video GBR/ Component output connector Left side Projecting Projecting the Picture ON/STANDBY indicator to video GBR/ component output Rear remote control detector White to audio output (L) Red to audio output (R) VCR A SMF-402 Signal Cable (not supplied) HD D-sub 15-pin (male) ↔ 3 × phono .... The powered tilt adjuster rises and stops at the previously adjusted position and adjusts the focus. The ON/STANDBY indicator flashes in red and the projector goes into a wall outlet, then connect all equipment.
Projecting 11 To connect to a video GBR/ Component output connector Left side Projecting Projecting the Picture ON/STANDBY indicator to video GBR/ component output Rear remote control detector White to audio output (L) Red to audio output (R) VCR A SMF-402 Signal Cable (not supplied) HD D-sub 15-pin (male) ↔ 3 × phono .... The powered tilt adjuster rises and stops at the previously adjusted position and adjusts the focus. The ON/STANDBY indicator flashes in red and the projector goes into a wall outlet, then connect all equipment.
Operating Instructions
Page 12
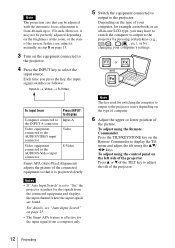
...signals are found. For details, see "Auto Input Search" on the equipment connected to the projector. 4 Press the INPUT key to the projector. To adjust using the control panel on the Remote Commander to the projector by pressing certain keys (e.g., , etc.), or by changing your computer's settings. In this... side of the projector Press v or V of the TILT key to "On," the projector searches for the input signal from a computer only. 5 Switch the equipment connected to output to select the input source. To adjust using the v/V/ b/B keys. However, it manually in -one LCD type, you press...
...signals are found. For details, see "Auto Input Search" on the equipment connected to the projector. 4 Press the INPUT key to the projector. To adjust using the control panel on the Remote Commander to the projector by pressing certain keys (e.g., , etc.), or by changing your computer's settings. In this... side of the projector Press v or V of the TILT key to "On," the projector searches for the input signal from a computer only. 5 Switch the equipment connected to output to select the input source. To adjust using the v/V/ b/B keys. However, it manually in -one LCD type, you press...

Operating Instructions
Page 13
...," the "V Keystone" correction is automatically adjusted. It may not be perfectly adjusted depending on the left side of the projector Press the ZOOM +/- Press the TILT/KEYSTONE key on the Remote Commander until the power is performed at the same time. In this case, adjust it may cause a malfunction. 7 ...Adjust the size of the picture using the Remote Commander: Press the LENS key on the projector to display the Lens Zoom menu and adjust the size of the picture. To adjust using the control panel on the ...
...," the "V Keystone" correction is automatically adjusted. It may not be perfectly adjusted depending on the left side of the projector Press the ZOOM +/- Press the TILT/KEYSTONE key on the Remote Commander until the power is performed at the same time. In this case, adjust it may cause a malfunction. 7 ...Adjust the size of the picture using the Remote Commander: Press the LENS key on the projector to display the Lens Zoom menu and adjust the size of the picture. To adjust using the control panel on the ...

Operating Instructions
Page 15
To change the menu language, proceed as a yellow button. Selecting the Menu Language 15 The menu currently selected is English. The menu appears. Front remote control detector 5 Press the v or V key to select "Language," then press the B or ENTER key. 1 Plug the AC power cord into a wall outlet. 6 Press the ... Functions B Convenient Functions Selecting the Menu Language You can select one of fifteen languages for displaying the menu and other on the projector. 3 Press the MENU key. The factory setting is shown as follows: 2 Press the ?/1 key to the selected language.
To change the menu language, proceed as a yellow button. Selecting the Menu Language 15 The menu currently selected is English. The menu appears. Front remote control detector 5 Press the v or V key to select "Language," then press the B or ENTER key. 1 Plug the AC power cord into a wall outlet. 6 Press the ... Functions B Convenient Functions Selecting the Menu Language You can select one of fifteen languages for displaying the menu and other on the projector. 3 Press the MENU key. The factory setting is shown as follows: 2 Press the ?/1 key to the selected language.

Operating Instructions
Page 18
... where the icon is located is input. 1 Project a normal image, and press the D ZOOM + key on page 14," then cool it down before storing the projector in the center of inadequate charging. Notes • When unplugging the AC power cord, ensure that case, follow the procedure for turning off the power... page 14. Effective Tools for less than 15 minutes, the fan might not begin to the procedure explained in ""Turning Off the Power" on the Remote Commander. The digital zoom icon appears in the carrying case. • However, if the unit has been on the image you want to the point...
... where the icon is located is input. 1 Project a normal image, and press the D ZOOM + key on page 14," then cool it down before storing the projector in the center of inadequate charging. Notes • When unplugging the AC power cord, ensure that case, follow the procedure for turning off the power... page 14. Effective Tools for less than 15 minutes, the fan might not begin to the procedure explained in ""Turning Off the Power" on the Remote Commander. The digital zoom icon appears in the carrying case. • However, if the unit has been on the image you want to the point...

Operating Instructions
Page 19
This function works when a signal from a computer is pressed. To return the image to its original size immediately. "Freeze" appears when the key is input. key. Other Functions 19 Just pressing the RESET key returns the image back to scroll the enlarged image. Convenient Functions Use the arrow key (v/V/b/B) to its original size Press the D ZOOM - To restore the original screen, press the FREEZE key again. To freeze the image projected (Freeze function) Press the FREEZE key on the remote commander.
This function works when a signal from a computer is pressed. To return the image to its original size immediately. "Freeze" appears when the key is input. key. Other Functions 19 Just pressing the RESET key returns the image back to scroll the enlarged image. Convenient Functions Use the arrow key (v/V/b/B) to its original size Press the D ZOOM - To restore the original screen, press the FREEZE key again. To freeze the image projected (Freeze function) Press the FREEZE key on the remote commander.

Operating Instructions
Page 21
...no input signal, "Cannot adjust this item." For details, see page 31. To reset items that cannot be reset are automatically stored in the projector memory when the ENTER key is reset to reset, and press the RESET key on the "Adjust Signal..." Using a MENU 21 menu of the... Signal menu Storage of the Picture menu. • "Dot Phase," "H Size," and "Shift" on the Remote Commander. appears on the "Adjust Picture..." Adjustments and Settings Using a Menu To clear the menu Press the MENU key. "Complete!" Unadjustable items Items that have...
...no input signal, "Cannot adjust this item." For details, see page 31. To reset items that cannot be reset are automatically stored in the projector memory when the ENTER key is reset to reset, and press the RESET key on the "Adjust Signal..." Using a MENU 21 menu of the... Signal menu Storage of the Picture menu. • "Dot Phase," "H Size," and "Shift" on the Remote Commander. appears on the "Adjust Picture..." Adjustments and Settings Using a Menu To clear the menu Press the MENU key. "Complete!" Unadjustable items Items that have...

Operating Instructions
Page 25
...Standby Mode Power Saving Functions Initial setting The APA (Auto Pixel Alignment) automatically On adjusts "Dot Phase," "H Size" and "Shift" on the projector or the remote commander is input from a computer, the APA functions automatically so that the picture can adjust the picture by the "Smart APA," it will ... be seen clearly. When set to "On," a test pattern is displayed on the Remote Commander even if "Smart APA" set to "Off," the focus adjustment does not work On automatically when the projector is turned on or when the AUTO FOCUS key on the Signal menu for the first...
...Standby Mode Power Saving Functions Initial setting The APA (Auto Pixel Alignment) automatically On adjusts "Dot Phase," "H Size" and "Shift" on the projector or the remote commander is input from a computer, the APA functions automatically so that the picture can adjust the picture by the "Smart APA," it will ... be seen clearly. When set to "On," a test pattern is displayed on the Remote Commander even if "Smart APA" set to "Off," the focus adjustment does not work On automatically when the projector is turned on or when the AUTO FOCUS key on the Signal menu for the first...

Operating Instructions
Page 26
...to "On," turns on the security lock function, which locks the projector once a password has been set to "On." If the projected image includes a black portion around it, the APA function will be operated only with the Remote Commander. Notes • Press the APA key when the full ...image is displayed on the projector's security lock function. Turns on the screen. For details, see "Security Lock" on page 16. ...
...to "On," turns on the security lock function, which locks the projector once a password has been set to "On." If the projected image includes a black portion around it, the APA function will be operated only with the Remote Commander. Notes • Press the APA key when the full ...image is displayed on the projector's security lock function. Turns on the screen. For details, see "Security Lock" on page 16. ...
Operating Instructions
Page 27
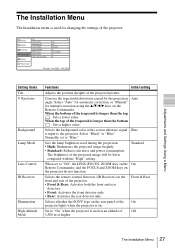
Standard When set to "Blue." Front & Rear Selects whether the SONY logo on the rear panel of the trapezoid is on the projector do not function. V Keystone Background Lamp Mode Lens Control IR Receiver Illumination High Altitude Mode Functions Initial setting Adjusts ...for changing the settings of Off 1,500 m or higher. Set to "On" when the projector is longer than the top : Sets a lower value. Selects the remote control detectors (IR Receiver) on the Remote Commander. The Installation Menu 27 Adjustments and Settings Using a Menu The Installation Menu The Installation ...
Standard When set to "Blue." Front & Rear Selects whether the SONY logo on the rear panel of the trapezoid is on the projector do not function. V Keystone Background Lamp Mode Lens Control IR Receiver Illumination High Altitude Mode Functions Initial setting Adjusts ...for changing the settings of Off 1,500 m or higher. Set to "On" when the projector is longer than the top : Sets a lower value. Selects the remote control detectors (IR Receiver) on the Remote Commander. The Installation Menu 27 Adjustments and Settings Using a Menu The Installation Menu The Installation ...

Operating Instructions
Page 33
... ON/STANDBY indicator around the ?/1 key lights in red. 9 Press the following keys on . 7 Turn the projector back over. 8 Connect the power cord. Disposal of the lamp. • The power will not turn on ...Lamp 33 Maintenance Notes • Be careful not to avoid electrical shock or fire. If not, the projector cannot be regulated if sold in the United States. Tighten the two screws (c). For disposal or recycling ...it was. Disposal of this product may be turned on the Remote Commander in the following order for less than five seconds each: RESET, b, B, ENTER. Fold down the...
... ON/STANDBY indicator around the ?/1 key lights in red. 9 Press the following keys on . 7 Turn the projector back over. 8 Connect the power cord. Disposal of the lamp. • The power will not turn on ...Lamp 33 Maintenance Notes • Be careful not to avoid electrical shock or fire. If not, the projector cannot be regulated if sold in the United States. Tighten the two screws (c). For disposal or recycling ...it was. Disposal of this product may be turned on the Remote Commander in the following order for less than five seconds each: RESET, b, B, ENTER. Fold down the...

Operating Instructions
Page 37
...proper connections have replaced the lamp, the electrical system may break down. c Consult with qualified Sony personnel. Cause and Remedy • A cable is not adjusted properly. does not work.... page 22). c Check that nothing is blocking the ventilation holes. • The projector is being used is dead. Cause and Remedy The control panel keys are wrong. ...page 9). • The connecting cable used at a high altitude. Remote Commander Symptom Cause and Remedy The Remote Commander The Remote Commander battery is incorrect. c Attach the cover securely (see page...
...proper connections have replaced the lamp, the electrical system may break down. c Consult with qualified Sony personnel. Cause and Remedy • A cable is not adjusted properly. does not work.... page 22). c Check that nothing is blocking the ventilation holes. • The projector is being used is dead. Cause and Remedy The control panel keys are wrong. ...page 9). • The connecting cable used at a high altitude. Remote Commander Symptom Cause and Remedy The Remote Commander The Remote Commander battery is incorrect. c Attach the cover securely (see page...

Operating Instructions
Page 38
... "Component." c Check to see page 9). c Set the output setting to XGA (VPL-CX20) and SVGA (VPLCS20) (see that is within the range of the frequency. • The resolution setting of the output signal of the projector are locked! Please check Input-A Signal Sel. c Replace the lamp. •...; When this message appears on the screen when using the projector at normal altitudes, check to see page 29). Operate the projector with the keys on the Remote Commander (see page 34). No v 38 Troubleshooting Message Meaning and Remedy High temp.! Switch to...
... "Component." c Check to see page 9). c Set the output setting to XGA (VPL-CX20) and SVGA (VPLCS20) (see that is within the range of the frequency. • The resolution setting of the output signal of the projector are locked! Please check Input-A Signal Sel. c Replace the lamp. •...; When this message appears on the screen when using the projector at normal altitudes, check to see page 29). Operate the projector with the keys on the Remote Commander (see page 34). No v 38 Troubleshooting Message Meaning and Remedy High temp.! Switch to...

Operating Instructions
Page 39
c To enable the the LENS (FOCUS, ZOOM) key on the Remote Commander, and the FOCUS and ZOOM keys on the Installation menu is locked! Message Meaning and Remedy Lens control is set "Lens Control" to "Off." Others Troubleshooting 39 Yes V No v "Lens Control" on the projector, set to "On." Do you wish to unlock?
c To enable the the LENS (FOCUS, ZOOM) key on the Remote Commander, and the FOCUS and ZOOM keys on the Installation menu is locked! Message Meaning and Remedy Lens control is set "Lens Control" to "Off." Others Troubleshooting 39 Yes V No v "Lens Control" on the projector, set to "On." Do you wish to unlock?

Operating Instructions
Page 41
For details, please consult your nearest Sony dealer. Safety regulations UL60950, cUL (CSA No. 60950), FCC Class ...AC 100 to 240 V, 2.2 to 1.0 A, 50/ 60 Hz Power consumption Max. 220 W in some areas. Optional accessories Projector Lamp LMP-C162(for replacement) Signal Cable SMF-402 (HD D-sub 15-pin (male) y 3 × phono type ...) Storage temperature -20°C to +60°C (-4°F to +140°F) Storage humidity 10% to 90% Supplied accessories Remote Commander (1) Lithium battery CR2025 (1) HD D-sub 15 pin cable (2 m) (1) (1-791-992-XX) A/V connecting adaptor (1) (1-830...
For details, please consult your nearest Sony dealer. Safety regulations UL60950, cUL (CSA No. 60950), FCC Class ...AC 100 to 240 V, 2.2 to 1.0 A, 50/ 60 Hz Power consumption Max. 220 W in some areas. Optional accessories Projector Lamp LMP-C162(for replacement) Signal Cable SMF-402 (HD D-sub 15-pin (male) y 3 × phono type ...) Storage temperature -20°C to +60°C (-4°F to +140°F) Storage humidity 10% to 90% Supplied accessories Remote Commander (1) Lithium battery CR2025 (1) HD D-sub 15 pin cable (2 m) (1) (1-791-992-XX) A/V connecting adaptor (1) (1-830...


