Operating Instructions
Page 2
... 4 Control/Connector Panel 5 Remote Commander 6 The Setup Menu 29 The Information Menu 30 Maintenance Replacing the Lamp 32 Cleaning the Air Filter 34 Projecting the Picture Installing the Projector 8 Connecting the Projector 9 Connecting a Computer 9 Connecting a VCR 10 Projecting 11 Turning Off the Power 14 Others Troubleshooting 35 Messages List 38 Specifications 40 Index 44 Convenient Functions Selecting the Menu Language .......... 15 Security Lock 16 Other Functions 18 Off & Go Function 18 Effective Tools for Your Presentation 18 Adjustments and Settings Using...
... 4 Control/Connector Panel 5 Remote Commander 6 The Setup Menu 29 The Information Menu 30 Maintenance Replacing the Lamp 32 Cleaning the Air Filter 34 Projecting the Picture Installing the Projector 8 Connecting the Projector 9 Connecting a Computer 9 Connecting a VCR 10 Projecting 11 Turning Off the Power 14 Others Troubleshooting 35 Messages List 38 Specifications 40 Index 44 Convenient Functions Selecting the Menu Language .......... 15 Security Lock 16 Other Functions 18 Off & Go Function 18 Effective Tools for Your Presentation 18 Adjustments and Settings Using...
Operating Instructions
Page 3
... image, which allows projection on the Remote Commander. This enables you to another location immediately after the power is turned off . It allows the 165 W UHP lamp to give a light output of an image with a powered zoom and powered focus lens, allowing you to move the projector to adjust the size and focus of 2000 ANSI lumen. This makes the projector convenient for projection. Overview B Overview Features High brightness, high picture quality High brightness Adopting Sony...
... image, which allows projection on the Remote Commander. This enables you to another location immediately after the power is turned off . It allows the 165 W UHP lamp to give a light output of an image with a powered zoom and powered focus lens, allowing you to move the projector to adjust the size and focus of 2000 ANSI lumen. This makes the projector convenient for projection. Overview B Overview Features High brightness, high picture quality High brightness Adopting Sony...

Operating Instructions
Page 5
... Adjusts the picture size. Lights in green from the projector is turned on , and when it on page 11. Once the projector is in green while the cooling fan is running after the power is not secured firmly. Also, flashes in standby mode, you can turn it is turned off . Lights when the temperature inside the projector becomes unusually high. - Overview Control/Connector Panel Open the cover to the audio output and video output, or S video output (Y/C video...
... Adjusts the picture size. Lights in green from the projector is turned on , and when it on page 11. Once the projector is in green while the cooling fan is running after the power is not secured firmly. Also, flashes in standby mode, you can turn it is turned off . Lights when the temperature inside the projector becomes unusually high. - Overview Control/Connector Panel Open the cover to the audio output and video output, or S video output (Y/C video...
Operating Instructions
Page 6
... D-sub 15-pin, female) Inputs a computer signal, video GBR signal, component signal, or DTV signal depending on -screen menu. k AC IN socket Connects the supplied AC power cord. m ENTER/Arrow (v/V/b/B) keys Used to enter the settings of the image manually. a ?/1 (On/Standby) key b ENTER/ v/V/b/B (Arrow) keys c MENU key d D ZOOM (Digital Zoom) +/- f Infrared transmitter g FREEZE key Freezes the projected picture. j TILT/KEYSTONE (Trapezoidal distortion correction) key Adjusts the tilt of the projector, or the trapezoidal distortion of...
... D-sub 15-pin, female) Inputs a computer signal, video GBR signal, component signal, or DTV signal depending on -screen menu. k AC IN socket Connects the supplied AC power cord. m ENTER/Arrow (v/V/b/B) keys Used to enter the settings of the image manually. a ?/1 (On/Standby) key b ENTER/ v/V/b/B (Arrow) keys c MENU key d D ZOOM (Digital Zoom) +/- f Infrared transmitter g FREEZE key Freezes the projected picture. j TILT/KEYSTONE (Trapezoidal distortion correction) key Adjusts the tilt of the projector, or the trapezoidal distortion of...

Operating Instructions
Page 11
... Rear remote control detector White to audio output (L) Red to audio output (R) VCR A SMF-402 Signal Cable (not supplied) HD D-sub 15-pin (male) ↔ 3 × phono jack B A/V connecting adaptor (supplied) C Stereo audio connecting cable (not supplied) (Use a no-resistance cable.) Note Set the aspect ratio using "Wide Mode" on the Signal menu according to the input signal. 1 Plug the AC power cord into standby mode. 2 Press the ?/1 key. The ON/STANDBY indicator lights in green and the Advanced Intelligent Auto-setup starts. The powered tilt adjuster...
... Rear remote control detector White to audio output (L) Red to audio output (R) VCR A SMF-402 Signal Cable (not supplied) HD D-sub 15-pin (male) ↔ 3 × phono jack B A/V connecting adaptor (supplied) C Stereo audio connecting cable (not supplied) (Use a no-resistance cable.) Note Set the aspect ratio using "Wide Mode" on the Signal menu according to the input signal. 1 Plug the AC power cord into standby mode. 2 Press the ?/1 key. The ON/STANDBY indicator lights in green and the Advanced Intelligent Auto-setup starts. The powered tilt adjuster...

Operating Instructions
Page 18
... the powered tilt adjuster is retracted into the projector. The enlargement ratio is unplugged, the fan runs for a few seconds. Digital zoom icon 2 Move the icon to the point on the screen for a certain time automatically. After the AC power cord is displayed on the image you want to move the icon. 3 Press the D ZOOM + key again. This function works when a signal from a computer is input.
... the powered tilt adjuster is retracted into the projector. The enlargement ratio is unplugged, the fan runs for a few seconds. Digital zoom icon 2 Move the icon to the point on the screen for a certain time automatically. After the AC power cord is displayed on the image you want to move the icon. 3 Press the D ZOOM + key again. This function works when a signal from a computer is input.

Operating Instructions
Page 20
...: Gamma Mode: Color Temp.: Setup Information Sel: Set: Standard 80 50 50 Graphics High Back: Exit: 4 Make the setting or adjustment of the adjustable/setting items are displayed in a popup menu, in a setting menu, in an adjustment menu or in the next menu window. Picture Signal Function Installation Setup Tilt V Keystone: Background: Lamp Mode: Lens Control: IR Receiver: Illumination: High Altitude Mode: Auto Blue Standard On Front & Rear On Off Information Sel: Set: Exit: 2 Use the v or V key to restore the previous screen. If...
...: Gamma Mode: Color Temp.: Setup Information Sel: Set: Standard 80 50 50 Graphics High Back: Exit: 4 Make the setting or adjustment of the adjustable/setting items are displayed in a popup menu, in a setting menu, in an adjustment menu or in the next menu window. Picture Signal Function Installation Setup Tilt V Keystone: Background: Lamp Mode: Lens Control: IR Receiver: Illumination: High Altitude Mode: Auto Blue Standard On Front & Rear On Off Information Sel: Set: Exit: 2 Use the v or V key to restore the previous screen. If...
Operating Instructions
Page 23
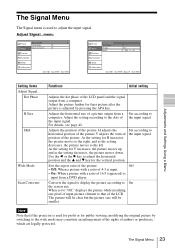
...23 Adjust Signal...menu Picture Signal Adjust Signal Wide Mode: Scan Converter: Function Installation Setup Information Sel: Off On Set: Exit: Picture Signal Function Adjust Signal Dot Phase: H Size: Shift: Installation Setup Information Sel: Set: 12 1344 H: 235 V: 34 Back: Exit: Adjustments and Settings Using a Menu Setting items Adjust Signal... Converts the signal to display the picture according to adjust the horizontal position and the v and V key for public viewing, modifying the original picture by pressing the APA key. Adjusts the horizontal size of input picture...
...23 Adjust Signal...menu Picture Signal Adjust Signal Wide Mode: Scan Converter: Function Installation Setup Information Sel: Off On Set: Exit: Picture Signal Function Adjust Signal Dot Phase: H Size: Shift: Installation Setup Information Sel: Set: 12 1344 H: 235 V: 34 Back: Exit: Adjustments and Settings Using a Menu Setting items Adjust Signal... Converts the signal to display the picture according to adjust the horizontal position and the v and V key for public viewing, modifying the original picture by pressing the APA key. Adjusts the horizontal size of input picture...

Operating Instructions
Page 24
... unpressed input signal. Make finer adjustments by adjusting "H Size." If more than 4:3, a part of the signal using the Signal menu, it to find if the signal is displayed in the projector. This projector has 40 types of that signal are registered, the newest memory always overwrites the oldest one. The memory number and signal type of preset data for the signal from the preset memory, you adjust the data of the screen...
... unpressed input signal. Make finer adjustments by adjusting "H Size." If more than 4:3, a part of the signal using the Signal menu, it to find if the signal is displayed in the projector. This projector has 40 types of that signal are registered, the newest memory always overwrites the oldest one. The memory number and signal type of preset data for the signal from the preset memory, you adjust the data of the screen...

Operating Instructions
Page 25
... screen during "Lens Zoom", "Lens Focus," or "V Keystone" adjustment. The Function Menu The Function menu is used for 10 minutes. When set to "Off," the focus adjustment does not work On automatically when the projector is turned on or when the AUTO FOCUS key on the Signal menu for the first 45 seconds after the lamp goes out. You can be readjusted even when the cable is disconnected and connected again or the input...
... screen during "Lens Zoom", "Lens Focus," or "V Keystone" adjustment. The Function Menu The Function menu is used for 10 minutes. When set to "Off," the focus adjustment does not work On automatically when the projector is turned on or when the AUTO FOCUS key on the Signal menu for the first 45 seconds after the lamp goes out. You can be readjusted even when the cable is disconnected and connected again or the input...

Operating Instructions
Page 26
... of input signal. • Adjust the "Dot Phase," "H Size," and "Shift" items on the screen. • The picture may not be displayed on the screen. • You can be operated only with the Remote Commander. If you press and hold the MENU key for 10 seconds turns the projector on when it is set to "On," turns on page 16. When it is in standby mode, and turns the projector to standby mode...
... of input signal. • Adjust the "Dot Phase," "H Size," and "Shift" items on the screen. • The picture may not be displayed on the screen. • You can be operated only with the Remote Commander. If you press and hold the MENU key for 10 seconds turns the projector on when it is set to "On," turns on page 16. When it is in standby mode, and turns the projector to standby mode...
Operating Instructions
Page 27
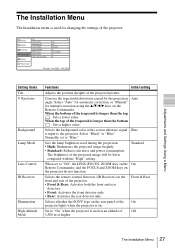
... "Auto" for automatic correction, or "Manual" for changing the settings of the projector. • Front & Rear: Activates both the front and rear detectors. • Front: Activates the front detector only. • Rear: Activates the rear detector only. Select "Black" or "Blue." Adjustments and Settings Using a Menu The Installation Menu The Installation menu is used during the projection. • High: Illuminates the projected image brightly. • Standard: Reduces fan noise and power...
... "Auto" for automatic correction, or "Manual" for changing the settings of the projector. • Front & Rear: Activates both the front and rear detectors. • Front: Activates the front detector only. • Rear: Activates the rear detector only. Select "Black" or "Blue." Adjustments and Settings Using a Menu The Installation Menu The Installation menu is used during the projection. • High: Illuminates the projected image brightly. • Standard: Reduces fan noise and power...

Operating Instructions
Page 32
... three screws with the Phillips screwdriver (a). When you replace the lamp, wait for at least an hour for the lamp to cool. If you touch the lamp, you pull out the lamp while it is a consumable product. Turn the projector over . 3 Open the lamp cover by holding the handle. appears on the screen • The LAMP/COVER indicator lights up . Caution The lamp remains not after using the projector, wait...
... three screws with the Phillips screwdriver (a). When you replace the lamp, wait for at least an hour for the lamp to cool. If you touch the lamp, you pull out the lamp while it is a consumable product. Turn the projector over . 3 Open the lamp cover by holding the handle. appears on the screen • The LAMP/COVER indicator lights up . Caution The lamp remains not after using the projector, wait...
Operating Instructions
Page 35
... following instructions. If the problem persists, consult with qualified Sony personnel. and TEMP/FAN indicators c Consult with qualified Sony personnel. light up. Picture Symptom No picture. projector. c Check that the proper connections have to switch the computer to output to the projector by pressing certain keys or by changing your computer is disconnected or the connections are wrong. c Set the computer signal to output only to the computer's operating instructions supplied with...
... following instructions. If the problem persists, consult with qualified Sony personnel. and TEMP/FAN indicators c Consult with qualified Sony personnel. light up. Picture Symptom No picture. projector. c Check that the proper connections have to switch the computer to output to the projector by pressing certain keys or by changing your computer is disconnected or the connections are wrong. c Set the computer signal to output only to the computer's operating instructions supplied with...
Operating Instructions
Page 36
... key. menu of "Input-A Signal Sel." menu of the Signal menu properly (see page 29). Symptom Cause and Remedy The picture is set to "Off." on the Setup menu to match the color system being input (see page 23). 36 Troubleshooting "Please check Input-A Signal Sel." Color balance is incorrect. c Replace the lamp with the power on the Setup menu to the wrong color system. c Display the full image on the Adjust Signal... The picture flickers. c Select "Auto", "Computer," "Video GBR...
... key. menu of "Input-A Signal Sel." menu of the Signal menu properly (see page 29). Symptom Cause and Remedy The picture is set to "Off." on the Setup menu to match the color system being input (see page 23). 36 Troubleshooting "Please check Input-A Signal Sel." Color balance is incorrect. c Replace the lamp with the power on the Setup menu to the wrong color system. c Display the full image on the Adjust Signal... The picture flickers. c Select "Auto", "Computer," "Video GBR...

Operating Instructions
Page 37
... projector is not adjusted properly. Both the LAMP/COVER The electrical system has broken down . and TEMP/FAN indicators c Consult with a new battery (see page 22). c Adjust "Volume" on the Installation menu is set to "On." c Replace it with qualified Sony personnel. c Unlock the control panel keys (see page 32). • The lamp has reached a high temperature. c Wait for 45 seconds to see page 9). • The sound is being used is...
... projector is not adjusted properly. Both the LAMP/COVER The electrical system has broken down . and TEMP/FAN indicators c Consult with a new battery (see page 22). c Adjust "Volume" on the Installation menu is set to "On." c Replace it with qualified Sony personnel. c Unlock the control panel keys (see page 32). • The lamp has reached a high temperature. c Wait for 45 seconds to see page 9). • The sound is being used is...

Operating Instructions
Page 38
... the keys on the control panel of the messages displayed on the Installation menu to see page 26). High temp.! min. c Press the appropriate key. c When using the projector at an altitude of 1,500 m or higher, set to XGA (VPL-CX20) and SVGA (VPLCS20) (see page 27). c Set the output setting to "Component." on the Setup menu is set "High Altitude Mode" on the screen. c Set "Input-A Signal Sel." Please clean the filter. Message Meaning and Remedy Not...
... the keys on the control panel of the messages displayed on the Installation menu to see page 26). High temp.! min. c Press the appropriate key. c When using the projector at an altitude of 1,500 m or higher, set to XGA (VPL-CX20) and SVGA (VPLCS20) (see page 27). c Set the output setting to "Component." on the Setup menu is set "High Altitude Mode" on the screen. c Set "Input-A Signal Sel." Please clean the filter. Message Meaning and Remedy Not...
Operating Instructions
Page 40
Specifications Optical characteristics Projection system 3 LCD panels, 1 lens, projection system LCD panel VPL-CX20: 0.63-inch XGA panel, approximately 2,360,000 pixels (786,432 pixels × 3) VPL-CS20: 0.63-inch SVGA panel, approximately 1,440,000 pixels (480,000 pixels × 3) Lens 1.2 times zoom lens (powered) f 18.8 to 22.6 mm/F1.6 to 1.94 Lamp 165 W UHP Projected picture size (measured diagonally) 40 to 300 inches 40 to 150 inches (auto focus operation range) Light output ANSI lumen1) 2000 lm...
Specifications Optical characteristics Projection system 3 LCD panels, 1 lens, projection system LCD panel VPL-CX20: 0.63-inch XGA panel, approximately 2,360,000 pixels (786,432 pixels × 3) VPL-CS20: 0.63-inch SVGA panel, approximately 1,440,000 pixels (480,000 pixels × 3) Lens 1.2 times zoom lens (powered) f 18.8 to 22.6 mm/F1.6 to 1.94 Lamp 165 W UHP Projected picture size (measured diagonally) 40 to 300 inches 40 to 150 inches (auto focus operation range) Light output ANSI lumen1) 2000 lm...

Operating Instructions
Page 41
... 3/4 × 2 1/8 × 8 3/8 inches) (w/h/d) (without projecting parts) Mass Approx. 1.9 kg (4 lb 3 oz) Power requirements AC 100 to 240 V, 2.2 to change without notice. Optional accessories Projector Lamp LMP-C162(for replacement) Signal Cable SMF-402 (HD D-sub 15-pin (male) y 3 × phono type (male)) Some of the items may not be available in standby: 0.8 W Heat dissipation 750.7 BTU Operating temperature 0°C to 35°...
... 3/4 × 2 1/8 × 8 3/8 inches) (w/h/d) (without projecting parts) Mass Approx. 1.9 kg (4 lb 3 oz) Power requirements AC 100 to 240 V, 2.2 to change without notice. Optional accessories Projector Lamp LMP-C162(for replacement) Signal Cable SMF-402 (HD D-sub 15-pin (male) y 3 × phono type (male)) Some of the items may not be available in standby: 0.8 W Heat dissipation 750.7 BTU Operating temperature 0°C to 35°...

Operating Instructions
Page 44
... Mode 27 Hue 22 I Illumination 27 Input-A Signal Sel 29 Installation 8 IR 27 IR Receiver 27 L Lamp Mode 27 Lamp replacement 32 Lamp Timer 30 Language 29 selecting the menu language 15 Lens Control 27 Location and function of controls control/connector panel 5 rear/right side/bottom 4 Remote Commander 6 top/front/left side 4 M Menu clearing the menu display 21 Function menu 25 Information Menu 30 Installation menu 27 Picture menu 22 Setup menu 29 Signal menu 23 using the menu 20 Message List caution 38 warning...
... Mode 27 Hue 22 I Illumination 27 Input-A Signal Sel 29 Installation 8 IR 27 IR Receiver 27 L Lamp Mode 27 Lamp replacement 32 Lamp Timer 30 Language 29 selecting the menu language 15 Lens Control 27 Location and function of controls control/connector panel 5 rear/right side/bottom 4 Remote Commander 6 top/front/left side 4 M Menu clearing the menu display 21 Function menu 25 Information Menu 30 Installation menu 27 Picture menu 22 Setup menu 29 Signal menu 23 using the menu 20 Message List caution 38 warning...


