Operating Instructions
Page 3
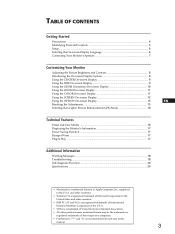
...Getting Started Precautions ...4 Identifying Parts and Controls 5 Setup ...6 Selecting the On-screen Display Language 6 Connecting Your Monitor's Speaker 7 Customizing Your Monitor Adjusting the Picture Brightness and Contrast 8 Introducing the On-screen Display System 8 Using the CENTER On-screen Display... the Graphic Picture Enhancement (GPE) Mode 16 F ES Technical Features Preset and User Modes ...16 C Displaying the Monitor's Information 17 Power Saving Function ...17 Damper Wires ...17 Plug & Play ...17 Additional Information Warning Messages ...18 Troubleshooting...
...Getting Started Precautions ...4 Identifying Parts and Controls 5 Setup ...6 Selecting the On-screen Display Language 6 Connecting Your Monitor's Speaker 7 Customizing Your Monitor Adjusting the Picture Brightness and Contrast 8 Introducing the On-screen Display System 8 Using the CENTER On-screen Display... the Graphic Picture Enhancement (GPE) Mode 16 F ES Technical Features Preset and User Modes ...16 C Displaying the Monitor's Information 17 Power Saving Function ...17 Damper Wires ...17 Plug & Play ...17 Additional Information Warning Messages ...18 Troubleshooting...

Operating Instructions
Page 4
... • After the power has been turned on, the CRT is demagnetized (degaussed) for your local power supply. If you transport this monitor. Examples of the screen with both hands as a transformer or high voltage power lines. The outlet should be installed near heat sources such as... magnetism, such as illustrated below. 15° 90° 90° 5° 4 Place magnetic recording equipment, tapes and disks away from this monitor for repair or shipment, use any type of abrasive pad, scouring powder or solvent, such as a ballpoint pen or screwdriver. Maintenance • Clean the...
... • After the power has been turned on, the CRT is demagnetized (degaussed) for your local power supply. If you transport this monitor. Examples of the screen with both hands as a transformer or high voltage power lines. The outlet should be installed near heat sources such as... magnetism, such as illustrated below. 15° 90° 90° 5° 4 Place magnetic recording equipment, tapes and disks away from this monitor for repair or shipment, use any type of abrasive pad, scouring powder or solvent, such as a ballpoint pen or screwdriver. Maintenance • Clean the...

Operating Instructions
Page 5
...(?//) buttons when adjusting other items. 7 u (power) switch and indicator (pages 17, 20) Turns the monitor on , and either flashes in green and orange or lights up in orange when the monitor is in parentheses for further details. Function as the (./>) buttons when adjusting other items. 6 ¨ ...(brightness) (./>) buttons (pages 7 - 15) Adjust the picture brightness. The indicator lights up in green when the monitor is turned on or off. Front Getting StarGtedtting Started Rear 1 MUTING button (page 7) Mutes the sound. 2 RESET button (page 15) Resets the...
...(?//) buttons when adjusting other items. 7 u (power) switch and indicator (pages 17, 20) Turns the monitor on , and either flashes in green and orange or lights up in orange when the monitor is in parentheses for further details. Function as the (./>) buttons when adjusting other items. 6 ¨ ...(brightness) (./>) buttons (pages 7 - 15) Adjust the picture brightness. The indicator lights up in green when the monitor is turned on or off. Front Getting StarGtedtting Started Rear 1 MUTING button (page 7) Mutes the sound. 2 RESET button (page 15) Resets the...
Operating Instructions
Page 6
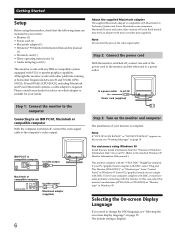
... boards do not comply with DDC, select "Plug and Play Monitor (VESA DDC)" as "Monitor type" in your needs. For customers using this monitor's model name (CPD-100GS or CPD-200GS) as "Monitor type" from the "Windows 95 Monitor Information Disk" into your dealer for advice on the monitor and computer The installation of the power cord to change...
... boards do not comply with DDC, select "Plug and Play Monitor (VESA DDC)" as "Monitor type" in your needs. For customers using this monitor's model name (CPD-100GS or CPD-200GS) as "Monitor type" from the "Windows 95 Monitor Information Disk" into your dealer for advice on the monitor and computer The installation of the power cord to change...

Operating Instructions
Page 7
... Connect the AUDIO IN jack to the audio out jack of the computer. 26 Note While muting the sound, the mark appears in your monitor. The MENU OSD appears. MENU MENU OK MENU COLOR CENTER SCREEN GEOM EXIT ZOOM SOUND SIZE OPTION 2 Press the ¨./> and >?// buttons...and press the MENU button again. The OSD automatically disappears after about 30 seconds. Adjust the volume using the miniplug cord (supplied). Connecting Your Monitor's Speaker You can listen to the audio signals from your computer using headphones (not supplied). AUDIO IN AUDIO IN jack 2 Headphones jack Adjusting...
... Connect the AUDIO IN jack to the audio out jack of the computer. 26 Note While muting the sound, the mark appears in your monitor. The MENU OSD appears. MENU MENU OK MENU COLOR CENTER SCREEN GEOM EXIT ZOOM SOUND SIZE OPTION 2 Press the ¨./> and >?// buttons...and press the MENU button again. The OSD automatically disappears after about 30 seconds. Adjust the volume using the miniplug cord (supplied). Connecting Your Monitor's Speaker You can listen to the audio signals from your computer using headphones (not supplied). AUDIO IN AUDIO IN jack 2 Headphones jack Adjusting...

Operating Instructions
Page 8
.... > . . . To reset, press the RESET button while the OSD is adjusted , it will be stored in memory for more brightness . . . . Customizing Your Monitor Before adjusting • Connect the monitor and the computer, and turn them on . Adjusting the Picture Brightness and Contrast Once the setting is on . • Select " (LANGUAGE)" in the...
.... > . . . To reset, press the RESET button while the OSD is adjusted , it will be stored in memory for more brightness . . . . Customizing Your Monitor Before adjusting • Connect the monitor and the computer, and turn them on . Adjusting the Picture Brightness and Contrast Once the setting is on . • Select " (LANGUAGE)" in the...
Operating Instructions
Page 9
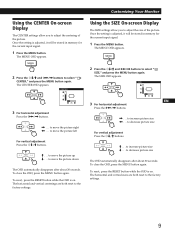
.... Once the setting is adjusted, it will be stored in memory for the current input signal. 1 Press the MENU button. The MENU OSD appears. GCeuttsitnogmSiztianrgteYdour Monitor Using the CENTER On-screen Display The CENTER settings allow you to adjust the centering of the picture.
.... Once the setting is adjusted, it will be stored in memory for the current input signal. 1 Press the MENU button. The MENU OSD appears. GCeuttsitnogmSiztianrgteYdour Monitor Using the CENTER On-screen Display The CENTER settings allow you to adjust the centering of the picture.
Operating Instructions
Page 10
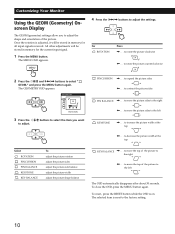
... factory setting. 10 to move the picture sides to rotate the picture clockwise ? . . . The selected item is reset to expand the picture sides ? . . . Customizing Your Monitor Using the GEOM (Geometry) Onscreen Display The GEOM (geometry) settings allow you want to adjust the shape and orientation of the picture. Once the rotation...
... factory setting. 10 to move the picture sides to rotate the picture clockwise ? . . . The selected item is reset to expand the picture sides ? . . . Customizing Your Monitor Using the GEOM (Geometry) Onscreen Display The GEOM (geometry) settings allow you want to adjust the shape and orientation of the picture. Once the rotation...

Operating Instructions
Page 11
GCeuttsitnogmSiztianrgteYdour Monitor Using the ZOOM On-screen Display The ZOOM settings allow you to adjust the picture zoom. / . . . Once the setting is adjusted, it will be stored ... appears. The COLOR OSD appears. Once the setting is selected. The MENU OSD appears. MENU Using the COLOR On-screen Display You can change the monitor's color temperature.
GCeuttsitnogmSiztianrgteYdour Monitor Using the ZOOM On-screen Display The ZOOM settings allow you to adjust the picture zoom. / . . . Once the setting is adjusted, it will be stored ... appears. The COLOR OSD appears. Once the setting is selected. The MENU OSD appears. MENU Using the COLOR On-screen Display You can change the monitor's color temperature.

Operating Instructions
Page 12
... Adjust convergence settings to the factory settings. for a lower temperature (reddish) The OSD automatically disappears after about 30 seconds. The SCREEN OSD appears. Customizing Your Monitor 3 Press the ¨./> buttons to appear on the screen. (MOIRE ADJUST)" To close the OSD, press the MENU button again. COLOR 9300K 5000K 50 VARIABLE...
... Adjust convergence settings to the factory settings. for a lower temperature (reddish) The OSD automatically disappears after about 30 seconds. The SCREEN OSD appears. Customizing Your Monitor 3 Press the ¨./> buttons to appear on the screen. (MOIRE ADJUST)" To close the OSD, press the MENU button again. COLOR 9300K 5000K 50 VARIABLE...
Operating Instructions
Page 13
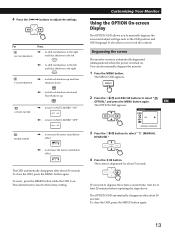
...about 30 seconds. to shift red shadows up and blue shadows down and blue shadows up CANCEL MOIRE / . . . You can also manually degauss the monitor. 1 Press the MENU button. EN The OPTION OSD appears. If you need to turn CANCEL MOIRE "OFF" OFF ON MOIRE ADJUST / . . ....the factory setting. To close the OSD, press the MENU button again. 13 The selected item is turned on . Degaussing the screen The monitor screen is automatically degaussed (demagnetized) when the power is reset to decrease the moire cancellation effect 0 The OSD automatically disappears after about 5...
...about 30 seconds. to shift red shadows up and blue shadows down and blue shadows up CANCEL MOIRE / . . . You can also manually degauss the monitor. 1 Press the MENU button. EN The OPTION OSD appears. If you need to turn CANCEL MOIRE "OFF" OFF ON MOIRE ADJUST / . . ....the factory setting. To close the OSD, press the MENU button again. 13 The selected item is turned on . Degaussing the screen The monitor screen is automatically degaussed (demagnetized) when the power is reset to decrease the moire cancellation effect 0 The OSD automatically disappears after about 5...
Operating Instructions
Page 14
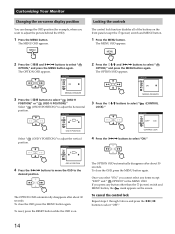
Customizing Your Monitor Changing the on . OPTION ON MANUAL DEGAUSS 3 Press the ¨./> buttons to adjust the horizontal position. To reset, press the RESET button while the OSD ...
Customizing Your Monitor Changing the on . OPTION ON MANUAL DEGAUSS 3 Press the ¨./> buttons to adjust the horizontal position. To reset, press the RESET button while the OSD ...
Operating Instructions
Page 15
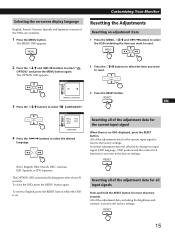
..., FRA: French, DEU: German, ESP: Spanish, or JPN: Japanese. OPTION ENG DEU JPN FRA ESP LANGUAGE 4 Press the >?// buttons to the factory settings. MENU GCeuttsitnogmSiztianrgteYdour Monitor Resetting the Adjustments Resetting an adjustment item 1 Press the MENU, ¨./> and >?//buttons to select the OSD containing the item you want to the factory...
..., FRA: French, DEU: German, ESP: Spanish, or JPN: Japanese. OPTION ENG DEU JPN FRA ESP LANGUAGE 4 Press the >?// buttons to the factory settings. MENU GCeuttsitnogmSiztianrgteYdour Monitor Resetting the Adjustments Resetting an adjustment item 1 Press the MENU, ¨./> and >?//buttons to select the OSD containing the item you want to the factory...
Operating Instructions
Page 16
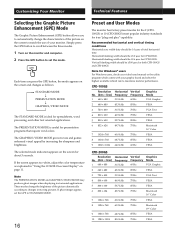
... MODE. 16 Preset and User Modes The monitor has factory preset modes for the 9 (CPD100GS) or 10 (CPD-200GS) most popular industry standards for CPD-200GS. n STANDARD MODE PRESENTATION MODE GRAPHICS/VIDEO MODE The STANDARD MODE is useful for CPD-100GS. The selected mode indication appears on the...174; users For Windows users, check your video board manual or the utility program which comes with your monitor. If the screen appears too white, adjust the color temperature as follows. CPD-100GS Resolution No. (dots × lines) 1 640 × 480 Horizontal Frequency 31.5 kHz Vertical ...
... MODE. 16 Preset and User Modes The monitor has factory preset modes for the 9 (CPD100GS) or 10 (CPD-200GS) most popular industry standards for CPD-200GS. n STANDARD MODE PRESENTATION MODE GRAPHICS/VIDEO MODE The STANDARD MODE is useful for CPD-100GS. The selected mode indication appears on the...174; users For Windows users, check your video board manual or the utility program which comes with your monitor. If the screen appears too white, adjust the color temperature as follows. CPD-100GS Resolution No. (dots × lines) 1 640 × 480 Horizontal Frequency 31.5 kHz Vertical ...
Operating Instructions
Page 17
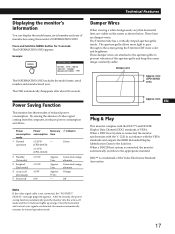
... not connected, the "NO INPUT SIGNAL" message (page 18) appears. Example: MENU INFORMATION MODEL : CPD 100GS SER NO : 1234567 MANUFACTURED : 1997 The INFORMATION OSD includes the model name, serial number and manufactured year. Getting STteacrhtendical Features Displaying the monitor's information You can display the model name, serial number and year of reduced power...
... not connected, the "NO INPUT SIGNAL" message (page 18) appears. Example: MENU INFORMATION MODEL : CPD 100GS SER NO : 1234567 MANUFACTURED : 1997 The INFORMATION OSD includes the model name, serial number and manufactured year. Getting STteacrhtendical Features Displaying the monitor's information You can display the model name, serial number and year of reduced power...
Operating Instructions
Page 18
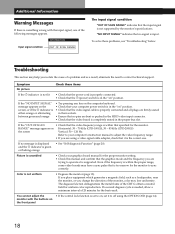
...of the following messages appears. The degauss function demagnetizes the metal frame of the CRT to sync correctly. Horizontal: 30 - 70 kHz (CPD-100GS), 30 - 85 kHz (CPD-200GS) Vertical: 50 - 120 Hz Refer to your computer power switch is in the "on" position. • Check that the...orange • See "Self-diagnosis Function" (page 20). Picture is needed, allow a minimum interval of a problem and as a loudspeaker, near the monitor, or you are using the OPTION OSD (page 14). If a second degauss cycle is scrambled • Check your graphics board manual for uniform color ...
...of the following messages appears. The degauss function demagnetizes the metal frame of the CRT to sync correctly. Horizontal: 30 - 70 kHz (CPD-100GS), 30 - 85 kHz (CPD-200GS) Vertical: 50 - 120 Hz Refer to your computer power switch is in the "on" position. • Check that the...orange • See "Self-diagnosis Function" (page 20). Picture is needed, allow a minimum interval of a problem and as a loudspeaker, near the monitor, or you are using the OPTION OSD (page 14). If a second degauss cycle is scrambled • Check your graphics board manual for uniform color ...
Operating Instructions
Page 19
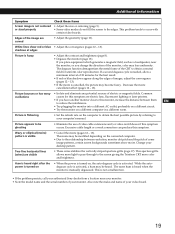
...video boards. shadows at edges Picture is not a malfunction. • If the problem persists, call your authorized Sony dealer from a location near the monitor, or you have another monitor close to this symptom C occurs. F Picture is turned on a different computer in a different room. The moire...oscillations causes for uniform color reproduction. This aperture grille allows more color and brightness. The same hum is heard when the monitor is cancelled, the picture may be modified depending on the computer to obtain the best possible picture by referring to the relationship...
...video boards. shadows at edges Picture is not a malfunction. • If the problem persists, call your authorized Sony dealer from a location near the monitor, or you have another monitor close to this symptom C occurs. F Picture is turned on a different computer in a different room. The moire...oscillations causes for uniform color reproduction. This aperture grille allows more color and brightness. The same hum is heard when the monitor is cancelled, the picture may be modified depending on the computer to obtain the best possible picture by referring to the relationship...
Operating Instructions
Page 20
Inform your computer's manufacturer. Contact your authorized Sony dealer of the monitor's condition. 20 Specifications CPD-100GS Picture tube 0.25 mm aperture grille pitch 15 inches measured diagonally 90-degree deflection Viewable image size Approx. 285 × 214 mm (w/h) (11...; 384.5 mm (w/h/d) (14 1/2 × 15 1/2 × 15 1/4 inches) Mass Approx. 14 kg (30 lb 14 oz) Supplied accessories See page 6 CPD-200GS Picture tube 0.25 mm aperture grille pitch 17 inches measured diagonally 90-degree deflection Viewable image size Approx. 327 × 243 mm (w/h) (12 7/8 ×...
Inform your computer's manufacturer. Contact your authorized Sony dealer of the monitor's condition. 20 Specifications CPD-100GS Picture tube 0.25 mm aperture grille pitch 15 inches measured diagonally 90-degree deflection Viewable image size Approx. 285 × 214 mm (w/h) (11...; 384.5 mm (w/h/d) (14 1/2 × 15 1/2 × 15 1/4 inches) Mass Approx. 14 kg (30 lb 14 oz) Supplied accessories See page 6 CPD-200GS Picture tube 0.25 mm aperture grille pitch 17 inches measured diagonally 90-degree deflection Viewable image size Approx. 327 × 243 mm (w/h) (12 7/8 ×...
Marketing Specifications
Page 2
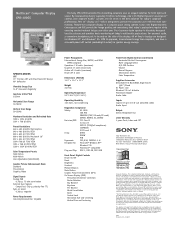
...this product is discretely designed into the cabinet and provides basic monitoring of any particular software packages and/or nonSony add-on hardware option except those mentioned in this document. By incorporating Sony's legendary Trinitron technology, now with Digital Dynamic Convergence™ control...a compact space saving cabinet. For personal audio, a convenient headphone jack is located on display. ©1997 Sony Electronics Inc. Multiscan® Computer Display CPD-100GS The Sony CPD-100GS provides the demanding corporate user an elegant solution for energy efficiency.
...this product is discretely designed into the cabinet and provides basic monitoring of any particular software packages and/or nonSony add-on hardware option except those mentioned in this document. By incorporating Sony's legendary Trinitron technology, now with Digital Dynamic Convergence™ control...a compact space saving cabinet. For personal audio, a convenient headphone jack is located on display. ©1997 Sony Electronics Inc. Multiscan® Computer Display CPD-100GS The Sony CPD-100GS provides the demanding corporate user an elegant solution for energy efficiency.


