Operating Instructions
Page 2
.... 2 Owner's Record The model and serial numbers are present inside the unit. Refer to these numbers whenever you call upon your authority to comply with the instructions, may not cause harmful interference, and (2) this equipment. Model No. Do not open the cabinet. Refer servicing to rain or moisture. This equipment generates, uses, and can radiate radio frequency energy and, if not installed...
.... 2 Owner's Record The model and serial numbers are present inside the unit. Refer to these numbers whenever you call upon your authority to comply with the instructions, may not cause harmful interference, and (2) this equipment. Model No. Do not open the cabinet. Refer servicing to rain or moisture. This equipment generates, uses, and can radiate radio frequency energy and, if not installed...
Operating Instructions
Page 3
... Your Monitor Adjusting the Picture Brightness and Contrast 8 Introducing the On-screen Display System 8 Using the CENTER On-screen Display 9 Using the SIZE On-screen Display 9 Using the GEOM (Geometry) On-screen Display 10 Using the ZOOM On-screen Display 11 Using the COLOR On-screen Display 11 Using the SCREEN On-screen Display 12 Using the OPTION On-screen Display 13 EN Resetting the Adjustments 15 Selecting the Graphic Picture Enhancement (GPE) Mode 16 F ES Technical Features Preset and User Modes ...16 C Displaying the Monitor's Information 17 Power Saving...
... Your Monitor Adjusting the Picture Brightness and Contrast 8 Introducing the On-screen Display System 8 Using the CENTER On-screen Display 9 Using the SIZE On-screen Display 9 Using the GEOM (Geometry) On-screen Display 10 Using the ZOOM On-screen Display 11 Using the COLOR On-screen Display 11 Using the SCREEN On-screen Display 12 Using the OPTION On-screen Display 13 EN Resetting the Adjustments 15 Selecting the Graphic Picture Enhancement (GPE) Mode 16 F ES Technical Features Preset and User Modes ...16 C Displaying the Monitor's Information 17 Power Saving...

Operating Instructions
Page 4
... turn the monitor vertically and horizontally, hold it at least 30 seconds after turning off the power to allow the static electricity on , the CRT is demagnetized (degaussed) for repair or shipment, use any type of cleaner containing an anti-static solution or similar additive as a transformer or high voltage power lines. Maintenance • Clean the cabinet, panel and controls with a soft cloth lightly...
... turn the monitor vertically and horizontally, hold it at least 30 seconds after turning off the power to allow the static electricity on , the CRT is demagnetized (degaussed) for repair or shipment, use any type of cleaner containing an anti-static solution or similar additive as a transformer or high voltage power lines. Maintenance • Clean the cabinet, panel and controls with a soft cloth lightly...

Operating Instructions
Page 5
... Outputs audio signals to the factory settings. 3 GPE button (page 16) Selects the Graphic Picture Enhancement (GPE) mode. 4 MENU button (pages 7 -15, 17) Displays the MENU OSD. 5 > (contrast) (?//) buttons (pages 7 - 15, 20) Adjust the contrast. Function as the (./>) buttons when adjusting other items. 6 ¨ (brightness) (./>) buttons (pages 7 - 15) Adjust the picture brightness. Function as the (?//) buttons when adjusting other items. 7 u (power) switch and indicator (pages 17, 20) Turns the monitor on , and either flashes in green and orange or lights up in green...
... Outputs audio signals to the factory settings. 3 GPE button (page 16) Selects the Graphic Picture Enhancement (GPE) mode. 4 MENU button (pages 7 -15, 17) Displays the MENU OSD. 5 > (contrast) (?//) buttons (pages 7 - 15, 20) Adjust the contrast. Function as the (./>) buttons when adjusting other items. 6 ¨ (brightness) (./>) buttons (pages 7 - 15) Adjust the picture brightness. Function as the (?//) buttons when adjusting other items. 7 u (power) switch and indicator (pages 17, 20) Turns the monitor on , and either flashes in green and orange or lights up in green...
Operating Instructions
Page 6
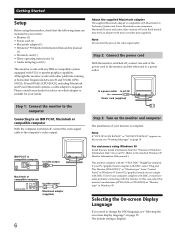
... video signal cable. Step 2: Connect the power cord With the monitor switched off , connect the video signal cable to change the OSD language, see "Warning Messages" on which adapter is complete. Although this monitor. Some PCs/graphics boards do not comply with VGA or greater graphics capability. If your PC/graphics board complies with micro switches (not supplied). Getting Started Setup Before using Windows 95 Install the new model information from "Control Panel" in Windows 95. In this case, select this monitor, check...
... video signal cable. Step 2: Connect the power cord With the monitor switched off , connect the video signal cable to change the OSD language, see "Warning Messages" on which adapter is complete. Although this monitor. Some PCs/graphics boards do not comply with VGA or greater graphics capability. If your PC/graphics board complies with micro switches (not supplied). Getting Started Setup Before using Windows 95 Install the new model information from "Control Panel" in Windows 95. In this case, select this monitor, check...

Operating Instructions
Page 7
.... Connecting Your Monitor's Speaker You can listen to the audio signals from the speaker. MENU MENU OK MENU COLOR CENTER SCREEN GEOM EXIT ZOOM SOUND SIZE OPTION 2 Press the ¨./> and >?// buttons to cancel the mark and activate the speaker. 7 Adjust the volume using the speaker in the SOUND OSD instead of the screen. Connect the AUDIO IN jack to the audio out jack of your computer using the miniplug cord (supplied). No sound comes from your computer's sound card using headphones...
.... Connecting Your Monitor's Speaker You can listen to the audio signals from the speaker. MENU MENU OK MENU COLOR CENTER SCREEN GEOM EXIT ZOOM SOUND SIZE OPTION 2 Press the ¨./> and >?// buttons to cancel the mark and activate the speaker. 7 Adjust the volume using the speaker in the SOUND OSD instead of the screen. Connect the AUDIO IN jack to the audio out jack of your computer using the miniplug cord (supplied). No sound comes from your computer's sound card using headphones...

Operating Instructions
Page 8
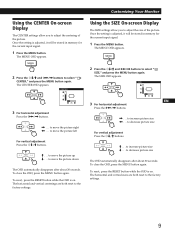
Customizing Your Monitor Before adjusting • Connect the monitor and the computer, and turn them on . BRIGHTNESS/CONTRAST 26 26 60.0kHz/ 85Hz Introducing the On-screen Display System Most adjustments are both reset to the factory settings. * The horizontal and vertical frequencies for the received input signal appear in the BRIGHTNESS/CONTRAST OSD. 1 COLOR Displays the COLOR OSD for adjusting the color temperature. 2 CENTER Displays the CENTER OSD for adjusting the centering of the picture. 3 SCREEN Displays the SCREEN OSD for adjusting the vertical and horizontal convergence,...
Customizing Your Monitor Before adjusting • Connect the monitor and the computer, and turn them on . BRIGHTNESS/CONTRAST 26 26 60.0kHz/ 85Hz Introducing the On-screen Display System Most adjustments are both reset to the factory settings. * The horizontal and vertical frequencies for the received input signal appear in the BRIGHTNESS/CONTRAST OSD. 1 COLOR Displays the COLOR OSD for adjusting the color temperature. 2 CENTER Displays the CENTER OSD for adjusting the centering of the picture. 3 SCREEN Displays the SCREEN OSD for adjusting the vertical and horizontal convergence,...
Operating Instructions
Page 9
GCeuttsitnogmSiztianrgteYdour Monitor Using the CENTER On-screen Display The CENTER settings allow you to decrease picture size The OSD automatically disappears after about 30 seconds. The MENU OSD appears. to move the picture right ? . . . The horizontal and vertical centerings are both reset to the factory settings. 9 to move the picture down The OSD automatically disappears after about 30 seconds. CENTER 73 26 3 For horizontal adjustment Press the >?// buttons. / . . . Once the setting is adjusted, it...
GCeuttsitnogmSiztianrgteYdour Monitor Using the CENTER On-screen Display The CENTER settings allow you to decrease picture size The OSD automatically disappears after about 30 seconds. The MENU OSD appears. to move the picture right ? . . . The horizontal and vertical centerings are both reset to the factory settings. 9 to move the picture down The OSD automatically disappears after about 30 seconds. CENTER 73 26 3 For horizontal adjustment Press the >?// buttons. / . . . Once the setting is adjusted, it...

Operating Instructions
Page 11
... reset, press the RESET button while the OSD is selected. MENU 2 Press the ¨./> and >?// buttons to adjust the picture zoom. / . . . Note The picture zoom adjustment will be stored in memory for all input signals received. 1 Press the MENU button. For more information on . MENU Using the COLOR On-screen Display You can change the monitor's color temperature. ZOOM H 26 V 73 3 Press the >?//buttons to select " ZOOM," and press the MENU button again. Once the setting...
... reset, press the RESET button while the OSD is selected. MENU 2 Press the ¨./> and >?// buttons to adjust the picture zoom. / . . . Note The picture zoom adjustment will be stored in memory for all input signals received. 1 Press the MENU button. For more information on . MENU Using the COLOR On-screen Display You can change the monitor's color temperature. ZOOM H 26 V 73 3 Press the >?//buttons to select " ZOOM," and press the MENU button again. Once the setting...

Operating Instructions
Page 12
... MENU button again. Adjust the CANCEL MOIRE function to eliminate red or blue shadows that may appear around objects on the screen adjust the degree of moire cancellation * CANCEL MOIRE must be stored in the OSD. for all input signals received. 1 Press the MENU button. Using the SCREEN On-screen Display Adjust convergence settings to eliminate wavy or elliptical lines that may appear on the screen. Once the setting is adjusted...
... MENU button again. Adjust the CANCEL MOIRE function to eliminate red or blue shadows that may appear around objects on the screen adjust the degree of moire cancellation * CANCEL MOIRE must be stored in the OSD. for all input signals received. 1 Press the MENU button. Using the SCREEN On-screen Display Adjust convergence settings to eliminate wavy or elliptical lines that may appear on the screen. Once the setting is adjusted...
Operating Instructions
Page 13
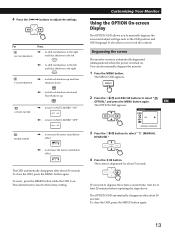
... OSD is reset to manually degauss the screen and adjust settings such as the OSD position and OSD language. to the left and blue shadows to turn CANCEL MOIRE "OFF" OFF ON MOIRE ADJUST / . . . To close the OSD, press the MENU button again. The selected item is on . GCeuttsitnogmSiztianrgteYdour Monitor Using the OPTION On-screen Display The OPTION OSD allows you need to lock the controls. to turn CANCEL MOIRE "ON" OFF ON ? . . . to shift red...
... OSD is reset to manually degauss the screen and adjust settings such as the OSD position and OSD language. to the left and blue shadows to turn CANCEL MOIRE "OFF" OFF ON MOIRE ADJUST / . . . To close the OSD, press the MENU button again. The selected item is on . GCeuttsitnogmSiztianrgteYdour Monitor Using the OPTION On-screen Display The OPTION OSD allows you need to lock the controls. to turn CANCEL MOIRE "ON" OFF ON ? . . . to shift red...
Operating Instructions
Page 14
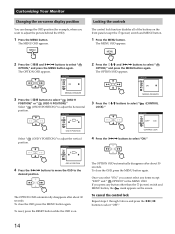
... OSD). 1 Press the MENU button. To reset, press the RESET button while the OSD is on the front panel except the u (power) switch and MENU button. 1 Press the MENU button. Once you select "ON," you press any items except "EXIT" and " OPTION" in the MENU OSD. The MENU OSD appears. The OPTION OSD automatically disappears after about 30 seconds. To close the OSD, press the MENU button again. Customizing Your Monitor Changing the on-screen display position...
... OSD). 1 Press the MENU button. To reset, press the RESET button while the OSD is on the front panel except the u (power) switch and MENU button. 1 Press the MENU button. Once you select "ON," you press any items except "EXIT" and " OPTION" in the MENU OSD. The MENU OSD appears. The OPTION OSD automatically disappears after about 30 seconds. To close the OSD, press the MENU button again. Customizing Your Monitor Changing the on-screen display position...
Operating Instructions
Page 15
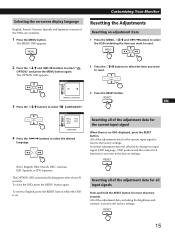
... adjustment data not affected by changes in input signal (OSD language , OSD position and the control lock function) is reset to the factory settings. RESET 15 MENU GCeuttsitnogmSiztianrgteYdour Monitor Resetting the Adjustments Resetting an adjustment item 1 Press the MENU, ¨./> and >?//buttons to select the OSD containing the item you want to reset. OPTION ENG DEU JPN FRA ESP LANGUAGE 4 Press the >?// buttons to select " (LANGUAGE)." All of the adjustment data, including the brightness and contrast, is not reset to the factory settings...
... adjustment data not affected by changes in input signal (OSD language , OSD position and the control lock function) is reset to the factory settings. RESET 15 MENU GCeuttsitnogmSiztianrgteYdour Monitor Resetting the Adjustments Resetting an adjustment item 1 Press the MENU, ¨./> and >?//buttons to select the OSD containing the item you want to reset. OPTION ENG DEU JPN FRA ESP LANGUAGE 4 Press the >?// buttons to select " (LANGUAGE)." All of the adjustment data, including the brightness and contrast, is not reset to the factory settings...
Operating Instructions
Page 16
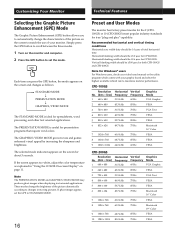
... "Using the COLOR On-screen Display" on the monitor and computer. 2 Press the GPE button to set the GPE to maximize monitor performance. Note The PRESENTATION MODE and GRAPHICS/VIDEO MODE may produce ghost images when displaying text oriented applications. Recommended horizontal and vertical timing conditions Horizontal sync width duty should be 1.0 µsec of your graphic board and select the highest available refresh rate to STANDARD MODE. 16 Preset and User Modes...
... "Using the COLOR On-screen Display" on the monitor and computer. 2 Press the GPE button to set the GPE to maximize monitor performance. Note The PRESENTATION MODE and GRAPHICS/VIDEO MODE may produce ghost images when displaying text oriented applications. Recommended horizontal and vertical timing conditions Horizontal sync width duty should be 1.0 µsec of your graphic board and select the highest available refresh rate to STANDARD MODE. 16 Preset and User Modes...
Operating Instructions
Page 17
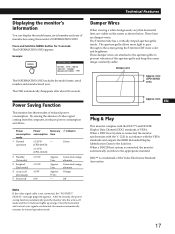
.... Press and hold the MENU button for 5 seconds. Power Saving Function This monitor has three modes of the aperture grille and keep the screen image constantly stable. Approx. 15 sec. - CLK in accordance with the VESA standards and outputs the EDID (Extended Display Identification Data) to the appropriate standard. When a DDC2B host system is not connected, the "NO INPUT SIGNAL" message (page 18) appears...
.... Press and hold the MENU button for 5 seconds. Power Saving Function This monitor has three modes of the aperture grille and keep the screen image constantly stable. Approx. 15 sec. - CLK in accordance with the VESA standards and outputs the EDID (Extended Display Identification Data) to the appropriate standard. When a DDC2B host system is not connected, the "NO INPUT SIGNAL" message (page 18) appears...
Operating Instructions
Page 18
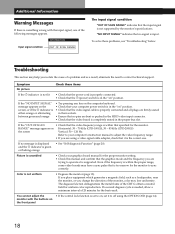
INFORMATION Input signal condition OUT OF SCAN RANGE The input signal condition "OUT OF SCAN RANGE" indicates that is too narrow for the monitor to adjust the video frequency range. • If you are using the OPTION OSD (page 14). Horizontal: 30 - 70 kHz (CPD-100GS), 30 - 85 kHz (CPD-200GS) Vertical: 50 - 120 Hz Refer to your computer's instruction manual to sync correctly. Symptom No picture Check these problems, see "Troubleshooting" below. If a second degauss...
INFORMATION Input signal condition OUT OF SCAN RANGE The input signal condition "OUT OF SCAN RANGE" indicates that is too narrow for the monitor to adjust the video frequency range. • If you are using the OPTION OSD (page 14). Horizontal: 30 - 70 kHz (CPD-100GS), 30 - 85 kHz (CPD-200GS) Vertical: 50 - 120 Hz Refer to your computer's instruction manual to sync correctly. Symptom No picture Check these problems, see "Troubleshooting" below. If a second degauss...
Operating Instructions
Page 19
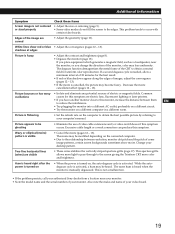
... the model name and the serial number of the monitor, color may become fuzzy. The degauss function demagnetizes the metal frame of the image are curved • Adjust the geometry (page 10). F Picture is flickering • Set the refresh rate on a different computer in a different room. Also note the make and name of your computer's manual. White lines show moire. shadows at edges Picture is manually degaussed...
... the model name and the serial number of the monitor, color may become fuzzy. The degauss function demagnetizes the metal frame of the image are curved • Adjust the geometry (page 10). F Picture is flickering • Set the refresh rate on a different computer in a different room. Also note the make and name of your computer's manual. White lines show moire. shadows at edges Picture is manually degaussed...
Operating Instructions
Page 20
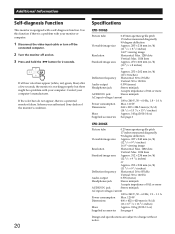
...-diagnosis Function This monitor is working properly but there might be a problem with your computer. Inform your computer's manufacturer. Contact your authorized Sony dealer of the monitor's condition. 20 Specifications CPD-100GS Picture tube 0.25 mm aperture grille pitch 15 inches measured diagonally 90-degree deflection Viewable image size Approx. 285 × 214 mm (w/h) (11 1/4 × 8 1/2 inches) 14.0" viewing image Resolution Horizontal: Max. 1280 dots Vertical: Max. 1024...
...-diagnosis Function This monitor is working properly but there might be a problem with your computer. Inform your computer's manufacturer. Contact your authorized Sony dealer of the monitor's condition. 20 Specifications CPD-100GS Picture tube 0.25 mm aperture grille pitch 15 inches measured diagonally 90-degree deflection Viewable image size Approx. 285 × 214 mm (w/h) (11 1/4 × 8 1/2 inches) 14.0" viewing image Resolution Horizontal: Max. 1280 dots Vertical: Max. 1024...

Marketing Specifications
Page 1
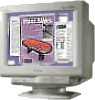
Multiscan® Computer Display CPD-100GS CPD-100GS • 15" Trinitron® CRT (14.0" viewable image size) • Super Fine Pitch™ 0.25mm Aperture Grille • Vertically flat short-neck CRT design • Compact, redesigned cabinet features reduced depth with detachable tilt-swivel base • Digital Multiscan Technology supports multiple PC and Mac resolutions up to 1280 x 1024 @ 60Hz • Digital Dynamic Convergence™ control for consistent image performance even in...
Multiscan® Computer Display CPD-100GS CPD-100GS • 15" Trinitron® CRT (14.0" viewable image size) • Super Fine Pitch™ 0.25mm Aperture Grille • Vertically flat short-neck CRT design • Compact, redesigned cabinet features reduced depth with detachable tilt-swivel base • Digital Multiscan Technology supports multiple PC and Mac resolutions up to 1280 x 1024 @ 60Hz • Digital Dynamic Convergence™ control for consistent image performance even in...
Marketing Specifications
Page 2
... Size and Centering Vertical Size and Centering Front Panel Digital Controls (continued) Horizontal Vertical Convergence Multi Language Select H/V OSD Position Volume Manual Degauss Information Screen Color Temperature Supplies Accessories Detachable Tilt Base/Wide Angle Swivel (±90°) Stand AC Power cord Windows® 95 inf. By incorporating Sony's legendary Trinitron technology, now with the most comfortable, feature-rich computer display in a compact space saving cabinet. Multiscan® Computer Display CPD-100GS The Sony CPD-100GS provides the demanding corporate user...
... Size and Centering Vertical Size and Centering Front Panel Digital Controls (continued) Horizontal Vertical Convergence Multi Language Select H/V OSD Position Volume Manual Degauss Information Screen Color Temperature Supplies Accessories Detachable Tilt Base/Wide Angle Swivel (±90°) Stand AC Power cord Windows® 95 inf. By incorporating Sony's legendary Trinitron technology, now with the most comfortable, feature-rich computer display in a compact space saving cabinet. Multiscan® Computer Display CPD-100GS The Sony CPD-100GS provides the demanding corporate user...


