Operating Instructions
Page 3
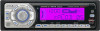
... module (sold separately). Table of Contents Getting Started Resetting the unit 4 Setting the clock 4 DEMO mode 4 Detaching the front panel 4 Attaching the front panel 5 Inserting the disc in the unit 5 Ejecting the disc 5 Location of Sony Corporation. list-up 9 Other functions Changing the sound settings 9 Adjusting the sound characteristics - MENU 10 Using optional equipment 11...
... module (sold separately). Table of Contents Getting Started Resetting the unit 4 Setting the clock 4 DEMO mode 4 Detaching the front panel 4 Attaching the front panel 5 Inserting the disc in the unit 5 Ejecting the disc 5 Location of Sony Corporation. list-up 9 Other functions Changing the sound settings 9 Adjusting the sound characteristics - MENU 10 Using optional equipment 11...
Operating Instructions
Page 4
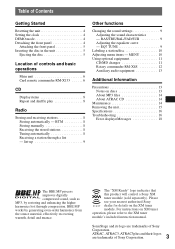
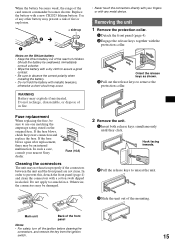
...the right, then gently pull out the left end of this unit to heat/high temperature or moisture. Detaching the front panel You can detach the front panel of the front panel. 1 2 Notes • Do not drop or put excessive pressure on a dashboard/rear tray. Caution alarm If you...a 12-hour digital indication. 1 Press (MENU). 2 Press (GP/PRESET) +/- To move the digital indication, press (SEEK) -/+. 5 Press (ENTER). Detach the front panel and press the RESET button with a pointed object, such as a ball-point pen. RESET button Note Pressing the RESET button will only sound if the...
...the right, then gently pull out the left end of this unit to heat/high temperature or moisture. Detaching the front panel You can detach the front panel of the front panel. 1 2 Notes • Do not drop or put excessive pressure on a dashboard/rear tray. Caution alarm If you...a 12-hour digital indication. 1 Press (MENU). 2 Press (GP/PRESET) +/- To move the digital indication, press (SEEK) -/+. 5 Press (ENTER). Detach the front panel and press the RESET button with a pointed object, such as a ball-point pen. RESET button Note Pressing the RESET button will only sound if the...
Operating Instructions
Page 5
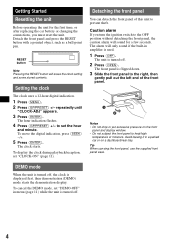
The disc is ejected. 3 Close the front panel. A B x 3 Close the front panel. Note Do not put anything on the unit, then lightly push the left side in the unit 1 Press (OPEN). 2 Insert the disc (label side up). Inserting the disc in . Attaching the front panel Place the hole A of the front panel onto the spindle B on the inner surface of the front panel. 5 Playback starts automatically. Press (SOURCE) on the unit (or insert a disc) to operate the unit. Ejecting the disc 1 Press (OPEN). 2 Press Z.
The disc is ejected. 3 Close the front panel. A B x 3 Close the front panel. Note Do not put anything on the unit, then lightly push the left side in the unit 1 Press (OPEN). 2 Insert the disc (label side up). Inserting the disc in . Attaching the front panel Place the hole A of the front panel onto the spindle B on the inner surface of the front panel. 5 Playback starts automatically. Press (SOURCE) on the unit (or insert a disc) to operate the unit. Ejecting the disc 1 Press (OPEN). 2 Press Z.
Operating Instructions
Page 6
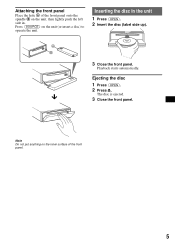
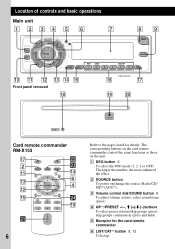
... AL SOU TER SOUND TCAT DSO SEEK SEEK EQ7 ME NU EN MODE DSPL REP SHUF 1 2 3 OPEN COLOR BBBBEEMP 4 5 6 OFF 0 qa qs Front panel removed qd qf qg qk CDX-F5710 qh qj ql w; E Receptor for details. DSPL REP 1 SHUF 2 SCRL 3 4 5 6 ws wd qf 6 4 wf qh wa + VOL - 6 Refer to the pages listed...
... AL SOU TER SOUND TCAT DSO SEEK SEEK EQ7 ME NU EN MODE DSPL REP SHUF 1 2 3 OPEN COLOR BBBBEEMP 4 5 6 OFF 0 qa qs Front panel removed qd qf qg qk CDX-F5710 qh qj ql w; E Receptor for details. DSPL REP 1 SHUF 2 SCRL 3 4 5 6 ws wd qf 6 4 wf qh wa + VOL - 6 Refer to the pages listed...

Operating Instructions
Page 7
...MODE button 8, 11 To select the radio band (FM/AM)/select the unit*5. store stations (press and hold ). T Disc slot 5 To insert the disc. If the changer is connected, the operation is... SCRL button 8 To scroll the display item. *1 When an MD changer is connected. *2 When an optional Sony portable device is connected. *3 When an MP3/ATRAC CD is played and a changer is connected. *6 The unit...battery of 7 color settings for the LCD. G Display window H OPEN button 5 To open the front panel. I COLOR button To select one of the card remote commander" on the card remote commander have also ...
...MODE button 8, 11 To select the radio band (FM/AM)/select the unit*5. store stations (press and hold ). T Disc slot 5 To insert the disc. If the changer is connected, the operation is... SCRL button 8 To scroll the display item. *1 When an MD changer is connected. *2 When an optional Sony portable device is connected. *3 When an MP3/ATRAC CD is played and a changer is connected. *6 The unit...battery of 7 color settings for the LCD. G Display window H OPEN button 5 To open the front panel. I COLOR button To select one of the card remote commander" on the card remote commander have also ...
Operating Instructions
Page 15
...a cotton swab dipped in fire. • Never touch the connectors directly with your nearest Sony dealer. WARNING Battery may not function properly if the connectors between the unit and the front panel are not clean. Do not apply too much force. Should the battery be damaged. 2... (10A) Cleaning the connectors The unit may explode if mistreated. Hook facing inwards. 2 Pull the release keys to prevent this, detach the front panel (page 4) and clean the connectors with the protection collar. Otherwise, the connectors may be swallowed, immediately consult a doctor. • Wipe the ...
...a cotton swab dipped in fire. • Never touch the connectors directly with your nearest Sony dealer. WARNING Battery may not function properly if the connectors between the unit and the front panel are not clean. Do not apply too much force. Should the battery be damaged. 2... (10A) Cleaning the connectors The unit may explode if mistreated. Hook facing inwards. 2 Pull the release keys to prevent this, detach the front panel (page 4) and clean the connectors with the protection collar. Otherwise, the connectors may be swallowed, immediately consult a doctor. • Wipe the ...
Operating Instructions
Page 16
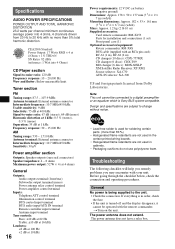
...panel case (1) Optional accessories/equipment: Rotary commander: RM-X4S BUS cable (supplied with an RCA pin cord): RC-61 (1 m), RC-62 (2 m) CD changer (10 discs): CDX-757MX CD changer (6 discs): CDX-T69 MD changer (6 discs...to the unit. • Check the connection. General No power is Sony BUS system compatible. The power antenna does not have a relay box. ... average power into 4 Ohms) CD Player section Signal-to-noise ratio: 120 dB Frequency response: 10 ...000 Hz Wow and flutter: Below measurable limit Tuner section FM Tuning range: 87.5 - 107.9 MHz Antenna terminal: External...
...panel case (1) Optional accessories/equipment: Rotary commander: RM-X4S BUS cable (supplied with an RCA pin cord): RC-61 (1 m), RC-62 (2 m) CD changer (10 discs): CDX-757MX CD changer (6 discs): CDX-T69 MD changer (6 discs...to the unit. • Check the connection. General No power is Sony BUS system compatible. The power antenna does not have a relay box. ... average power into 4 Ohms) CD Player section Signal-to-noise ratio: 120 dB Frequency response: 10 ...000 Hz Wow and flutter: Below measurable limit Tuner section FM Tuning range: 87.5 - 107.9 MHz Antenna terminal: External...


