
Limited Warranty (U.S. Only)
Page 1
... ("Parts Warranty"), Sony will , at its option, (i) repair the product using new or refurbished parts or (ii) replace the product with new or refurbished product, product determined to be lost or reformatted during ordinary consumer use , acts of God, misuse, limitations of technology, or modification of or to obtain warranty service for the time periods and as fuses or batteries). It...
... ("Parts Warranty"), Sony will , at its option, (i) repair the product using new or refurbished parts or (ii) replace the product with new or refurbished product, product determined to be lost or reformatted during ordinary consumer use , acts of God, misuse, limitations of technology, or modification of or to obtain warranty service for the time periods and as fuses or batteries). It...

XM Satellite Radio Operating manual
Page 1
...need to radio communications. t Select another area where your nearest Sony dealer. 3-243-168-11 (1) XM Satellite Radio Receiver Operating Instructions Owner's Record The model number is hampered by noises. XT-XM1 Serial No. Visit www.xmradio.com. Press the Display (DSPL) button. Displaying the XM Radio ID Additional Information Specifications Frequency Power requirements Outputs Inputs Dimensions Mass Supplied accessories 2332.5 - 2345.0 MHz 12 V DC car battery (negative ground) BUS control output Audio output Antenna input (Satellite, Terrestrial) BUS control input Audio...
...need to radio communications. t Select another area where your nearest Sony dealer. 3-243-168-11 (1) XM Satellite Radio Receiver Operating Instructions Owner's Record The model number is hampered by noises. XT-XM1 Serial No. Visit www.xmradio.com. Press the Display (DSPL) button. Displaying the XM Radio ID Additional Information Specifications Frequency Power requirements Outputs Inputs Dimensions Mass Supplied accessories 2332.5 - 2345.0 MHz 12 V DC car battery (negative ground) BUS control output Audio output Antenna input (Satellite, Terrestrial) BUS control input Audio...

XM Satellite Radio Operating manual
Page 2
... moisture. - Use of the driver and it will be exposed to install it first. Connection Connection example XM Antenna* XT-XM1 CD/MD changer* Connection diagram Sony BUS Compatible Car Audio* Cautions • This unit is energized at all times Be sure to connect the black ground lead to temperatures exceeding 55°C (131°F) (such as heaters). - POWER SONY BUS CONTROL OUT IN AUDIO L OUT R L IN R ANTENNA TER SAT 2 Connect as the connector hook facing down...
... moisture. - Use of the driver and it will be exposed to install it first. Connection Connection example XM Antenna* XT-XM1 CD/MD changer* Connection diagram Sony BUS Compatible Car Audio* Cautions • This unit is energized at all times Be sure to connect the black ground lead to temperatures exceeding 55°C (131°F) (such as heaters). - POWER SONY BUS CONTROL OUT IN AUDIO L OUT R L IN R ANTENNA TER SAT 2 Connect as the connector hook facing down...
Operating Instructions
Page 1
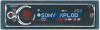
...-11 (1) FM/AM Compact Disc Player Operating Instructions US Mode d'emploi FR Manual de instrucciones ES Owner's Record The model and serial numbers are located on the bottom of the unit. Model No. Para obtener información sobre la instalación y las conexiones, consulte el manual de instalación/conexiones suministrado. CDX-CA900X © 2002 Sony Corporation En ce qui concerne l'installation et les connexions, consulter le manuel d'installation/raccordement fourni...
...-11 (1) FM/AM Compact Disc Player Operating Instructions US Mode d'emploi FR Manual de instrucciones ES Owner's Record The model and serial numbers are located on the bottom of the unit. Model No. Para obtener información sobre la instalación y las conexiones, consulte el manual de instalación/conexiones suministrado. CDX-CA900X © 2002 Sony Corporation En ce qui concerne l'installation et les connexions, consulter le manuel d'installation/raccordement fourni...
Operating Instructions
Page 2
... audio CD that includes information such as the disc name, artist name, and track names. For instructions on XM tuner operation, please refer to the XM tuner module's included instruction manual. CAUTION The use of the following measures: - If this equipment. Increase the separation between the equipment and receiver. - You are designed to provide reasonable protection against harmful interference in this Sony Compact Disc Player...
... audio CD that includes information such as the disc name, artist name, and track names. For instructions on XM tuner operation, please refer to the XM tuner module's included instruction manual. CAUTION The use of the following measures: - If this equipment. Increase the separation between the equipment and receiver. - You are designed to provide reasonable protection against harmful interference in this Sony Compact Disc Player...
Operating Instructions
Page 3
... Location of the subwoofer(s 20 Selecting the spectrum analyzer (SA). . . . . 21 Connecting auxiliary audio equipment . . . . 21 Additional Information Maintenance 22 Removing the unit 24 Specifications 25 Troubleshooting 26 Error displays/Messages 27 3 List-up 15 Other Functions Using the rotary commander 16 Adjusting the sound characteristics 17 Quickly attenuating the sound 17 Changing the sound and display settings - Best Tuning Memory (BTM 13 Receiving the stored stations 14 Storing only the desired stations 14 Storing station names - Station...
... Location of the subwoofer(s 20 Selecting the spectrum analyzer (SA). . . . . 21 Connecting auxiliary audio equipment . . . . 21 Additional Information Maintenance 22 Removing the unit 24 Specifications 25 Troubleshooting 26 Error displays/Messages 27 3 List-up 15 Other Functions Using the rotary commander 16 Adjusting the sound characteristics 17 Quickly attenuating the sound 17 Changing the sound and display settings - Best Tuning Memory (BTM 13 Receiving the stored stations 14 Storing only the desired stations 14 Storing station names - Station...
Operating Instructions
Page 4
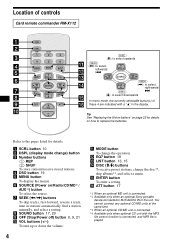
Location of these 4 are indicated with a " v" in the display. a SCRL button 10 b DSPL (display mode change) button c Number buttons (1) REP (2) SHUF To store stations/receive stored stations. g SEEK ( f SOURCE (Power on page 22 for details. SOURCE SOUND DISC - SEEK+ ENTER OFF + ATT VOL - (DISC) (M): to select upwards (SEEK) ( (m): to replace the batteries. Refer to the pages listed for details on how to select downwards In menu mode, the currently selectable button(s) of controls Card remote commander RM-X112 SCRL DSPL...
Location of these 4 are indicated with a " v" in the display. a SCRL button 10 b DSPL (display mode change) button c Number buttons (1) REP (2) SHUF To store stations/receive stored stations. g SEEK ( f SOURCE (Power on page 22 for details. SOURCE SOUND DISC - SEEK+ ENTER OFF + ATT VOL - (DISC) (M): to select upwards (SEEK) ( (m): to replace the batteries. Refer to the pages listed for details on how to select downwards In menu mode, the currently selectable button(s) of controls Card remote commander RM-X112 SCRL DSPL...
Operating Instructions
Page 5
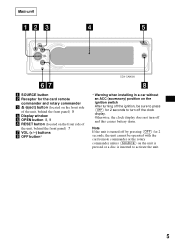
Note If the unit is inserted to turn off and this causes battery drain. Main unit SOURCE VOL OFF CDX-CA900X a SOURCE button b Receptor for the card remote commander and rotary commander c Z (eject) button (located on the front side of the unit, behind the front panel) 9 d Display window e OPEN button 8, 9 f RESET button (located on the front side of the unit, behind the front panel) 7 g VOL (+/-) buttons h OFF button* * Warning when installing in a car without an ACC (accessory...
Note If the unit is inserted to turn off and this causes battery drain. Main unit SOURCE VOL OFF CDX-CA900X a SOURCE button b Receptor for the card remote commander and rotary commander c Z (eject) button (located on the front side of the unit, behind the front panel) 9 d Display window e OPEN button 8, 9 f RESET button (located on the front side of the unit, behind the front panel) 7 g VOL (+/-) buttons h OFF button* * Warning when installing in a car without an ACC (accessory...
Operating Instructions
Page 6
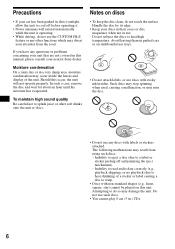
... operating it. • Power antennas will not operate properly. Do not use such discs. • You cannot play 8 cm (3 in use discs with labels or stickers attached. Notes on dashboards/rear trays. • Do not attach labels, or use . Do not subject the discs to cool off and jamming the eject mechanism). - Precautions • If your car has been parked in direct sunlight, allow the unit...
... operating it. • Power antennas will not operate properly. Do not use such discs. • You cannot play 8 cm (3 in use discs with labels or stickers attached. Notes on dashboards/rear trays. • Do not attach labels, or use . Do not subject the discs to cool off and jamming the eject mechanism). - Precautions • If your car has been parked in direct sunlight, allow the unit...
Operating Instructions
Page 9
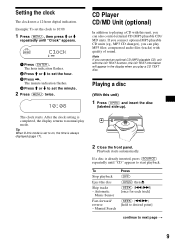
... units (eg., MP3 CD changer), you play a CD TEXT disc. Playing a disc (With this unit, you can play mode. Playback starts automatically. The clock starts. Tip When D.Info mode is already inserted, press (SOURCE) repeatedly until "Clock" appears. 1 Press (ENTER). If a disc is set the clock to on, the time is completed, the display returns to playing a CD with quality of sound. Automatic Music Sensor Fast-forward/ reverse - CD Player CD/MD Unit...
... units (eg., MP3 CD changer), you play a CD TEXT disc. Playing a disc (With this unit, you can play mode. Playback starts automatically. The clock starts. Tip When D.Info mode is already inserted, press (SOURCE) repeatedly until "Clock" appears. 1 Press (ENTER). If a disc is set the clock to on, the time is completed, the display returns to playing a CD with quality of sound. Automatic Music Sensor Fast-forward/ reverse - CD Player CD/MD Unit...
Operating Instructions
Page 11
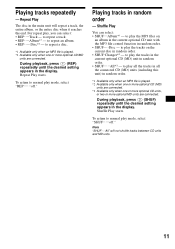
... more optional MD units are connected. During playback, press (1) (REP) repeatedly until the desired setting appears in the main unit will not shuffle tracks between CD units and MD units. 11 Playing tracks in random order. • SHUF·Changer*2 - to play mode, select "SHUF·····off ." Repeat Play The disc in the display. Shuffle Play starts. Repeat Play starts. Note "SHUF...
... more optional MD units are connected. During playback, press (1) (REP) repeatedly until the desired setting appears in the main unit will not shuffle tracks between CD units and MD units. 11 Playing tracks in random order. • SHUF·Changer*2 - to play mode, select "SHUF·····off ." Repeat Play The disc in the display. Shuffle Play starts. Repeat Play starts. Note "SHUF...
Operating Instructions
Page 14
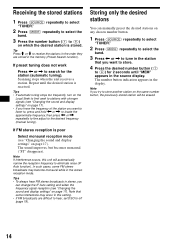
... adjust to (6)) for the station (automatic tuning). Note that you want to store. 4 Press the desired number button ((1) to the desired frequency (manual tuning). Note If you try to off (page 19). Scanning stops when the unit receives a station. Tips • To always hear FM stereo broadcasts in the memory (Preset Search function). If FM stereo reception is poor Select monaural reception mode (see "Changing the sound and display settings" on any chosen number button. 1 Press (SOURCE...
... adjust to (6)) for the station (automatic tuning). Note that you want to store. 4 Press the desired number button ((1) to the desired frequency (manual tuning). Note If you try to off (page 19). Scanning stops when the unit receives a station. Tips • To always hear FM stereo broadcasts in the memory (Preset Search function). If FM stereo reception is poor Select monaural reception mode (see "Changing the sound and display settings" on any chosen number button. 1 Press (SOURCE...
Operating Instructions
Page 16
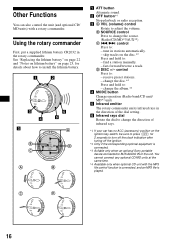
... CD/MD units at the same time. *4 Available only when optional CD unit with a rotary commander. change the source. (Radio/CD/MD*2/AUX*3) C ./> control Press to BUS AUDIO IN of infrared rays. *1 If your car has no ACC (accessory) position on the disc.*2 Press and hold to : - C D 16 tune in stations automatically. - fast-forward/reverse a track. receive preset stations. - find a station manually. - skip tracks on the ignition key switch, be...
... CD/MD units at the same time. *4 Available only when optional CD unit with a rotary commander. change the source. (Radio/CD/MD*2/AUX*3) C ./> control Press to BUS AUDIO IN of infrared rays. *1 If your car has no ACC (accessory) position on the disc.*2 Press and hold to : - C D 16 tune in stations automatically. - fast-forward/reverse a track. receive preset stations. - find a station manually. - skip tracks on the ignition key switch, be...
Operating Instructions
Page 17
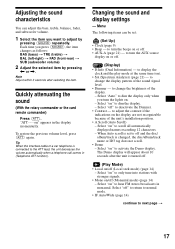
... remote commander) Press (ATT). To restore the previous volume level, press (ATT) again. Select "on " appears in the display momentarily. "ATT on " to dim the display. - to display the clock and the play mode at the same time (on /off (Monaural mode) (page 14) - Select "on" to only tune into stations with stronger signals. • Mono on ). • SA (Spectrum Analyzer) (page 21) - Changing the sound and display settings - to turn the AUX source display on . - Select "Auto...
... remote commander) Press (ATT). To restore the previous volume level, press (ATT) again. Select "on " appears in the display momentarily. "ATT on " to dim the display. - to display the clock and the play mode at the same time (on /off (Monaural mode) (page 14) - Select "on" to only tune into stations with stronger signals. • Mono on ). • SA (Spectrum Analyzer) (page 21) - Changing the sound and display settings - to turn the AUX source display on . - Select "Auto...
Operating Instructions
Page 20
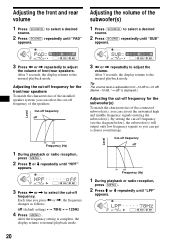
... the connected subwoofer(s), you press < or ,, the frequency changes as follows: off Frequency (Hz) 1 During playback or radio reception, press (MENU). 2 Press M or m repeatedly until "LPF" appears. 20 After 3 seconds, the display returns to the normal playback mode. Level Level 3 Press < or , repeatedly to adjust the volume of the installed speaker system, you can select the cut -off frequency (see the diagram below), the subwoofer(s) will output only low frequency signals...
... the connected subwoofer(s), you press < or ,, the frequency changes as follows: off Frequency (Hz) 1 During playback or radio reception, press (MENU). 2 Press M or m repeatedly until "LPF" appears. 20 After 3 seconds, the display returns to the normal playback mode. Level Level 3 Press < or , repeatedly to adjust the volume of the installed speaker system, you can select the cut -off frequency (see the diagram below), the subwoofer(s) will output only low frequency signals...
Operating Instructions
Page 21
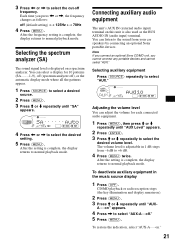
... sound signal level is adjustable in the music source display 1 Press (OFF). The volume level is displayed on a spectrum analyzer. To deactivate auxiliary equipment in 1 dB steps from your car speakers by connecting an optional Sony portable devices. Selecting auxiliary equipment Press (SOURCE) repeatedly to select a desired source. 2 Press (MENU). 3 Press M or m repeatedly until "AUX- Connecting auxiliary audio equipment The unit's AUX IN (external audio input) terminal on " appears. 4 Press , to select "AUX-A····off frequency. After the frequency...
... sound signal level is adjustable in the music source display 1 Press (OFF). The volume level is displayed on a spectrum analyzer. To deactivate auxiliary equipment in 1 dB steps from your car speakers by connecting an optional Sony portable devices. Selecting auxiliary equipment Press (SOURCE) repeatedly to select a desired source. 2 Press (MENU). 3 Press M or m repeatedly until "AUX- Connecting auxiliary audio equipment The unit's AUX IN (external audio input) terminal on " appears. 4 Press , to select "AUX-A····off frequency. After the frequency...
Operating Instructions
Page 25
... (2 lb 14 oz.) Card remote commander (1) Parts for installation and connections (1 set) Front panel case (1) Rotary commander (1) BUS cable (supplied with an RCA pin cord) RC-61 (1 m), RC-62 (2 m) CD changer (10 discs) CDX-757MX, CDX-656 CD changer (6 discs) CDX-T70MX, CDX-T69 MD changer (6 discs) MDX-66XLP MG-MS System-up Player MGS-X1 XM Radio Tuner XT-XM1 Source selector XA-C30 Note This unit cannot be connected to 20 kHz with no...
... (2 lb 14 oz.) Card remote commander (1) Parts for installation and connections (1 set) Front panel case (1) Rotary commander (1) BUS cable (supplied with an RCA pin cord) RC-61 (1 m), RC-62 (2 m) CD changer (10 discs) CDX-757MX, CDX-656 CD changer (6 discs) CDX-T70MX, CDX-T69 MD changer (6 discs) MDX-66XLP MG-MS System-up Player MGS-X1 XM Radio Tuner XT-XM1 Source selector XA-C30 Note This unit cannot be connected to 20 kHz with no...
Operating Instructions
Page 26
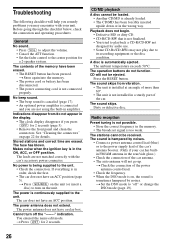
..., check the fuse. • The car does not have an ACC position. General No sound. • Press (VOL) to adjust the volume. • Cancel the ATT function. • Set the fader control to the unit. • Check the connection. Indications disappear from vibration. • The unit is installed at an angle of the power antenna control lead. • Check the frequency. • When the DSO mode is on...
..., check the fuse. • The car does not have an ACC position. General No sound. • Press (VOL) to adjust the volume. • Cancel the ATT function. • Set the fader control to the unit. • Check the connection. Indications disappear from vibration. • The unit is installed at an angle of the power antenna control lead. • Check the frequency. • When the DSO mode is on...
Product Guide / Specifications
Page 1
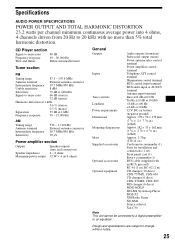
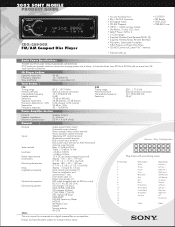
....2 watts per channel minimum continuous average power into 4 ohms, 4 channels driven from 20 Hz to change without notice. Design and Specifications subject to 20 kHz with wires facing viewer. 2002 SONY MOBILE PRODUCT GUIDE CDX-CA900X FM/AM Compact Disc Player • Aux Lite Auxiliary Input • 8fs, 1-Bit D/A Converter • 60 Degree Install • CD-RW Playback • 18FM + 12AM memory presets • Dot Matrix, 3-color LCD, clock • Xplo- Pin Number 1 2 3 4 5 6 7 8 9 10 11...
....2 watts per channel minimum continuous average power into 4 ohms, 4 channels driven from 20 Hz to change without notice. Design and Specifications subject to 20 kHz with wires facing viewer. 2002 SONY MOBILE PRODUCT GUIDE CDX-CA900X FM/AM Compact Disc Player • Aux Lite Auxiliary Input • 8fs, 1-Bit D/A Converter • 60 Degree Install • CD-RW Playback • 18FM + 12AM memory presets • Dot Matrix, 3-color LCD, clock • Xplo- Pin Number 1 2 3 4 5 6 7 8 9 10 11...
Product Guide / Specifications
Page 2
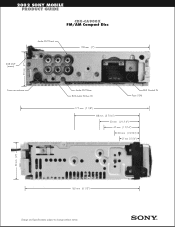
2002 SONY MOBILE PRODUCT GUIDE CDX-CA900X FM/AM Compact Disc Audio OUT Front 178 mm (7”) SUB OUT (mono) 50 mm (2”) From car antenna Audio OUT Rear BUS Audio IN/Aux IN BUS Control IN Fuse (10A) 177 mm (7 1/8”) 88 mm (3 7/16”) 53 mm ( 2 1/16”) 47 mm (1 7/16”) 33 mm (1 5/16”) 27 mm (1 1/16”) 50 mm (2”) 162 mm (6 1/2”) Design and Specifications subject to change without notice.
2002 SONY MOBILE PRODUCT GUIDE CDX-CA900X FM/AM Compact Disc Audio OUT Front 178 mm (7”) SUB OUT (mono) 50 mm (2”) From car antenna Audio OUT Rear BUS Audio IN/Aux IN BUS Control IN Fuse (10A) 177 mm (7 1/8”) 88 mm (3 7/16”) 53 mm ( 2 1/16”) 47 mm (1 7/16”) 33 mm (1 5/16”) 27 mm (1 1/16”) 50 mm (2”) 162 mm (6 1/2”) Design and Specifications subject to change without notice.


