
Limited Warranty (U.S. Only)
Page 1
...-01 ® Car Audio LIMITED WARRANTY (U.S. Pursuant to any part of Sony. A dated purchase receipt is your exclusive remedies. Any parts or product replaced under this Limited Warranty, Sony will , at its original specifications. Please refer to obtain warranty service for ninety (90) days, whichever is invalid if the factory-applied serial number has been altered or removed from your unit. This Limited...
...-01 ® Car Audio LIMITED WARRANTY (U.S. Pursuant to any part of Sony. A dated purchase receipt is your exclusive remedies. Any parts or product replaced under this Limited Warranty, Sony will , at its original specifications. Please refer to obtain warranty service for ninety (90) days, whichever is invalid if the factory-applied serial number has been altered or removed from your unit. This Limited...
Operating Instructions
Page 1
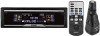
... product. CDX-CA860X CDX-CA850X © 2001 Sony Corporation Para obtener información sobre la instalación y las conexiones, consulte el manual de instalación/conexiones suministrado. For installation and connections, see the supplied installation/connections manual. CDX-CA860X/CA850X Serial No. 3-229-198-11 (1) FM/AM Compact Disc Player Operating Instructions US Mode d'emploi FR Manual de instrucciones ES Owner's Record The model and serial numbers are located on the bottom of the unit. Refer...
... product. CDX-CA860X CDX-CA850X © 2001 Sony Corporation Para obtener información sobre la instalación y las conexiones, consulte el manual de instalación/conexiones suministrado. For installation and connections, see the supplied installation/connections manual. CDX-CA860X/CA850X Serial No. 3-229-198-11 (1) FM/AM Compact Disc Player Operating Instructions US Mode d'emploi FR Manual de instrucciones ES Owner's Record The model and serial numbers are located on the bottom of the unit. Refer...
Operating Instructions
Page 2
... a Class B digital device, pursuant to Part 15 of the following measures: - Reorient or relocate the receiving antenna. - Consult the dealer or an experienced radio/TV technician for help. Thank you select. *2 This unit works with Sony products only. *3 A CD TEXT disc is an audio CD that any changes or modifications not expressly approved in this manual could void your authority to operate this equipment does...
... a Class B digital device, pursuant to Part 15 of the following measures: - Reorient or relocate the receiving antenna. - Consult the dealer or an experienced radio/TV technician for help. Thank you select. *2 This unit works with Sony products only. *3 A CD TEXT disc is an audio CD that any changes or modifications not expressly approved in this manual could void your authority to operate this equipment does...
Operating Instructions
Page 3
... 25 Removing the unit 26 Specifications 27 Troubleshooting 28 Error displays/Messages 29 3 List-up 16 Other Functions Using the rotary commander 16 Adjusting the sound characteristics 18 Quickly attenuating the sound 18 Changing the sound and display settings - Shuffle Play 10 Labeling a CD - Disc Memo 11 Locating a disc by name - Repeat Play 10 Playing tracks in a station through a list - Bank 12 * Functions available with optional CD/MD unit Radio Storing stations automatically - Best Tuning Memory (BTM 13 Receiving...
... 25 Removing the unit 26 Specifications 27 Troubleshooting 28 Error displays/Messages 29 3 List-up 16 Other Functions Using the rotary commander 16 Adjusting the sound characteristics 18 Quickly attenuating the sound 18 Changing the sound and display settings - Shuffle Play 10 Labeling a CD - Disc Memo 11 Locating a disc by name - Repeat Play 10 Playing tracks in a station through a list - Bank 12 * Functions available with optional CD/MD unit Radio Storing stations automatically - Best Tuning Memory (BTM 13 Receiving...
Operating Instructions
Page 4
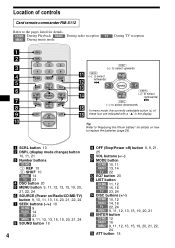
... DISC + SOURCE SEEK+ (SEEK) DISC - (+): to select rightwards/ (DISC) > (-): to select downwards In menu mode, the currently selectable button (s) of controls Card remote commander RM-X112 Refer to replace the batteries (page 26). Tip Refer to select leftwards/ . SEEK+ ENTER OFF + ATT VOL - (DISC) (+): to select upwards (SEEK) (-): to "Replacing the lithium battery" for details. Location of these four are indicated with a " v" in the display. CD/MD : During Playback RADIO : During radio reception MENU : During menu mode...
... DISC + SOURCE SEEK+ (SEEK) DISC - (+): to select rightwards/ (DISC) > (-): to select downwards In menu mode, the currently selectable button (s) of controls Card remote commander RM-X112 Refer to replace the batteries (page 26). Tip Refer to select leftwards/ . SEEK+ ENTER OFF + ATT VOL - (DISC) (+): to select upwards (SEEK) (-): to "Replacing the lithium battery" for details. Location of these four are indicated with a " v" in the display. CD/MD : During Playback RADIO : During radio reception MENU : During menu mode...
Operating Instructions
Page 5
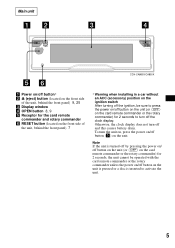
Otherwise, the clock display does not turn off button (1) on the unit. Main unit OPEN CDX-CA860X/CA850X a Power on/off button* b Z (eject) button (located on the front side of the unit, behind the front panel) 7 * Warning when installing in a car without an ACC (accessory) position on the ignition switch After turning off the ignition, be operated with the card remote commander or the rotary commander unless the power on/off button on the...
Otherwise, the clock display does not turn off button (1) on the unit. Main unit OPEN CDX-CA860X/CA850X a Power on/off button* b Z (eject) button (located on the front side of the unit, behind the front panel) 7 * Warning when installing in a car without an ACC (accessory) position on the ignition switch After turning off the ignition, be operated with the card remote commander or the rotary commander unless the power on/off button on the...
Operating Instructions
Page 6
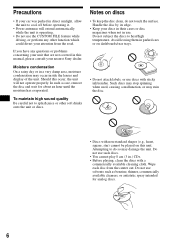
...; Power antennas will not operate properly. Do not subject the discs to splash juice or other function which could divert your discs in their cases or disc magazines when not in parked cars or on this occur, the unit will extend automatically while the unit is operating. • Do not use the CUSTOM FILE feature while driving, or perform any questions or problems concerning...
...; Power antennas will not operate properly. Do not subject the discs to splash juice or other function which could divert your discs in their cases or disc magazines when not in parked cars or on this occur, the unit will extend automatically while the unit is operating. • Do not use the CUSTOM FILE feature while driving, or perform any questions or problems concerning...
Operating Instructions
Page 8
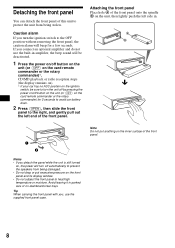
.... Tip When carrying the front panel with you connect an optional amplifier and do not use the supplied front panel case. A B 1 2 Notes • If you turn the ignition switch to the OFF position without removing the front panel, the caution alarm will be sure to turn off button on the unit (or (OFF) on the unit, then lightly push the left end of the...
.... Tip When carrying the front panel with you connect an optional amplifier and do not use the supplied front panel case. A B 1 2 Notes • If you turn the ignition switch to the OFF position without removing the front panel, the caution alarm will be sure to turn off button on the unit (or (OFF) on the unit, then lightly push the left end of the...
Operating Instructions
Page 9
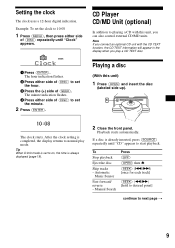
... on, the time is always displayed (page 19). 2 Close the front panel. Automatic Music Sensor Fast-forward/ reverse - Manual Search Press (OFF) (OPEN) then Z (SEEK) (./>) [once for each track] (SEEK) (m/M) [hold to desired point] continue to set to start playback. CD Player CD/MD Unit (optional) In addition to normal play a CD TEXT disc. 1 Press (ENTER). The hour indication flashes. 2 Press...
... on, the time is always displayed (page 19). 2 Close the front panel. Automatic Music Sensor Fast-forward/ reverse - Manual Search Press (OFF) (OPEN) then Z (SEEK) (./>) [once for each track] (SEEK) (m/M) [hold to desired point] continue to set to start playback. CD Player CD/MD Unit (optional) In addition to normal play a CD TEXT disc. 1 Press (ENTER). The hour indication flashes. 2 Press...

Operating Instructions
Page 10
... the disc. • With optional unit connected, playback of a CD TEXT disc. Repeat Play The disc in random order - to select "CD" or "MD." 2 Press (MODE) repeatedly until the desired unit appears. During playback, press (1) (REP) repeatedly until the desired setting appears in the display. During playback, press (2) (SHUF) repeatedly until the desired setting appears in the display. Disc Track Elapsed number number playing time Displayable items • Disc name...
... the disc. • With optional unit connected, playback of a CD TEXT disc. Repeat Play The disc in random order - to select "CD" or "MD." 2 Press (MODE) repeatedly until the desired unit appears. During playback, press (1) (REP) repeatedly until the desired setting appears in the display. During playback, press (2) (SHUF) repeatedly until the desired setting appears in the display. Disc Track Elapsed number number playing time Displayable items • Disc name...
Operating Instructions
Page 11
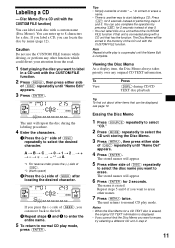
... is another way to erase, try selecting a different CD unit in the memory of (DISC) repeatedly to normal CD play mode, press (ENTER). t ... The unit returns to select the desired character. You can also complete the operation by name (page 12). Viewing the Disc Memo As a display item, the Disc Memo always takes priority over any other function which could divert your attention from...
... is another way to erase, try selecting a different CD unit in the memory of (DISC) repeatedly to normal CD play mode, press (ENTER). t ... The unit returns to select the desired character. You can also complete the operation by name (page 12). Viewing the Disc Memo As a display item, the Disc Memo always takes priority over any other function which could divert your attention from...
Operating Instructions
Page 12
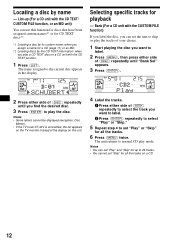
.... 2 Press (ENTER) repeatedly to select "Play" or "Skip." 5 Repeat step 4 to play mode. The unit returns to normal CD play the disc. List-up to the current disc appears in the display. Locating a disc by the CD TEXT information: when you find the desired disc. 3 Press (ENTER) to set "Play" or "Skip" for all the tracks on a CD unit with the CD TEXT function. 1 Press (LIST).
.... 2 Press (ENTER) repeatedly to select "Play" or "Skip." 5 Repeat step 4 to play mode. The unit returns to normal CD play the disc. List-up to the current disc appears in the display. Locating a disc by the CD TEXT information: when you find the desired disc. 3 Press (ENTER) to set "Play" or "Skip" for all the tracks on a CD unit with the CD TEXT function. 1 Press (LIST).
Operating Instructions
Page 14
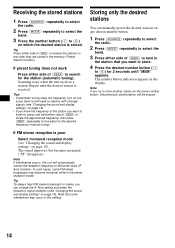
... desired stations You can change the IF Auto setting and widen the frequency signal reception (see "Changing the sound and display settings" on which the desired station is received. The number button indication appears in the memory (Preset Search function). Receiving the stored stations 1 Press (SOURCE) repeatedly to select the radio. 2 Press (MODE) repeatedly to select the band. 3 Press the number button ((1) to eliminate noise (IF Auto function). If preset tuning does not work Press either side of (DISC) to select the...
... desired stations You can change the IF Auto setting and widen the frequency signal reception (see "Changing the sound and display settings" on which the desired station is received. The number button indication appears in the memory (Preset Search function). Receiving the stored stations 1 Press (SOURCE) repeatedly to select the radio. 2 Press (MODE) repeatedly to select the band. 3 Press the number button ((1) to eliminate noise (IF Auto function). If preset tuning does not work Press either side of (DISC) to select the...
Operating Instructions
Page 17
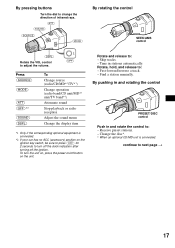
... t 17 By pressing buttons Turn the dial to change the direction of infrared rays. (ATT) (SOUND) (SOURCE) (MODE) By rotating the control SEEK/AMS control OFF (DSPL) Rotate the VOL control to adjust the volume. (OFF) Press (SOURCE) (MODE) (ATT) (OFF)*2 (SOUND) (DSPL) To Change source (radio/CD/MD*1/TV*1) Change operation (radio band/CD unit/MD*1 unit/TV band*1) Attenuate sound Stop playback or radio reception Adjust the sound menu Change the display item *1 Only if the corresponding optional equipment is connected.
... t 17 By pressing buttons Turn the dial to change the direction of infrared rays. (ATT) (SOUND) (SOURCE) (MODE) By rotating the control SEEK/AMS control OFF (DSPL) Rotate the VOL control to adjust the volume. (OFF) Press (SOURCE) (MODE) (ATT) (OFF)*2 (SOUND) (DSPL) To Change source (radio/CD/MD*1/TV*1) Change operation (radio band/CD unit/MD*1 unit/TV band*1) Attenuate sound Stop playback or radio reception Adjust the sound menu Change the display item *1 Only if the corresponding optional equipment is connected.
Operating Instructions
Page 18
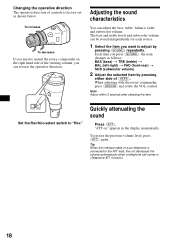
...Changing the operative direction The operative direction of controls is connected to mount the rotary commander on " appears in (Telephone ATT function). 18 The bass and treble levels and subwoofer volume can adjust the bass, treble, balance, fader, and subwoofer volume. Quickly attenuating the sound Press (ATT). Note Adjust within 3 seconds after selecting the item. Tip When the interface cable of a car telephone is factory-set as follows: BAS (bass) t TRE (treble) t BAL (left-right) t FAD (front-rear) t SUB (subwoofer volume) 2 Adjust the selected item by pressing (SOUND...
...Changing the operative direction The operative direction of controls is connected to mount the rotary commander on " appears in (Telephone ATT function). 18 The bass and treble levels and subwoofer volume can adjust the bass, treble, balance, fader, and subwoofer volume. Quickly attenuating the sound Press (ATT). Note Adjust within 3 seconds after selecting the item. Tip When the interface cable of a car telephone is factory-set as follows: BAS (bass) t TRE (treble) t BAL (left-right) t FAD (front-rear) t SUB (subwoofer volume) 2 Adjust the selected item by pressing (SOUND...
Operating Instructions
Page 19
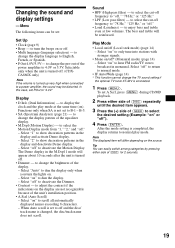
...." • LPF (Low pass filter) - to hear FM radio/TV stereo broadcast in the display and deactivate Demo display. - The bass and treble will differ depending on /off "). 4 Press (ENTER). Select "Auto" to dim the display only when you turn the beeps on " to display the clock and the play mode. After the mode setting is connected. 1 Press (MENU). Select "off * (Monaural mode) (page 14) - Sound • HPF (High pass filter) - Tip You...
...." • LPF (Low pass filter) - to hear FM radio/TV stereo broadcast in the display and deactivate Demo display. - The bass and treble will differ depending on /off "). 4 Press (ENTER). Select "Auto" to dim the display only when you turn the beeps on " to display the clock and the play mode. After the mode setting is connected. 1 Press (MENU). Select "off * (Monaural mode) (page 14) - Sound • HPF (High pass filter) - Tip You...
Operating Instructions
Page 20
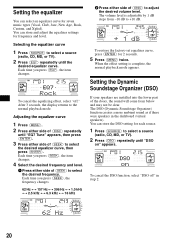
...), the item changes. Setting the Dynamic Soundstage Organizer (DSO) If your speakers are installed into the lower part of (SEEK) to +10 dB. Setting the equalizer You can select an equalizer curve for frequency and level. Adjusting the equalizer curve 1 Press (MENU). 2 Press either side of the doors, the sound will come from -10 dB to select the desired frequency. The volume level is complete, the normal playback mode appears...
...), the item changes. Setting the Dynamic Soundstage Organizer (DSO) If your speakers are installed into the lower part of (SEEK) to +10 dB. Setting the equalizer You can select an equalizer curve for frequency and level. Adjusting the equalizer curve 1 Press (MENU). 2 Press either side of the doors, the sound will come from -10 dB to select the desired frequency. The volume level is complete, the normal playback mode appears...
Operating Instructions
Page 26
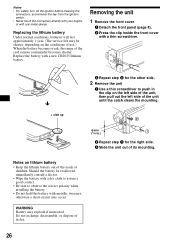
... battery with any metal device. Removing the unit 1 Remove the front cover 1 Detach the front panel (page 8). 2 Press the clip inside the front cover with a new CR2025 lithium battery. Do not recharge, disassemble, or dispose of the card remote commander becomes shorter. Notes • For safety, turn off the ignition before cleaning the connectors, and remove the key from the ignition switch...
... battery with any metal device. Removing the unit 1 Remove the front cover 1 Detach the front panel (page 8). 2 Press the clip inside the front cover with a new CR2025 lithium battery. Do not recharge, disassemble, or dispose of the card remote commander becomes shorter. Notes • For safety, turn off the ignition before cleaning the connectors, and remove the key from the ignition switch...
Operating Instructions
Page 27
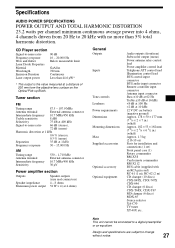
...; 4 (at 4 ohms) General Outputs Inputs Tone controls Loudness Power requirements Dimensions Mounting dimensions Mass Supplied accessories Optional accessory Optional equipment Audio outputs (front/rear) Subwoofer output (mono) Power antenna relay control lead Power amplifier control lead Telephone ATT control lead Illumination control lead BUS control input connector BUS audio input connector Remote controller input connector Antenna input connector Bass ±10 dB at 62 Hz Treble ±10 dB at 16 kHz +8 dB at 100 Hz +2 dB at 10 kHz 12 V DC car battery (negative ground) Approx. 178...
...; 4 (at 4 ohms) General Outputs Inputs Tone controls Loudness Power requirements Dimensions Mounting dimensions Mass Supplied accessories Optional accessory Optional equipment Audio outputs (front/rear) Subwoofer output (mono) Power antenna relay control lead Power amplifier control lead Telephone ATT control lead Illumination control lead BUS control input connector BUS audio input connector Remote controller input connector Antenna input connector Bass ±10 dB at 62 Hz Treble ±10 dB at 16 kHz +8 dB at 100 Hz +2 dB at 10 kHz 12 V DC car battery (negative ground) Approx. 178...
Operating Instructions
Page 28
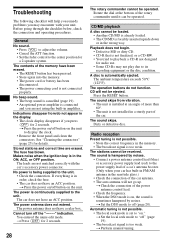
... Preset tuning is not possible. • Store the correct frequency in order, check the fuse. • The car does not have been erased. • The RESET button has been pressed. • Store again into the memory. • The power cord or battery has been disconnected. • The power connecting cord is sometimes hampered by noises. • Connect a power antenna control lead (blue) or accessory power supply lead (red) to the unit. A disc...
... Preset tuning is not possible. • Store the correct frequency in order, check the fuse. • The car does not have been erased. • The RESET button has been pressed. • Store again into the memory. • The power cord or battery has been disconnected. • The power connecting cord is sometimes hampered by noises. • Connect a power antenna control lead (blue) or accessory power supply lead (red) to the unit. A disc...


