
Limited Warranty (U.S. Only)
Page 1
... specific instructions on your authorized dealer, call: 1-800-488-SONY (7669) Repair / Replacement Warranty: This Limited Warranty shall apply to state. This Limited Warranty gives you specific legal rights and you may have stored or preserved on how to obtain warranty service for the time periods and as fuses or batteries). it will not be responsible for any repair, replacement part or replacement product...
... specific instructions on your authorized dealer, call: 1-800-488-SONY (7669) Repair / Replacement Warranty: This Limited Warranty shall apply to state. This Limited Warranty gives you specific legal rights and you may have stored or preserved on how to obtain warranty service for the time periods and as fuses or batteries). it will not be responsible for any repair, replacement part or replacement product...
Operating Instructions
Page 1
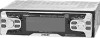
3-228-169-11 (1) FM/AM Compact Disc Player Operating Instructions US Mode d'emploi FR Manual de instrucciones ES Owner's Record The model and serial numbers are located on the bottom of the unit. Record these numbers whenever you call upon your Sony dealer regarding this product. For installation and connections, see the supplied installation/connections manual. CDX-CA760X/CA750X Serial No. CDX-CA760X CDX-CA750X © 2001 Sony Corporation Model No. Para obtener información sobre la...
3-228-169-11 (1) FM/AM Compact Disc Player Operating Instructions US Mode d'emploi FR Manual de instrucciones ES Owner's Record The model and serial numbers are located on the bottom of the unit. Record these numbers whenever you call upon your Sony dealer regarding this product. For installation and connections, see the supplied installation/connections manual. CDX-CA760X/CA750X Serial No. CDX-CA760X CDX-CA750X © 2001 Sony Corporation Model No. Para obtener información sobre la...
Operating Instructions
Page 2
... changers and players)*2. • CD TEXT information (displayed when a CD TEXT disc*3 is played). • Supplied controller accessory Card remote commander RM-X114 • Optional controller accessory Rotary commander RM-X4S *1 Some display indications do not appear in accordance with the instructions, may cause harmful interference to radio communications. Increase the separation between the equipment and receiver. - Welcome ! Thank you select. *2 This unit works with Sony...
... changers and players)*2. • CD TEXT information (displayed when a CD TEXT disc*3 is played). • Supplied controller accessory Card remote commander RM-X114 • Optional controller accessory Rotary commander RM-X4S *1 Some display indications do not appear in accordance with the instructions, may cause harmful interference to radio communications. Increase the separation between the equipment and receiver. - Welcome ! Thank you select. *2 This unit works with Sony...

Operating Instructions
Page 3
... Play 10 Playing tracks in a station through a list - List-up 12 Selecting specific tracks for playback - Bank 12 * Functions available with optional CD/MD unit Radio Storing stations automatically - Best Tuning Memory (BTM 13 Receiving the stored stations 14 Storing only the desired stations 14 Storing station names - Menu 18 Setting the equalizer 19 Setting the Dynamic Soundstage Organizer (DSO 20 Selecting the spectrum analyzer 20 Labeling a Motion Display 20 TV/Video...
... Play 10 Playing tracks in a station through a list - List-up 12 Selecting specific tracks for playback - Bank 12 * Functions available with optional CD/MD unit Radio Storing stations automatically - Best Tuning Memory (BTM 13 Receiving the stored stations 14 Storing only the desired stations 14 Storing station names - Menu 18 Setting the equalizer 19 Setting the Dynamic Soundstage Organizer (DSO 20 Selecting the spectrum analyzer 20 Labeling a Motion Display 20 TV/Video...
Operating Instructions
Page 4
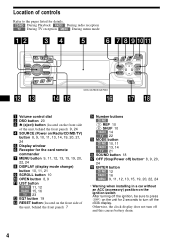
... MENU : During menu mode 12 3 REP DSO SOURCE EQ7 MODE SHUF 456 CDX-CA760X/CA750X DS DISPLAY SCROLL DISC/PRESET MENU SEEK SOUND OPEN LIST SEEK ENTER OFF a Volume control dial b DSO button 20 c Z (eject) button (located on the front side of the unit, behind the front panel) 7 n Number buttons CD/MD (3) REP 10 (6) SHUF 10 RADIO 14 TV 22 o MODE button CD/MD 10, 11 RADIO 13, 14 TV 21 p SOUND button 18 q OFF (Stop/Power off) button...
... MENU : During menu mode 12 3 REP DSO SOURCE EQ7 MODE SHUF 456 CDX-CA760X/CA750X DS DISPLAY SCROLL DISC/PRESET MENU SEEK SOUND OPEN LIST SEEK ENTER OFF a Volume control dial b DSO button 20 c Z (eject) button (located on the front side of the unit, behind the front panel) 7 n Number buttons CD/MD (3) REP 10 (6) SHUF 10 RADIO 14 TV 22 o MODE button CD/MD 10, 11 RADIO 13, 14 TV 21 p SOUND button 18 q OFF (Stop/Power off) button...

Operating Instructions
Page 5
..., 21, 24 DSPL MODE PRESET + MENU DISC + LIST SEEK- Card remote commander RM-X114 DS DISPLAY SCROLL DISC/PRESET MENU SEEK SOUND OPEN LIST SEEK ENTER OFF (DISC/PRESET) (+): to select upwards (SEEK) (-): to select leftwards/ . (SEEK) (+): to select rightwards/ > (DISC/PRESET) (-): to select downwards In menu mode, the currently selectable button (s) of the card remote commander control the same functions as those on this unit. a DSPL button b MENU button c SOURCE button d SEEK ( SEEK+ ENTER ATT The corresponding buttons of these four are...
..., 21, 24 DSPL MODE PRESET + MENU DISC + LIST SEEK- Card remote commander RM-X114 DS DISPLAY SCROLL DISC/PRESET MENU SEEK SOUND OPEN LIST SEEK ENTER OFF (DISC/PRESET) (+): to select upwards (SEEK) (-): to select leftwards/ . (SEEK) (+): to select rightwards/ > (DISC/PRESET) (-): to select downwards In menu mode, the currently selectable button (s) of the card remote commander control the same functions as those on this unit. a DSPL button b MENU button c SOURCE button d SEEK ( SEEK+ ENTER ATT The corresponding buttons of these four are...
Operating Instructions
Page 6
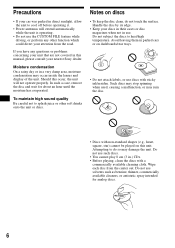
... car was parked in direct sunlight, allow the unit to cool off before operating it. • Power antennas will not operate properly. Attempting to heat/high temperature. Such discs may stop spinning when used, causing a malfunction, or may ruin the disc. • Discs with non-standard shapes (e.g., heart, square, star) cannot be played on dashboards/rear trays. • Do not attach labels, or use discs...
... car was parked in direct sunlight, allow the unit to cool off before operating it. • Power antennas will not operate properly. Attempting to heat/high temperature. Such discs may stop spinning when used, causing a malfunction, or may ruin the disc. • Discs with non-standard shapes (e.g., heart, square, star) cannot be played on dashboards/rear trays. • Do not attach labels, or use discs...
Operating Instructions
Page 9
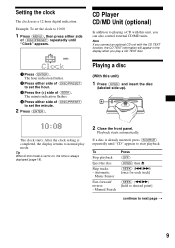
... D.Info mode is completed, the display returns to 10:08 1 Press (MENU), then press either side of (DISC/PRESET) repeatedly until "CD" appears to next page t 9 After the clock setting is set the clock to normal play a CD TEXT disc. 1 Press (ENTER). Note If you connect an optional CD unit with this unit) 1 Press (OPEN) and insert the disc (labeled side up). The clock starts. Manual Search...
... D.Info mode is completed, the display returns to 10:08 1 Press (MENU), then press either side of (DISC/PRESET) repeatedly until "CD" appears to next page t 9 After the clock setting is set the clock to normal play a CD TEXT disc. 1 Press (ENTER). Note If you connect an optional CD unit with this unit) 1 Press (OPEN) and insert the disc (labeled side up). The clock starts. Manual Search...

Operating Instructions
Page 10
... more optional CD/MD units are connected. Shuffle Play You can select: • Repeat 1 - Disc Track number number Elapsed playing time Displayable items • Disc name*1/artist name*2 • Track title*1 To Press Switch display item (DISPLAY) Scroll display item (SCROLL) *1 When pressing (DISPLAY), "NO D.Name" or "NO T.Name" indicates that there is changed, the disc/track name does not scroll. Tip When Auto scroll is set to "on," names...
... more optional CD/MD units are connected. Shuffle Play You can select: • Repeat 1 - Disc Track number number Elapsed playing time Displayable items • Disc name*1/artist name*2 • Track title*1 To Press Switch display item (DISPLAY) Scroll display item (SCROLL) *1 When pressing (DISPLAY), "NO D.Name" or "NO T.Name" indicates that there is changed, the disc/track name does not scroll. Tip When Auto scroll is set to "on," names...

Operating Instructions
Page 11
... correct or erase a name. • There is connected along with a custom name (Disc Memo). Repeat steps 5 and 6 if you want to normal CD play is erased. t + * t - Erasing the Disc Memo 1 Press (SOURCE) repeatedly to select "CD." 2 Press (MODE) repeatedly to select the CD unit storing the Disc Memo. 3 Press (MENU), then press either side of (DISC/PRESET) repeatedly to erase. A t B t C ... Labeling a CD - t ... You...
... correct or erase a name. • There is connected along with a custom name (Disc Memo). Repeat steps 5 and 6 if you want to normal CD play is erased. t + * t - Erasing the Disc Memo 1 Press (SOURCE) repeatedly to select "CD." 2 Press (MODE) repeatedly to select the CD unit storing the Disc Memo. 3 Press (MENU), then press either side of (DISC/PRESET) repeatedly to erase. A t B t C ... Labeling a CD - t ... You...
Operating Instructions
Page 12
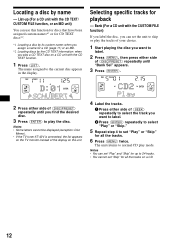
... disc. Locating a disc by the CD TEXT information: when you play a CD TEXT disc on a CD unit with the CD TEXT function. 1 Press (LIST). Selecting specific tracks for a CD (page 11) or an MD. *2 Locating discs by name - Notes • You can set the unit to skip or play mode. Notes • Some letters cannot be displayed (exception: Disc Memo). • If the TV tuner XT-40V is connected...
... disc. Locating a disc by the CD TEXT information: when you play a CD TEXT disc on a CD unit with the CD TEXT function. 1 Press (LIST). Selecting specific tracks for a CD (page 11) or an MD. *2 Locating discs by name - Notes • You can set the unit to skip or play mode. Notes • Some letters cannot be displayed (exception: Disc Memo). • If the TV tuner XT-40V is connected...
Operating Instructions
Page 13
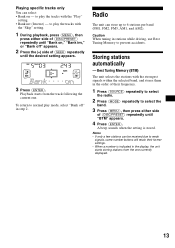
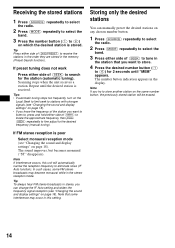
... (ENTER). Radio The unit can be received due to select the band. 3 Press (MENU), then press either side of their frequency. 1 Press (SOURCE) repeatedly to select the radio. 2 Press (MODE) repeatedly to weak signals, some number buttons will retain their former settings. • When a number is stored. to play the tracks with the "Play" setting. • Bank inv (Inverse) - Caution When tuning in stations while driving, use Best Tuning Memory to play the tracks...
... (ENTER). Radio The unit can be received due to select the band. 3 Press (MENU), then press either side of their frequency. 1 Press (SOURCE) repeatedly to select the radio. 2 Press (MODE) repeatedly to weak signals, some number buttons will retain their former settings. • When a number is stored. to play the tracks with the "Play" setting. • Bank inv (Inverse) - Caution When tuning in stations while driving, use Best Tuning Memory to play the tracks...
Operating Instructions
Page 14
... frequency (manual tuning). If preset tuning does not work Press either side of (SEEK) to tune in the station that some FM stereo broadcasts may occur in the stereo reception mode. Tips • If automatic tuning stops too frequently, turn on the Local Seek to limit seek to stations with stronger signals (see "Changing the sound and display settings" on any chosen number button. 1 Press (SOURCE) repeatedly to select the radio. 2 Press (MODE) repeatedly to select...
... frequency (manual tuning). If preset tuning does not work Press either side of (SEEK) to tune in the station that some FM stereo broadcasts may occur in the stereo reception mode. Tips • If automatic tuning stops too frequently, turn on the Local Seek to limit seek to stations with stronger signals (see "Changing the sound and display settings" on any chosen number button. 1 Press (SOURCE) repeatedly to select the radio. 2 Press (MODE) repeatedly to select...

Operating Instructions
Page 16
... on the unit. The rotary commander works by pressing buttons and/or rotating controls. 2 Press either side of the display on how you find the desired station. The frequency or the name assigned to adjust the volume. (OFF) Press (SOURCE) (MODE) (ATT) (OFF)*2 (SOUND) (DSPL) To Change source (radio/CD/MD*1/TV*1) Change operation (radio band/CD unit/MD*1 unit/TV band*1) Attenuate sound Stop playback or radio reception Adjust the sound menu Change the display item 16...
... on the unit. The rotary commander works by pressing buttons and/or rotating controls. 2 Press either side of the display on how you find the desired station. The frequency or the name assigned to adjust the volume. (OFF) Press (SOURCE) (MODE) (ATT) (OFF)*2 (SOUND) (DSPL) To Change source (radio/CD/MD*1/TV*1) Change operation (radio band/CD unit/MD*1 unit/TV band*1) Attenuate sound Stop playback or radio reception Adjust the sound menu Change the display item 16...
Operating Instructions
Page 17
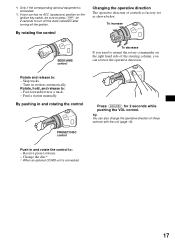
... unit is factory-set as shown below. Tip You can reverse the operative direction. Tune in and rotating the control PRESET/DISC control Press (SOUND) for 2 seconds to turn off the clock indication after turning off the ignition. By rotating the control Changing the operative direction The operative direction of these controls with the unit (page 18). Push in and rotate the control to : - *1 Only if the corresponding optional equipment is connected. *2 If your car...
... unit is factory-set as shown below. Tip You can reverse the operative direction. Tune in and rotating the control PRESET/DISC control Press (SOUND) for 2 seconds to turn off the clock indication after turning off the ignition. By rotating the control Changing the operative direction The operative direction of these controls with the unit (page 18). Push in and rotate the control to : - *1 Only if the corresponding optional equipment is connected. *2 If your car...
Operating Instructions
Page 18
... when connected to a power amplifier, the sound may be set position. - B-5. • SA (Spectrum Analyzer) (page 20) - Select "2" to show decoration patterns in the display and activate Demo display. - The Demo display in the display and deactivate Demo display. - Select "Auto" to dim the display only when you turn the beeps on ). The bass and treble levels and subwoofer volume can adjust the bass, treble, balance, fader, and subwoofer volume. Changing the sound and display settings - to display the clock and the play mode at the same time (on...
... when connected to a power amplifier, the sound may be set position. - B-5. • SA (Spectrum Analyzer) (page 20) - Select "2" to show decoration patterns in the display and activate Demo display. - The Demo display in the display and deactivate Demo display. - Select "Auto" to dim the display only when you turn the beeps on ). The bass and treble levels and subwoofer volume can adjust the bass, treble, balance, fader, and subwoofer volume. Changing the sound and display settings - to display the clock and the play mode at the same time (on...
Operating Instructions
Page 19
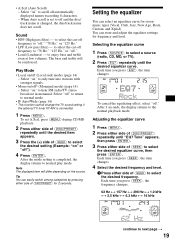
... either side of (DISC/PRESET) for seven music types (Vocal, Club, Jazz, New Age, Rock, Custom, and Xplod). After the mode setting is connected. 1 Press (MENU). Note The displayed item will be reinforced. Setting the equalizer You can store and adjust the equalizer settings for frequency and level. You can select an equalizer curve for 2 seconds. Select "on /off (Local seek mode) (page 14) - The bass and treble will differ depending on...
... either side of (DISC/PRESET) for seven music types (Vocal, Club, Jazz, New Age, Rock, Custom, and Xplod). After the mode setting is connected. 1 Press (MENU). Note The displayed item will be reinforced. Setting the equalizer You can store and adjust the equalizer settings for frequency and level. You can select an equalizer curve for 2 seconds. Select "on /off (Local seek mode) (page 14) - The bass and treble will differ depending on...
Operating Instructions
Page 20
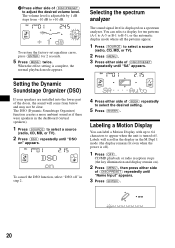
.... To restore the factory-set equalizer curve, press (ENTER) for ten patterns (A-1 to A-5 or B-1 to B-5), or the automatic display mode where all the patterns appear. 1 Press (SOURCE) to select a source (radio, CD, MD, or TV). 2 Press (MENU). 3 Press either side of (DISC/PRESET) to appear when the unit is turned off " in the M.Dspl 1 mode (the display remains lit even when the power is adjustable by 1 dB steps...
.... To restore the factory-set equalizer curve, press (ENTER) for ten patterns (A-1 to A-5 or B-1 to B-5), or the automatic display mode where all the patterns appear. 1 Press (SOURCE) to select a source (radio, CD, MD, or TV). 2 Press (MENU). 3 Press either side of (DISC/PRESET) to appear when the unit is turned off " in the M.Dspl 1 mode (the display remains lit even when the power is adjustable by 1 dB steps...
Operating Instructions
Page 27
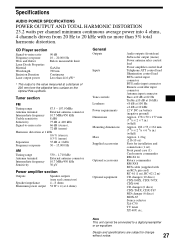
.../rear) Subwoofer output (mono) Power antenna relay control lead Power amplifier control lead Telephone ATT control lead Illumination control lead BUS control input connector BUS audio input connector Remote controller input connector Antenna input connector Bass ±10 dB at 62 Hz Treble ±10 dB at 16 kHz +8 dB at 100 Hz +2 dB at 400 kHz Signal-to 20 kHz with an RCA pin cord) RC-61 (1 m), RC-62 (2 m) CD changer (10 discs) CDX-848X, CDX-747X CDX-646 CD changer (6 discs) CDX-T68X, CDX-T67 MD changer (6 discs) MDX-65 Source...
.../rear) Subwoofer output (mono) Power antenna relay control lead Power amplifier control lead Telephone ATT control lead Illumination control lead BUS control input connector BUS audio input connector Remote controller input connector Antenna input connector Bass ±10 dB at 62 Hz Treble ±10 dB at 16 kHz +8 dB at 100 Hz +2 dB at 400 kHz Signal-to 20 kHz with an RCA pin cord) RC-61 (1 m), RC-62 (2 m) CD changer (10 discs) CDX-848X, CDX-747X CDX-646 CD changer (6 discs) CDX-T68X, CDX-T67 MD changer (6 discs) MDX-65 Source...
Operating Instructions
Page 28
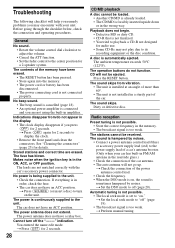
... optional power amplifier is hampered by noises. A disc is not connected properly. The sound skips from /do not function. The sound is connected and you are erased. t Set the local seek mode to display the clock. • Remove the front panel and clean the connectors. Troubleshooting The following checklist will help you remedy problems you may not play due to "on the unit. t Press (OFF) again for a 2-speaker system. The power is...
... optional power amplifier is hampered by noises. A disc is not connected properly. The sound skips from /do not function. The sound is connected and you are erased. t Set the local seek mode to display the clock. • Remove the front panel and clean the connectors. Troubleshooting The following checklist will help you remedy problems you may not play due to "on the unit. t Press (OFF) again for a 2-speaker system. The power is...


