
Limited Warranty (U.S. Only)
Page 1
...specifications. Instructions: To obtain warranty service, you . A dated purchase receipt is valid only in material or workmanship during service and Sony will do not allow the exclusion or limitation of protection to the End User License Agreements included with the Product for the time periods and as fuses or batteries... ("Parts Warranty"), Sony will , at its option, (i) repair the product using new or refurbished parts or (ii) replace the product with respect to be responsible for any repair, replacement part or replacement product for the remainder of Sony. If Sony elects...
...specifications. Instructions: To obtain warranty service, you . A dated purchase receipt is valid only in material or workmanship during service and Sony will do not allow the exclusion or limitation of protection to the End User License Agreements included with the Product for the time periods and as fuses or batteries... ("Parts Warranty"), Sony will , at its option, (i) repair the product using new or refurbished parts or (ii) replace the product with respect to be responsible for any repair, replacement part or replacement product for the remainder of Sony. If Sony elects...
Installation/Connection Instructions
Page 2
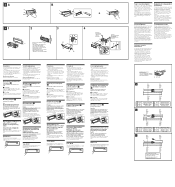
...Schraube wieder anbringen, arretieren Sie zuerst den Hebel B. When you have any questions and problems connecting your car's auxiliary power connector diagram to turn off the engine. Précautions • Choisissez soigneusement l'emplacement de l'installation afin que l'appareil ne gê.... B A Warnhinweis zur Installation des Geräts in the car stereo's power connecting cord. If you press (OFF) only momentarily, the clock display does not turn off the clock display after turning off and this manual, please consult the car dealer. Appuyez sur (OPEN...
...Schraube wieder anbringen, arretieren Sie zuerst den Hebel B. When you have any questions and problems connecting your car's auxiliary power connector diagram to turn off the engine. Précautions • Choisissez soigneusement l'emplacement de l'installation afin que l'appareil ne gê.... B A Warnhinweis zur Installation des Geräts in the car stereo's power connecting cord. If you press (OFF) only momentarily, the clock display does not turn off the clock display after turning off and this manual, please consult the car dealer. Appuyez sur (OPEN...
Operating Instructions (primary manual)
Page 1
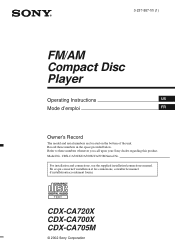
... supplied installation/connections manual. Refer to these numbers in the space provided below. CDX-CA720X/CA700X/CA705M Serial No. Record these numbers whenever you call upon your Sony dealer regarding this product. CDX-CA720X CDX-CA700X CDX-CA705M © 2002 Sony Corporation En ce qui concerne l'installation et les connexions, consulter le manuel d'installation/raccordement fourni. 3-237-887-11 (1) FM/AM Compact Disc Player Operating Instructions US Mode d'emploi FR Owner's Record The model...
... supplied installation/connections manual. Refer to these numbers in the space provided below. CDX-CA720X/CA700X/CA705M Serial No. Record these numbers whenever you call upon your Sony dealer regarding this product. CDX-CA720X CDX-CA700X CDX-CA705M © 2002 Sony Corporation En ce qui concerne l'installation et les connexions, consulter le manuel d'installation/raccordement fourni. 3-237-887-11 (1) FM/AM Compact Disc Player Operating Instructions US Mode d'emploi FR Owner's Record The model...
Operating Instructions (primary manual)
Page 2
... the receiving antenna. - Consult the dealer or an experienced radio/TV technician for purchasing this Sony Compact Disc Player. However, there is an audio CD that any changes or modifications not expressly approved in a particular installation. If this equipment does cause harmful interference to radio or television reception, which the receiver is recorded on XM tuner operation, please refer to the XM tuner module's included instruction manual...
... the receiving antenna. - Consult the dealer or an experienced radio/TV technician for purchasing this Sony Compact Disc Player. However, there is an audio CD that any changes or modifications not expressly approved in a particular installation. If this equipment does cause harmful interference to radio or television reception, which the receiver is recorded on XM tuner operation, please refer to the XM tuner module's included instruction manual...
Operating Instructions (primary manual)
Page 3
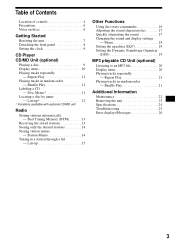
... Playing tracks repeatedly - List-up 12 * Functions available with optional CD/MD unit Radio Storing stations automatically - Disc Memo 11 Locating a disc by name - Shuffle Play 21 Additional Information Maintenance 22 Removing the unit 23 Specifications 24 Troubleshooting 25 Error displays/Messages 26 3 Station Memo 14 Tuning in random order - Repeat Play 11 Playing tracks in a station through a list - Repeat Play 21 Playing tracks in random order - Best Tuning Memory (BTM 13 Receiving the stored stations...
... Playing tracks repeatedly - List-up 12 * Functions available with optional CD/MD unit Radio Storing stations automatically - Disc Memo 11 Locating a disc by name - Shuffle Play 21 Additional Information Maintenance 22 Removing the unit 23 Specifications 24 Troubleshooting 25 Error displays/Messages 26 3 Station Memo 14 Tuning in random order - Repeat Play 11 Playing tracks in a station through a list - Repeat Play 21 Playing tracks in random order - Best Tuning Memory (BTM 13 Receiving the stored stations...
Operating Instructions (primary manual)
Page 4
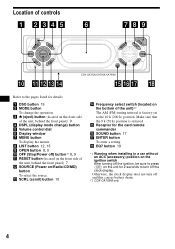
... clock display. Make sure that the 9 k (50 k) position is factory-set to the 10 k (200 k) position. c Z (eject) button (located on the unit for 2 seconds to turn off ) button*1 8, 9 k RESET button (located on the front side of the unit)*2 The AM (FM) tuning interval is selected. h LIST button 12, 15 i OPEN button 8, 9 j OFF (Stop/Power off and this causes battery drain. *2 CDX-CA705M only 4 m SCRL (scroll) button 10 n Frequency select switch (located on /Radio/CD/MD) button To select the source. Otherwise, the clock display...
... clock display. Make sure that the 9 k (50 k) position is factory-set to the 10 k (200 k) position. c Z (eject) button (located on the unit for 2 seconds to turn off ) button*1 8, 9 k RESET button (located on the front side of the unit)*2 The AM (FM) tuning interval is selected. h LIST button 12, 15 i OPEN button 8, 9 j OFF (Stop/Power off and this causes battery drain. *2 CDX-CA705M only 4 m SCRL (scroll) button 10 n Frequency select switch (located on /Radio/CD/MD) button To select the source. Otherwise, the clock display...
Operating Instructions (primary manual)
Page 5
... d MENU button e SOURCE button f SEEK ( s DISC/PRESET buttons (+/-) To receive preset stations, change the disc* and select a menu. * When an optional CD/MD unit is connected. a DSPL button b Number buttons (1) REP (2) SHUF To store stations, receive stored stations. SEEK+ ENTER OFF ATT VOL The corresponding buttons of these four are indicated with a " M" in stations automatically, find a station manually, and select a setting. D T ET DI ISC/PRES SEEK SC/PRESE (SEEK) (+): to select rightwards/ > (DISC/PRESET) (-): to select leftwards/ . DSPL REP 1 4 DSO SHUF 2 5 MODE...
... d MENU button e SOURCE button f SEEK ( s DISC/PRESET buttons (+/-) To receive preset stations, change the disc* and select a menu. * When an optional CD/MD unit is connected. a DSPL button b Number buttons (1) REP (2) SHUF To store stations, receive stored stations. SEEK+ ENTER OFF ATT VOL The corresponding buttons of these four are indicated with a " M" in stations automatically, find a station manually, and select a setting. D T ET DI ISC/PRES SEEK SC/PRESE (SEEK) (+): to select rightwards/ > (DISC/PRESET) (-): to select leftwards/ . DSPL REP 1 4 DSO SHUF 2 5 MODE...
Operating Instructions (primary manual)
Page 6
...) cannot be played on dashboards/rear trays. • Do not attach labels, or use such discs. • You cannot play 8 cm CDs. 6 Attempting to do not touch the surface. Inability to read audio data correctly (e.g., playback skipping, or no playback) due to heat shrinking of the unit. Precautions • If your car has been parked in direct sunlight, allow...
...) cannot be played on dashboards/rear trays. • Do not attach labels, or use such discs. • You cannot play 8 cm CDs. 6 Attempting to do not touch the surface. Inability to read audio data correctly (e.g., playback skipping, or no playback) due to heat shrinking of the unit. Precautions • If your car has been parked in direct sunlight, allow...
Operating Instructions (primary manual)
Page 9
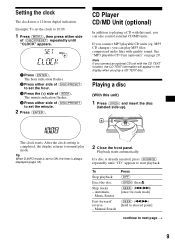
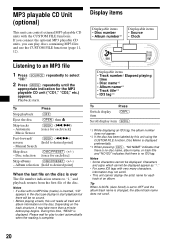
..." appears to normal play mode. MP3 CD changer), you play MP3 files; Playback starts automatically. The clock starts. To Stop playback Eject the disc Skip tracks - CD Player CD/MD Unit (optional) In addition to set to next page t 9 Setting the clock The clock uses a 12-hour digital indication. Automatic Music Sensor Fast-forward/ reverse - Note If you connect an optional CD unit with quality sound. Manual Search Press...
..." appears to normal play mode. MP3 CD changer), you play MP3 files; Playback starts automatically. The clock starts. To Stop playback Eject the disc Skip tracks - CD Player CD/MD Unit (optional) In addition to set to next page t 9 Setting the clock The clock uses a 12-hour digital indication. Automatic Music Sensor Fast-forward/ reverse - Note If you connect an optional CD unit with quality sound. Manual Search Press...
Operating Instructions (primary manual)
Page 10
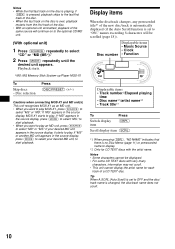
... until the desired unit appears. If "MS" or another MD unit appears in the source display, press (MODE) to select your desired MD unit appears in the source display, it starts to play MGS-X1, press (SOURCE) to play . Disc number Displayable items • Music Source • Clock • Function Displayable items • Track number/ Elapsed playing time • Disc name*1/artist name*2 • Track title*1 To Press Switch display item (DSPL) Scroll display item (SCRL) *1 When...
... until the desired unit appears. If "MS" or another MD unit appears in the source display, press (MODE) to select your desired MD unit appears in the source display, it starts to play MGS-X1, press (SOURCE) to play . Disc number Displayable items • Music Source • Clock • Function Displayable items • Track number/ Elapsed playing time • Disc name*1/artist name*2 • Track title*1 To Press Switch display item (DSPL) Scroll display item (SCRL) *1 When...
Operating Instructions (primary manual)
Page 11
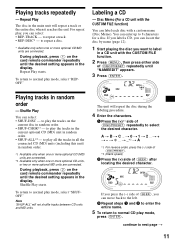
... CD/MD units are connected. to 8 characters for a disc. t + * t - You can locate the disc by name (page 12). 1 Start playing the disc you want to normal play the tracks in the current optional CD (MD) unit in a CD unit with the CUSTOM FILE function. 2 Press (MENU), then press either side of (SEEK), you can enter up to play mode, select "REPOFF." Shuffle Play You can select: •...
... CD/MD units are connected. to 8 characters for a disc. t + * t - You can locate the disc by name (page 12). 1 Start playing the disc you want to normal play the tracks in the current optional CD (MD) unit in a CD unit with the CUSTOM FILE function. 2 Press (MENU), then press either side of (SEEK), you can enter up to play mode, select "REPOFF." Shuffle Play You can select: •...
Operating Instructions (primary manual)
Page 13
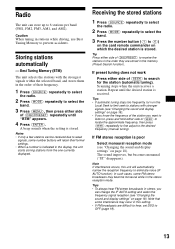
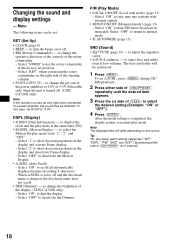
... poor Select monaural reception mode (see "Changing the sound and display settings" on the Local Seek to limit seek to (6)) on the card remote commander on page 18). Note If interference occurs, this setting. • If FM broadcasts are stored in stations while driving, use Best Tuning Memory to OFF (page 19). 13 Scanning stops when the unit receives a station. Receiving the stored stations 1 Press (SOURCE) repeatedly to select the radio. 2 Press (MODE...
... poor Select monaural reception mode (see "Changing the sound and display settings" on the Local Seek to limit seek to (6)) on the card remote commander on page 18). Note If interference occurs, this setting. • If FM broadcasts are stored in stations while driving, use Best Tuning Memory to OFF (page 19). 13 Scanning stops when the unit receives a station. Receiving the stored stations 1 Press (SOURCE) repeatedly to select the radio. 2 Press (MODE...
Operating Instructions (primary manual)
Page 16
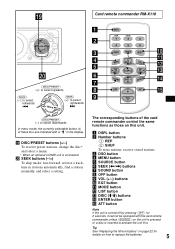
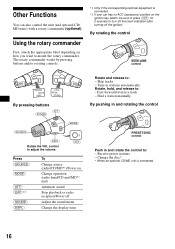
... Change operation (radio band/CD unit/MD*1 unit) Attenuate sound Stop playback or radio reception/Power off Adjust the sound menu Change the display item Rotate and release to turn off the clock indication after turning off the ignition. Rotate, hold, and release to mount the rotary commander. Receive preset stations. - By rotating the control SEEK/AMS control SOUND MODE DSPL DSPL MODE SOUND By pressing buttons (ATT) (SOUND) (MODE) (SOURCE) OFF (DSPL) Rotate the VOL control to adjust the volume. (OFF) Press (SOURCE) (MODE) (ATT) (OFF)*2 (SOUND...
... Change operation (radio band/CD unit/MD*1 unit) Attenuate sound Stop playback or radio reception/Power off Adjust the sound menu Change the display item Rotate and release to turn off the clock indication after turning off the ignition. Rotate, hold, and release to mount the rotary commander. Receive preset stations. - By rotating the control SEEK/AMS control SOUND MODE DSPL DSPL MODE SOUND By pressing buttons (ATT) (SOUND) (MODE) (SOURCE) OFF (DSPL) Rotate the VOL control to adjust the volume. (OFF) Press (SOURCE) (MODE) (ATT) (OFF)*2 (SOUND...
Operating Instructions (primary manual)
Page 18
... change the operative direction of the controls of the power amplifier to adjust the equalizer curve. • LOUD (Loudness) - to normal mode. • IF AUTO/WIDE (page 13) SND (Sound) • EQ7 TUNE (page 19) - Select "OFF" to return to change the pre-out of the rotary commander. - Tip You can be reinforced. 1 Press (MENU). Selectable only when the unit is turned off. (CDXCA720X only) Note If the volume...
... change the operative direction of the controls of the power amplifier to adjust the equalizer curve. • LOUD (Loudness) - to normal mode. • IF AUTO/WIDE (page 13) SND (Sound) • EQ7 TUNE (page 19) - Select "OFF" to return to change the pre-out of the rotary commander. - Tip You can be reinforced. 1 Press (MENU). Selectable only when the unit is turned off. (CDXCA720X only) Note If the volume...
Operating Instructions (primary manual)
Page 19
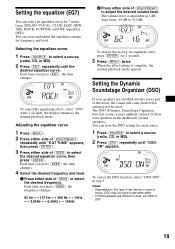
... from -10 dB to +10 dB. Selecting the equalizer curve 1 Press (SOURCE) to adjust the desired volume level. Setting the Dynamic Soundstage Organizer (DSO) If your speakers are installed into the lower part of music, DSO may not be clear. Adjusting the equalizer curve 1 Press (MENU). 2 Press either side of (DISC/PRESET) to select a source (radio, CD, or MD). 2 Press (EQ7) repeatedly until "EQ7 TUNE" appears, then press (ENTER). 3 Press...
... from -10 dB to +10 dB. Selecting the equalizer curve 1 Press (SOURCE) to adjust the desired volume level. Setting the Dynamic Soundstage Organizer (DSO) If your speakers are installed into the lower part of music, DSO may not be clear. Adjusting the equalizer curve 1 Press (MENU). 2 Press either side of (DISC/PRESET) to select a source (radio, CD, or MD). 2 Press (EQ7) repeatedly until "EQ7 TUNE" appears, then press (ENTER). 3 Press...
Operating Instructions (primary manual)
Page 20
... by this time, "READ" is changed, the album/track name does not scroll. 20 Disc selection [once for play discs containing MP3 files and use the CUSTOM FILE functions (page 11, 12). Tip When A.SCRL (Auto Scroll) is set to start playback but there will be displayed. If you connect the optional MP3 playable CD units, you can control external MP3 playable CD units with...
... by this time, "READ" is changed, the album/track name does not scroll. 20 Disc selection [once for play discs containing MP3 files and use the CUSTOM FILE functions (page 11, 12). Tip When A.SCRL (Auto Scroll) is set to start playback but there will be displayed. If you connect the optional MP3 playable CD units, you can control external MP3 playable CD units with...
Operating Instructions (primary manual)
Page 24
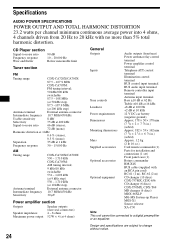
... remote commander (1) Parts for installation and connections (1 set) Front panel case (1) Rotary commander RM-X4S BUS cable (supplied with no more than 5% total harmonic distortion. Specifications AUDIO POWER SPECIFICATIONS POWER OUTPUT AND TOTAL HARMONIC DISTORTION 23.2 watts per channel minimum continuous average power into 4 ohms, 4 channels driven from 20 Hz to 20 kHz with an RCA pin cord) RC-61 (1 m), RC-62 (2 m) CD changer (10 discs) CDX-757MX, CDX-656 CD changer (6 discs) CDX-T70MX, CDX-T69...
... remote commander (1) Parts for installation and connections (1 set) Front panel case (1) Rotary commander RM-X4S BUS cable (supplied with no more than 5% total harmonic distortion. Specifications AUDIO POWER SPECIFICATIONS POWER OUTPUT AND TOTAL HARMONIC DISTORTION 23.2 watts per channel minimum continuous average power into 4 ohms, 4 channels driven from 20 Hz to 20 kHz with an RCA pin cord) RC-61 (1 m), RC-62 (2 m) CD changer (10 discs) CDX-757MX, CDX-656 CD changer (6 discs) CDX-T70MX, CDX-T69...
Operating Instructions (primary manual)
Page 25
... have an ACC position. The operation buttons do not appear in a sturdy part of the car antenna. • The auto antenna will not go up. Press the RESET button. The sound is being supplied to display the clock. • Remove the front panel and clean the connectors. t Check the connection of the power antenna control lead. • Check the frequency. • When the DSO mode is set to "OFF" (page 19). t Press...
... have an ACC position. The operation buttons do not appear in a sturdy part of the car antenna. • The auto antenna will not go up. Press the RESET button. The sound is being supplied to display the clock. • Remove the front panel and clean the connectors. t Check the connection of the power antenna control lead. • Check the frequency. • When the DSO mode is set to "OFF" (page 19). t Press...
Product Guide / Specifications
Page 1
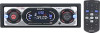
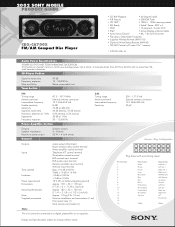
... ATT Illumination Battery Note This unit cannot be connected to 20 kHz with wires facing viewer. 2002 SONY MOBILE PRODUCT GUIDE CDX-CA700X FM/AM Compact Disc Player • CD-RW Playback • 60 Degree Install • F/R Preouts • SSIR-EXA Tuner • CD TEXT® • 18FM + 12AM memory presets • XM Ready • Xplod® Power: 52W x 4 • DSO- • 13-segment, 3-color LCD • EQ7 • Active Display w/Demo Mode • Active Servo Control...
... ATT Illumination Battery Note This unit cannot be connected to 20 kHz with wires facing viewer. 2002 SONY MOBILE PRODUCT GUIDE CDX-CA700X FM/AM Compact Disc Player • CD-RW Playback • 60 Degree Install • F/R Preouts • SSIR-EXA Tuner • CD TEXT® • 18FM + 12AM memory presets • XM Ready • Xplod® Power: 52W x 4 • DSO- • 13-segment, 3-color LCD • EQ7 • Active Display w/Demo Mode • Active Servo Control...
Product Guide / Specifications
Page 2
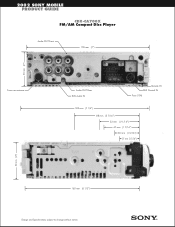
2002 SONY MOBILE PRODUCT GUIDE CDX-CA700X FM/AM Compact Disc Player Audio OUT Front 178 mm (7”) 50 mm (2”) From car antenna Audio OUT Rear BUS Audio IN Remote IN BUS Control IN Fuse (10A) 182 mm (7 1/4”) 88 mm (3 7/16”) 53 mm ( 2 1/16”) 47 mm (1 7/16”) 33 mm (1 5/16”) 27 mm (1 1/16”) 50 mm (2”) 162 mm (6 1/2”) Design and Specifications subject to change without notice.
2002 SONY MOBILE PRODUCT GUIDE CDX-CA700X FM/AM Compact Disc Player Audio OUT Front 178 mm (7”) 50 mm (2”) From car antenna Audio OUT Rear BUS Audio IN Remote IN BUS Control IN Fuse (10A) 182 mm (7 1/4”) 88 mm (3 7/16”) 53 mm ( 2 1/16”) 47 mm (1 7/16”) 33 mm (1 5/16”) 27 mm (1 1/16”) 50 mm (2”) 162 mm (6 1/2”) Design and Specifications subject to change without notice.


