
Limited Warranty (U.S. Only)
Page 1
... consumables (such as set forth below is provided "AS IS" unless expressly provided for in material or workmanship for the time periods and as fuses or batteries). Printed in the United States. Only) Sony Electronics Inc. ("Sony") warrants this Limited Warranty, Sony will , at its option, repair or replace with a new or refurbished product. Labor: For a period of Sony. Parts: For a period...
... consumables (such as set forth below is provided "AS IS" unless expressly provided for in material or workmanship for the time periods and as fuses or batteries). Printed in the United States. Only) Sony Electronics Inc. ("Sony") warrants this Limited Warranty, Sony will , at its option, repair or replace with a new or refurbished product. Labor: For a period of Sony. Parts: For a period...
Operating Instructions
Page 1
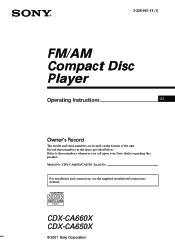
CDX-CA660X/CA650X Serial No. For installation and connections, see the supplied installation/connections manual. Model No. Refer to these numbers in the space provided below. CDX-CA660X CDX-CA650X © 2001 Sony Corporation 3-226-961-11 (1) FM/AM Compact Disc Player Operating Instructions US Owner's Record The model and serial numbers are located on the bottom of the unit. Record these numbers whenever you call upon your Sony dealer regarding this product.
CDX-CA660X/CA650X Serial No. For installation and connections, see the supplied installation/connections manual. Model No. Refer to these numbers in the space provided below. CDX-CA660X CDX-CA650X © 2001 Sony Corporation 3-226-961-11 (1) FM/AM Compact Disc Player Operating Instructions US Owner's Record The model and serial numbers are located on the bottom of the unit. Record these numbers whenever you call upon your Sony dealer regarding this product.
Operating Instructions
Page 2
... not installed and used in this manual could void your authority to operate this product will not occur in a residential installation. This information is recorded on a connected optional CD unit with the CD TEXT function). •Supplied controller accessory Card remote commander RM-X114 •Optional controller accessory Rotary commander RM-X4S *1 This unit works with Sony products only. *2 A CD TEXT disc is an audio CD...
... not installed and used in this manual could void your authority to operate this product will not occur in a residential installation. This information is recorded on a connected optional CD unit with the CD TEXT function). •Supplied controller accessory Card remote commander RM-X114 •Optional controller accessory Rotary commander RM-X4S *1 This unit works with Sony products only. *2 A CD TEXT disc is an audio CD...
Operating Instructions
Page 3
... discs 6 Getting Started Resetting the unit 7 Detaching the front panel 8 Setting the clock 9 CD Player CD/MD Unit (optional) Playing a disc 9 Display items 10 Playing tracks repeatedly - Station Memo 22 Locating a TV station by name - Best Tuning Memory (BTM 13 Receiving the stored stations 14 Storing only the desired stations 14 Storing station names - List-up 22 Watching the TV or video while listening to a CD or MD - Menu 18 Selecting the sound position - Shuffle Play...
... discs 6 Getting Started Resetting the unit 7 Detaching the front panel 8 Setting the clock 9 CD Player CD/MD Unit (optional) Playing a disc 9 Display items 10 Playing tracks repeatedly - Station Memo 22 Locating a TV station by name - Best Tuning Memory (BTM 13 Receiving the stored stations 14 Storing only the desired stations 14 Storing station names - List-up 22 Watching the TV or video while listening to a CD or MD - Menu 18 Selecting the sound position - Shuffle Play...
Operating Instructions
Page 4
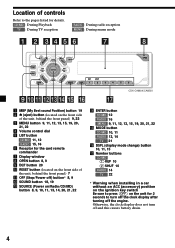
... TV reception RADIO : During radio reception MENU : During menu mode CDX-CA660X/CA650X 1 MBP (My Best sound Position) button 19 2 Z (eject) button (located on the front side of the unit, behind the front panel) 9, 22 3 MENU button 9, 11, 12, 13, 15, 19, 20, 21, 22 4 Volume control dial 5 LIST button CD/MD 11, 12 RADIO 15, 16 6 Receptor for the card remote commander 7 Display window 8 OPEN button 8, 9 9 EQ7 button 20 0 RESET button (located on the unit for details...
... TV reception RADIO : During radio reception MENU : During menu mode CDX-CA660X/CA650X 1 MBP (My Best sound Position) button 19 2 Z (eject) button (located on the front side of the unit, behind the front panel) 9, 22 3 MENU button 9, 11, 12, 13, 15, 19, 20, 21, 22 4 Volume control dial 5 LIST button CD/MD 11, 12 RADIO 15, 16 6 Receptor for the card remote commander 7 Display window 8 OPEN button 8, 9 9 EQ7 button 20 0 RESET button (located on the unit for details...
Operating Instructions
Page 5
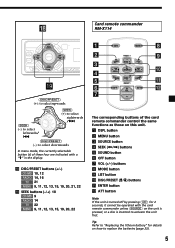
..., 15, 19, 20, 22 DSPL MODE PRESET + MENU DISC + LIST SEEK- PRESET - + VOL - SEEK+ ENTER ATT The corresponding buttons of these four are indicated with a "M" in the display. SOURCE SOUND OFF DISC - Card remote commander RM-X114 (DISC/PRESET) (+): to select upwards (SEEK) (-): to select leftwards/ . (SEEK) (+):to select rightwards /> (DISC/PRESET) (-): to select downwards In menu mode, the currently selectable button (s) of the card remote commander control the same functions as those on this unit. 1 DSPL button 2 MENU button 3 SOURCE button 4 SEEK (
..., 15, 19, 20, 22 DSPL MODE PRESET + MENU DISC + LIST SEEK- PRESET - + VOL - SEEK+ ENTER ATT The corresponding buttons of these four are indicated with a "M" in the display. SOURCE SOUND OFF DISC - Card remote commander RM-X114 (DISC/PRESET) (+): to select upwards (SEEK) (-): to select leftwards/ . (SEEK) (+):to select rightwards /> (DISC/PRESET) (-): to select downwards In menu mode, the currently selectable button (s) of the card remote commander control the same functions as those on this unit. 1 DSPL button 2 MENU button 3 SOURCE button 4 SEEK (
Operating Instructions
Page 6
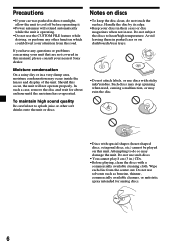
... lenses and display of the unit. Do not use discs with sticky ink/residue. Attempting to cool off before operating it. •Power antennas will not operate properly. Wipe each disc from the road. To maintain high sound quality Be careful not to heat/high temperature. Precautions •If your car was parked in .) CDs. •Before playing, clean the discs with a commercially...
... lenses and display of the unit. Do not use discs with sticky ink/residue. Attempting to cool off before operating it. •Power antennas will not operate properly. Wipe each disc from the road. To maintain high sound quality Be careful not to heat/high temperature. Precautions •If your car was parked in .) CDs. •Before playing, clean the discs with a commercially...
Operating Instructions
Page 7
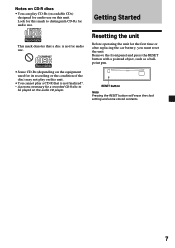
Resetting the unit Before operating the unit for audio use. Remove the front panel and press the RESET button with a pointed object, such as a ballpoint pen. RESET button Note Pressing the RESET button will erase the clock setting and some stored contents. 7 Notes on CD-R discs •You can play CD-Rs (recordable CDs) designed for audio use on this unit. •You cannot play on the audio CD player. Getting Started This mark denotes...
Resetting the unit Before operating the unit for audio use. Remove the front panel and press the RESET button with a pointed object, such as a ballpoint pen. RESET button Note Pressing the RESET button will erase the clock setting and some stored contents. 7 Notes on CD-R discs •You can play CD-Rs (recordable CDs) designed for audio use on this unit. •You cannot play on the audio CD player. Getting Started This mark denotes...
Operating Instructions
Page 9
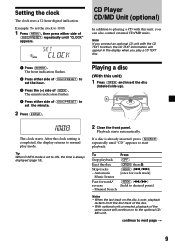
... Eject the disc Skip tracks - Tip When D.INFO mode is set the minute. 2 Press (ENTER). Automatic Music Sensor Fast-forward/ reverse - Manual Search Press (OFF) (OPEN) then Z (SEEK) (./>) [once for each track] (SEEK) (m/M) [hold to the optional CD/ MD unit. The minute indication flashes. 4 Press either side of the same source will appear in the display when you can also control...
... Eject the disc Skip tracks - Tip When D.INFO mode is set the minute. 2 Press (ENTER). Automatic Music Sensor Fast-forward/ reverse - Manual Search Press (OFF) (OPEN) then Z (SEEK) (./>) [once for each track] (SEEK) (m/M) [hold to the optional CD/ MD unit. The minute indication flashes. 4 Press either side of the same source will appear in the display when you can also control...
Operating Instructions
Page 10
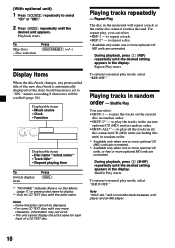
To Skip discs - Displayable items • Music source • Clock • Function Displayable items • Disc name*1/artist name*2 • Track title*1 • Elapsed playing time To Switch display item Press (DSPL) *1 "NO NAME" indicates there is set to play the tracks in the current optional CD (MD) unit in random order. *1 Available only when one or more optional CD (MD) units are connected. *2 Available only when one...
To Skip discs - Displayable items • Music source • Clock • Function Displayable items • Disc name*1/artist name*2 • Track title*1 • Elapsed playing time To Switch display item Press (DSPL) *1 "NO NAME" indicates there is set to play the tracks in the current optional CD (MD) unit in random order. *1 Available only when one or more optional CD (MD) units are connected. *2 Available only when one...
Operating Instructions
Page 11
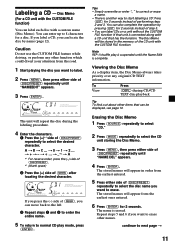
...memory of (SEEK) after locating the desired character. Caution Do not use the CUSTOM FILE feature while driving, or perform any original CD TEXT information. t + t - t _*2 t A *1 For reverse order, press the (-) side of (DISC/PRESET). *2 (blank space) 2 Press the (+) side of the CD unit with a CD unit that can also complete the operation...has the function. The name is suspended until "NAME DEL" appears. 4 Press (ENTER). Erasing the Disc Memo 1 Press (SOURCE) repeatedly to select "CD." 2 Press (MODE) repeatedly to select the CD unit storing the Disc Memo. 3 Press (MENU), then ...
...memory of (SEEK) after locating the desired character. Caution Do not use the CUSTOM FILE feature while driving, or perform any original CD TEXT information. t + t - t _*2 t A *1 For reverse order, press the (-) side of (DISC/PRESET). *2 (blank space) 2 Press the (+) side of the CD unit with a CD unit that can also complete the operation...has the function. The name is suspended until "NAME DEL" appears. 4 Press (ENTER). Erasing the Disc Memo 1 Press (SOURCE) repeatedly to select "CD." 2 Press (MODE) repeatedly to select the CD unit storing the Disc Memo. 3 Press (MENU), then ...
Operating Instructions
Page 14
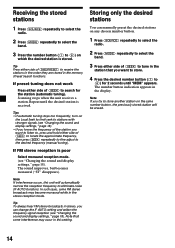
... unit receives a station. Tip Press either side of (DISC/PRESET) to receive the stations in the order they are stored in this unit will be erased. 14 Storing only the desired stations You can change the IF AUTO setting and widen the frequency signal reception (see "Changing the sound and display settings," page 18). Receiving the stored stations 1 Press (SOURCE) repeatedly to select the radio. 2 Press (MODE) repeatedly to select the band. 3 Press the number button...
... unit receives a station. Tip Press either side of (DISC/PRESET) to receive the stations in the order they are stored in this unit will be erased. 14 Storing only the desired stations You can change the IF AUTO setting and widen the frequency signal reception (see "Changing the sound and display settings," page 18). Receiving the stored stations 1 Press (SOURCE) repeatedly to select the radio. 2 Press (MODE) repeatedly to select the band. 3 Press the number button...
Operating Instructions
Page 16
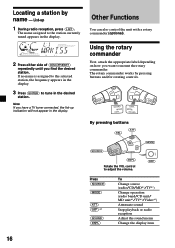
... volume. (MODE) (OFF) OFF Press (SOURCE) (MODE) (ATT) (OFF)*2 (SOUND) (DSPL) To Change source (radio/CD/MD*1/TV*1) Change operation (radio band/CD unit/ MD unit*1/TV*1/Video*1) Attenuate sound Stop playback or radio reception Adjust the sound menu Change the display item 16 The rotary commander works by name - Using the rotary commander First, attach the appropriate label depending on how you have a TV tuner connected, the list-up 1 During radio reception, press (LIST). Locating a station by pressing buttons...
... volume. (MODE) (OFF) OFF Press (SOURCE) (MODE) (ATT) (OFF)*2 (SOUND) (DSPL) To Change source (radio/CD/MD*1/TV*1) Change operation (radio band/CD unit/ MD unit*1/TV*1/Video*1) Attenuate sound Stop playback or radio reception Adjust the sound menu Change the display item 16 The rotary commander works by name - Using the rotary commander First, attach the appropriate label depending on how you have a TV tuner connected, the list-up 1 During radio reception, press (LIST). Locating a station by pressing buttons...
Operating Instructions
Page 17
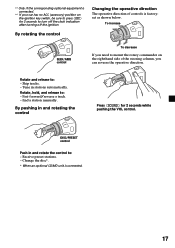
... optional equipment is connected. 17 Fast-forward/reverse a track. - By pushing in stations automatically. Tune in and rotating the control Press (SOUND) for 2 seconds to turn off the clock indication after turning off the ignition. By rotating the control Changing the operative direction The operative direction of the steering column, you can reverse the operative direction. find a station manually. To increase SEEK/AMS control To decrease If you need to : -
... optional equipment is connected. 17 Fast-forward/reverse a track. - By pushing in stations automatically. Tune in and rotating the control Press (SOUND) for 2 seconds to turn off the clock indication after turning off the ignition. By rotating the control Changing the operative direction The operative direction of the steering column, you can reverse the operative direction. find a station manually. To increase SEEK/AMS control To decrease If you need to : -
Operating Instructions
Page 18
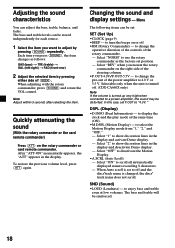
... changed, the disc/ track name does not scroll. The bass and treble will be distorted. The bass and treble levels can be set position. - Quickly attenuating the sound (With the rotary commander or the card remote commander) Press (ATT) on the right side of (SEEK). Menu The following items can adjust the bass, treble, balance, and fader. to change the operative direction of the controls of the power amplifier to 4.0 V or 5.5 V. DSPL (Display...
... changed, the disc/ track name does not scroll. The bass and treble will be distorted. The bass and treble levels can be set position. - Quickly attenuating the sound (With the rotary commander or the card remote commander) Press (ATT) on the right side of (SEEK). Menu The following items can adjust the bass, treble, balance, and fader. to change the operative direction of the controls of the power amplifier to 4.0 V or 5.5 V. DSPL (Display...
Operating Instructions
Page 19
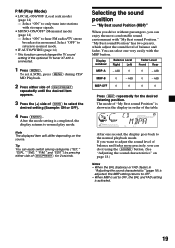
... play mode. After one very easily with the MBP button. Select "OFF" to return to only tune into stations with "My Best sound Position." Tip You can select one second, the display goes back to select the desired setting (Example: ON or OFF). 4 Press (ENTER). Selecting the sound position - "My Best sound Position" has two presets, which adjust the sound level of (DISC/PRESET) for the desired listening position. Display window Balance Level...
... play mode. After one very easily with the MBP button. Select "OFF" to return to only tune into stations with "My Best sound Position." Tip You can select one second, the display goes back to select the desired setting (Example: ON or OFF). 4 Press (ENTER). Selecting the sound position - "My Best sound Position" has two presets, which adjust the sound level of (DISC/PRESET) for the desired listening position. Display window Balance Level...
Operating Instructions
Page 21
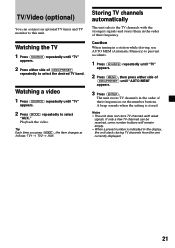
... displayed. 21 TV/Video (optional) You can be received, some number buttons will remain empty. • When a preset number is stored. Tip Each time you press (MODE), the item changes as follows: TV1 t TV2 t AUX Storing TV channels automatically The unit selects the TV channels with weak signals. A beep sounds when the setting is indicated in the order of (DISC/PRESET) until "TV" appears. 2 Press either side of their frequency...
... displayed. 21 TV/Video (optional) You can be received, some number buttons will remain empty. • When a preset number is stored. Tip Each time you press (MODE), the item changes as follows: TV1 t TV2 t AUX Storing TV channels automatically The unit selects the TV channels with weak signals. A beep sounds when the setting is indicated in the order of (DISC/PRESET) until "TV" appears. 2 Press either side of their frequency...
Operating Instructions
Page 25
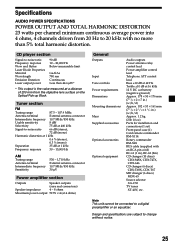
... Optical Pick-up Block. Note This unit cannot be connected to 20 kHz with an RCA pin cord) RC-61 (1 m), RC-62 (2m) CD changer (10 discs) CDX-848X, CDX-747X, CDX-646 CD changer (6 discs) CDX-T68X, CDX-T67 MD changer (6 discs) MDX-65 Source selector XA-C30 TV tuner XT-40V, etc. Tuner section FM Tuning range 87.5 - 107.9 MHz Antenna terminal External antenna connector Intermediate frequency 10.7 MHz/450 kHz Usable...
... Optical Pick-up Block. Note This unit cannot be connected to 20 kHz with an RCA pin cord) RC-61 (1 m), RC-62 (2m) CD changer (10 discs) CDX-848X, CDX-747X, CDX-646 CD changer (6 discs) CDX-T68X, CDX-T67 MD changer (6 discs) MDX-65 Source selector XA-C30 TV tuner XT-40V, etc. Tuner section FM Tuning range 87.5 - 107.9 MHz Antenna terminal External antenna connector Intermediate frequency 10.7 MHz/450 kHz Usable...
Operating Instructions
Page 26
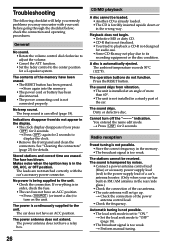
... not play due to display the clock. •Remove the front panel and clean the connectors. Press the RESET button. The sound skips from /do not function. Cannot turn on the unit. t Press (LIST) for details. t Check the connection of the memory have an ACC position. If everything is installed at an angle of the car. The power is hampered by noises. •Connect a power antenna control lead (blue) or accessory power supply...
... not play due to display the clock. •Remove the front panel and clean the connectors. Press the RESET button. The sound skips from /do not function. Cannot turn on the unit. t Press (LIST) for details. t Check the connection of the memory have an ACC position. If everything is installed at an angle of the car. The power is hampered by noises. •Connect a power antenna control lead (blue) or accessory power supply...
Operating Instructions
Page 27
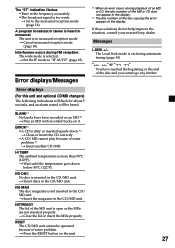
... display. *2 The disc number of some problem.*2 t Insert another CD/MD. Error displays/Messages Error displays (For this unit and optional CD/MD changers) The following indications will flash for about 5 seconds, and an alarm sound will be operated because of the disc causing the error appears in the display. The Local Seek mode is in monaural reception mode. The unit is on during automatic tuning (page 14). NO DISC No disc...
... display. *2 The disc number of some problem.*2 t Insert another CD/MD. Error displays/Messages Error displays (For this unit and optional CD/MD changers) The following indications will flash for about 5 seconds, and an alarm sound will be operated because of the disc causing the error appears in the display. The Local Seek mode is in monaural reception mode. The unit is on during automatic tuning (page 14). NO DISC No disc...


