
Limited Warranty (U.S. Only)
Page 1
... Sony authorized service facility specified. Printed in either its original specifications. This Limited Warranty only covers product issues caused by any other rights which vary from the original date of purchase of protection to its original packaging or packaging affording an equal degree of the product ("Labor Warranty"), Sony will supply new or refurbished replacement parts in the United...
... Sony authorized service facility specified. Printed in either its original specifications. This Limited Warranty only covers product issues caused by any other rights which vary from the original date of purchase of protection to its original packaging or packaging affording an equal degree of the product ("Labor Warranty"), Sony will supply new or refurbished replacement parts in the United...

Product Guide / Specifications
Page 1
... µV Harness Plug Configuration CD Player Section Mechanism Type Optical Pickup Name System Frequency Response Signal-to change without notice. PART 1 CDX-C7000X CD Receiver/Changer Controller • X-tal Lock SSIR-EXA Tuner, Station Memo • 18FM + 12AM Presets, BTM • 8X Oversampling, 1-Bit, CD-R Playback,† CD TEXT • Rotary Encoder w/Cross Key • Adjustable HPF/LPF Sub Output • CD/MD/TV Control with wires facing viewer Pin Number Wire Color 1 White...
... µV Harness Plug Configuration CD Player Section Mechanism Type Optical Pickup Name System Frequency Response Signal-to change without notice. PART 1 CDX-C7000X CD Receiver/Changer Controller • X-tal Lock SSIR-EXA Tuner, Station Memo • 18FM + 12AM Presets, BTM • 8X Oversampling, 1-Bit, CD-R Playback,† CD TEXT • Rotary Encoder w/Cross Key • Adjustable HPF/LPF Sub Output • CD/MD/TV Control with wires facing viewer Pin Number Wire Color 1 White...

Operating Instructions
Page 1
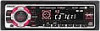
For installation and connections, see the supplied installation/connections manual. Model No. Refer to these numbers in the space provided below. CDX-C7000X CDX-C5000X CDX-C5005 © 2000 Sony Corporation Serial No. Record these numbers whenever you call upon your Sony dealer regarding this product. 3-043-279-13 (1) FM/AM Compact Disc Player Operating Instructions US Owner's Record The model and serial numbers are located on the bottom of the unit.
For installation and connections, see the supplied installation/connections manual. Model No. Refer to these numbers in the space provided below. CDX-C7000X CDX-C5000X CDX-C5005 © 2000 Sony Corporation Serial No. Record these numbers whenever you call upon your Sony dealer regarding this product. 3-043-279-13 (1) FM/AM Compact Disc Player Operating Instructions US Owner's Record The model and serial numbers are located on the bottom of the unit.

Operating Instructions
Page 2
... other function which the receiver is located on the drive unit's internal chassis (CDX-C5005 only). • If your car was parked in direct sunlight resulting in a considerable rise in a particular installation. Reorient or relocate the receiving antenna. - Supplied card remote commander complies with this product will increase eye hazard. Consult the dealer or an experienced radio/ TV technician for purchasing the Sony Compact Disc Player. CAUTION...
... other function which the receiver is located on the drive unit's internal chassis (CDX-C5005 only). • If your car was parked in direct sunlight resulting in a considerable rise in a particular installation. Reorient or relocate the receiving antenna. - Supplied card remote commander complies with this product will increase eye hazard. Consult the dealer or an experienced radio/ TV technician for purchasing the Sony Compact Disc Player. CAUTION...

Operating Instructions
Page 3
...on the unit or CD may contaminate the lenses inside the unit, reduce the sound quality, or prevent sound reproduction altogether. Sugary residues on the lenses inside the car. To enjoy optimum sound, handle the disc as ...unit. Stickers that is not finalized (Finalization is sticky. Labels are paste residue. Before playing, clean the discs with labels or stickers attached. Do not use second-hand or rental CDs that are beginning to protect the CD player from peeled-off . Do not use your audio equipment, be a considerable rise in .) CDs Use the optional Sony compact disc...
...on the unit or CD may contaminate the lenses inside the unit, reduce the sound quality, or prevent sound reproduction altogether. Sugary residues on the lenses inside the car. To enjoy optimum sound, handle the disc as ...unit. Stickers that is not finalized (Finalization is sticky. Labels are paste residue. Before playing, clean the discs with labels or stickers attached. Do not use second-hand or rental CDs that are beginning to protect the CD player from peeled-off . Do not use your audio equipment, be a considerable rise in .) CDs Use the optional Sony compact disc...

Operating Instructions
Page 4
... Displaying the information stored on /off 8 How to use the menu 8 Setting the clock 8 CD Player CD/MD Unit (optional) Listening to a CD or MD - Best Tuning Memory (BTM 15 Memorizing only the desired stations 15 Receiving the memorized stations 16 Storing the station names - Simultaneous Play 23 Additional Information Maintenance 24 Dismounting the unit 25 Specifications 26 Troubleshooting guide 27 4 Bank 14 * Functions available with optional CD/MD unit Radio...
... Displaying the information stored on /off 8 How to use the menu 8 Setting the clock 8 CD Player CD/MD Unit (optional) Listening to a CD or MD - Best Tuning Memory (BTM 15 Memorizing only the desired stations 15 Receiving the memorized stations 16 Storing the station names - Simultaneous Play 23 Additional Information Maintenance 24 Dismounting the unit 25 Specifications 26 Troubleshooting guide 27 4 Bank 14 * Functions available with optional CD/MD unit Radio...

Operating Instructions
Page 5
... 10 k (200 k) position. D-BASS button 21 qa SOUND button 20 qs Reset button (located on the front side of the unit behind the front panel) 9 4 DISC/PRST +/- (cursor up/down) buttons 8, 10, 12, 13, 14, 15, 16, 17, 21, 22, 24 During CD/MD playback: Disc change 11, 13 During radio reception: Preset stations select 16, 18 During TV reception: Band select 22 5 DSPL (display mode change) button 9, 10, 12, 17 6 LIST...
... 10 k (200 k) position. D-BASS button 21 qa SOUND button 20 qs Reset button (located on the front side of the unit behind the front panel) 9 4 DISC/PRST +/- (cursor up/down) buttons 8, 10, 12, 13, 14, 15, 16, 17, 21, 22, 24 During CD/MD playback: Disc change 11, 13 During radio reception: Preset stations select 16, 18 During TV reception: Band select 22 5 DSPL (display mode change) button 9, 10, 12, 17 6 LIST...
Operating Instructions
Page 6
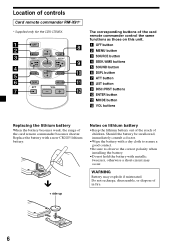
.../CLOSE MENU SEEK DISC SOURCE LIST SEEK SOUND DISC ENTER DSPL ATT MODE VOL The corresponding buttons of the card remote commander control the same functions as those on lithium battery •Keep the lithium battery out of the reach of controls Card remote commander RM-X91* * Supplied only for the CDX-C7000X. Do not recharge, disassemble, or dispose of the card remote commander becomes shorter. WARNING Battery may...
.../CLOSE MENU SEEK DISC SOURCE LIST SEEK SOUND DISC ENTER DSPL ATT MODE VOL The corresponding buttons of the card remote commander control the same functions as those on lithium battery •Keep the lithium battery out of the reach of controls Card remote commander RM-X91* * Supplied only for the CDX-C7000X. Do not recharge, disassemble, or dispose of the card remote commander becomes shorter. WARNING Battery may...

Operating Instructions
Page 7
... time or B after replacing the car battery, you , use the built-in amplifier, the beep sound will erase the clock setting and some memorized functions such as the station memo. Never leave it on the unit as illustrated, then push the left side of the front panel. 1 2 Notes • Do not put excessive pressure on , the power will turn the ignition key switch to prevent the speakers...
... time or B after replacing the car battery, you , use the built-in amplifier, the beep sound will erase the clock setting and some memorized functions such as the station memo. Never leave it on the unit as illustrated, then push the left side of the front panel. 1 2 Notes • Do not put excessive pressure on , the power will turn the ignition key switch to prevent the speakers...

Operating Instructions
Page 8
... (radio). SOURCE (SEEK/AMS) (-): to select downwards The minute indication flashes. 4 Press either side of (DISC/PRST) to set to stop CD/MD playback or FM/ AM reception (the key illumination and display remain on the unit Press (SOURCE) or insert a CD in the unit. Turning off the unit Press (OFF) to ON, the time is turned off . How to use the menu This unit is completed, the display...
... (radio). SOURCE (SEEK/AMS) (-): to select downwards The minute indication flashes. 4 Press either side of (DISC/PRST) to set to stop CD/MD playback or FM/ AM reception (the key illumination and display remain on the unit Press (SOURCE) or insert a CD in the unit. Turning off the unit Press (OFF) to ON, the time is turned off . How to use the menu This unit is completed, the display...

Operating Instructions
Page 10
... end of the MD or CD TEXT disc is displayed. Tip The Motion Display mode can be turned off . 1 During playback, press (MENU). 2 Press either side of (DISC/PRST) repeatedly until "A.SCRL-OFF" appears. 3 Press the (+) side of (SEEK/AMS). To cancel Auto Scroll, select "A.SCRL-OFF" in a track - Auto Scroll does not work. Automatic Music Sensor (AMS) During playback, press either...
... end of the MD or CD TEXT disc is displayed. Tip The Motion Display mode can be turned off . 1 During playback, press (MENU). 2 Press either side of (DISC/PRST) repeatedly until "A.SCRL-OFF" appears. 3 Press the (+) side of (SEEK/AMS). To cancel Auto Scroll, select "A.SCRL-OFF" in a track - Auto Scroll does not work. Automatic Music Sensor (AMS) During playback, press either...

Operating Instructions
Page 12
...). You can locate the disc by pressing (LIST) for playback (page 14). 1 Start playing the disc you connect an optional CD unit with the CD TEXT function, the CD TEXT information will appear in the display when you press the (-) side of (SEEK/AMS), the previous character flashes. 3 Repeat steps 1 and 2 to put a blank space between characters, select "_" (underbar). 2 Press...
...). You can locate the disc by pressing (LIST) for playback (page 14). 1 Start playing the disc you connect an optional CD unit with the CD TEXT function, the CD TEXT information will appear in the display when you press the (-) side of (SEEK/AMS), the previous character flashes. 3 Repeat steps 1 and 2 to put a blank space between characters, select "_" (underbar). 2 Press...

Operating Instructions
Page 15
... AM2) in stations while driving, use Best Tuning Memory to prevent accidents. 1 Press (SOURCE) repeatedly to select the band. A beep sounds when the setting is stored. Notes • The unit does not store stations with the strongest signals and memorizes them in the order of (DISC/PRST) repeatedly until "MEM" appears. The number button indication appears in the display, the unit starts storing stations from the one...
... AM2) in stations while driving, use Best Tuning Memory to prevent accidents. 1 Press (SOURCE) repeatedly to select the band. A beep sounds when the setting is stored. Notes • The unit does not store stations with the strongest signals and memorizes them in the order of (DISC/PRST) repeatedly until "MEM" appears. The number button indication appears in the display, the unit starts storing stations from the one...
Operating Instructions
Page 16
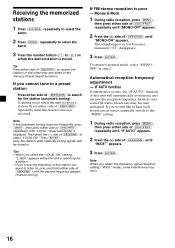
... the unit receives a station. The sound improves, but becomes monaural ("ST" disappears). 3 Press (ENTER). Receiving the memorized stations 1 Press (SOURCE) repeatedly to select the tuner. 2 Press (MODE) repeatedly to select the band. 3 Press the number button ((1) to select "LOCAL-ON." Press either side of (DISC/PRST) repeatedly until "IF AUTO" appears. 2 Press the (+) side of (SEEK/AMS) until the desired frequency appears (manual tuning). Monaural Mode 1 During radio reception, press (MENU), then...
... the unit receives a station. The sound improves, but becomes monaural ("ST" disappears). 3 Press (ENTER). Receiving the memorized stations 1 Press (SOURCE) repeatedly to select the tuner. 2 Press (MODE) repeatedly to select the band. 3 Press the number button ((1) to select "LOCAL-ON." Press either side of (DISC/PRST) repeatedly until "IF AUTO" appears. 2 Press the (+) side of (SEEK/AMS) until the desired frequency appears (manual tuning). Monaural Mode 1 During radio reception, press (MENU), then...

Operating Instructions
Page 20
... sound menu. Tip When the interface cable of controls is connected to the ATT lead, the unit decreases the volume automatically when a telephone call comes in (Telephone ATT function). OFF Press (OFF) to mount the rotary commander on the rotary commander or card remote commander. To decrease If you need to turn off the clock indication after selecting the item. Press (DSPL) to adjust the volume. Changing the operative direction The operative direction...
... sound menu. Tip When the interface cable of controls is connected to the ATT lead, the unit decreases the volume automatically when a telephone call comes in (Telephone ATT function). OFF Press (OFF) to mount the rotary commander on the rotary commander or card remote commander. To decrease If you need to turn off the clock indication after selecting the item. Press (DSPL) to adjust the volume. Changing the operative direction The operative direction...

Operating Instructions
Page 21
... frequency of the subwoofer output. *1 CDX-C5005 only *2 CDX-C7000X only Note If you connect an optional power amplifier and do not use the rotary commander as follows: CLOCK t BEEP t RM t D.INFO t AMBER/ GREEN*1 t M.DSPL t A.SCRL*2 *1 CDX-C5005 only *2 When no CD or MD is completed, the display returns to normal play mode at the same time (ON). • AMBER/GREEN*1 - Note If the bass sound becomes distorted, select...
... frequency of the subwoofer output. *1 CDX-C5005 only *2 CDX-C7000X only Note If you connect an optional power amplifier and do not use the rotary commander as follows: CLOCK t BEEP t RM t D.INFO t AMBER/ GREEN*1 t M.DSPL t A.SCRL*2 *1 CDX-C5005 only *2 When no CD or MD is completed, the display returns to normal play mode at the same time (ON). • AMBER/GREEN*1 - Note If the bass sound becomes distorted, select...
Operating Instructions
Page 22
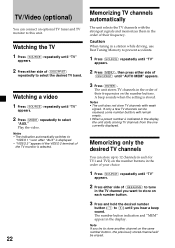
... displayed. If only a few TV channels can be received, some number buttons will be erased. The number button indication and "MEM" appear in the order of (DISC/PRST) until "TV" appears. 2 Press (MODE) repeatedly to this unit. A beep sounds when the setting is selected. 22 Memorizing TV channels automatically The unit selects the TV channels with weak signals. Watching a video 1 Press (SOURCE) repeatedly until "AUTO MEM" appears. 3 Press (ENTER). Play the video...
... displayed. If only a few TV channels can be received, some number buttons will be erased. The number button indication and "MEM" appear in the order of (DISC/PRST) until "TV" appears. 2 Press (MODE) repeatedly to this unit. A beep sounds when the setting is selected. 22 Memorizing TV channels automatically The unit selects the TV channels with weak signals. Watching a video 1 Press (SOURCE) repeatedly until "AUTO MEM" appears. 3 Press (ENTER). Play the video...

Operating Instructions
Page 26
... Power amplifier control lead Telephone ATT control lead Bass ±9 dB at 100 Hz Treble ±9 dB at 10 kHz 12 V DC car battery (negative ground) Approx. 178 × 50 × 183 mm (7 1/8 × 2 × 7 1/4 in.) (w/h/d) Approx. 182 × 53 × 162 mm (7 1/4 × 2 1/8 × 6 1/2 in.) (w/h/d) Approx. 1.2 kg (2 lb. 10 oz.) Parts for installation and connections (1 set) Front panel case (1) Card remote commander RM-X91 (CDX-C7000X...
... Power amplifier control lead Telephone ATT control lead Bass ±9 dB at 100 Hz Treble ±9 dB at 10 kHz 12 V DC car battery (negative ground) Approx. 178 × 50 × 183 mm (7 1/8 × 2 × 7 1/4 in.) (w/h/d) Approx. 182 × 53 × 162 mm (7 1/4 × 2 1/8 × 6 1/2 in.) (w/h/d) Approx. 1.2 kg (2 lb. 10 oz.) Parts for installation and connections (1 set) Front panel case (1) Card remote commander RM-X91 (CDX-C7000X...

Operating Instructions
Page 27
... disc. CD/MD playback Problem A disc cannot be ejected. Cause/Solution •Another CD is already loaded. •The CD is not installed in the Remove the front panel and clean the connectors. Before going through the checklist below, check the connection and operating procedures. The sound skips due to adjust the volume. General Problem Cause/Solution No sound. •Cancel the ATT function. •Set the fader control...
... disc. CD/MD playback Problem A disc cannot be ejected. Cause/Solution •Another CD is already loaded. •The CD is not installed in the Remove the front panel and clean the connectors. Before going through the checklist below, check the connection and operating procedures. The sound skips due to adjust the volume. General Problem Cause/Solution No sound. •Cancel the ATT function. •Set the fader control...

Operating Instructions
Page 28
... disc causing the error appears in the rear/side glass.) Automatic tuning is not inserted in Insert the magazine in the CD/MD unit. Radio reception Problem Cause/Solution Preset tuning is not possible. •Store the correct frequency in the frequency accurately. •The broadcast signal is too weak. The stations cannot be operated because of a car's noises. antenna booster. (Only when your nearest Sony...
... disc causing the error appears in the rear/side glass.) Automatic tuning is not inserted in Insert the magazine in the CD/MD unit. Radio reception Problem Cause/Solution Preset tuning is not possible. •Store the correct frequency in the frequency accurately. •The broadcast signal is too weak. The stations cannot be operated because of a car's noises. antenna booster. (Only when your nearest Sony...


