Operating Instructions
Page 5
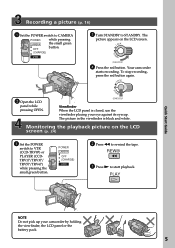
...the LCD panel or the battery pack. 5 Your camcorder starts recording. REW 3 Press N to rewind the tape. Recording a picture (p. 16) 1 Set the POWER switch to CAMERA POWER while pressing CAMERA OFF the small green button. (CHARGE) VTR STA 3 Turn STANDBY to VTR (CCD-TRV87) or PLAYER (CCDTRV17/TRV37/ ...TRV57/TRV67) while pressing the small green button. Monitoring the playback picture on the LCD screen.
...the LCD panel or the battery pack. 5 Your camcorder starts recording. REW 3 Press N to rewind the tape. Recording a picture (p. 16) 1 Set the POWER switch to CAMERA POWER while pressing CAMERA OFF the small green button. (CHARGE) VTR STA 3 Turn STANDBY to VTR (CCD-TRV87) or PLAYER (CCDTRV17/TRV37/ ...TRV57/TRV67) while pressing the small green button. Monitoring the playback picture on the LCD screen.
Operating Instructions
Page 7
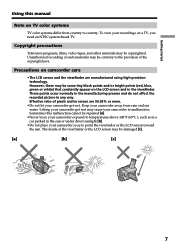
..., video tapes, and other materials may be contrary to point the viewfinder or the LCD screen toward the sun. Effective ratio of the copyright laws. Keep your camcorder get wet may be repaired [a]. •Never leave your camcorder exposed to temperatures above 140°F (60°C ), such as to the provision... occur normally in the manufacturing process and do not affect the recorded picture in any way. Unauthorized recording of the viewfinder or the LCD screen may cause your camcorder so as in a car parked in the sun or under direct sunlight [b]. •Do not place your...
..., video tapes, and other materials may be contrary to point the viewfinder or the LCD screen toward the sun. Effective ratio of the copyright laws. Keep your camcorder get wet may be repaired [a]. •Never leave your camcorder exposed to temperatures above 140°F (60°C ), such as to the provision... occur normally in the manufacturing process and do not affect the recorded picture in any way. Unauthorized recording of the viewfinder or the LCD screen may cause your camcorder so as in a car parked in the sun or under direct sunlight [b]. •Do not place your...
Operating Instructions
Page 12
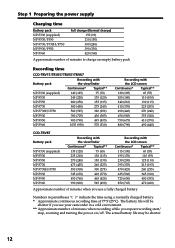
...390 (330) 420 (360) Approximate number of minutes to charge an empty battery pack Recording time CCD-TRV17/TRV37/TRV57/TRV67 Battery pack Recording with the viewfinder Continuous* Typical** NP-F330 (supplied) NP-F530 ...500) 300 (275) 745 (670) 410 (370) 850 (760) 465 (420) 990 (890) 545 (490) Recording with the LCD screen Continuous* Typical** 115 (100) 65 (55) 195 (170) 110 (95) 230 (200) 125 (110) 395 (355) 215... actual battery life may be shorter if you use your camcorder in parentheses "( )" indicate the time using a normally charged battery. * Approximate continuous recording time at...
...390 (330) 420 (360) Approximate number of minutes to charge an empty battery pack Recording time CCD-TRV17/TRV37/TRV57/TRV67 Battery pack Recording with the viewfinder Continuous* Typical** NP-F330 (supplied) NP-F530 ...500) 300 (275) 745 (670) 410 (370) 850 (760) 465 (420) 990 (890) 545 (490) Recording with the LCD screen Continuous* Typical** 115 (100) 65 (55) 195 (170) 110 (95) 230 (200) 125 (110) 395 (355) 215... actual battery life may be shorter if you use your camcorder in parentheses "( )" indicate the time using a normally charged battery. * Approximate continuous recording time at...
Operating Instructions
Page 13
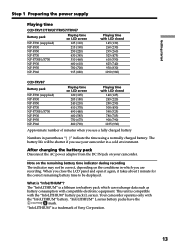
... of minutes when you are recording. "InfoLITHIUM" is a lithium ion battery pack which you use your camcorder. Getting started Step 1 Preparing the power supply Playing time CCD-TRV17/TRV37/TRV57/TRV67 Battery pack NP-F330 (supplied) NP-F530 NP-F550 NP-F730 NP-F730H/F750 NP-F930...) 680 (585) 750 (675) 880 (790) Playing time with LCD closed 140 (125) 245 (220) 280 (250) 500 (450) 580 (525) 780 (705) 900 (790) 1035 (930) Approximate number of Sony Corporation. 13 Your camcorder operates only with compatible electronic equipment. What is compatible with the "InfoLITHIUM...
... of minutes when you are recording. "InfoLITHIUM" is a lithium ion battery pack which you use your camcorder. Getting started Step 1 Preparing the power supply Playing time CCD-TRV17/TRV37/TRV57/TRV67 Battery pack NP-F330 (supplied) NP-F530 NP-F550 NP-F730 NP-F730H/F750 NP-F930...) 680 (585) 750 (675) 880 (790) Playing time with LCD closed 140 (125) 245 (220) 280 (250) 500 (450) 580 (525) 780 (705) 900 (790) 1035 (930) Approximate number of Sony Corporation. 13 Your camcorder operates only with compatible electronic equipment. What is compatible with the "InfoLITHIUM...
Operating Instructions
Page 16
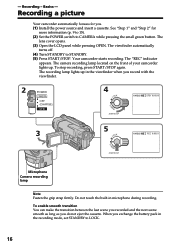
...Fasten the grip strap firmly. Basics - The viewfinder automatically turns off. (4) Turn STANDBY to CAMERA while pressing the small green button. - Recording a picture Your camcorder automatically focuses for more information (p. 9 to 15). (2) Set the POWER switch to STANDBY. (5) Press START/STOP. Do not touch the built-in the ... to LOCK. 16 When you . (1) Install the power source and insert a cassette. The camera recording lamp located on the front of your camcorder lights up in the viewfinder when you do not eject the cassette. Recording - The lens cover opens. (3) Open the...
...Fasten the grip strap firmly. Basics - The viewfinder automatically turns off. (4) Turn STANDBY to CAMERA while pressing the small green button. - Recording a picture Your camcorder automatically focuses for more information (p. 9 to 15). (2) Set the POWER switch to STANDBY. (5) Press START/STOP. Do not touch the built-in the ... to LOCK. 16 When you . (1) Install the power source and insert a cassette. The camera recording lamp located on the front of your camcorder lights up in the viewfinder when you do not eject the cassette. Recording - The lens cover opens. (3) Open the...

Operating Instructions
Page 17
..., the indicator appears in the viewfinder and on your camcorder in the mirror mode The picture on LCD BRIGHT. When you use the LCD screen outdoors in the mirror mode DATE and TIME on the LCD screen (Mirror mode). The LCD panel moves about 90 degrees to the viewfinder side and...Indicators in the mirror mode, the viewfinder automatically turns off . to brighten 180° LCD BRIGHT to 0:00:00 Press COUNTER RESET (p. 82). If you leave your camcorder do not work. Note When using the LCD screen except in the mirror mode •The STBY indicator appears as Xz and REC...
..., the indicator appears in the viewfinder and on your camcorder in the mirror mode The picture on LCD BRIGHT. When you use the LCD screen outdoors in the mirror mode DATE and TIME on the LCD screen (Mirror mode). The LCD panel moves about 90 degrees to the viewfinder side and...Indicators in the mirror mode, the viewfinder automatically turns off . to brighten 180° LCD BRIGHT to 0:00:00 Press COUNTER RESET (p. 82). If you leave your camcorder do not work. Note When using the LCD screen except in the mirror mode •The STBY indicator appears as Xz and REC...
Operating Instructions
Page 19
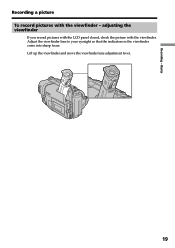
Lift up the viewfinder and move the viewfinder lens adjustment lever. 19 Adjust the viewfinder lens to your eyesight so that the indicators in the viewfinder come into sharp focus. adjusting the viewfinder If you record pictures with the LCD panel closed, check the picture with the viewfinder - Basics Recording a picture To record pictures with the viewfinder. Recording -
Lift up the viewfinder and move the viewfinder lens adjustment lever. 19 Adjust the viewfinder lens to your eyesight so that the indicators in the viewfinder come into sharp focus. adjusting the viewfinder If you record pictures with the LCD panel closed, check the picture with the viewfinder - Basics Recording a picture To record pictures with the viewfinder. Recording -
Operating Instructions
Page 20
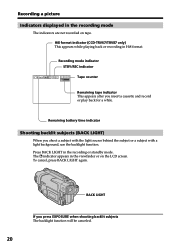
...counter Remaining tape indicator This appears after you press EXPOSURE when shooting backlit subjects The backlight function will be canceled. 20 Press BACK LIGHT in Hi8 format. To cancel, press BACK LIGHT again. BACK LIGHT If you insert a cassette and record or play back for a while. Remaining battery... in the viewfinder or on tape. The . Recording a picture Indicators displayed in the recording mode The indicators are not recorded on the LCD screen. Hi8 format indicator (CCD-TRV67/TRV87 only) This appears while playing back or recording in the recording or standby mode.
...counter Remaining tape indicator This appears after you press EXPOSURE when shooting backlit subjects The backlight function will be canceled. 20 Press BACK LIGHT in Hi8 format. To cancel, press BACK LIGHT again. BACK LIGHT If you insert a cassette and record or play back for a while. Remaining battery... in the viewfinder or on tape. The . Recording a picture Indicators displayed in the recording mode The indicators are not recorded on the LCD screen. Hi8 format indicator (CCD-TRV67/TRV87 only) This appears while playing back or recording in the recording or standby mode.

Operating Instructions
Page 21
...function, slide NIGHTSHOT to shoot a subject in a dark place. CCD-TRV87 only The Super NightShot mode makes subjects more than four times brighter than those recorded in normal recording, the picture may cause your camcorder is difficult with the NightShot Light on. Notes •Do not ... the NightShot Light The picture will be automatically changed depending on the LCD screen or in bright places (ex. and "NIGHTSHOT" indicators flash on the LCD screen or in the viewfinder. indicator appears on the LCD screen or in the viewfinder. (2) Press SUPER NIGHTSHOT. To cancel ...
...function, slide NIGHTSHOT to shoot a subject in a dark place. CCD-TRV87 only The Super NightShot mode makes subjects more than four times brighter than those recorded in normal recording, the picture may cause your camcorder is difficult with the NightShot Light on. Notes •Do not ... the NightShot Light The picture will be automatically changed depending on the LCD screen or in bright places (ex. and "NIGHTSHOT" indicators flash on the LCD screen or in the viewfinder. indicator appears on the LCD screen or in the viewfinder. (2) Press SUPER NIGHTSHOT. To cancel ...

Operating Instructions
Page 22
Recording a picture The SUPER NIGHTSHOT button does not work (CCD-TRV87 only): - Press TIME to record the date. DATE TIME The default ...settings (p. 55). Superimposing the date and time on pictures You can reset the clock in the Super NightShot mode (CCD-TRV87 only). You can record the date or time displayed in the black screen as the background for about 10... record the date and time in the picture Record the date and time in the viewfinder or on the LCD screen superimposed on the picture. while the digital effect function is set to OFF NightShot Light NightShot Light rays...
Recording a picture The SUPER NIGHTSHOT button does not work (CCD-TRV87 only): - Press TIME to record the date. DATE TIME The default ...settings (p. 55). Superimposing the date and time on pictures You can reset the clock in the Super NightShot mode (CCD-TRV87 only). You can record the date or time displayed in the black screen as the background for about 10... record the date and time in the picture Record the date and time in the viewfinder or on the LCD screen superimposed on the picture. while the digital effect function is set to OFF NightShot Light NightShot Light rays...
Operating Instructions
Page 24
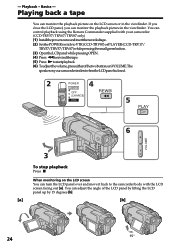
.... 2 POWER 4 CAMERA OFF REW (CHARGE) VTR 5 PLAY 6 VOLUME 3 To stop playback Press x. When monitoring on the LCD screen You can monitor the playback picture on your camcorder. (CCD-TRV57/TRV67/TRV87 only) (1) Installthepowersourceandinserttherecordedtape. (2) SetthePOWERswitchtoVTR(CCD-TRV87)orPLAYER(CCD-TRV17/ TRV37/TRV57/TRV67) while pressing the small green button. (3) OpentheLCDpanelwhilepressingOPEN. (4) Press mtorewindthetape. (5) Press Ntostartplayback. (6) Toadjustthevolume,presseitherofthetwobuttonsonVOLUME.The...
.... 2 POWER 4 CAMERA OFF REW (CHARGE) VTR 5 PLAY 6 VOLUME 3 To stop playback Press x. When monitoring on the LCD screen You can monitor the playback picture on your camcorder. (CCD-TRV57/TRV67/TRV87 only) (1) Installthepowersourceandinserttherecordedtape. (2) SetthePOWERswitchtoVTR(CCD-TRV87)orPLAYER(CCD-TRV17/ TRV37/TRV57/TRV67) while pressing the small green button. (3) OpentheLCDpanelwhilepressingOPEN. (4) Press mtorewindthetape. (5) Press Ntostartplayback. (6) Toadjustthevolume,presseitherofthetwobuttonsonVOLUME.The...
Operating Instructions
Page 25
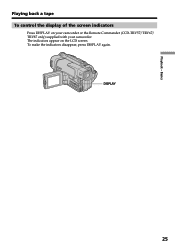
DISPLAY 25 To make the indicators disappear, press DISPLAY again. The indicators appear on your camcorder or the Remote Commander (CCD-TRV57/TRV67/ TRV87 only) supplied with your camcorder. Basics Playing back a tape To control the display of the screen indicators Press DISPLAY on the LCD screen. Playback -
DISPLAY 25 To make the indicators disappear, press DISPLAY again. The indicators appear on your camcorder or the Remote Commander (CCD-TRV57/TRV67/ TRV87 only) supplied with your camcorder. Basics Playing back a tape To control the display of the screen indicators Press DISPLAY on the LCD screen. Playback -
Operating Instructions
Page 27
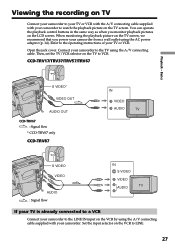
... your TV or VCR with the A/V connecting cable supplied with your camcorder from a wall outlet using the AC power adaptor (p. 14). Open the jack cover. When monitoring the playback picture on the LCD screen. Set the input selector on the VCR to watch the playback picture on the TV... to VCR. CCD-TRV17/TRV37/TRV57/TRV67 Playback - You can operate the playback control buttons in the same way as when you monitor playback pictures on the TV screen, we recommend that you power your camcorder. Basics S VIDEO* VIDEO OUT AUDIO OUT CCD-TRV67 : Signal flow * CCD-TRV67 only CCD-TRV87 IN VIDEO...
... your TV or VCR with the A/V connecting cable supplied with your camcorder from a wall outlet using the AC power adaptor (p. 14). Open the jack cover. When monitoring the playback picture on the LCD screen. Set the input selector on the VCR to watch the playback picture on the TV... to VCR. CCD-TRV17/TRV37/TRV57/TRV67 Playback - You can operate the playback control buttons in the same way as when you monitor playback pictures on the TV screen, we recommend that you power your camcorder. Basics S VIDEO* VIDEO OUT AUDIO OUT CCD-TRV67 : Signal flow * CCD-TRV67 only CCD-TRV87 IN VIDEO...
Operating Instructions
Page 28
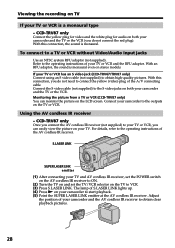
...-quality pictures. Refer to the operating instructions of your TV or VCR has an S video jack (CCD-TRV67/TRV87 only) Connect using an S video cable (not supplied) to connect the yellow (video) plug of your camcorder and the AV cordless IR receiver to a TV or VCR without Video/Audio input jacks Use... an NTSC system RFU adaptor (not supplied). Monitoring the picture from a TV or VCR (CCD-TRV87 only) You can easily view the picture on the LCD screen. If your TV or...
...-quality pictures. Refer to the operating instructions of your TV or VCR has an S video jack (CCD-TRV67/TRV87 only) Connect using an S video cable (not supplied) to connect the yellow (video) plug of your camcorder and the AV cordless IR receiver to a TV or VCR without Video/Audio input jacks Use... an NTSC system RFU adaptor (not supplied). Monitoring the picture from a TV or VCR (CCD-TRV87 only) You can easily view the picture on the LCD screen. If your TV or...

Operating Instructions
Page 30
...PHOTO deeper. PHOTO FADE PHOTO SHUTTER PHOTO (1) While your camcorder is in the standby mode, select the photo mode in the menu settings (p. 55). (2) Keep pressing PHOTO lightly until recording is recorded for about seven seconds. CCD-TRV87 only You can record a still picture like a photograph.... The still image is displayed in the viewfinder or on the LCD screen is completed. 1 30 MENU 2 PHOTO 3 PHOTO CAPTURE This mode is...
...PHOTO deeper. PHOTO FADE PHOTO SHUTTER PHOTO (1) While your camcorder is in the standby mode, select the photo mode in the menu settings (p. 55). (2) Keep pressing PHOTO lightly until recording is recorded for about seven seconds. CCD-TRV87 only You can record a still picture like a photograph.... The still image is displayed in the viewfinder or on the LCD screen is completed. 1 30 MENU 2 PHOTO 3 PHOTO CAPTURE This mode is...
Operating Instructions
Page 54
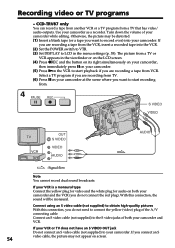
...camcorder while editing. Select a TV program if you are recording from TV. (6) Press Xon your camcorder and the VCR (you want to record over) into your camcorder...camcorder as a recorder. If your VCR or TV does not have an S VIDEO OUT jack Do not connect an S video cable (not supplied) to LCD in the viewfinder or on the LCD... screen. (4) Press zREC and the button on its right simultaneously on your camcorder, then immediately press X on your camcorder. Use your camcorder... jacks of your camcorder and VCR. Connect... of both your camcorder at the scene ...
...camcorder while editing. Select a TV program if you are recording from TV. (6) Press Xon your camcorder and the VCR (you want to record over) into your camcorder...camcorder as a recorder. If your VCR or TV does not have an S VIDEO OUT jack Do not connect an S video cable (not supplied) to LCD in the viewfinder or on the LCD... screen. (4) Press zREC and the button on its right simultaneously on your camcorder, then immediately press X on your camcorder. Use your camcorder... jacks of your camcorder and VCR. Connect... of both your camcorder at the scene ...
Operating Instructions
Page 56
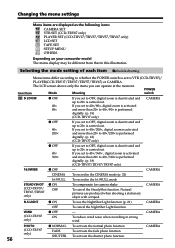
... zoom is carried out. Natural pictures are displayed as the following icons: CAMERA SET VTR SET (CCD-TRV87 only) PLAYER SET (CCD-TRV17/TRV37/TRV57/TRV67 only) LCD SET TAPE SET SETUP MENU OTHERS Depending on your camcorder model The menu display may be different from that in this illustration. If you can operate at...
... zoom is carried out. Natural pictures are displayed as the following icons: CAMERA SET VTR SET (CCD-TRV87 only) PLAYER SET (CCD-TRV17/TRV37/TRV57/TRV67 only) LCD SET TAPE SET SETUP MENU OTHERS Depending on your camcorder model The menu display may be different from that in this illustration. If you can operate at...
Operating Instructions
Page 57
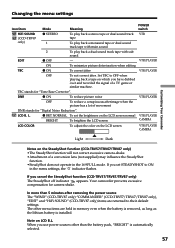
... sound EDIT z OFF - If you set the brightness on the LCD screen normal VTR/PLAYER BRIGHT To brighten the LCD screen CAMERA LCD COLOR To adjust the color on the LCD screen VTR/PLAYER CAMERA Customizing Your Camcorder Light Dark Notes on the SteadyShot function (CCD-TRV57/TRV67/TRV87 only) •The SteadyShot function will not...
... sound EDIT z OFF - If you set the brightness on the LCD screen normal VTR/PLAYER BRIGHT To brighten the LCD screen CAMERA LCD COLOR To adjust the color on the LCD screen VTR/PLAYER CAMERA Customizing Your Camcorder Light Dark Notes on the SteadyShot function (CCD-TRV57/TRV67/TRV87 only) •The SteadyShot function will not...
Operating Instructions
Page 59
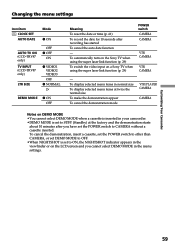
... the menu settings Icon/item CLOCK SET AUTO DATE Mode z ON AUTO TV ON (CCD-TRV87 only) TV INPUT (CCD-TRV87 only) LTR SIZE OFF z OFF ON z VIDEO1 VIDEO2 VIDEO3 OFF z NORMAL ... NIGHTSHOT indicator appears in the viewfinder or on the LCD screen and you cannot select DEMO MODE in the menu settings. To automatically turn on the Sony TV when using the super laser link function (p. ...•When NIGHTSHOT is set to CAMERA without a cassette inserted. To display selected menu items in your camcorder. •DEMO MODE is set to STBY (Standby) at twice the normal size To make the demonstration...
... the menu settings Icon/item CLOCK SET AUTO DATE Mode z ON AUTO TV ON (CCD-TRV87 only) TV INPUT (CCD-TRV87 only) LTR SIZE OFF z OFF ON z VIDEO1 VIDEO2 VIDEO3 OFF z NORMAL ... NIGHTSHOT indicator appears in the viewfinder or on the LCD screen and you cannot select DEMO MODE in the menu settings. To automatically turn on the Sony TV when using the super laser link function (p. ...•When NIGHTSHOT is set to CAMERA without a cassette inserted. To display selected menu items in your camcorder. •DEMO MODE is set to STBY (Standby) at twice the normal size To make the demonstration...
Operating Instructions
Page 60
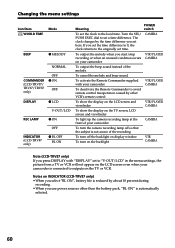
... 0, the clock returns to the originally set the clock to set here. Turn the SEL/ PUSH EXEC dial to the local time. Notes on INDICATOR (CCD-TRV87 only) • When you select "BL ON", battery life is reduced by other than the battery pack, "BL ON" is automatically selected. 60... The clock changes by the time difference you press DISPLAY with "DISPLAY" set to "V-OUT/LCD" in the menu settings, the picture from a TV or VCR will not appear on the LCD screen even when your camcorder is connected to avoid remote control misoperation caused by about 10 percent during recording. • ...
... 0, the clock returns to the originally set the clock to set here. Turn the SEL/ PUSH EXEC dial to the local time. Notes on INDICATOR (CCD-TRV87 only) • When you select "BL ON", battery life is reduced by other than the battery pack, "BL ON" is automatically selected. 60... The clock changes by the time difference you press DISPLAY with "DISPLAY" set to "V-OUT/LCD" in the menu settings, the picture from a TV or VCR will not appear on the LCD screen even when your camcorder is connected to avoid remote control misoperation caused by about 10 percent during recording. • ...


