Operating Instructions
Page 3
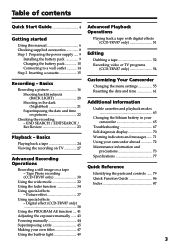
... / Rec Review 23 Customizing Your Camcorder Changing the menu settings 55 Resetting the date and time 61 Additional Information Usable cassettes and playback modes 63 Changing the lithium battery in your camcorder abroad 72 Maintenance information and precautions 73 Advanced Recording Specifications 77 Operations Recording a still image on pictures 22 Checking the recording - Picture effect 37 Using special effects - Tape Photo recording (CCD-TRV87 only 30 Using the wide mode 32 Using the fader function 34 Quick Reference Identifying the parts and controls ...... 79 Quick...
... / Rec Review 23 Customizing Your Camcorder Changing the menu settings 55 Resetting the date and time 61 Additional Information Usable cassettes and playback modes 63 Changing the lithium battery in your camcorder abroad 72 Maintenance information and precautions 73 Advanced Recording Specifications 77 Operations Recording a still image on pictures 22 Checking the recording - Picture effect 37 Using special effects - Tape Photo recording (CCD-TRV87 only 30 Using the wide mode 32 Using the fader function 34 Quick Reference Identifying the parts and controls ...... 79 Quick...
Operating Instructions
Page 6
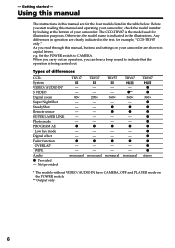
... a beep sound to CAMERA. Set the POWER switch to indicate that the operation is being carried out. z - - monaural TRV87 z z 360× z z z z z z z z z z z stereo * The models without VIDEO/AUDIO IN have CAMERA, OFF and PLAYER mode on your camcorder. - When you carry out an operation, you start reading this manual and operating your camcorder, check the model number by looking at the bottom of differences CCDSystem VIDEO/AUDIO IN* S VIDEO Digital zoom Super NightShot SteadyShot Remote sensor...
... a beep sound to CAMERA. Set the POWER switch to indicate that the operation is being carried out. z - - monaural TRV87 z z 360× z z z z z z z z z z z stereo * The models without VIDEO/AUDIO IN have CAMERA, OFF and PLAYER mode on your camcorder. - When you carry out an operation, you start reading this manual and operating your camcorder, check the model number by looking at the bottom of differences CCDSystem VIDEO/AUDIO IN* S VIDEO Digital zoom Super NightShot SteadyShot Remote sensor...
Operating Instructions
Page 16
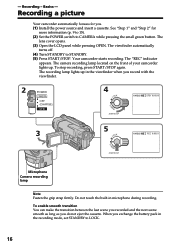
.... (1) Install the power source and insert a cassette. Your camcorder starts recording. The camera recording lamp located on the front of your camcorder lights up in the recording mode, set STANDBY to LOCK. 16 When you exchange the battery pack in the viewfinder when you do not eject the cassette. Recording a picture Your camcorder automatically focuses for more information (p. 9 to 15). (2) Set the POWER switch to STANDBY. (5) Press START/STOP. The viewfinder automatically turns off. (4) Turn...
.... (1) Install the power source and insert a cassette. Your camcorder starts recording. The camera recording lamp located on the front of your camcorder lights up in the recording mode, set STANDBY to LOCK. 16 When you exchange the battery pack in the viewfinder when you do not eject the cassette. Recording a picture Your camcorder automatically focuses for more information (p. 9 to 15). (2) Set the POWER switch to STANDBY. (5) Press START/STOP. The viewfinder automatically turns off. (4) Turn...

Operating Instructions
Page 17
... the LCD panel, set the counter to 0:00:00 Press COUNTER RESET (p. 82). When you use the LCD screen outdoors in direct sunlight The LCD screen may be normal when recorded. However, the picture will be normal when recorded. 17 Recording - Picture in the mirror mode DATE and TIME on the LCD is to save battery power and to the lens side. Indicators in the standby mode for 5 minutes while the cassette is working. After recording (1) Turn...
... the LCD panel, set the counter to 0:00:00 Press COUNTER RESET (p. 82). When you use the LCD screen outdoors in direct sunlight The LCD screen may be normal when recorded. However, the picture will be normal when recorded. 17 Recording - Picture in the mirror mode DATE and TIME on the LCD is to save battery power and to the lens side. Indicators in the standby mode for 5 minutes while the cassette is working. After recording (1) Turn...
Operating Instructions
Page 26
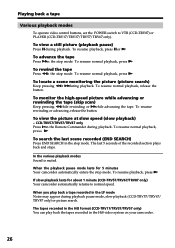
To view the picture at slow speed (slow playback) - To rewind the tape Press min the stop mode. To resume rewinding or advancing, release the button. In the various playback modes Sound is muted. When you play back the tapes recorded in the stop mode. The tapes recorded in the Hi8 format (CCD-TRV17/TRV37/TRV57 only) You can play back a tape recorded in the LP mode Noise may appear during playback. To resume playback, press X or N. CCD-TRV57/TRV67/TRV87 only...
To view the picture at slow speed (slow playback) - To rewind the tape Press min the stop mode. To resume rewinding or advancing, release the button. In the various playback modes Sound is muted. When you play back the tapes recorded in the stop mode. The tapes recorded in the Hi8 format (CCD-TRV17/TRV37/TRV57 only) You can play back a tape recorded in the LP mode Noise may appear during playback. To resume playback, press X or N. CCD-TRV57/TRV67/TRV87 only...
Operating Instructions
Page 27
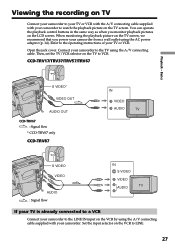
... You can operate the playback control buttons in the same way as when you power your camcorder from a wall outlet using the AC power adaptor (p. 14). Set the input selector on the VCR by using the A/V connecting cable. CCD-TRV17/TRV37/TRV57/TRV67 Playback - Then, set the TV/VCR selector on the TV screen. Open the jack cover. Viewing the recording on TV Connect your camcorder to your TV or VCR with the A/V connecting cable supplied with your camcorder.
... You can operate the playback control buttons in the same way as when you power your camcorder from a wall outlet using the AC power adaptor (p. 14). Set the input selector on the VCR by using the A/V connecting cable. CCD-TRV17/TRV37/TRV57/TRV67 Playback - Then, set the TV/VCR selector on the TV screen. Open the jack cover. Viewing the recording on TV Connect your camcorder to your TV or VCR with the A/V connecting cable supplied with your camcorder.
Operating Instructions
Page 28
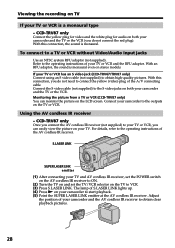
... (CCD-TRV67/TRV87 only) Connect using an S video cable (not supplied) to the outputs on the TV or VCR. Adjust the position of your camcorder and the TV or the VCR (you can monitor the picture on stereo models. CCD-TRV87 only Connect the yellow plug for video and the white plug for audio on both your camcorder to obtain high-quality pictures. If your TV. With this connection, the sound is a monaural type - CCD...
... (CCD-TRV67/TRV87 only) Connect using an S video cable (not supplied) to the outputs on the TV or VCR. Adjust the position of your camcorder and the TV or the VCR (you can monitor the picture on stereo models. CCD-TRV87 only Connect the yellow plug for video and the white plug for audio on both your camcorder to obtain high-quality pictures. If your TV. With this connection, the sound is a monaural type - CCD...
Operating Instructions
Page 29
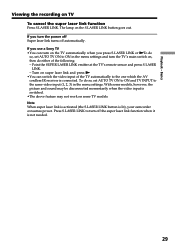
... laser link function Press S.LASER LINK. To do either of the TV automatically to turn the TV's main switch on some models, however, the picture and sound may not work on , then do so, set AUTO TV ON to ON and TV INPUT to ON in the menu settings. Turn on the TV automatically when you use a Sony TV •You can switch the video input of the...
... laser link function Press S.LASER LINK. To do either of the TV automatically to turn the TV's main switch on some models, however, the picture and sound may not work on , then do so, set AUTO TV ON to ON and TV INPUT to ON in the menu settings. Turn on the TV automatically when you use a Sony TV •You can switch the video input of the...
Operating Instructions
Page 33
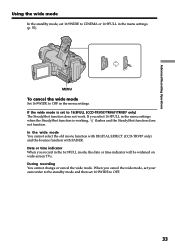
... in the menu settings (p. 55). During recording You cannot change or cancel the wide mode. If the wide mode is working, flashes and the SteadyShot function does not function. Advanced Recording Operations Using the wide mode In the standby mode, set to 16:9FULL (CCD-TRV57/TRV67/TRV87 only) The SteadyShot function does not work. Date or time indicator When you cancel the wide mode, set your camcorder to the standby mode and then set 16...
... in the menu settings (p. 55). During recording You cannot change or cancel the wide mode. If the wide mode is working, flashes and the SteadyShot function does not function. Advanced Recording Operations Using the wide mode In the standby mode, set to 16:9FULL (CCD-TRV57/TRV67/TRV87 only) The SteadyShot function does not work. Date or time indicator When you cancel the wide mode, set your camcorder to the standby mode and then set 16...
Operating Instructions
Page 39
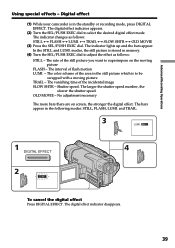
Advanced Recording Operations Using special effects - In the STILL and LUMI. and TRAIL. 3 LUMI. 1 4 DIGITAL EFFECT 2 LUMI. The indicator lights up and the bars appear. The interval of the incidental image SLOW SHTR - y TRAIL y SLOW SHTR y OLD MOVIE (3) Press the SEL/PUSH EXEC dial. Shutter speed. The bars appear in memory. (4) Turn the SEL/PUSH EXEC dial to be swapped with a moving picture FLASH - To cancel...
Advanced Recording Operations Using special effects - In the STILL and LUMI. and TRAIL. 3 LUMI. 1 4 DIGITAL EFFECT 2 LUMI. The indicator lights up and the bars appear. The interval of the incidental image SLOW SHTR - y TRAIL y SLOW SHTR y OLD MOVIE (3) Press the SEL/PUSH EXEC dial. Shutter speed. The bars appear in memory. (4) Turn the SEL/PUSH EXEC dial to be swapped with a moving picture FLASH - To cancel...
Operating Instructions
Page 49
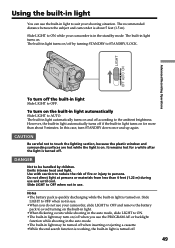
... ejecting a cassette. •While the end search function is turned off according to AUTO. LIGHT OFF AUTO ON Advanced Recording Operations Using the built-in light You can use the built-in the standby mode. Slide LIGHT to ON while your camcorder is on and off . To turn on the built-in light automatically turns on . In this case, turn on the built-in light. •When flickering occurs while shooting...
... ejecting a cassette. •While the end search function is turned off according to AUTO. LIGHT OFF AUTO ON Advanced Recording Operations Using the built-in light You can use the built-in the standby mode. Slide LIGHT to ON while your camcorder is on and off . To turn on the built-in light automatically turns on . In this case, turn on the built-in light. •When flickering occurs while shooting...
Operating Instructions
Page 56
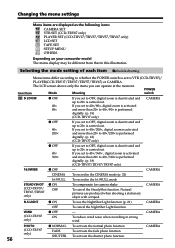
... SET (CCD-TRV17/TRV37/TRV57/TRV67 only) LCD SET TAPE SET SETUP MENU OTHERS Depending on your camcorder model The menu display may be different from that in this illustration. Menu items differ according to 20× is carried out. CAMERA CINEMA To record in the CINEMA mode (p. 32) 16:9FULL To record in strong wind CAMERA PHOTO z NORMAL To activate the normal photo function (CCD-TRV87 FADE To activate the fade photo function only) SHUTTER...
... SET (CCD-TRV17/TRV37/TRV57/TRV67 only) LCD SET TAPE SET SETUP MENU OTHERS Depending on your camcorder model The menu display may be different from that in this illustration. Menu items differ according to 20× is carried out. CAMERA CINEMA To record in the CINEMA mode (p. 32) 16:9FULL To record in strong wind CAMERA PHOTO z NORMAL To activate the normal photo function (CCD-TRV87 FADE To activate the fade photo function only) SHUTTER...
Operating Instructions
Page 62
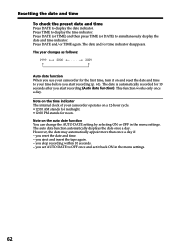
... Auto date function When you start recording (Auto date function). This function works only once a day. you eject and insert the tape again. - However, the date may automatically appear more than once a day if: - you stop recording within 10 seconds. - Press DATE (or TIME) and then press TIME (or DATE) to display the date indicator. Note on the time indicator The internal clock of your time before you use your camcorder for noon. Resetting the date and time...
... Auto date function When you start recording (Auto date function). This function works only once a day. you eject and insert the tape again. - However, the date may automatically appear more than once a day if: - you stop recording within 10 seconds. - Press DATE (or TIME) and then press TIME (or DATE) to display the date indicator. Note on the time indicator The internal clock of your time before you use your camcorder for noon. Resetting the date and time...
Operating Instructions
Page 64
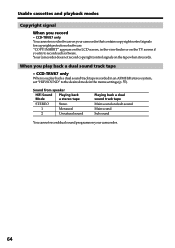
"COPY INHIBIT" appears on the LCD screen, in the viewfinder or on the tape when it records. Your camcorder does not record copyright control signals on the TV screen if you play back a dual sound track tape - CCD-TRV87 only When you try to the desired mode in the menu settings (p. 55). When you record - Usable cassettes and playback modes Copyright signal When you play back a dual sound track tape recorded in an AFM HiFi...
"COPY INHIBIT" appears on the LCD screen, in the viewfinder or on the tape when it records. Your camcorder does not record copyright control signals on the TV screen if you play back a dual sound track tape - CCD-TRV87 only When you try to the desired mode in the menu settings (p. 55). When you record - Usable cassettes and playback modes Copyright signal When you play back a dual sound track tape recorded in an AFM HiFi...
Operating Instructions
Page 67
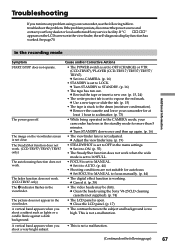
... function does not work . (CCD-TRV87 only) The x indicator flashes in the viewfinder, the self-diagnosis display function has worked. c Turn STANDBY to troubleshoot the problem. This is working. c Set FOCUS to MANUAL to LOCK. The power goes off. A vertical band appears when you shoot a subject such as lights or a candle flame against a dark background. c Clean the heads using your camcorder for autofocus. In the recording mode Additional Information Symptom START/STOP does not operate...
... function does not work . (CCD-TRV87 only) The x indicator flashes in the viewfinder, the self-diagnosis display function has worked. c Turn STANDBY to troubleshoot the problem. This is working. c Set FOCUS to MANUAL to LOCK. The power goes off. A vertical band appears when you shoot a subject such as lights or a candle flame against a dark background. c Clean the heads using your camcorder for autofocus. In the recording mode Additional Information Symptom START/STOP does not operate...
Operating Instructions
Page 68
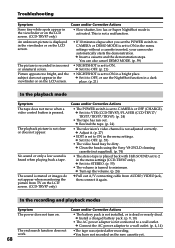
...; The video head may be dirty. c Insert a cassette and the demonstration stops. c Turn up the volume. (p. 24) c Pull out A/V connecting cable from TV on the LCD screen. (CCD-TRV87 only) Cause and/or Corrective Actions • The POWER switch is set to ON in the menu settings. c Clean the heads using the Sony V8-25CLD cleaning cassette (not supplied). (p. 74) • The stereo tape is turned to ON in the menu settings without a cassette inserted, your camcorder automatically...
...; The video head may be dirty. c Insert a cassette and the demonstration stops. c Turn up the volume. (p. 24) c Pull out A/V connecting cable from TV on the LCD screen. (CCD-TRV87 only) Cause and/or Corrective Actions • The POWER switch is set to ON in the menu settings. c Clean the heads using the Sony V8-25CLD cleaning cassette (not supplied). (p. 74) • The stereo tape is turned to ON in the menu settings without a cassette inserted, your camcorder automatically...
Operating Instructions
Page 71
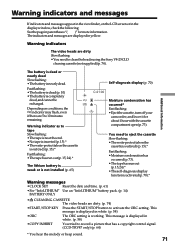
... (red) (p. 15).* Fast flashing: • The tape has run out (p. 15, 24).* • The self-diagnosis display function is displayed in white. (p. 58) • ORC The ORC setting is completely dead, and cannot be recharged. This message is activated (p. 70).* Warning messages •CLOCK SET Reset the date and time. (p. 61) •For "InfoLITHIUM" Use an "InfoLITHIUM" battery pack. (p. 14) BATTERY ONLY • CLEANING CASSETTE The video heads are 5 to eject the cassette Slow flashing...
... (red) (p. 15).* Fast flashing: • The tape has run out (p. 15, 24).* • The self-diagnosis display function is displayed in white. (p. 58) • ORC The ORC setting is completely dead, and cannot be recharged. This message is activated (p. 70).* Warning messages •CLOCK SET Reset the date and time. (p. 61) •For "InfoLITHIUM" Use an "InfoLITHIUM" battery pack. (p. 14) BATTERY ONLY • CLEANING CASSETTE The video heads are 5 to eject the cassette Slow flashing...
Operating Instructions
Page 75
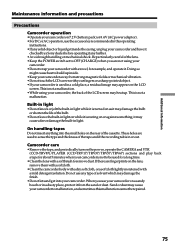
... power, operate the CAMERA and VTR (CCD-TRV87)/PLAYER (CCD-TRV17/TRV37/TRV57/TRV67) sections and play back a tape for example, and operate it. When you are fingerprints on the lens, remove them with a soft cloth. •Clean the camcorder body with a dry soft cloth, or a soft cloth lightly moistened with a mild detergent solution. These holes are used to sense the type and thickness of the LCD screen...
... power, operate the CAMERA and VTR (CCD-TRV87)/PLAYER (CCD-TRV17/TRV37/TRV57/TRV67) sections and play back a tape for example, and operate it. When you are fingerprints on the lens, remove them with a soft cloth. •Clean the camcorder body with a dry soft cloth, or a soft cloth lightly moistened with a mild detergent solution. These holes are used to sense the type and thickness of the LCD screen...
Operating Instructions
Page 77
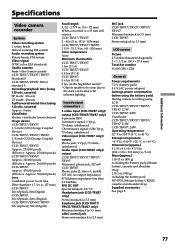
...;F to 104 °F (0 °C to 40 °C) Storage temperature -4 °F to +140 °F (-20 °C to the dark can be shot with infrared lighting. Additional Information Specifications Video camera recorder System Video recording system 2 rotary heads Helical scanning FM system Audio recording system Rotary heads, FM system Video signal NTSC color, EIA standards Usable cassette 8mm video format cassette CCD-TRV17/TRV37/TRV57: Standard 8 CCD-TRV67/TRV87: Hi8 or standard 8 Recording/playback time (using 120 min.
...;F to 104 °F (0 °C to 40 °C) Storage temperature -4 °F to +140 °F (-20 °C to the dark can be shot with infrared lighting. Additional Information Specifications Video camera recorder System Video recording system 2 rotary heads Helical scanning FM system Audio recording system Rotary heads, FM system Video signal NTSC color, EIA standards Usable cassette 8mm video format cassette CCD-TRV17/TRV37/TRV57: Standard 8 CCD-TRV67/TRV87: Hi8 or standard 8 Recording/playback time (using 120 min.
Operating Instructions
Page 87
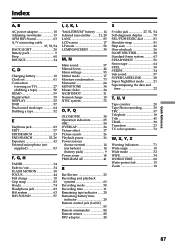
... sound 57 Manual focus 44 Menu settings 55 Mirror mode 17 Moisture condensation .......... 73 Monaural 64 MONOTONE 34 Mosaic fader 34 NIGHTSHOT 21 Normal charge 10 NTSC system 72 O, P, Q OLD MOVIE 38 Operation indicators 85 ORC 58 OVERLAP 34 Picture effect 37 Picture search 26 Playback pause 26 Power sources (house current 14 (car battery 14 (battery pack 9 Power zoom 18 PROGRAM AE 41 R Rec Review 23 Recording and playback systems 63 Recording mode 58 Recording time...
... sound 57 Manual focus 44 Menu settings 55 Mirror mode 17 Moisture condensation .......... 73 Monaural 64 MONOTONE 34 Mosaic fader 34 NIGHTSHOT 21 Normal charge 10 NTSC system 72 O, P, Q OLD MOVIE 38 Operation indicators 85 ORC 58 OVERLAP 34 Picture effect 37 Picture search 26 Playback pause 26 Power sources (house current 14 (car battery 14 (battery pack 9 Power zoom 18 PROGRAM AE 41 R Rec Review 23 Recording and playback systems 63 Recording mode 58 Recording time...


