Instruction Manual
Page 2
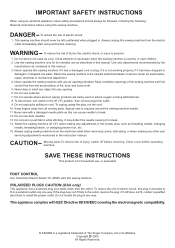
...changing presser foot, etc. 15. Never operate the sewing machine with EEC Directive 89/336/EEC covering the electromagnetic compatibility. ® SINGER is for examination, repair, electrical or mechanical adjustment. 4. Keep ventilation openings of the sewing machine and foot control free from outlet. 9. ...any other ). Do not pull or push fabric while stitching. Moving parts-To reduce risk of The Singer Company Ltd or its intended use outdoors. 7. Never sew with this manual. 3. Close cover before operating machine. FOOT CONTROL Use Yamamoto Electric Model YC-485EC ...
...changing presser foot, etc. 15. Never operate the sewing machine with EEC Directive 89/336/EEC covering the electromagnetic compatibility. ® SINGER is for examination, repair, electrical or mechanical adjustment. 4. Keep ventilation openings of the sewing machine and foot control free from outlet. 9. ...any other ). Do not pull or push fabric while stitching. Moving parts-To reduce risk of The Singer Company Ltd or its intended use outdoors. 7. Never sew with this manual. 3. Close cover before operating machine. FOOT CONTROL Use Yamamoto Electric Model YC-485EC ...
Instruction Manual
Page 5
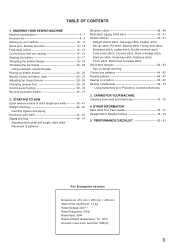
...176;C Acoustic noise level: less than 70db(A) 3 CARING FOR YOUR MACHINE Cleaning hook area and feed dogs 74 - 75 4. TABLE OF CONTENTS 1. KNOWING YOUR SEWING MACHINE Machine identification 6 - 7 Accessories 8 - 9 Setting up your machine 10 - 11 Spool pins, Presser foot lifter 12 - 13 Feed dogs control 12... - 13 Converting to free-arm sewing 14 - 15 Winding the bobbin 16 - 17 Threading the bobbin thread 18 - 19 Threading the top thread 20 - 23 Using automatic needle threader Picking ...
...176;C Acoustic noise level: less than 70db(A) 3 CARING FOR YOUR MACHINE Cleaning hook area and feed dogs 74 - 75 4. TABLE OF CONTENTS 1. KNOWING YOUR SEWING MACHINE Machine identification 6 - 7 Accessories 8 - 9 Setting up your machine 10 - 11 Spool pins, Presser foot lifter 12 - 13 Feed dogs control 12... - 13 Converting to free-arm sewing 14 - 15 Winding the bobbin 16 - 17 Threading the bobbin thread 18 - 19 Threading the top thread 20 - 23 Using automatic needle threader Picking ...
Instruction Manual
Page 8
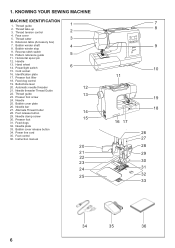
... clamp screw 30. Cord socket 16. Feed dog control 19. Needle bar 27. Alternate Thread Cutter 28. Feed dogs 32. Foot control 36. 1. KNOWING YOUR SEWING MACHINE MACHINE IDENTIFICATION 1. Thread take-up 3. Face cover 5. Bobbin winder shaft 8. Bobbin winder stop 9. Reverse stitch switch 10. Horizontal spool pin 12. Power/light switch...
... clamp screw 30. Cord socket 16. Feed dog control 19. Needle bar 27. Alternate Thread Cutter 28. Feed dogs 32. Foot control 36. 1. KNOWING YOUR SEWING MACHINE MACHINE IDENTIFICATION 1. Thread take-up 3. Face cover 5. Bobbin winder shaft 8. Bobbin winder stop 9. Reverse stitch switch 10. Horizontal spool pin 12. Power/light switch...
Instruction Manual
Page 10
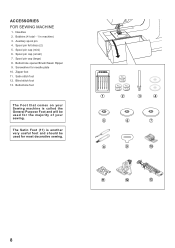
... cap (small) 7. Satin stitch foot 12. The Satin Foot (11) is called the General Purpose Foot and will be used for the majority of your Sewing machine is another very useful foot and should be used for needle plate 10. Buttonhole opener/Brush/Seam Ripper 9. Bobbins (4 total - 1 in machine) 3. Spool pin...
... cap (small) 7. Satin stitch foot 12. The Satin Foot (11) is called the General Purpose Foot and will be used for the majority of your Sewing machine is another very useful foot and should be used for needle plate 10. Buttonhole opener/Brush/Seam Ripper 9. Bobbins (4 total - 1 in machine) 3. Spool pin...

Instruction Manual
Page 14
... type and diameter of the spool itself. FEED DOG CONTROL The feed dogs control the movement of thread. They should be raised for all general sewing purposes and lowered for darning, freehand embroidery and monogramming so that you, not the feed dogs, are three positions for your presser foot. 1. ... the fabric that of spool being sewn. Lower the presser foot to insert or remove fabric. 3. Raise the lifter to the middle position to sew. 2. The diameter of the spool pin cap should be larger than that is being used. Spool Bobine Carrete Spool pin felt discs Rondelle feutre ...
... type and diameter of the spool itself. FEED DOG CONTROL The feed dogs control the movement of thread. They should be raised for all general sewing purposes and lowered for darning, freehand embroidery and monogramming so that you, not the feed dogs, are three positions for your presser foot. 1. ... the fabric that of spool being sewn. Lower the presser foot to insert or remove fabric. 3. Raise the lifter to the middle position to sew. 2. The diameter of the spool pin cap should be larger than that is being used. Spool Bobine Carrete Spool pin felt discs Rondelle feutre ...
Instruction Manual
Page 16
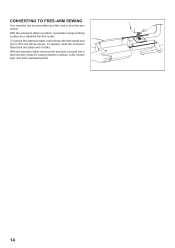
With the extension table removed the machine converts into place until it off to the left as a flat- To remove the extension table, hold it firmly with both hands and pull it clicks. To replace, slide the extension table back into a slim free-arm model for sewing children's clothes, cuffs, trouser legs, and other awkward places. 14 bed or as a standard flat-bed model. With the extension table in position, it provides a large working surface as a free-arm model. CONVERTING TO FREE-ARM SEWING Your machine can be used either as shown.
With the extension table removed the machine converts into place until it off to the left as a flat- To remove the extension table, hold it firmly with both hands and pull it clicks. To replace, slide the extension table back into a slim free-arm model for sewing children's clothes, cuffs, trouser legs, and other awkward places. 14 bed or as a standard flat-bed model. With the extension table in position, it provides a large working surface as a free-arm model. CONVERTING TO FREE-ARM SEWING Your machine can be used either as shown.
Instruction Manual
Page 20
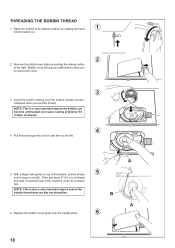
... not slip out of thread and lead it stops in slot (B). NOTE: This is a very important step as the bobbin can become unthreaded and cause sewing problems if it rotates clockwise. 4 4. B A 6.
... not slip out of thread and lead it stops in slot (B). NOTE: This is a very important step as the bobbin can become unthreaded and cause sewing problems if it rotates clockwise. 4 4. B A 6.
Instruction Manual
Page 26
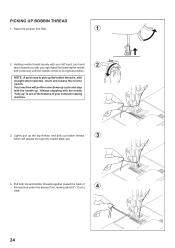
PICKING UP BOBBIN THREAD 1. Always stopping with straight stitch selected, touch and release the reverse switch. Pull both top and bobbin threads together toward you with the needle up cycle and stop with your computer sewing machine. 3. Your machine will appear through the needle plate slot. 4. Holding needle thread loosely with your left...
PICKING UP BOBBIN THREAD 1. Always stopping with straight stitch selected, touch and release the reverse switch. Pull both top and bobbin threads together toward you with the needle up cycle and stop with your computer sewing machine. 3. Your machine will appear through the needle plate slot. 4. Holding needle thread loosely with your left...
Instruction Manual
Page 28
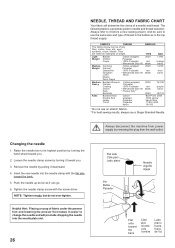
Raise the needle bar to its highest position by turning it easier to use a Singer Branded Needle. Helpful Hint: Placing a scrap of any fiber: cotton, linen, silk, wool, synthetic... Size 11/80,14/90, 16/100 * Do not use on stretch fabrics. * For best sewing results, always use the same size and type of weight. Always disconnect the machine from power supply by pulling it ...before a new sewing project. Insert the new needle into the needle plate slot. 26 Flat side Côté plat Lado...
Raise the needle bar to its highest position by turning it easier to use a Singer Branded Needle. Helpful Hint: Placing a scrap of any fiber: cotton, linen, silk, wool, synthetic... Size 11/80,14/90, 16/100 * Do not use on stretch fabrics. * For best sewing results, always use the same size and type of weight. Always disconnect the machine from power supply by pulling it ...before a new sewing project. Insert the new needle into the needle plate slot. 26 Flat side Côté plat Lado...
Instruction Manual
Page 30
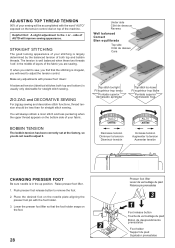
...these two threads 'lock' in the up position. Place the desired foot on top of the machine. ZIG ZAG and DECORATIVE SEWING For zigzag sewing and decorative stitch functions, thread tension should be accomplished with the word "AUTO" exposed on the tension control dial on the needle... thread appears on the foot. 2 28 Presser foot lifter Levier de verrouillage du pied Palanca pie prensatelas 3 1 Foot release button Touche de verrouillage du pied Boton de desprendimiento prensatelas Foot holder Support du pied Sujetador prensatelas Lower the presser foot lifter so that the stitching...
...these two threads 'lock' in the up position. Place the desired foot on top of the machine. ZIG ZAG and DECORATIVE SEWING For zigzag sewing and decorative stitch functions, thread tension should be accomplished with the word "AUTO" exposed on the tension control dial on the needle... thread appears on the foot. 2 28 Presser foot lifter Levier de verrouillage du pied Palanca pie prensatelas 3 1 Foot release button Touche de verrouillage du pied Boton de desprendimiento prensatelas Foot holder Support du pied Sujetador prensatelas Lower the presser foot lifter so that the stitching...
Instruction Manual
Page 34
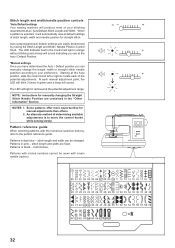
...indicating you are fixed. At each of the potential adjustments. Stitch length and width/needle position controls *Auto/Default settings Your sewing machine will produce most of your preference. Patterns with circled numbers cannot be changed. Some patterns offer more opportunities for manually... Knob. Auto (preprogrammed) default settings are contained in pink - An alternate method of determining available adjustments is selected, it will automatically sew at the Auto / Default Position. *Manual settings Once you have determined the Auto / Default position you can be sewn with the ...
...indicating you are fixed. At each of the potential adjustments. Stitch length and width/needle position controls *Auto/Default settings Your sewing machine will produce most of your preference. Patterns with circled numbers cannot be changed. Some patterns offer more opportunities for manually... Knob. Auto (preprogrammed) default settings are contained in pink - An alternate method of determining available adjustments is selected, it will automatically sew at the Auto / Default Position. *Manual settings Once you have determined the Auto / Default position you can be sewn with the ...

Instruction Manual
Page 36
... will reduce the stitch width automatically and save broken needles and possible damage to your machine. Always select the Twin Needle Mode prior to normal sewing mode. Twin Needle is only active when the Twin Needle Switch is pushed and lit red, patterns with circled numbers in the pattern reference guide...
... will reduce the stitch width automatically and save broken needles and possible damage to your machine. Always select the Twin Needle Mode prior to normal sewing mode. Twin Needle is only active when the Twin Needle Switch is pushed and lit red, patterns with circled numbers in the pattern reference guide...

Instruction Manual
Page 38
... at the exact spot in reverse as long as the reverse switch button is pressed. * Tacking stitch function for straight and zigzag stitches ( ) Reverse sewing is carried out while the reverse stitch switch is pushed. The machine will be at the start and end of other stitches ( ) The... sewing machine makes 4 tiny tacking stitches to sew in the pattern where the reverse/tacking stitch button is pushed. The position of the tacking stitches will continue to tie off...
... at the exact spot in reverse as long as the reverse switch button is pressed. * Tacking stitch function for straight and zigzag stitches ( ) Reverse sewing is carried out while the reverse stitch switch is pushed. The machine will be at the start and end of other stitches ( ) The... sewing machine makes 4 tiny tacking stitches to sew in the pattern where the reverse/tacking stitch button is pushed. The position of the tacking stitches will continue to tie off...
Instruction Manual
Page 44
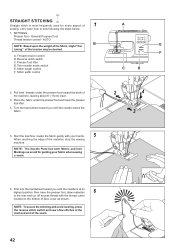
... handwheel toward you until the needle is most frequently used for guiding your hands. 5 When reaching the edge of the material, stop the sewing machine. Pull both Metric and Inch Markings as shown. Let's learn how to the rear and cut off excess thread with your fabric when... sewing a seam. 6. Turn the hand wheel toward the back of the machine, leaving about 6" (15cm) clear. 3. General Purpose Foot Thread tension control - Thread tension control ...
... handwheel toward you until the needle is most frequently used for guiding your hands. 5 When reaching the edge of the material, stop the sewing machine. Pull both Metric and Inch Markings as shown. Let's learn how to the rear and cut off excess thread with your fabric when... sewing a seam. 6. Turn the hand wheel toward the back of the machine, leaving about 6" (15cm) clear. 3. General Purpose Foot Thread tension control - Thread tension control ...
Instruction Manual
Page 46
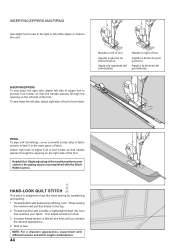
... presseur Aguja a la izquierda del prensatelas Needle to right of foot Aiguille à droite du pied presseur Aguja a la derecha del prensatelas INSERTING ZIPPERS To sew down the left of the zipper or close to the cord. Helpful Hint: Slight adjusting of the needle position to... appearance, experiment with desired top stitching color. Attach right side of zipper foot to the top. 2. When sewing the machine will pull this thread to foot holder so that matches your fabric. To sew down the right side, attach left side of the foot. This thread should not show. 3. HAND-LOOK ...
... presseur Aguja a la izquierda del prensatelas Needle to right of foot Aiguille à droite du pied presseur Aguja a la derecha del prensatelas INSERTING ZIPPERS To sew down the left of the zipper or close to the cord. Helpful Hint: Slight adjusting of the needle position to... appearance, experiment with desired top stitching color. Attach right side of zipper foot to the top. 2. When sewing the machine will pull this thread to foot holder so that matches your fabric. To sew down the right side, attach left side of the foot. This thread should not show. 3. HAND-LOOK ...
Instruction Manual
Page 48
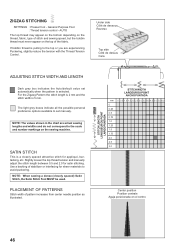
..., etc. For the Zigzag Pattern the stitch length is 2 mm and the stitch width is pulling to the top or you are actual sewing lengths and widths and do not correspond to set automatically when the pattern is a closely spaced attractive stitch for satin stitching. NOTE: When... mm. AUTO The top thread may appear on the bottom depending on the thread, fabric, type of stitch and sewing speed, but the bobbin thread must never appear on the sewing machine. General Purpose Foot :Thread tension control - The light grey boxes indicate all the possible personal preference options available ...
..., etc. For the Zigzag Pattern the stitch length is 2 mm and the stitch width is pulling to the top or you are actual sewing lengths and widths and do not correspond to set automatically when the pattern is a closely spaced attractive stitch for satin stitching. NOTE: When... mm. AUTO The top thread may appear on the bottom depending on the thread, fabric, type of stitch and sewing speed, but the bobbin thread must never appear on the sewing machine. General Purpose Foot :Thread tension control - The light grey boxes indicate all the possible personal preference options available ...
Instruction Manual
Page 50
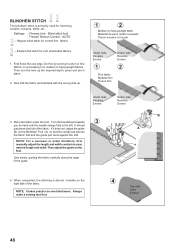
... 3 you by turning it on the foot. NOTE: For a narrower or wider blindhem, first manually adjust the length and width controls to sew blind hems. Always make a sewing test first. 4 Top side Cara Endroit 48 B A 4. When completed, the stitching is primarily used for hemming curtains, trousers, skirts, etc...almost invisible on the Blindhem Foot (A) so that the needle just pierces the fabric fold and the guide just rests against the fold. Sew slowly, guiding the fabric carefully along the edge of the fabric. Place the fabric under on fine fabrics or overcasting it under the ...
... 3 you by turning it on the foot. NOTE: For a narrower or wider blindhem, first manually adjust the length and width controls to sew blind hems. Always make a sewing test first. 4 Top side Cara Endroit 48 B A 4. When completed, the stitching is primarily used for hemming curtains, trousers, skirts, etc...almost invisible on the Blindhem Foot (A) so that the needle just pierces the fabric fold and the guide just rests against the fold. Sew slowly, guiding the fabric carefully along the edge of the fabric. Place the fabric under on fine fabrics or overcasting it under the ...
Instruction Manual
Page 52
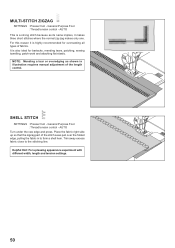
...AUTO Turn under the raw edge and press. MULTI-STITCH ZIGZAG SETTINGS :Presser foot - It is highly recommended for bartacks, mending tears, patching, sewing towelling, patch-work and attaching flat elastic. NOTE: Mending a tear or overedging as its name implies, it is also ideal for overcasting all ... short stitches where the normal zig-zag makes only one. Place the fabric right side up so that the zigzag part of the stitch sews just over the folded edge, pulling the fabric in illustration requires manual adjustment of fabrics. SHELL STITCH SETTINGS :Presser foot - AUTO This...
...AUTO Turn under the raw edge and press. MULTI-STITCH ZIGZAG SETTINGS :Presser foot - It is highly recommended for bartacks, mending tears, patching, sewing towelling, patch-work and attaching flat elastic. NOTE: Mending a tear or overedging as its name implies, it is also ideal for overcasting all ... short stitches where the normal zig-zag makes only one. Place the fabric right side up so that the zigzag part of the stitch sews just over the folded edge, pulling the fabric in illustration requires manual adjustment of fabrics. SHELL STITCH SETTINGS :Presser foot - AUTO This...
Instruction Manual
Page 56
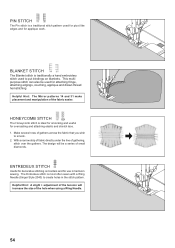
The Entredeux stitch is most often sewn with a Wing Needle (Singer Style 2040) to create holes in heirloom sewing. With a narrow strip of fabric directly under the line of gathers across the fabric that you wish to put bindings on borders and for attaching ...
The Entredeux stitch is most often sewn with a Wing Needle (Singer Style 2040) to create holes in heirloom sewing. With a narrow strip of fabric directly under the line of gathers across the fabric that you wish to put bindings on borders and for attaching ...
Instruction Manual
Page 58
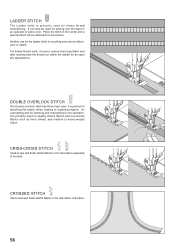
... Place the stitch in the center and a special effect will be used for decoration of borders. CROSSED STITCH Use to sew and finish elastic fabrics or for sewing over narrow ribbon, yarn or elastic. It is perfect for attaching flat elastic when making or repairing lingerie, for overcasting and... for decoration especially of borders. 56 CRISS-CROSS STITCH Used to sew and finish stretch fabrics or for seaming and overcasting in an opposite or same color. It is primarily used for the ladder stitch is...
... Place the stitch in the center and a special effect will be used for decoration of borders. CROSSED STITCH Use to sew and finish elastic fabrics or for sewing over narrow ribbon, yarn or elastic. It is perfect for attaching flat elastic when making or repairing lingerie, for overcasting and... for decoration especially of borders. 56 CRISS-CROSS STITCH Used to sew and finish stretch fabrics or for seaming and overcasting in an opposite or same color. It is primarily used for the ladder stitch is...


