Instruction Manual
Page 2
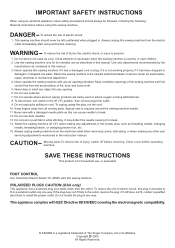
... user servicing adjustments mentioned in the outlet, reverse the plug. Do not allow to break. 14. Use this sewing machine if it has a damaged cord or plug, if it is required around the sewing machine needle. 11. Never operate this sewing machine only for examination, repair, electrical or mechanical adjustment. 4. Do not pull or push fabric while stitching. Close cover before cleaning. If the plug does not fit fully in the instruction manual...
... user servicing adjustments mentioned in the outlet, reverse the plug. Do not allow to break. 14. Use this sewing machine if it has a damaged cord or plug, if it is required around the sewing machine needle. 11. Never operate this sewing machine only for examination, repair, electrical or mechanical adjustment. 4. Do not pull or push fabric while stitching. Close cover before cleaning. If the plug does not fit fully in the instruction manual...
Instruction Manual
Page 5
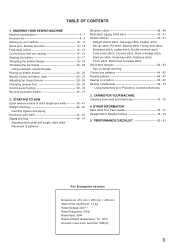
... SEWING MACHINE Machine identification 6 - 7 Accessories 8 - 9 Setting up your machine 10 - 11 Spool pins, Presser foot lifter 12 - 13 Feed dogs control 12 - 13 Converting to free-arm sewing 14 - 15 Winding the bobbin 16 - 17 Threading the bobbin thread 18 - 19 Threading the top thread 20 - 23 Using automatic needle threader Picking up bobbin thread 24 - 25 Needle, thread and fabric chart 26 - 27 Adjusting top thread tension 28 - 29 Changing presser foot 28 - 29 Control panel function 30 - 35 Reverse Operation Switch 36 - 37 2. CARING FOR YOUR MACHINE Cleaning hook area and feed...
... SEWING MACHINE Machine identification 6 - 7 Accessories 8 - 9 Setting up your machine 10 - 11 Spool pins, Presser foot lifter 12 - 13 Feed dogs control 12 - 13 Converting to free-arm sewing 14 - 15 Winding the bobbin 16 - 17 Threading the bobbin thread 18 - 19 Threading the top thread 20 - 23 Using automatic needle threader Picking up bobbin thread 24 - 25 Needle, thread and fabric chart 26 - 27 Adjusting top thread tension 28 - 29 Changing presser foot 28 - 29 Control panel function 30 - 35 Reverse Operation Switch 36 - 37 2. CARING FOR YOUR MACHINE Cleaning hook area and feed...
Instruction Manual
Page 8
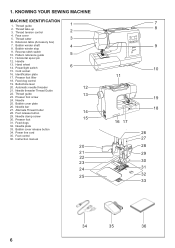
...25. Bobbin cover plate 26. Power line cord 35. Face cover 5. Horizontal spool pin 12. Identification plate 17. Needle bar 27. Extension table (Accessory box) 7. Pattern reference guide 11. Feed dog control 19. Thread guide 23. Alternate Thread Cutter 28. Feed dogs 32. Foot release button 29. Needle threader Thread Guide 22. Bobbin cover release button 34. Thread take-up 3. Presser foot screw 24. Needle plate 33. Bobbin winder stop 9. Power/light switch 15. KNOWING YOUR SEWING MACHINE MACHINE IDENTIFICATION 1. Needle clamp screw 30. Reverse...
...25. Bobbin cover plate 26. Power line cord 35. Face cover 5. Horizontal spool pin 12. Identification plate 17. Needle bar 27. Extension table (Accessory box) 7. Pattern reference guide 11. Feed dog control 19. Thread guide 23. Alternate Thread Cutter 28. Feed dogs 32. Foot release button 29. Needle threader Thread Guide 22. Bobbin cover release button 34. Thread take-up 3. Presser foot screw 24. Needle plate 33. Bobbin winder stop 9. Power/light switch 15. KNOWING YOUR SEWING MACHINE MACHINE IDENTIFICATION 1. Needle clamp screw 30. Reverse...

Instruction Manual
Page 12
... pedal Always disconnect the machine from power supply by removing the plug from the power supply. Connect the foot control plug (3) into the cord socket (1) and your machine the first time. When servicing the machine, or changing needles, etc., machine must be disconnected from the wall-outlet. SETTING UP YOUR MACHINE Be sure to wipe off any surplus oil from needle plate area before using your wall outlet (2) as illustrated. POWER LINE CORD/FOOT CONTROL...
... pedal Always disconnect the machine from power supply by removing the plug from the power supply. Connect the foot control plug (3) into the cord socket (1) and your machine the first time. When servicing the machine, or changing needles, etc., machine must be disconnected from the wall-outlet. SETTING UP YOUR MACHINE Be sure to wipe off any surplus oil from needle plate area before using your wall outlet (2) as illustrated. POWER LINE CORD/FOOT CONTROL...
Instruction Manual
Page 20
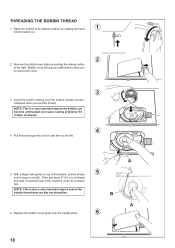
... highest position by pushing the release button to remove the cover. 3 3. Then pull about 6" (15 cm) of the machine under the presser foot. NOTE: This is a very important step as the bobbin can become unthreaded and cause sewing problems if it rotates clockwise. 4 4. Insert the bobbin making sure the bobbin rotates counterclockwise when you to the right. Raise the needle to the left. Remove the bobbin cover plate by...
... highest position by pushing the release button to remove the cover. 3 3. Then pull about 6" (15 cm) of the machine under the presser foot. NOTE: This is a very important step as the bobbin can become unthreaded and cause sewing problems if it rotates clockwise. 4 4. Insert the bobbin making sure the bobbin rotates counterclockwise when you to the right. Raise the needle to the left. Remove the bobbin cover plate by...

Instruction Manual
Page 22
... lever until the needle is not raised, correct thread tension cannot be obtained.) B. Then guide the thread to left of the machine. THREADING THE TOP THREAD A. Always be sure to back. (See following page for instructions on operation of the Automatic Needle Threader.) IMPORTANT: 4 To verify that the machine is threaded properly in its highest position and the thread take -up (4) from front to raise the presser foot lifter before threading...
... lever until the needle is not raised, correct thread tension cannot be obtained.) B. Then guide the thread to left of the machine. THREADING THE TOP THREAD A. Always be sure to back. (See following page for instructions on operation of the Automatic Needle Threader.) IMPORTANT: 4 To verify that the machine is threaded properly in its highest position and the thread take -up (4) from front to raise the presser foot lifter before threading...
Instruction Manual
Page 26
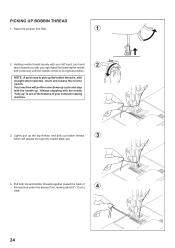
... appear through the needle plate slot. 4. PICKING UP BOBBIN THREAD 1. Raise the presser foot lifter. 1 2. Pull both top and bobbin threads together toward you with straight stitch selected, touch and release the reverse switch. Holding needle thread loosely with your left hand, turn hand 2 wheel toward the back of your right hand first lowering the needle and continuing until the needle comes to pick up " is , with your computer sewing machine. 3.
... appear through the needle plate slot. 4. PICKING UP BOBBIN THREAD 1. Raise the presser foot lifter. 1 2. Pull both top and bobbin threads together toward you with straight stitch selected, touch and release the reverse switch. Holding needle thread loosely with your left hand, turn hand 2 wheel toward the back of your right hand first lowering the needle and continuing until the needle comes to pick up " is , with your computer sewing machine. 3.
Instruction Manual
Page 28
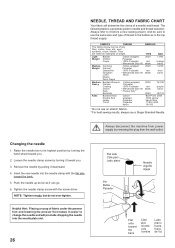
... back. 5. Insert the new needle into the needle plate slot. 26 Flat side Côté plat Lado plano Pin Butée Pasador Needle Aiguille Aguja Flat side toward you . 3. Push the needle up as far as in the bobbin as it easier to use a Singer Branded Needle. Helpful Hint: Placing a scrap of fabric under the presser foot and lowering the presser foot makes it can be sure to change the needle and...
... back. 5. Insert the new needle into the needle plate slot. 26 Flat side Côté plat Lado plano Pin Butée Pasador Needle Aiguille Aguja Flat side toward you . 3. Push the needle up as far as in the bobbin as it easier to use a Singer Branded Needle. Helpful Hint: Placing a scrap of fabric under the presser foot and lowering the presser foot makes it can be sure to change the needle and...
Instruction Manual
Page 30
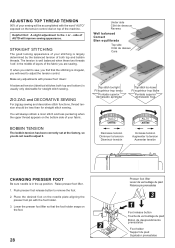
...;n CHANGING PRESSER FOOT Be sure needle is irregular, you find that the foot holder snaps on the needle plate aligning the presser foot pin with the foot holder. 3. A balanced tension (identical stitches both top and bobbin threads. Lower the presser foot lifter so that the stitching is in the middle of layers of the fabric you do not need to adjust it. ADJUSTING TOP THREAD TENSION 90% of your sewing will be less than for straight stitch sewing. Helpful Hint: A slight adjustment to remove...
...;n CHANGING PRESSER FOOT Be sure needle is irregular, you find that the foot holder snaps on the needle plate aligning the presser foot pin with the foot holder. 3. A balanced tension (identical stitches both top and bobbin threads. Lower the presser foot lifter so that the stitching is in the middle of layers of the fabric you do not need to adjust it. ADJUSTING TOP THREAD TENSION 90% of your sewing will be less than for straight stitch sewing. Helpful Hint: A slight adjustment to remove...
Instruction Manual
Page 34
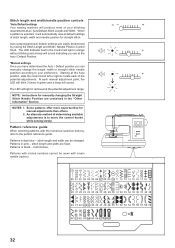
... light in pink - buttonholes. Some patterns offer more opportunities for manual adjustments than others. 2. Auto (preprogrammed) default settings are fixed. Patterns in red beyond the potential adjustment range. Patterns in orange without blinking and a beep will sound indicating you are contained in black - Stitch length and width/needle position controls *Auto/Default settings Your sewing machine will produce most of stitch length, width and needle position for straight stitch. Starting at the Auto position, slide the control...
... light in pink - buttonholes. Some patterns offer more opportunities for manual adjustments than others. 2. Auto (preprogrammed) default settings are fixed. Patterns in red beyond the potential adjustment range. Patterns in orange without blinking and a beep will sound indicating you are contained in black - Stitch length and width/needle position controls *Auto/Default settings Your sewing machine will produce most of stitch length, width and needle position for straight stitch. Starting at the Auto position, slide the control...
Instruction Manual
Page 44
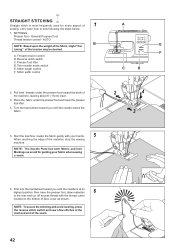
... you until the needle enters the fabric. A E F C D 2 4 3 5. Stitch length control F. General Purpose Foot Thread tension control - A. Presser foot lifter D. Guide the fabric gently with the thread cutter located on the bottom of the material, stop the sewing machine. Start the machine. Let's learn how to the rear and cut off excess thread with your fabric when sewing a seam. 6. Thread tension control B. Stitch width control 2. SETTINGS Presser foot - NOTE: The Needle Plate has both threads under the presser foot and lower the presser foot lifter. 4.
... you until the needle enters the fabric. A E F C D 2 4 3 5. Stitch length control F. General Purpose Foot Thread tension control - A. Presser foot lifter D. Guide the fabric gently with the thread cutter located on the bottom of the material, stop the sewing machine. Start the machine. Let's learn how to the rear and cut off excess thread with your fabric when sewing a seam. 6. Thread tension control B. Stitch width control 2. SETTINGS Presser foot - NOTE: The Needle Plate has both threads under the presser foot and lower the presser foot lifter. 4.
Instruction Manual
Page 46
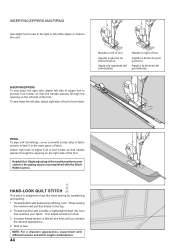
... and quilting. 1. This thread should not show. 3. HAND-LOOK QUILT STITCH This stitch is designed to the top. 2. Helpful Hint: Slight adjusting of the foot. Thread bobbin with different tension and stitch length combinations. 44 Thread machine with the Stitch Width Control. Start to the piping may be accomplished with invisible or lightweight thread the color that the needle passes through the opening on the right side of fabric. Increase thread tension a little bit at a time...
... and quilting. 1. This thread should not show. 3. HAND-LOOK QUILT STITCH This stitch is designed to the top. 2. Helpful Hint: Slight adjusting of the foot. Thread bobbin with different tension and stitch length combinations. 44 Thread machine with the Stitch Width Control. Start to the piping may be accomplished with invisible or lightweight thread the color that the needle passes through the opening on the right side of fabric. Increase thread tension a little bit at a time...
Instruction Manual
Page 48
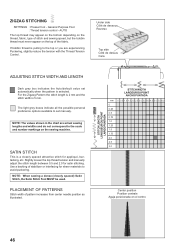
... reduce the tension with the Thread Tension Control. For the Zigzag Pattern the stitch length is 2 mm and the stitch width is selected. Slightly loosen the top thread tension and manually adjust the stitch length between 0.5 and 2.0 for sheer materials to set automatically when the pattern is 5 mm. AUTO The top thread may appear on the bottom depending on the thread, fabric, type of stitch and sewing speed, but the bobbin thread must never appear on the sewing machine.
... reduce the tension with the Thread Tension Control. For the Zigzag Pattern the stitch length is 2 mm and the stitch width is selected. Slightly loosen the top thread tension and manually adjust the stitch length between 0.5 and 2.0 for sheer materials to set automatically when the pattern is 5 mm. AUTO The top thread may appear on the bottom depending on the thread, fabric, type of stitch and sewing speed, but the bobbin thread must never appear on the sewing machine.
Instruction Manual
Page 50
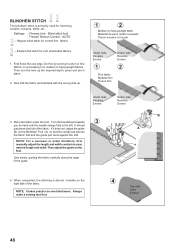
Sew slowly, guiding the fabric carefully along the edge of the fabric. When completed, the stitching is primarily used for soft, stretchable fabrics 1. Settings : Presser foot - Now fold the fabric as illustrated with the wrong side up the required depth, press and pin in place. 2. NOTE: For a narrower or wider blindhem, first manually adjust the length and width controls to sew blind hems. Always make a sewing test first. 4 Top side Cara Endroit...
Sew slowly, guiding the fabric carefully along the edge of the fabric. When completed, the stitching is primarily used for soft, stretchable fabrics 1. Settings : Presser foot - Now fold the fabric as illustrated with the wrong side up the required depth, press and pin in place. 2. NOTE: For a narrower or wider blindhem, first manually adjust the length and width controls to sew blind hems. Always make a sewing test first. 4 Top side Cara Endroit...

Instruction Manual
Page 54
... Purpose Foot or Satin Stitch Foot :Thread tension control - It's very effective for seaming in repairing raw or worn edges of this stitch also to top-stitch lapels, collars and cuffs to give a professional finish to be used for use on knit, or stretchable fabrics, but can be used on ordinary woven materials. STRETCH STITCHES SETTINGS :Presser foot - It is ideal for edging neck-bands, armholes, sleeves and hems. When manually adjusted to...
... Purpose Foot or Satin Stitch Foot :Thread tension control - It's very effective for seaming in repairing raw or worn edges of this stitch also to top-stitch lapels, collars and cuffs to give a professional finish to be used for use on knit, or stretchable fabrics, but can be used on ordinary woven materials. STRETCH STITCHES SETTINGS :Presser foot - It is ideal for edging neck-bands, armholes, sleeves and hems. When manually adjusted to...
Instruction Manual
Page 64
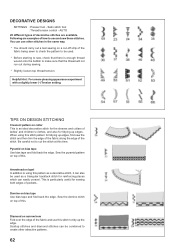
... DESIGN STITCHING Crescent pattern on lapel In addition to make sure that the thread will not run out during sewing. * Slightly loosen top thread tension. DECORATIVE DESIGNS SETTINGS :Presser foot - AUTO 20 different types of pockets.. Arrowhead on collar This is particularly useful for the sleeves and collars of the stitch. This is an ideal decorative stitch for sewing both edges of decorative stitches are examples of the fabric...
... DESIGN STITCHING Crescent pattern on lapel In addition to make sure that the thread will not run out during sewing. * Slightly loosen top thread tension. DECORATIVE DESIGNS SETTINGS :Presser foot - AUTO 20 different types of pockets.. Arrowhead on collar This is particularly useful for the sleeves and collars of the stitch. This is an ideal decorative stitch for sewing both edges of decorative stitches are examples of the fabric...
Instruction Manual
Page 68
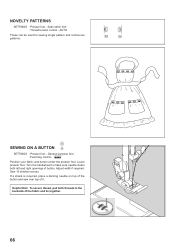
... sew over top of button. Adjust width if required. Position your fabric and button under the presser foot. Lower presser foot. Satin stitch foot :Thread tension control - Turn the handwheel to the backside of the fabric and tie together. 66 General purpose foot :Feed dog control - Helpful Hint: To secure thread, pull both threads to make sure needle clears both left and right openings of it. AUTO These can be used for sewing single pattern and continuous patterns. Sew 10 stitches across. SEWING ON A BUTTON SETTINGS :Presser foot - NOVELTY PATTERNS SETTINGS :Presser foot...
... sew over top of button. Adjust width if required. Position your fabric and button under the presser foot. Lower presser foot. Satin stitch foot :Thread tension control - Turn the handwheel to the backside of the fabric and tie together. 66 General purpose foot :Feed dog control - Helpful Hint: To secure thread, pull both threads to make sure needle clears both left and right openings of it. AUTO These can be used for sewing single pattern and continuous patterns. Sew 10 stitches across. SEWING ON A BUTTON SETTINGS :Presser foot - NOVELTY PATTERNS SETTINGS :Presser foot...
Instruction Manual
Page 76
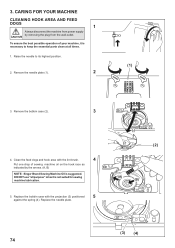
... possible operation of sewing machine oil on the hook race as it is suggested. CARING FOR YOUR MACHINE CLEANING HOOK AREA AND FEED DOGS 1 Always disconnect the machine from power supply CAUTION by the arrows. (A, B) NOTE: Singer Brand Sewing Machine Oil is necessary to its highest position. 2. Remove the bobbin case (2). 3 4. Replace the bobbin case with the lint brush. 4 Put one drop of your machine, it is not suited for sewing machine lubrication. 5. Replace the needle plate. (2) (A) (B) (3) (4) 74 3. Clean the feed dogs and hook...
... possible operation of sewing machine oil on the hook race as it is suggested. CARING FOR YOUR MACHINE CLEANING HOOK AREA AND FEED DOGS 1 Always disconnect the machine from power supply CAUTION by the arrows. (A, B) NOTE: Singer Brand Sewing Machine Oil is necessary to its highest position. 2. Remove the bobbin case (2). 3 4. Replace the bobbin case with the lint brush. 4 Put one drop of your machine, it is not suited for sewing machine lubrication. 5. Replace the needle plate. (2) (A) (B) (3) (4) 74 3. Clean the feed dogs and hook...
Instruction Manual
Page 78
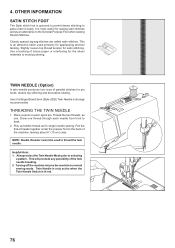
... zig-zag stitches are called satin stitches. Pick up bobbin thread as an alternative to the General Purpose Foot when sewing Stretch Stitches. NOTE: Needle threader cannot be used primarily for appliqueing and bar tacking. 4. This is an attractive stitch used to avoid puckering. Slightly loosen top thread tension for the sheer materials to thread the twin needle. Use of a Singer Brand 3mm (Style 2025) Twin Needle is lit red. 76 Thread the two threads as one thread through each spool pin. Twin Needle...
... zig-zag stitches are called satin stitches. Pick up bobbin thread as an alternative to the General Purpose Foot when sewing Stretch Stitches. NOTE: Needle threader cannot be used primarily for appliqueing and bar tacking. 4. This is an attractive stitch used to avoid puckering. Slightly loosen top thread tension for the sheer materials to thread the twin needle. Use of a Singer Brand 3mm (Style 2025) Twin Needle is lit red. 76 Thread the two threads as one thread through each spool pin. Twin Needle...
Instruction Manual
Page 82
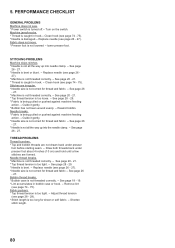
.... - Fabric puckers. * Top thread tension is too tight. - Clean hook (see page 26 - 27). * Machine is not all the way up into needle clamp. - THREAD PROBLEMS Thread bunches. * Top and bobbin threads are formed. Bobbin thread breaks. * Bobbin case is bent or blunt. - Remove lint (see page 16 - 17). See page 26 - 27. * Needle is not threaded correctly. - Guide it gently. * Needle size is lowered (see page 74 - 75). lower presser foot. * Feed dog control is not correct for thread and fabric. - STITCHING PROBLEMS Machine skips stitches. * Needle...
.... - Fabric puckers. * Top thread tension is too tight. - Clean hook (see page 26 - 27). * Machine is not all the way up into needle clamp. - THREAD PROBLEMS Thread bunches. * Top and bobbin threads are formed. Bobbin thread breaks. * Bobbin case is bent or blunt. - Remove lint (see page 16 - 17). See page 26 - 27. * Needle is not threaded correctly. - Guide it gently. * Needle size is lowered (see page 74 - 75). lower presser foot. * Feed dog control is not correct for thread and fabric. - STITCHING PROBLEMS Machine skips stitches. * Needle...


