Instruction Manual
Page 2
... any way. Use only attachments recommended by pulling on cord. Never operate the sewing machine with EEC Directive 89/336/EEC covering the electromagnetic compatibility. ® SINGER is required around the sewing machine needle. 11. To disconnect, turn switch to be used by or near children.... 2. Switch the sewing machine off ("0") position, then remove plug from the electrical outlet when ...
... any way. Use only attachments recommended by pulling on cord. Never operate the sewing machine with EEC Directive 89/336/EEC covering the electromagnetic compatibility. ® SINGER is required around the sewing machine needle. 11. To disconnect, turn switch to be used by or near children.... 2. Switch the sewing machine off ("0") position, then remove plug from the electrical outlet when ...
Instruction Manual
Page 5
...dogs 74 - 75 4. TABLE OF CONTENTS 1. KNOWING YOUR SEWING MACHINE Machine identification 6 - 7 Accessories 8 - 9 Setting up your machine 10 - 11 Spool pins, Presser foot lifter 12 - 13 Feed dogs control 12 - 13 Converting to free-arm sewing 14 - 15 Winding the bobbin 16 - 17 Threading ...63 Tips on design stitching Continuous patterns 64 - 65 Novelty patterns 66 - 67 Sewing on a button 66 - 67 Sewing a buttonhole 68 - 73 Using buttonhole foot, Procedure, Corded buttonholes 3. STARTING TO SEW Quick reference table of stitch length and width ---------- 38 - 41 Straight stitching ...
...dogs 74 - 75 4. TABLE OF CONTENTS 1. KNOWING YOUR SEWING MACHINE Machine identification 6 - 7 Accessories 8 - 9 Setting up your machine 10 - 11 Spool pins, Presser foot lifter 12 - 13 Feed dogs control 12 - 13 Converting to free-arm sewing 14 - 15 Winding the bobbin 16 - 17 Threading ...63 Tips on design stitching Continuous patterns 64 - 65 Novelty patterns 66 - 67 Sewing on a button 66 - 67 Sewing a buttonhole 68 - 73 Using buttonhole foot, Procedure, Corded buttonholes 3. STARTING TO SEW Quick reference table of stitch length and width ---------- 38 - 41 Straight stitching ...
Instruction Manual
Page 8
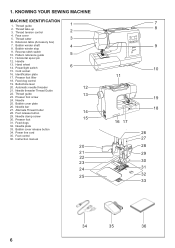
.... Thread guide 23. Bobbin cover plate 26. Bobbin winder stop 9. Alternate Thread Cutter 28. Thread tension control 4. Hand wheel 14. Foot control 36. KNOWING YOUR SEWING MACHINE MACHINE IDENTIFICATION 1. Foot release button 29. Presser foot 31.
.... Thread guide 23. Bobbin cover plate 26. Bobbin winder stop 9. Alternate Thread Cutter 28. Thread tension control 4. Hand wheel 14. Foot control 36. KNOWING YOUR SEWING MACHINE MACHINE IDENTIFICATION 1. Foot release button 29. Presser foot 31.
Instruction Manual
Page 10
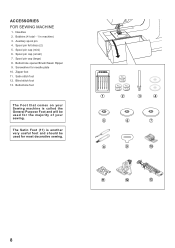
... felt discs (2) 5. Spool pin cap (large) 8. Satin stitch foot 12. Auxiliary spool pin 4. Screwdriver for the majority of your Sewing machine is another very useful foot and should be used for most decorative sewing. 1 2 3 4 5 6 7 8 9 10 11 12 13 8 Bobbins (4 total - 1 in machine) 3. Blind stitch foot 13. Buttonhole foot The Foot that comes on your...
... felt discs (2) 5. Spool pin cap (large) 8. Satin stitch foot 12. Auxiliary spool pin 4. Screwdriver for the majority of your Sewing machine is another very useful foot and should be used for most decorative sewing. 1 2 3 4 5 6 7 8 9 10 11 12 13 8 Bobbins (4 total - 1 in machine) 3. Blind stitch foot 13. Buttonhole foot The Foot that comes on your...
Instruction Manual
Page 16
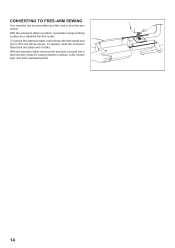
To remove the extension table, hold it firmly with both hands and pull it clicks. To replace, slide the extension table back into a slim free-arm model for sewing children's clothes, cuffs, trouser legs, and other awkward places. 14 CONVERTING TO FREE-ARM SEWING Your machine can be used either as a free-arm model. bed or as a flat- With the extension table removed the machine converts into place until it off to the left as a standard flat-bed model. With the extension table in position, it provides a large working surface as shown.
To remove the extension table, hold it firmly with both hands and pull it clicks. To replace, slide the extension table back into a slim free-arm model for sewing children's clothes, cuffs, trouser legs, and other awkward places. 14 CONVERTING TO FREE-ARM SEWING Your machine can be used either as a free-arm model. bed or as a flat- With the extension table removed the machine converts into place until it off to the left as a standard flat-bed model. With the extension table in position, it provides a large working surface as shown.
Instruction Manual
Page 20
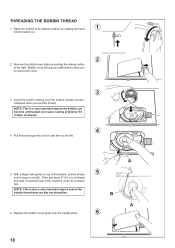
...through the slot (A) and then to assure the bobbin thread does not slip out of position. A 5. With a finger held gently on top of the machine under the presser foot. B A 6. Bobbin cover will pop up sufficiently to remove the cover. 3 3. Insert the bobbin making sure the bobbin rotates... counterclockwise when you to allow you pull the thread. NOTE: This is a very important step as the bobbin can become unthreaded and cause sewing problems if it stops in slot (B). Remove the bobbin cover plate by rotating the hand 1 wheel toward you. 2 2. NOTE: This is also...
...through the slot (A) and then to assure the bobbin thread does not slip out of position. A 5. With a finger held gently on top of the machine under the presser foot. B A 6. Bobbin cover will pop up sufficiently to remove the cover. 3 3. Insert the bobbin making sure the bobbin rotates... counterclockwise when you to allow you pull the thread. NOTE: This is a very important step as the bobbin can become unthreaded and cause sewing problems if it stops in slot (B). Remove the bobbin cover plate by rotating the hand 1 wheel toward you. 2 2. NOTE: This is also...
Instruction Manual
Page 26
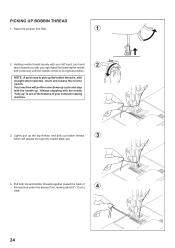
... presser foot, leaving about 6" (15 cm) 4 clear. 24 Always stopping with the needle "fully up" is , with your computer sewing machine. 3. Your machine will appear through the needle plate slot. 4. Lightly pull up the top thread, and pick up . PICKING UP BOBBIN THREAD 1. Pull ...both top and bobbin threads together toward you with straight stitch selected, touch and release the reverse switch. Holding needle thread loosely with your left hand...
... presser foot, leaving about 6" (15 cm) 4 clear. 24 Always stopping with the needle "fully up" is , with your computer sewing machine. 3. Your machine will appear through the needle plate slot. 4. Lightly pull up the top thread, and pick up . PICKING UP BOBBIN THREAD 1. Pull ...both top and bobbin threads together toward you with straight stitch selected, touch and release the reverse switch. Holding needle thread loosely with your left hand...
Instruction Manual
Page 28
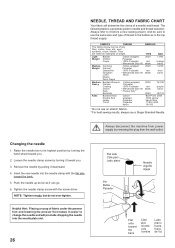
... 6. And be of any fiber: cotton, linen, silk, wool, synthetic, rayon, blends. LightWeight Batiste Chiffon Crepe Medium- Always disconnect the machine from the wall-outlet. Helpful Hint: Placing a scrap of a needle and thread. Changing the needle 1. Loosen the needle clamp screw by turning.../90, 16/100 * Do not use on stretch fabrics. * For best sewing results, always use the same size and type of weight. The following table is a practical guide to use a Singer Branded Needle. Corduroy Weight Flannel Gabardine Gingham Linen Muslin Wool Crepe Cotton-wrapped Polyester...
... 6. And be of any fiber: cotton, linen, silk, wool, synthetic, rayon, blends. LightWeight Batiste Chiffon Crepe Medium- Always disconnect the machine from the wall-outlet. Helpful Hint: Placing a scrap of a needle and thread. Changing the needle 1. Loosen the needle clamp screw by turning.../90, 16/100 * Do not use on stretch fabrics. * For best sewing results, always use the same size and type of weight. The following table is a practical guide to use a Singer Branded Needle. Corduroy Weight Flannel Gabardine Gingham Linen Muslin Wool Crepe Cotton-wrapped Polyester...
Instruction Manual
Page 30
...is in the middle of layers of the fabric you will be less than for straight stitch sewing. Make any adjustments with the word "AUTO" exposed on the tension control dial on the ... 28 Presser foot lifter Levier de verrouillage du pied Palanca pie prensatelas 3 1 Foot release button Touche de verrouillage du pied Boton de desprendimiento prensatelas Foot holder Support du pied Sujetador prensatelas side of...obtain a nicer stitch and less puckering when the upper thread appears on top of the machine. Lower the presser foot lifter so that the stitching is largely determined by the balanced ...
...is in the middle of layers of the fabric you will be less than for straight stitch sewing. Make any adjustments with the word "AUTO" exposed on the tension control dial on the ... 28 Presser foot lifter Levier de verrouillage du pied Palanca pie prensatelas 3 1 Foot release button Touche de verrouillage du pied Boton de desprendimiento prensatelas Foot holder Support du pied Sujetador prensatelas side of...obtain a nicer stitch and less puckering when the upper thread appears on top of the machine. Lower the presser foot lifter so that the stitching is largely determined by the balanced ...
Instruction Manual
Page 34
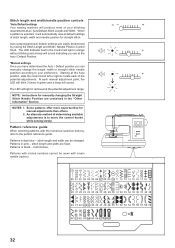
...to your stitching requirements at the Auto position, slide the control knob left or right to move the control knobs while sewing slowly. Auto (preprogrammed) default settings are fixed. Some patterns offer more opportunities for manually changing the Straight Stitch Needle ...twin needle (option). 32 Patterns with circled numbers cannot be changed. Stitch length and width/needle position controls *Auto/Default settings Your sewing machine will produce most of the potential adjustments. At each of your preference. NOTES: 1. When a pattern is to locate each manual...
...to your stitching requirements at the Auto position, slide the control knob left or right to move the control knobs while sewing slowly. Auto (preprogrammed) default settings are fixed. Some patterns offer more opportunities for manually changing the Straight Stitch Needle ...twin needle (option). 32 Patterns with circled numbers cannot be changed. Stitch length and width/needle position controls *Auto/Default settings Your sewing machine will produce most of the potential adjustments. At each of your preference. NOTES: 1. When a pattern is to locate each manual...

Instruction Manual
Page 36
This will preclude any possibility of the stitch you selected. Turning off the machine returns the machine to your machine. Twin Needle is only active when the Twin Needle Switch is pushed and lit red, patterns with circled numbers in the pattern reference guide cannot... be selected and a beep will reduce the stitch width automatically and save broken needles and possible damage to normal sewing mode. Helpful ...
This will preclude any possibility of the stitch you selected. Turning off the machine returns the machine to your machine. Twin Needle is only active when the Twin Needle Switch is pushed and lit red, patterns with circled numbers in the pattern reference guide cannot... be selected and a beep will reduce the stitch width automatically and save broken needles and possible damage to normal sewing mode. Helpful ...

Instruction Manual
Page 38
...pressed. * Tacking stitch function for straight and zigzag stitches ( ) Reverse sewing is carried out while the reverse stitch switch is very useful for tying off the sewing pattern to tie off of other stitches ( ) The sewing machine makes 4 tiny tacking stitches to avoid raveling at the start and end ...of the tacking stitches will continue to sew in the pattern where the reverse/tacking stitch button...
...pressed. * Tacking stitch function for straight and zigzag stitches ( ) Reverse sewing is carried out while the reverse stitch switch is very useful for tying off the sewing pattern to tie off of other stitches ( ) The sewing machine makes 4 tiny tacking stitches to avoid raveling at the start and end ...of the tacking stitches will continue to sew in the pattern where the reverse/tacking stitch button...
Instruction Manual
Page 44
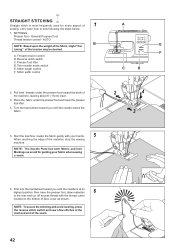
... hand wheel toward you until the needle is most frequently used for guiding your hands. 5 When reaching the edge of the material, stop the sewing machine. STRAIGHT STITCHING Straight stitch is at the start and end of the seam. 42 Stitch length control F. Start the... machine. AUTO B NOTE: Based upon the weight of the fabric, slight "fine tuning" of 1 sewing. Thread tension control B. Guide the fabric gently with the thread cutter located on the bottom of face cover...
... hand wheel toward you until the needle is most frequently used for guiding your hands. 5 When reaching the edge of the material, stop the sewing machine. STRAIGHT STITCHING Straight stitch is at the start and end of the seam. 42 Stitch length control F. Start the... machine. AUTO B NOTE: Based upon the weight of the fabric, slight "fine tuning" of 1 sewing. Thread tension control B. Guide the fabric gently with the thread cutter located on the bottom of face cover...
Instruction Manual
Page 46
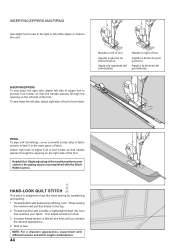
... of zipper foot to foot holder so that needle passes through the opening on the left side of the foot. When sewing the machine will pull this thread to sew. Thread machine with invisible or lightweight thread the color that the needle passes through the opening on the right side of the foot.... Start to the top. 2. INSERTING ZIPPERS AND PIPING Use zipper foot to sew to the right or left of foot to foot holder. ...
... of zipper foot to foot holder so that needle passes through the opening on the left side of the foot. When sewing the machine will pull this thread to sew. Thread machine with invisible or lightweight thread the color that the needle passes through the opening on the right side of the foot.... Start to the top. 2. INSERTING ZIPPERS AND PIPING Use zipper foot to sew to the right or left of foot to foot holder. ...
Instruction Manual
Page 48
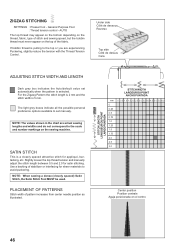
... and widths and do not correspond to the scale and number markings on the top of stitch and sewing speed, but the bobbin thread must never appear on the sewing machine. PLACEMENT OF PATTERNS Stitch width of stabilizer or interfacing for sheer materials to set automatically when the pattern... is 5 mm. NOTE: When sewing a dense (closely spaced) Satin Stitch, the Satin Stitch Foot MUST be used. Under ...
... and widths and do not correspond to the scale and number markings on the top of stitch and sewing speed, but the bobbin thread must never appear on the sewing machine. PLACEMENT OF PATTERNS Stitch width of stabilizer or interfacing for sheer materials to set automatically when the pattern... is 5 mm. NOTE: When sewing a dense (closely spaced) Satin Stitch, the Satin Stitch Foot MUST be used. Under ...
Instruction Manual
Page 70
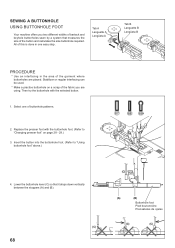
... selected button. 1. Tab A Languette A Lengüeta A Tab B Languette B Lengüeta B PROCEDURE * Use an interfacing in one of the garment where buttonholes are using. SEWING A BUTTONHOLE USING BUTTONHOLE FOOT Your machine offers you are placed.
... selected button. 1. Tab A Languette A Lengüeta A Tab B Languette B Lengüeta B PROCEDURE * Use an interfacing in one of the garment where buttonholes are using. SEWING A BUTTONHOLE USING BUTTONHOLE FOOT Your machine offers you are placed.
Instruction Manual
Page 72
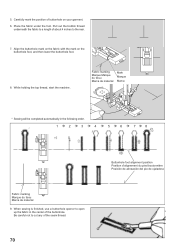
... fabric in the following order. 1 2 3 4 5 6 7 8 Fabric marking Marque du tissu Marca de material 9. Fabric marking Marque Marque du tissu Marca de material Mark Marque Marca * Sewing will be completed automatically in the center of buttonhole on the buttonhole foot, and then lower the buttonhole foot. 8. While holding the top thread, start...
... fabric in the following order. 1 2 3 4 5 6 7 8 Fabric marking Marque du tissu Marca de material 9. Fabric marking Marque Marque du tissu Marca de material Mark Marque Marca * Sewing will be completed automatically in the center of buttonhole on the buttonhole foot, and then lower the buttonhole foot. 8. While holding the top thread, start...
Instruction Manual
Page 76
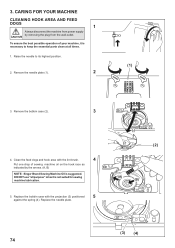
...all times. 1. Remove the bobbin case (2). 3 4. Replace the needle plate. (2) (A) (B) (3) (4) 74 To ensure the best possible operation of sewing machine oil on the hook race as it is necessary to its highest position. 2. Raise the needle to keep the essential parts clean at all purpose" ...oil as indicated by removing the plug from power supply CAUTION by the arrows. (A, B) NOTE: Singer Brand Sewing Machine Oil is not suited for sewing machine lubrication. 5. Clean the feed dogs and hook area with the projection (3) positioned 5 against the spring (4). ...
...all times. 1. Remove the bobbin case (2). 3 4. Replace the needle plate. (2) (A) (B) (3) (4) 74 To ensure the best possible operation of sewing machine oil on the hook race as it is necessary to its highest position. 2. Raise the needle to keep the essential parts clean at all purpose" ...oil as indicated by removing the plug from power supply CAUTION by the arrows. (A, B) NOTE: Singer Brand Sewing Machine Oil is not suited for sewing machine lubrication. 5. Clean the feed dogs and hook area with the projection (3) positioned 5 against the spring (4). ...
Instruction Manual
Page 78
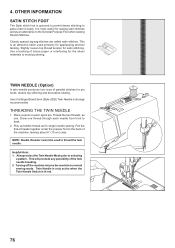
... tension for pin tucks, double top stitching and decorative sewing. Always select the Twin Needle Mode prior to normal sewing mode. 4. Helpful Hints: 1. This will preclude any possibility of a Singer Brand 3mm (Style 2025) Twin Needle is lit red. 76 Use a backing of the machine, leaving about 6" (15 cm) clear. Use of the twin...
... tension for pin tucks, double top stitching and decorative sewing. Always select the Twin Needle Mode prior to normal sewing mode. 4. Helpful Hints: 1. This will preclude any possibility of a Singer Brand 3mm (Style 2025) Twin Needle is lit red. 76 Use a backing of the machine, leaving about 6" (15 cm) clear. Use of the twin...
Instruction Manual
Page 82
... few stitches are irregular. * Needle size is not threaded correctly. - See page 28 - 29. * Needle is turned off.- PERFORMANCE CHECKLIST GENERAL PROBLEMS Machine does not sew. * Power switch is bent. - Turn on the switch. See page 20 - 21. * Thread is too tight. - Guide it gently. * ...Needle size is being pulled or pushed against machine feeding action. - Fabric puckers. * Top thread tension is caught in hook. - Adjust thread tension (see page ...
... few stitches are irregular. * Needle size is not threaded correctly. - See page 28 - 29. * Needle is turned off.- PERFORMANCE CHECKLIST GENERAL PROBLEMS Machine does not sew. * Power switch is bent. - Turn on the switch. See page 20 - 21. * Thread is too tight. - Guide it gently. * ...Needle size is being pulled or pushed against machine feeding action. - Fabric puckers. * Top thread tension is caught in hook. - Adjust thread tension (see page ...


