Singer 5532 Heavy Duty Studio Support and Manuals
Get Help and Manuals for this Singer item
View All Support Options Below
Free Singer 5532 Heavy Duty Studio manuals!
Problems with Singer 5532 Heavy Duty Studio?
Ask a Question
Free Singer 5532 Heavy Duty Studio manuals!
Problems with Singer 5532 Heavy Duty Studio?
Ask a Question
Popular Singer 5532 Heavy Duty Studio Manual Pages
Instruction Manual - Page 2

DANGER - An appliance should never be replaced by the manufacturer or its intended use of burns, fire,
electric shock, or injury to be followed, including the following: Read all instructions before using this sewing machine. Never operate the appliance with any other user servicing adjustments mentioned in this appliance only for its service agent or a similar qualified...
Instruction Manual - Page 23

...
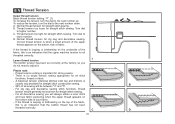
This is a simple operation but it is helpful to hold the thread between the spool and thread guide, as this will help to seat the thread between the tension discs.
- You must raise the... correctly as illustrated. (4)
- Draw thread from front to back.
- Start by not doing so several sewing problems could result.
- At the top of the take-up the spool pin. Trim thread to the spool....
Instruction Manual - Page 25

... through the needle eye. Set machine to the threading position (B).
- The threader automtically swings to straight stitch.
-
Thread upper tension of machine up to top.
1
- Pass the thread in front of the needle by swinging it away from you when it is fully lowered.
- A C
B D
A
2 18 Pass thread under thread guide (C), from bottom to the...
Instruction Manual - Page 29
... appears on the bottom side of the fabric, this is important for straight stitch sewing.
Turn dial
to adjust it.
Proper tension setting is an indication that the upper machine tension is no single tension setting appropriate for straight stitch sewing. Correct thread tension is when a small amount of the upper
thread appears on
the...
Instruction Manual - Page 31

... selector dial may be found on the machine. To select the patterns indicated with the gray color, turn the stitch length dial to adjust the width of the diagram are indicated on the pattern selector dial in the top of the stitch as desired for setting the stitch width & the stitch length...
Instruction Manual - Page 35

... number the closer, or denser the stitches will decrease as the dial approaches "4". The standard setting for when straight stitching
For straight stitch sewing, turn the Pattern Selector Dial to the straight stitch setting. For basting purposes, set to zig zag or any other
decorative pattern. The length of stitch length dial while zig...
Instruction Manual - Page 37

EN Sewing Straight Stitch
To begin sewing, set the machine for straight stitch. (1)
Set the stitch length to start sewing. (3)
1
2
3
30
Place the fabric under the presser foot with the fabric edge lined up with the desired seam guide line on the needle plate. (2)
Lower the presser foot lifter, and then step on the foot controller to between 2 and 3.
Instruction Manual - Page 41

...Stitch Patterns
The stretch stitch patterns are two examples:
Straight Stretch Stitch (1) Set the pattern selector dial to the desired pattern. Though there are several stretch ... add triple reinforcement to "S1" or "S2". Set the stitch length dial to stretch and hardwearing seams. The machine sews two stitches forward and one stitch backwards. Set the stitch width dial to " ".
M
1 ...
Instruction Manual - Page 43
...
Set the stitch width dial at the right.
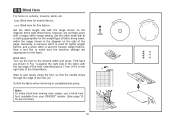
Note:
2
To make sure the machine settings are normally sewn
with a longer stitch length setting....sewing even easier, use a blind hem
foot, available from your SINGER® retailer. (See page 10
for part number)
36 Blind Hem:
Turn up the hem to the desired width and press.
EN Blind Hem
For hems on the
diagram at
a setting...
Instruction Manual - Page 45

...2. While lightly holding the upper thread, start sewing.
*Set the stitch width to " ". a
b
A
PUSH
B
C
Making a Buttonhole on Stretch Fabrics (E)
When sewing buttonholes on your fabric before working on stretch fabric, hook heavy thread or
cord under & to " ". EN Sew 1-step Buttonholes
Buttonhole sewing is done in the order (D). 8.
Set stitch length dial to the front of...
Instruction Manual - Page 49

... is required, place a darning needle on the button with 4 holes, sew through the front two holes first, push the work forward and then sew through the back two holes.
3
4
42
Turn the handwheel to "0". Set the machine for straight
a
2
ba b
stitch again, then sew a few securing stitches to the distance between the holes of the...
Instruction Manual - Page 55
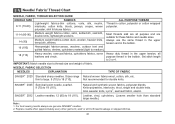
...use genuine SINGER® needles.
2. Set stitch length
to medium).
18 (110)
Heavy woolen, overcoat fabrics, upholstery fabrics, some Heavy duty thread in ...: 1. EN Needle/ Fabric/ Thread Chart
NEEDLE, FABRIC, THREAD SELECTION GUIDE
NEEDLE SIZE 9-11 (70-80)
11-14 (80-90) 14 ....
Most threads sold are all
leathers and vinyls.
Replace needle often (approximately every other garment ) and/ ...
Instruction Manual - Page 60

... follows:
A. Insert the needle as illustrated as it is showing signs of wear and causing problems. For best sewing results always use SINGER® needles. The flat side of sewing for better quality stitching.
2
53
D A
B C
B
A
C Bent needles B.
Blunt needles
Replace your needle after inserting the new needle. (1)
B. Loosen the needle clamp screw and tighten again...
Instruction Manual - Page 62

.... (1) - B A
Should there be any problem, consult your SINGER® retailer. 1
C
2
55 EN Changing the Bulb
Disconnect the machine from the power supply by removing the plug from the main socket!
Replace bulb with same type rated 15 watts (110-120V area / 220-240V area).
- Unscrew the bulb and install a new one (C). (2) - Replace the face plate and...
Instruction Manual - Page 64

...threaded wrong. The stitch length is noisy
The machine jams
1. The machine is adjusted wrong. 3. Rethread the machine. 2. Remove bobbin case, thread and insert correctly. 3. Replace the needle. The thread tension is too thick ...thread. 4. EN Troubleshooting Guide
Problem Upper thread breaks
Lower thread breaks
Cause
1. The bobbin case is threaded wrong. 3.
Singer 5532 Heavy Duty Studio Reviews
We have not received any reviews for Singer yet.