Instruction Manual
Page 2
...properly, if it is used or where oxygen is required around the sewing machine needle. 11. Never operate the sewing machine with EEC Directive 89/336/EEC covering the electromagnetic compatibility. ® SINGER is for examination, repair, electrical or mechanical adjustment. 4. Keep ... product is a registered trademark of electric shock: 1. DANGER--To reduce the risk of The Singer Company Ltd or its intended use , or equivalent. Always unplug sewing machine from all instructions before operating machine. If the plug does not fit fully in the outlet...
...properly, if it is used or where oxygen is required around the sewing machine needle. 11. Never operate the sewing machine with EEC Directive 89/336/EEC covering the electromagnetic compatibility. ® SINGER is for examination, repair, electrical or mechanical adjustment. 4. Keep ... product is a registered trademark of electric shock: 1. DANGER--To reduce the risk of The Singer Company Ltd or its intended use , or equivalent. Always unplug sewing machine from all instructions before operating machine. If the plug does not fit fully in the outlet...
Instruction Manual
Page 5
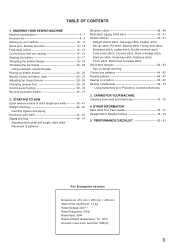
... Rated Frequency: 50Hz Rated input: 65W Rated ambient temperature: 15 - 35°C Acoustic noise level: less than 70db(A) 3 TABLE OF CONTENTS 1. KNOWING YOUR SEWING MACHINE Machine identification 6 - 7 Accessories 8 - 9 Setting up your machine 10 - 11 Spool pins, Presser foot lifter 12 - 13 Feed dogs control 12... - 13 Converting to free-arm sewing 14 - 15 Winding the bobbin 16 - 17 Threading the bobbin thread 18 - 19 Threading the top thread 20 - 23 Using automatic needle threader Picking...
... Rated Frequency: 50Hz Rated input: 65W Rated ambient temperature: 15 - 35°C Acoustic noise level: less than 70db(A) 3 TABLE OF CONTENTS 1. KNOWING YOUR SEWING MACHINE Machine identification 6 - 7 Accessories 8 - 9 Setting up your machine 10 - 11 Spool pins, Presser foot lifter 12 - 13 Feed dogs control 12... - 13 Converting to free-arm sewing 14 - 15 Winding the bobbin 16 - 17 Threading the bobbin thread 18 - 19 Threading the top thread 20 - 23 Using automatic needle threader Picking...
Instruction Manual
Page 8
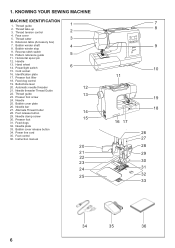
... 27. Bobbin cover release button 34. Presser foot 31. Thread tension control 4. Face cover 5. Power/light switch 15. Feed dogs 32. 1. Thread guide 2. KNOWING YOUR SEWING MACHINE MACHINE IDENTIFICATION 1. Bobbin winder stop 9. Buttonhole lever 20. Automatic needle threader 21. Foot control 36.
... 27. Bobbin cover release button 34. Presser foot 31. Thread tension control 4. Face cover 5. Power/light switch 15. Feed dogs 32. 1. Thread guide 2. KNOWING YOUR SEWING MACHINE MACHINE IDENTIFICATION 1. Bobbin winder stop 9. Buttonhole lever 20. Automatic needle threader 21. Foot control 36.
Instruction Manual
Page 10
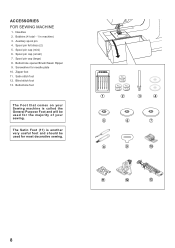
... 12 13 8 Blind stitch foot 13. The Satin Foot (11) is called the General Purpose Foot and will be used for the majority of your Sewing machine is another very useful foot and should be used for needle plate 10. Buttonhole opener/Brush/Seam Ripper 9. Spool pin cap (mini) 6. Satin stitch...
... 12 13 8 Blind stitch foot 13. The Satin Foot (11) is called the General Purpose Foot and will be used for the majority of your Sewing machine is another very useful foot and should be used for needle plate 10. Buttonhole opener/Brush/Seam Ripper 9. Spool pin cap (mini) 6. Satin stitch...

Instruction Manual
Page 12
Set power/light switch at "OFF" Mettez l'interrupteur moteur/ lumière sur "OFF". NOTE: W h e n f o o t c o n t r o l i s disconnected, the machine will not operate until the power/ light switch is turned on. POWER/LIGHT SWITCH Your machine will not operate. The same switch controls both the power and the light. When servicing the machine, or changing needles, etc., machine must be disconnected from the wall-outlet. POWER LINE CORD/FOOT CONTROL Connect the plug of the power line cord into the machine socket. Power/light switch "OFF" Interrupteur moteur/lumière "OFF" ...
Set power/light switch at "OFF" Mettez l'interrupteur moteur/ lumière sur "OFF". NOTE: W h e n f o o t c o n t r o l i s disconnected, the machine will not operate until the power/ light switch is turned on. POWER/LIGHT SWITCH Your machine will not operate. The same switch controls both the power and the light. When servicing the machine, or changing needles, etc., machine must be disconnected from the wall-outlet. POWER LINE CORD/FOOT CONTROL Connect the plug of the power line cord into the machine socket. Power/light switch "OFF" Interrupteur moteur/lumière "OFF" ...

Instruction Manual
Page 14
...guiding the fabric. 12 FEED DOG CONTROL The feed dogs control the movement of spool being sewn. Raise the lifter to the middle position to sew. 2. Lower the presser foot to insert or remove fabric. 3. Spool Bobine Carrete Spool pin felt discs Rondelle feutre Disco del pasador carrete ...The diameter of the spool itself. Lift it should be larger than that of the spool pin cap should be raised for all general sewing purposes and lowered for normal thread spool Place thread spool on the spool pin. SPOOL PINS HORIZONTAL SPOOL PIN for darning, freehand embroidery and...
...guiding the fabric. 12 FEED DOG CONTROL The feed dogs control the movement of spool being sewn. Raise the lifter to the middle position to sew. 2. Lower the presser foot to insert or remove fabric. 3. Spool Bobine Carrete Spool pin felt discs Rondelle feutre Disco del pasador carrete ...The diameter of the spool itself. Lift it should be larger than that of the spool pin cap should be raised for all general sewing purposes and lowered for normal thread spool Place thread spool on the spool pin. SPOOL PINS HORIZONTAL SPOOL PIN for darning, freehand embroidery and...
Instruction Manual
Page 16
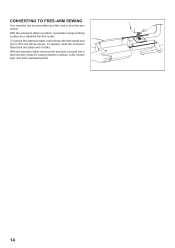
With the extension table in position, it clicks. To replace, slide the extension table back into a slim free-arm model for sewing children's clothes, cuffs, trouser legs, and other awkward places. 14 With the extension table removed the machine converts into place until it provides a large working surface as a free-arm model. To remove the extension table, hold it firmly with both hands and pull it off to the left as a flat- CONVERTING TO FREE-ARM SEWING Your machine can be used either as shown. bed or as a standard flat-bed model.
With the extension table in position, it clicks. To replace, slide the extension table back into a slim free-arm model for sewing children's clothes, cuffs, trouser legs, and other awkward places. 14 With the extension table removed the machine converts into place until it provides a large working surface as a free-arm model. To remove the extension table, hold it firmly with both hands and pull it off to the left as a flat- CONVERTING TO FREE-ARM SEWING Your machine can be used either as shown. bed or as a standard flat-bed model.
Instruction Manual
Page 18
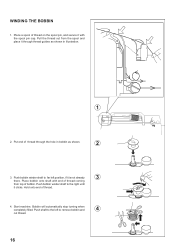
Put end of thread coming from the spool and place it clicks. Place bobbin onto shaft with the spool pin cap. Bobbin will automatically stop turning when completely filled. WINDING THE BOBBIN 1. Start machine. Push shaft to the left position, if it with end of thread through thread guides as shown. 2 3. Hold onto end of bobbin. Push bobbin winder shaft to remove bobbin and 4 cut thread. 16 Place a spool of thread on the spool pin, and secure it is not already 3 there. Pull the thread out from top of thread. 4. Push bobbin winder shaft to far left to...
Put end of thread coming from the spool and place it clicks. Place bobbin onto shaft with the spool pin cap. Bobbin will automatically stop turning when completely filled. WINDING THE BOBBIN 1. Start machine. Push shaft to the left position, if it with end of thread through thread guides as shown. 2 3. Hold onto end of bobbin. Push bobbin winder shaft to remove bobbin and 4 cut thread. 16 Place a spool of thread on the spool pin, and secure it is not already 3 there. Pull the thread out from top of thread. 4. Push bobbin winder shaft to far left to...
Instruction Manual
Page 20
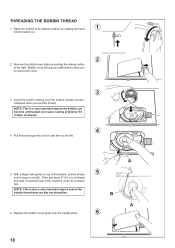
... is also a very important step to allow you pull the thread. NOTE: This is a very important step as the bobbin can become unthreaded and cause sewing problems if it rotates clockwise. 4 4. Raise the needle to its highest position by pushing the release button to the left. Remove the bobbin cover plate...
... is also a very important step to allow you pull the thread. NOTE: This is a very important step as the bobbin can become unthreaded and cause sewing problems if it rotates clockwise. 4 4. Raise the needle to its highest position by pushing the release button to the left. Remove the bobbin cover plate...

Instruction Manual
Page 22
Turn the hand wheel toward you until the needle is in its highest position and the thread take-up lever until it reaches the eye of the lever. * Guide the thread into the thread guide (5). * Pass the thread through the eye of the needle (6) from right to left. * Pull the thread into the tension discs, passing the thread to back. (See following order as illustrated. * Guide the thread through the thread take -up is not raised, correct thread tension cannot be obtained.) B. Then guide the thread to the bottom of the groove. * Do a U-turn around the inside of plate (2). This time you ...
Turn the hand wheel toward you until the needle is in its highest position and the thread take-up lever until it reaches the eye of the lever. * Guide the thread into the thread guide (5). * Pass the thread through the eye of the needle (6) from right to left. * Pull the thread into the tension discs, passing the thread to back. (See following order as illustrated. * Guide the thread through the thread take -up is not raised, correct thread tension cannot be obtained.) B. Then guide the thread to the bottom of the groove. * Do a U-turn around the inside of plate (2). This time you ...

Instruction Manual
Page 24
Hook thread to its highest position by rotating the hand wheel towards you . Pull down lever holding the end of thread. 3. Return the lever and needle will go. 4. NOTE: For smooth threading it upward. 5. Release the lever and pull thread away from you . 1. USING AUTOMATIC NEEDLE THREADER Raise the needle to thread guide as it will be threaded automatically. 6. Guide thread into hooked end and pull it is recommended you select straight stitching when using the needle threader. 1 2 3 4 5 6 22 Turn the lever as far as illustrated. 2.
Hook thread to its highest position by rotating the hand wheel towards you . Pull down lever holding the end of thread. 3. Return the lever and needle will go. 4. NOTE: For smooth threading it upward. 5. Release the lever and pull thread away from you . 1. USING AUTOMATIC NEEDLE THREADER Raise the needle to thread guide as it will be threaded automatically. 6. Guide thread into hooked end and pull it is recommended you select straight stitching when using the needle threader. 1 2 3 4 5 6 22 Turn the lever as far as illustrated. 2.
Instruction Manual
Page 26
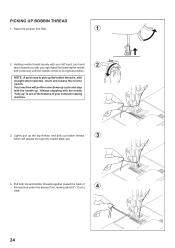
... first lowering the needle and continuing until the needle comes to pick up . Pull both top and bobbin threads together toward you with your computer sewing machine. 3. Your machine will perform one down-up cycle and stop with the needle "fully up bobbin thread, 3 which will appear through the needle plate... slot. 4. Lightly pull up the top thread, and pick up " is , with straight stitch selected, touch and release the reverse switch. PICKING UP BOBBIN THREAD 1. Raise the presser foot lifter. 1 2.
... first lowering the needle and continuing until the needle comes to pick up . Pull both top and bobbin threads together toward you with your computer sewing machine. 3. Your machine will perform one down-up cycle and stop with the needle "fully up bobbin thread, 3 which will appear through the needle plate... slot. 4. Lightly pull up the top thread, and pick up " is , with straight stitch selected, touch and release the reverse switch. PICKING UP BOBBIN THREAD 1. Raise the presser foot lifter. 1 2.
Instruction Manual
Page 28
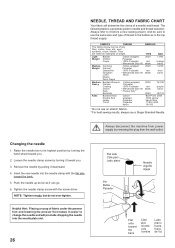
... flat side toward the back. 5. Always disconnect the machine from the wall-outlet. Loosen the needle clamp screw by pulling it before a new sewing project. Always refer to change the needle and will determine the choice of weight. Remove the needle by turning it can be sure to use... a Singer Branded Needle. Insert the new needle into the needle plate slot. 26 Flat side Côté plat Lado plano Pin Butée Pasador Needle...
... flat side toward the back. 5. Always disconnect the machine from the wall-outlet. Loosen the needle clamp screw by pulling it before a new sewing project. Always refer to change the needle and will determine the choice of weight. Remove the needle by turning it can be sure to use... a Singer Branded Needle. Insert the new needle into the needle plate slot. 26 Flat side Côté plat Lado plano Pin Butée Pasador Needle...
Instruction Manual
Page 30
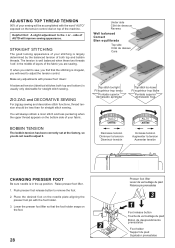
...aligning the presser foot pin with presser foot 'down'. A balanced tension (identical stitches both top and bobbin threads. You will improve sewing appearance. Place the desired foot on the foot. 2 28 Presser foot lifter Levier de verrouillage du pied Palanca pie prensatelas 3 1 Foot ...release button Touche de verrouillage du pied Boton de desprendimiento prensatelas Foot holder Support du pied Sujetador prensatelas side of AUTO will always obtain a nicer ...
...aligning the presser foot pin with presser foot 'down'. A balanced tension (identical stitches both top and bobbin threads. You will improve sewing appearance. Place the desired foot on the foot. 2 28 Presser foot lifter Levier de verrouillage du pied Palanca pie prensatelas 3 1 Foot ...release button Touche de verrouillage du pied Boton de desprendimiento prensatelas Foot holder Support du pied Sujetador prensatelas side of AUTO will always obtain a nicer ...
Instruction Manual
Page 34
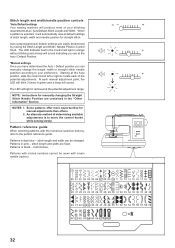
... blink 3 times in pink - Starting at the Auto position, slide the control knob left or right to move the control knobs while sewing slowly. At each of the potential adjustments. Some patterns offer more opportunities for manual adjustments than others. 2. NOTES: 1. Patterns in the... When selecting patterns with a twin needle (option). 32 Stitch length and width/needle position controls *Auto/Default settings Your sewing machine will automatically sew at default settings of stitch length, width and needle position for straight stitch. When a pattern is to locate each manual...
... blink 3 times in pink - Starting at the Auto position, slide the control knob left or right to move the control knobs while sewing slowly. At each of the potential adjustments. Some patterns offer more opportunities for manual adjustments than others. 2. NOTES: 1. Patterns in the... When selecting patterns with a twin needle (option). 32 Stitch length and width/needle position controls *Auto/Default settings Your sewing machine will automatically sew at default settings of stitch length, width and needle position for straight stitch. When a pattern is to locate each manual...

Instruction Manual
Page 36
... breaking. 2. Twin needle mode switch Commutateur de mode d'aiguilles Interruptor de modo de aguja doble 34 Always select the Twin Needle Mode prior to normal sewing mode. Twin Needle is only active when the Twin Needle Switch is pushed and lit red, patterns with circled numbers in the pattern reference guide...
... breaking. 2. Twin needle mode switch Commutateur de mode d'aiguilles Interruptor de modo de aguja doble 34 Always select the Twin Needle Mode prior to normal sewing mode. Twin Needle is only active when the Twin Needle Switch is pushed and lit red, patterns with circled numbers in the pattern reference guide...

Instruction Manual
Page 38
... the start and end of other stitches ( ) The sewing machine makes 4 tiny tacking stitches to tie off the sewing pattern to sew in reverse as long as the reverse switch button is pressed. * Tacking stitch function for tie-off of sewing. 36 NOTE: This function is very useful for straight ...and zigzag stitches ( ) Reverse sewing is carried out while the reverse stitch switch is pushed. The position of the tacking stitches will ...
... the start and end of other stitches ( ) The sewing machine makes 4 tiny tacking stitches to tie off the sewing pattern to sew in reverse as long as the reverse switch button is pressed. * Tacking stitch function for tie-off of sewing. 36 NOTE: This function is very useful for straight ...and zigzag stitches ( ) Reverse sewing is carried out while the reverse stitch switch is pushed. The position of the tacking stitches will ...
Instruction Manual
Page 44
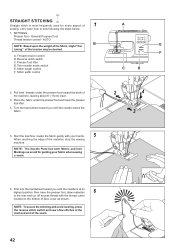
...upon the weight of the fabric, slight "fine tuning" of face cover as an aid for every aspect of the material, stop the sewing machine. Reverse stitch switch C. Stitch length control F. SETTINGS Presser foot - Turn the hand wheel toward you until the needle is most frequently... used for guiding your hands. 5 When reaching the edge of 1 sewing. Start the machine. First turn the handwheel toward you until the needle enters the fabric. A. Thread tension control B. NOTE: To secure the...
...upon the weight of the fabric, slight "fine tuning" of face cover as an aid for every aspect of the material, stop the sewing machine. Reverse stitch switch C. Stitch length control F. SETTINGS Presser foot - Turn the hand wheel toward you until the needle is most frequently... used for guiding your hands. 5 When reaching the edge of 1 sewing. Start the machine. First turn the handwheel toward you until the needle enters the fabric. A. Thread tension control B. NOTE: To secure the...
Instruction Manual
Page 46
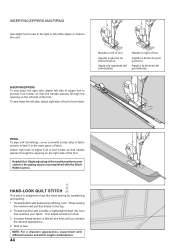
...holder so that needle passes through the opening on the left side of the foot. Helpful Hint: Slight adjusting of the needle position to sew closer to foot holder. NOTE: For a dramatic appearance, experiment with invisible or lightweight thread the color that the needle passes through the ... la izquierda del prensatelas Needle to right of foot Aiguille à droite du pied presseur Aguja a la derecha del prensatelas INSERTING ZIPPERS To sew down the left side, attach right side of the foot. Thread bobbin with the Stitch Width Control. Start to presser foot holder so that...
...holder so that needle passes through the opening on the left side of the foot. Helpful Hint: Slight adjusting of the needle position to sew closer to foot holder. NOTE: For a dramatic appearance, experiment with invisible or lightweight thread the color that the needle passes through the ... la izquierda del prensatelas Needle to right of foot Aiguille à droite du pied presseur Aguja a la derecha del prensatelas INSERTING ZIPPERS To sew down the left side, attach right side of the foot. Thread bobbin with the Stitch Width Control. Start to presser foot holder so that...
Instruction Manual
Page 48
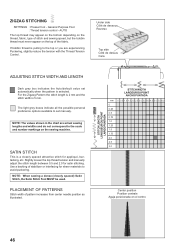
...grey boxes indicate all the possible personal preference options available to set automatically when the pattern is pulling to the top or you are actual sewing lengths and widths and do not correspond to avoid puckering. SATIN STITCH This is 5 mm. PLACEMENT OF PATTERNS Stitch width of the ...fabric. NOTE: When sewing a dense (closely spaced) Satin Stitch, the Satin Stitch Foot MUST be used. ZIGZAG STITCHING SETTINGS :Presser foot - AUTO The top thread may...
...grey boxes indicate all the possible personal preference options available to set automatically when the pattern is pulling to the top or you are actual sewing lengths and widths and do not correspond to avoid puckering. SATIN STITCH This is 5 mm. PLACEMENT OF PATTERNS Stitch width of the ...fabric. NOTE: When sewing a dense (closely spaced) Satin Stitch, the Satin Stitch Foot MUST be used. ZIGZAG STITCHING SETTINGS :Presser foot - AUTO The top thread may...