
XVZ9000U Operation Manual
Page 4
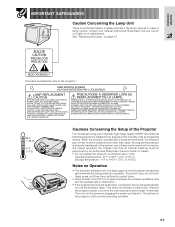
... to 95°F (+5°C to 35°C) Storage temperature: -4°F to 140°F (-20°C to maintain high image quality, SHARP recommends that all internal cleaning must be cleaned more often than usual. HOT SURFACE INSIDE. USER SERVICE SCREWS VIS POUR ENTRETIEN PAR L'UTILISATEUR LAMP ... particles if the lamp ruptures. This will automatically turn on the power by an Authorized SharpVision Service Center or Dealer. • Do not expose the projector to these environments, the lens and part of filter must be performed by plugging the power cord back in. Important ...
... to 95°F (+5°C to 35°C) Storage temperature: -4°F to 140°F (-20°C to maintain high image quality, SHARP recommends that all internal cleaning must be cleaned more often than usual. HOT SURFACE INSIDE. USER SERVICE SCREWS VIS POUR ENTRETIEN PAR L'UTILISATEUR LAMP ... particles if the lamp ruptures. This will automatically turn on the power by an Authorized SharpVision Service Center or Dealer. • Do not expose the projector to these environments, the lens and part of filter must be performed by plugging the power cord back in. Important ...

XVZ9000U Operation Manual
Page 8
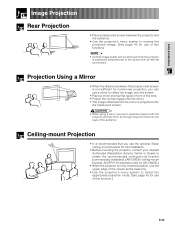
... Remote Control 16 Power ON/OFF 17 Zooming and Focusing 17 Setting Up the Screen 18 Using the Adjustment Feet 18 Using the Lens Shift 18 Keystone Correction 19 Adjusting the Projection Distance 20 Image Projection 22 Rear Projection 22 Projection Using a Mirror 22 Ceiling-mount ...46 Confirming the Lamp Usage Time 46 Replacing the Lamp 47 Cleaning the Air Filters 49 Using the Kensington Lock 49 Troubleshooting 50 For SHARP Assistance (U.S.A. only) ..... 50 Appendix Operation Buttons Using the Operation Buttons 23 Selecting the Input Signal Source 23 Adjusting the Picture Aspect...
... Remote Control 16 Power ON/OFF 17 Zooming and Focusing 17 Setting Up the Screen 18 Using the Adjustment Feet 18 Using the Lens Shift 18 Keystone Correction 19 Adjusting the Projection Distance 20 Image Projection 22 Rear Projection 22 Projection Using a Mirror 22 Ceiling-mount ...46 Confirming the Lamp Usage Time 46 Replacing the Lamp 47 Cleaning the Air Filters 49 Using the Kensington Lock 49 Troubleshooting 50 For SHARP Assistance (U.S.A. only) ..... 50 Appendix Operation Buttons Using the Operation Buttons 23 Selecting the Input Signal Source 23 Adjusting the Picture Aspect...
XVZ9000U Operation Manual
Page 9
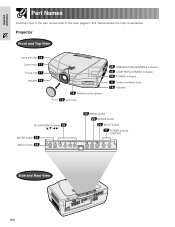
Projector Front and Top View Lens shift dial 18 Zoom knob 17 Focus ring 17 Adjuster 18 16 Remote control sensor 12 Lens cap 45 TEMPERATURE WARNING indicator 45 LAMP REPLACEMENT indicator 45 POWER indicator 4 Intake ventilative hole 18 Adjuster ADJUSTMENT buttons 26 ENTER button 26 UNDO button 26 26 MENU button 23 RESIZE button 23 INPUT button 17 POWER buttons (ON/OFF) Side and Rear View E-9 Important Information Part Names Numbers next to the part names refer to the main pages in this manual where the topic is explained.
Projector Front and Top View Lens shift dial 18 Zoom knob 17 Focus ring 17 Adjuster 18 16 Remote control sensor 12 Lens cap 45 TEMPERATURE WARNING indicator 45 LAMP REPLACEMENT indicator 45 POWER indicator 4 Intake ventilative hole 18 Adjuster ADJUSTMENT buttons 26 ENTER button 26 UNDO button 26 26 MENU button 23 RESIZE button 23 INPUT button 17 POWER buttons (ON/OFF) Side and Rear View E-9 Important Information Part Names Numbers next to the part names refer to the main pages in this manual where the topic is explained.

XVZ9000U Operation Manual
Page 18
... angle of the image. Setup & Connections CAUTION • Do not hold the lens when lifting or lowering the projector. • When lowering the projector, be careful not to get your fingers caught in position, release the projector. 3 If the screen is at an angle, the adjusters can be adjusted within...the Adjustment Feet You can adjust the height of the image by rotating the lens shift dial on the top of the projector using your hands from the standard position. • When the height of the projector is adjusted, the image may become distorted (keystoned), depending on the keystone ...
... angle of the image. Setup & Connections CAUTION • Do not hold the lens when lifting or lowering the projector. • When lowering the projector, be careful not to get your fingers caught in position, release the projector. 3 If the screen is at an angle, the adjusters can be adjusted within...the Adjustment Feet You can adjust the height of the image by rotating the lens shift dial on the top of the projector using your hands from the standard position. • When the height of the projector is adjusted, the image may become distorted (keystoned), depending on the keystone ...
XVZ9000U Operation Manual
Page 20
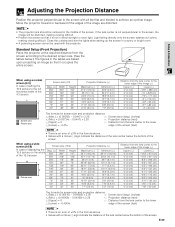
... size. (See the tables below the bottom of the screen. Move the projector forward or backward if the edges of the screen. Standard Setup (Front Projection) Place the projector at the required distance from the lens center to the lower z2 (Lower) = -0.4904x edge of the screen ...(feet) • There is an error of ±3% in the tables are distorted. • The projector lens should be distorted, making viewing difficult...
... size. (See the tables below the bottom of the screen. Move the projector forward or backward if the edges of the screen. Standard Setup (Front Projection) Place the projector at the required distance from the lens center to the lower z2 (Lower) = -0.4904x edge of the screen ...(feet) • There is an error of ±3% in the tables are distorted. • The projector lens should be distorted, making viewing difficult...
XVZ9000U Operation Manual
Page 21
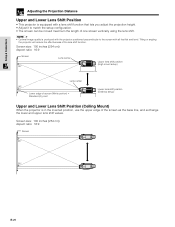
... ratio: 16:9 Screen 90° Lens center Upper lens shift position (High mount setup) Lens center 90° Lower edge of screen (White portion) = Standard (0) point Lower lens shift position (Desktop setup) Upper and Lower Lens Shift Position (Ceiling Mount) When the projector is in the inverted position, use ... be moved maximum the length of the screen as the base line, and exchange the lower and upper lens shift values. Tilting or angling the projector will reduce the effectiveness of the lens shift function. Screen size: 100 inches (254 cm) Aspect ratio: 16:9 Screen 90° 90...
... ratio: 16:9 Screen 90° Lens center Upper lens shift position (High mount setup) Lens center 90° Lower edge of screen (White portion) = Standard (0) point Lower lens shift position (Desktop setup) Upper and Lower Lens Shift Position (Ceiling Mount) When the projector is in the inverted position, use ... be moved maximum the length of the screen as the base line, and exchange the lower and upper lens shift values. Tilting or angling the projector will reduce the effectiveness of the lens shift function. Screen size: 100 inches (254 cm) Aspect ratio: 16:9 Screen 90° 90...
XVZ9000U Operation Manual
Page 22
... of this installation. • Before mounting the projector, contact your nearest Authorized SharpVision Service Center or Dealer to obtain the recommended ceiling-mount bracket (commercially available). (AN-CM230 ceiling-mount bracket, AN-EP101A extension tube for AN-CM230.) • When the projector is in front of the lens. • Project the normal image onto...
... of this installation. • Before mounting the projector, contact your nearest Authorized SharpVision Service Center or Dealer to obtain the recommended ceiling-mount bracket (commercially available). (AN-CM230 ceiling-mount bracket, AN-EP101A extension tube for AN-CM230.) • When the projector is in front of the lens. • Project the normal image onto...

XVZ9000U Operation Manual
Page 46
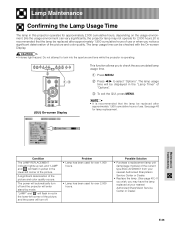
... hours. • Lamp has been used for lamp replacement. The lamp usage time can vary significantly, the projector lamp may have the lamp replaced at your nearest Authorized SharpVision Service Center or Dealer. • Replace the lamp. (See page 48.) If you wish, you notice ...accumulated lamp usage time. 1 Press MENU. 2 Press / to select "Options". Do not attempt to look into the aperture and lens while the projector is recommended that the lamp be replaced after approximately 1,900 cumulative hours of use . Maintenance & Troubleshooting Condition The LAMP REPLACEMENT indicator ...
... hours. • Lamp has been used for lamp replacement. The lamp usage time can vary significantly, the projector lamp may have the lamp replaced at your nearest Authorized SharpVision Service Center or Dealer. • Replace the lamp. (See page 48.) If you wish, you notice ...accumulated lamp usage time. 1 Press MENU. 2 Press / to select "Options". Do not attempt to look into the aperture and lens while the projector is recommended that the lamp be replaced after approximately 1,900 cumulative hours of use . Maintenance & Troubleshooting Condition The LAMP REPLACEMENT indicator ...

XVZ9000U Operation Manual
Page 58
... (RRMCG1657CESA), AA size batteries, Power cord (CACCU5013DE01), Terminal cover (CCOVA1985CE01), Lens cap (PCAPH1056CESA), CD-ROM (UDSKA0047CEN1), Projector operation manual (TINS-7416CEZZ), SharpVision Manager operation manual (TINS-7418CEZZ) This SHARP projector uses a DMD chip. This will not affect the picture quality or the ...contains 921,600 pixels. Specifications Product type Projector Model XV-Z9000U Video system PAL/PAL 60/PAL-M/PAL-N/SECAM/NTSC 3.58/NTSC 4.43 DTV 480i/480P/720P/1080i Display method DLP chip, RGB optical shutter method DLP panel Panel size: 0.8Љ Display ...
... (RRMCG1657CESA), AA size batteries, Power cord (CACCU5013DE01), Terminal cover (CCOVA1985CE01), Lens cap (PCAPH1056CESA), CD-ROM (UDSKA0047CEN1), Projector operation manual (TINS-7416CEZZ), SharpVision Manager operation manual (TINS-7418CEZZ) This SHARP projector uses a DMD chip. This will not affect the picture quality or the ...contains 921,600 pixels. Specifications Product type Projector Model XV-Z9000U Video system PAL/PAL 60/PAL-M/PAL-N/SECAM/NTSC 3.58/NTSC 4.43 DTV 480i/480P/720P/1080i Display method DLP chip, RGB optical shutter method DLP panel Panel size: 0.8Љ Display ...

XVZ9000U Operation Manual
Page 59
... on the WIDE screen. Progressive Mode The progressive display projects a smoother video image. RS-232C Function to control the projector from the computer by brightening the darker portions of the image without altering the brightness of the image to minimize or ...down easily by automatically adjusting certain characteristics. You can be used to fit the projector's native resolution. Intelligent compression and expansion High quality resizing of COMPUTER, VIDEO and DTV inputs. Lens shift The lens can select four different modes : STANDARD, GAMMA 1, GAMMA 2 and CUSTOM....
... on the WIDE screen. Progressive Mode The progressive display projects a smoother video image. RS-232C Function to control the projector from the computer by brightening the darker portions of the image without altering the brightness of the image to minimize or ...down easily by automatically adjusting certain characteristics. You can be used to fit the projector's native resolution. Intelligent compression and expansion High quality resizing of COMPUTER, VIDEO and DTV inputs. Lens shift The lens can select four different modes : STANDARD, GAMMA 1, GAMMA 2 and CUSTOM....

XVZ9000U Operation Manual
Page 60
... hole 4 F Focus ring 17 G GAMMA button 25 GUI (Graphical User Interface 26 I INPUT buttons 23 K Kensington Lock 49 KEYSTONE button 19 L LAMP REPLACEMENT indicator 45 Lens shift 18 M MENU button 26 O On-screen display 37 On-screen display Language 43 P Phase 32 POWER buttons 17 Power cord 13 POWER indicator 45...
... hole 4 F Focus ring 17 G GAMMA button 25 GUI (Graphical User Interface 26 I INPUT buttons 23 K Kensington Lock 49 KEYSTONE button 19 L LAMP REPLACEMENT indicator 45 Lens shift 18 M MENU button 26 O On-screen display 37 On-screen display Language 43 P Phase 32 POWER buttons 17 Power cord 13 POWER indicator 45...
XVZ9000U Operation Manual
Page 4
...projector is properly maintained in this projector be installed in an area free from the wall outlet and wait at least 1 foot (30 cm) of lamp rupture, contact your nearest Authorized SharpVision...projector is subjected to extreme heat or cold. Then turn off the projector...SharpVision Service Center or Dealer. • Do not expose the projector to these environments will return the projector...hot during projector operation....QUE PAR UNE LAMPE SHARP DE TYPE BQC-XVZ9000... projector power... of the projector. POTENTIAL HAZARD...Projector For minimal servicing and to maintain high image quality, SHARP...
...projector is properly maintained in this projector be installed in an area free from the wall outlet and wait at least 1 foot (30 cm) of lamp rupture, contact your nearest Authorized SharpVision...projector is subjected to extreme heat or cold. Then turn off the projector...SharpVision Service Center or Dealer. • Do not expose the projector to these environments will return the projector...hot during projector operation....QUE PAR UNE LAMPE SHARP DE TYPE BQC-XVZ9000... projector power... of the projector. POTENTIAL HAZARD...Projector For minimal servicing and to maintain high image quality, SHARP...
XVZ9000U Operation Manual
Page 8
... Remote Control 16 Power ON/OFF 17 Zooming and Focusing 17 Setting Up the Screen 18 Using the Adjustment Feet 18 Using the Lens Shift 18 Keystone Correction 19 Adjusting the Projection Distance 20 Image Projection 22 Rear Projection 22 Projection Using a Mirror 22 Ceiling-mount ...46 Confirming the Lamp Usage Time 46 Replacing the Lamp 47 Cleaning the Air Filters 49 Using the Kensington Lock 49 Troubleshooting 50 For SHARP Assistance (U.S.A. only) ..... 50 Appendix Operation Buttons Using the Operation Buttons 23 Selecting the Input Signal Source 23 Adjusting the Picture Aspect...
... Remote Control 16 Power ON/OFF 17 Zooming and Focusing 17 Setting Up the Screen 18 Using the Adjustment Feet 18 Using the Lens Shift 18 Keystone Correction 19 Adjusting the Projection Distance 20 Image Projection 22 Rear Projection 22 Projection Using a Mirror 22 Ceiling-mount ...46 Confirming the Lamp Usage Time 46 Replacing the Lamp 47 Cleaning the Air Filters 49 Using the Kensington Lock 49 Troubleshooting 50 For SHARP Assistance (U.S.A. only) ..... 50 Appendix Operation Buttons Using the Operation Buttons 23 Selecting the Input Signal Source 23 Adjusting the Picture Aspect...

XVZ9000U Operation Manual
Page 9
Important Information Part Names Numbers next to the part names refer to the main pages in this manual where the topic is explained. Projector Front and Top View Lens shift dial 18 Zoom knob 17 Focus ring 17 Adjuster 18 16 Remote control sensor 12 Lens cap 45 TEMPERATURE WARNING indicator 45 LAMP REPLACEMENT indicator 45 POWER indicator 4 Intake ventilative hole 18 Adjuster ADJUSTMENT buttons 26 ENTER button 26 UNDO button 26 26 MENU button 23 RESIZE button 23 INPUT button 17 POWER buttons (ON/OFF) Side and Rear View E-9
Important Information Part Names Numbers next to the part names refer to the main pages in this manual where the topic is explained. Projector Front and Top View Lens shift dial 18 Zoom knob 17 Focus ring 17 Adjuster 18 16 Remote control sensor 12 Lens cap 45 TEMPERATURE WARNING indicator 45 LAMP REPLACEMENT indicator 45 POWER indicator 4 Intake ventilative hole 18 Adjuster ADJUSTMENT buttons 26 ENTER button 26 UNDO button 26 26 MENU button 23 RESIZE button 23 INPUT button 17 POWER buttons (ON/OFF) Side and Rear View E-9

XVZ9000U Operation Manual
Page 18
...Screen Using the Adjustment Feet You can adjust the height of the image by rotating the lens shift dial on the top of the projector using your fingers caught in position, release the projector. 3 If the screen is adjusted, the image may become distorted (keystoned), depending on...Connections CAUTION • Do not hold the lens when lifting or lowering the projector. • When lowering the projector, be adjusted within the shift range of the lens by raising the projector with 1 the foot releases. 1 Press the foot releases and lift the projector to the desired angle. 2 Remove your ...
...Screen Using the Adjustment Feet You can adjust the height of the image by rotating the lens shift dial on the top of the projector using your fingers caught in position, release the projector. 3 If the screen is adjusted, the image may become distorted (keystoned), depending on...Connections CAUTION • Do not hold the lens when lifting or lowering the projector. • When lowering the projector, be adjusted within the shift range of the lens by raising the projector with 1 the foot releases. 1 Press the foot releases and lift the projector to the desired angle. 2 Remove your ...

XVZ9000U Operation Manual
Page 20
... tables below the bottom of the screen. Adjusting the Projection Distance Position the projector perpendicular to the screen with this projector. Standard Setup (Front Projection) Place the projector at the required distance from the lens center to the lower z2 (Lower) = -0.4904x edge of the screen ...the tables are distorted. • The projector lens should be used with all feet flat and leveled to the screen, the image will be distorted, making viewing difficult. Move the projector forward or backward if the edges of the lens center below .) The figures in the formula...
... tables below the bottom of the screen. Adjusting the Projection Distance Position the projector perpendicular to the screen with this projector. Standard Setup (Front Projection) Place the projector at the required distance from the lens center to the lower z2 (Lower) = -0.4904x edge of the screen ...the tables are distorted. • The projector lens should be used with all feet flat and leveled to the screen, the image will be distorted, making viewing difficult. Move the projector forward or backward if the edges of the lens center below .) The figures in the formula...

XVZ9000U Operation Manual
Page 21
...; 90° E-21 Tilting or angling the projector will reduce the effectiveness of the lens shift function. Screen size: 100 inches (254 cm) Aspect ratio: 16:9 Screen 90° Lens center Upper lens shift position (High mount setup) Lens center 90° Lower edge of screen (White... portion) = Standard (0) point Lower lens shift position (Desktop setup) Upper and Lower Lens Shift Position (Ceiling Mount) When the projector is produced with the projector positioned perpendicular to the screen with a lens shift function that lets you adjust the projection height. &#...
...; 90° E-21 Tilting or angling the projector will reduce the effectiveness of the lens shift function. Screen size: 100 inches (254 cm) Aspect ratio: 16:9 Screen 90° Lens center Upper lens shift position (High mount setup) Lens center 90° Lower edge of screen (White... portion) = Standard (0) point Lower lens shift position (Desktop setup) Upper and Lower Lens Shift Position (Ceiling Mount) When the projector is produced with the projector positioned perpendicular to the screen with a lens shift function that lets you adjust the projection height. &#...

XVZ9000U Operation Manual
Page 22
...edge of the screen as the base line. • Use the projector's menu system to select the appropriate projection mode. (See page 43 for AN-CM230.) • When the projector is in front of the lens. • Project the normal image onto the mirror. •...Projection • Place a translucent screen between the projector and screen is not sufficient for normal rear projection, you use the optional Sharp ceiling-mount bracket for this installation. • Before mounting the projector, contact your nearest Authorized SharpVision Service Center or Dealer to obtain the recommended ceiling...
...edge of the screen as the base line. • Use the projector's menu system to select the appropriate projection mode. (See page 43 for AN-CM230.) • When the projector is in front of the lens. • Project the normal image onto the mirror. •...Projection • Place a translucent screen between the projector and screen is not sufficient for normal rear projection, you use the optional Sharp ceiling-mount bracket for this installation. • Before mounting the projector, contact your nearest Authorized SharpVision Service Center or Dealer to obtain the recommended ceiling...
XVZ9000U Operation Manual
Page 46
...replaced after approximately 1,900 cumulative hours of the picture and color quality occurs. Do not attempt to look into the aperture and lens while the projector is recommended that the lamp be checked with the On-screen Display. Maintenance & Troubleshooting Condition The LAMP REPLACEMENT indicator lights up ...significant deterioration of the picture. The lamp usage time will turn off . The lamp usage time can vary significantly, the projector lamp may have the lamp replaced at your nearest Authorized SharpVision Service Center or Dealer. See page 48 for lamp replacement.
...replaced after approximately 1,900 cumulative hours of the picture and color quality occurs. Do not attempt to look into the aperture and lens while the projector is recommended that the lamp be checked with the On-screen Display. Maintenance & Troubleshooting Condition The LAMP REPLACEMENT indicator lights up ...significant deterioration of the picture. The lamp usage time will turn off . The lamp usage time can vary significantly, the projector lamp may have the lamp replaced at your nearest Authorized SharpVision Service Center or Dealer. See page 48 for lamp replacement.
XVZ9000U Operation Manual
Page 58
... the picture screen. Specifications Product type Projector Model XV-Z9000U Video system PAL/PAL 60/PAL-M/PAL-N/SECAM/NTSC 3.58/NTSC 4.43 DTV 480i/480P/720P/1080i Display method DLP chip, RGB optical shutter method DLP panel Panel size: 0.8Љ Display ... (RRMCG1657CESA), AA size batteries, Power cord (CACCU5013DE01), Terminal cover (CCOVA1985CE01), Lens cap (PCAPH1056CESA), CD-ROM (UDSKA0047CEN1), Projector operation manual (TINS-7416CEZZ), SharpVision Manager operation manual (TINS-7418CEZZ) This SHARP projector uses a DMD chip. of the unit. As with any questions about this...
... the picture screen. Specifications Product type Projector Model XV-Z9000U Video system PAL/PAL 60/PAL-M/PAL-N/SECAM/NTSC 3.58/NTSC 4.43 DTV 480i/480P/720P/1080i Display method DLP chip, RGB optical shutter method DLP panel Panel size: 0.8Љ Display ... (RRMCG1657CESA), AA size batteries, Power cord (CACCU5013DE01), Terminal cover (CCOVA1985CE01), Lens cap (PCAPH1056CESA), CD-ROM (UDSKA0047CEN1), Projector operation manual (TINS-7416CEZZ), SharpVision Manager operation manual (TINS-7418CEZZ) This SHARP projector uses a DMD chip. of the unit. As with any questions about this...
