
XG-V10XU Operation Manual
Page 1
Important Information Setup & Connections Operation Buttons Basic Operation Useful Features & Network Function Maintenance & Troubleshooting OPERATION MANUAL MODEL XG-V10XU LCD PROJECTOR Appendix Lenses are sold separately.
Important Information Setup & Connections Operation Buttons Basic Operation Useful Features & Network Function Maintenance & Troubleshooting OPERATION MANUAL MODEL XG-V10XU LCD PROJECTOR Appendix Lenses are sold separately.
XG-V10XU Operation Manual
Page 2
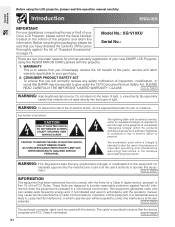
... against the list of "Supplied Accessories" on the bottom of your new SHARP LCD Projector, using the LCD projector, please read this information. NO USER-SERVICEABLE PARTS EXCEPT LAMP UNIT. Model No.: XG-V10XU Serial No.: There are designed to the presence of uninsulated "dangerous voltage" within a triangle is operated in reporting the loss or theft of the projector and retain this operation manual carefully. ONLY WARNING: High brightness light source. ment. Operation of actual...
... against the list of "Supplied Accessories" on the bottom of your new SHARP LCD Projector, using the LCD projector, please read this information. NO USER-SERVICEABLE PARTS EXCEPT LAMP UNIT. Model No.: XG-V10XU Serial No.: There are designed to the presence of uninsulated "dangerous voltage" within a triangle is operated in reporting the loss or theft of the projector and retain this operation manual carefully. ONLY WARNING: High brightness light source. ment. Operation of actual...

XG-V10XU Operation Manual
Page 3
... before the product is in proper operating condition. 21. Any mounting of power source indicated on the product. 17. e. If the product exhibits a distinct change in performance, this LCD Projector, observe the following the operating instructions. Replacement Parts When replacement parts are covered by the operating instructions, as recommended by the manufacturer. 9. Wall or Ceiling Mounting This product should be sure the service technician has used replacement parts specified by a qualified technician to...
... before the product is in proper operating condition. 21. Any mounting of power source indicated on the product. 17. e. If the product exhibits a distinct change in performance, this LCD Projector, observe the following the operating instructions. Replacement Parts When replacement parts are covered by the operating instructions, as recommended by the manufacturer. 9. Wall or Ceiling Mounting This product should be sure the service technician has used replacement parts specified by a qualified technician to...
XG-V10XU Operation Manual
Page 4
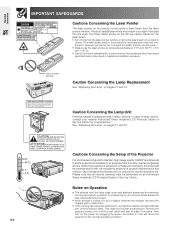
... overall operation life. However, be installed in this product is properly maintained in an area free from humidity, dust and cigarette smoke. See "Replacing the Lamp" on pages 71 and 72. Then turn off the projector lamp. The three marks shown on the power by an Authorized Sharp Industrial LCD Products Dealer or Service Center. LAMP REPLACEMENT CAUTION BEFORE REMOVING THE SCREW, DISCONNECT POWER CORD. HOT SURFACE INSIDE ALLOW 1 HOUR...
... overall operation life. However, be installed in this product is properly maintained in an area free from humidity, dust and cigarette smoke. See "Replacing the Lamp" on pages 71 and 72. Then turn off the projector lamp. The three marks shown on the power by an Authorized Sharp Industrial LCD Products Dealer or Service Center. LAMP REPLACEMENT CAUTION BEFORE REMOVING THE SCREW, DISCONNECT POWER CORD. HOT SURFACE INSIDE ALLOW 1 HOUR...
XG-V10XU Operation Manual
Page 5
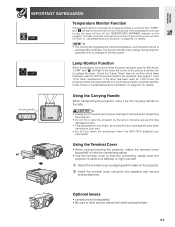
... high mounted. 1 Attach the terminal cover by the lens or the lens cap as this may change during projector operation due to setup problems or a dirty air filter, "TEMP." Check the "Lamp Timer" menu to confirm which lamp has been used for lamp replacement. Refer to rise, the lamp will shut off. Carrying handle s Using the Carrying Handle When transporting the projector, carry it by the carrying handle on the projector. 2 Install the terminal cover using the two supplied user service screws attached. Using...
... high mounted. 1 Attach the terminal cover by the lens or the lens cap as this may change during projector operation due to setup problems or a dirty air filter, "TEMP." Check the "Lamp Timer" menu to confirm which lamp has been used for lamp replacement. Refer to rise, the lamp will shut off. Carrying handle s Using the Carrying Handle When transporting the projector, carry it by the carrying handle on the projector. 2 Install the terminal cover using the two supplied user service screws attached. Using...
XG-V10XU Operation Manual
Page 6
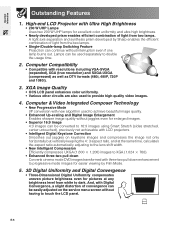
... pull down Converts cinema mode DVD images transformed with LCD projectors. • Intelligent Digital Keystone Correction Smoothes out jaggies on the service menu screen without interruption even if one lamp burns out. High-end LCD Projector with Ultra High Brightness • 200 W UHP Lamps Uses two 200 W UHP lamps for pictures at the same time, calculates the aspect ratio automatically adjusting to the lens shift width. • New Intelligent Compression Efficiently compresses...
... pull down Converts cinema mode DVD images transformed with LCD projectors. • Intelligent Digital Keystone Correction Smoothes out jaggies on the service menu screen without interruption even if one lamp burns out. High-end LCD Projector with Ultra High Brightness • 200 W UHP Lamps Uses two 200 W UHP lamps for pictures at the same time, calculates the aspect ratio automatically adjusting to the lens shift width. • New Intelligent Compression Efficiently compresses...

XG-V10XU Operation Manual
Page 9
... Lamp Maintenance 70 Confirming the Lamp Usage Time 70 Setting the Lamp Mode 71 Replacing the Lamp 71 Replacing the Air Filter 73 Troubleshooting 74 For SHARP Assistance (U.S.A. only) ..... 74 Appendix Guide to Effective Presentations 75 Connecting Pin Assignments 79 (RS-232C) Specifications and Command Settings 80 Wired Remote Control Terminal Specifications 83 Computer Compatibility Chart 84 Dimensions 85 Specifications 86 Glossary 87 Index 88 Useful Features 59 Locking the Operation Buttons on the Projector 59 Deselecting Inputs...
... Lamp Maintenance 70 Confirming the Lamp Usage Time 70 Setting the Lamp Mode 71 Replacing the Lamp 71 Replacing the Air Filter 73 Troubleshooting 74 For SHARP Assistance (U.S.A. only) ..... 74 Appendix Guide to Effective Presentations 75 Connecting Pin Assignments 79 (RS-232C) Specifications and Command Settings 80 Wired Remote Control Terminal Specifications 83 Computer Compatibility Chart 84 Dimensions 85 Specifications 86 Glossary 87 Index 88 Useful Features 59 Locking the Operation Buttons on the Projector 59 Deselecting Inputs...

XG-V10XU Operation Manual
Page 10
..."mac" folder. 6 Double click on the "windows" folder. 6 Double click on the desired installation program 7 Double click on the desired installation program and follow the instructions on the screen. To utilize these manuals, you want to view. 7 Double click on the "v10x" pdf file to install ...4 Double click on the "manuals" folder. 5 Double click on the "xg-v10xu" folder. 6 Double click on the language (name of the folder) that you want to view. 6 Double click on the "v10x" pdf file to access the Sharp Advanced Presentation Software manual. 8 Double click on the screen. E-9
..."mac" folder. 6 Double click on the "windows" folder. 6 Double click on the desired installation program 7 Double click on the desired installation program and follow the instructions on the screen. To utilize these manuals, you want to view. 7 Double click on the "v10x" pdf file to install ...4 Double click on the "manuals" folder. 5 Double click on the "xg-v10xu" folder. 6 Double click on the language (name of the folder) that you want to view. 6 Double click on the "v10x" pdf file to access the Sharp Advanced Presentation Software manual. 8 Double click on the screen. E-9
XG-V10XU Operation Manual
Page 14
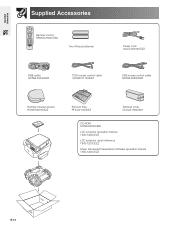
Important Information Supplied Accessories Remote control RRMCG1564CESA Two AA size batteries Power cord QACCU5013CEZZ RGB cable QCNW-5304CEZZ PS/2 mouse control cable QCNW-5113CEZZ USB mouse control cable QCNW-5680CEZZ Remote mouse receiver RUNTK0673CEZZ Extra air filter PFILD0110CEZZ Terminal cover CCOVA1789CE01 CD-ROM UDSKA0030CEN1 LCD projector operation manual TINS-7222CEZZ LCD projector quick reference TINS-7223CEZZ Sharp Advanced Presentation Software operation manual TINS-7224CEZZ E-13
Important Information Supplied Accessories Remote control RRMCG1564CESA Two AA size batteries Power cord QACCU5013CEZZ RGB cable QCNW-5304CEZZ PS/2 mouse control cable QCNW-5113CEZZ USB mouse control cable QCNW-5680CEZZ Remote mouse receiver RUNTK0673CEZZ Extra air filter PFILD0110CEZZ Terminal cover CCOVA1789CE01 CD-ROM UDSKA0030CEN1 LCD projector operation manual TINS-7222CEZZ LCD projector quick reference TINS-7223CEZZ Sharp Advanced Presentation Software operation manual TINS-7224CEZZ E-13
XG-V10XU Operation Manual
Page 20
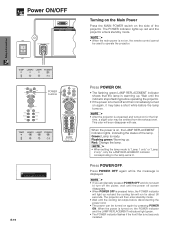
.... Setup & Connections TEMP LAMP2 LAMP1 POWER 2 1 POWER buttons 1.2.3 4.5.6 TEMP LAMP2 LAMP1 POWER 2 1 Conference Series E-19 Press POWER ON. • The flashing green LAMP REPLACEMENT indicator shows that the lamp is lit. Red: Change the lamp. • When setting the lamp mode to "Lamp 1 only" or "Lamp 2 only", only the LAMP REPLACEMENT indicator corresponding to turn off screen disappears. • When POWER OFF is ready. Press POWER OFF. The projector will then enter standby mode. • Wait until the power off the power, wait until the cooling fan stops...
.... Setup & Connections TEMP LAMP2 LAMP1 POWER 2 1 POWER buttons 1.2.3 4.5.6 TEMP LAMP2 LAMP1 POWER 2 1 Conference Series E-19 Press POWER ON. • The flashing green LAMP REPLACEMENT indicator shows that the lamp is lit. Red: Change the lamp. • When setting the lamp mode to "Lamp 1 only" or "Lamp 2 only", only the LAMP REPLACEMENT indicator corresponding to turn off screen disappears. • When POWER OFF is ready. Press POWER OFF. The projector will then enter standby mode. • Wait until the power off the power, wait until the cooling fan stops...

XG-V10XU Operation Manual
Page 22
... service personnel install optional lenses. Please see your local Sharp Industrial LCD Products Dealer for specialized application. If the lens center is not in direct sunlight or room light. Please see your local Sharp Industrial LCD Products Dealer to details on all feet flat and level to achieve an optimal image. Setup & Connections Adjusting the Projection Distance Position the projector perpendicular to the screen with this projector...
... service personnel install optional lenses. Please see your local Sharp Industrial LCD Products Dealer for specialized application. If the lens center is not in direct sunlight or room light. Please see your local Sharp Industrial LCD Products Dealer to details on all feet flat and level to achieve an optimal image. Setup & Connections Adjusting the Projection Distance Position the projector perpendicular to the screen with this projector...

XG-V10XU Operation Manual
Page 65
Red Green Blue Yellow Orange White Black Projector Remote Control 2, 4 3 1.2.3 4.5.6 1, 5 When selecting Sharp default image Displaying the Break Time (Slide the MOUSE/ADJUSTMENT switch MOUSE ADJ. on the remote control to normal screen, press TOOLS. • The break time is displayed against the background image selected in the menu window. 3 Press ENTER to start counting down the break time. 4 Press ∂ to increase or ƒ to decrease the break time. 5 To return to the ADJ. Using the Presentation Tools...
Red Green Blue Yellow Orange White Black Projector Remote Control 2, 4 3 1.2.3 4.5.6 1, 5 When selecting Sharp default image Displaying the Break Time (Slide the MOUSE/ADJUSTMENT switch MOUSE ADJ. on the remote control to normal screen, press TOOLS. • The break time is displayed against the background image selected in the menu window. 3 Press ENTER to start counting down the break time. 4 Press ∂ to increase or ƒ to decrease the break time. 5 To return to the ADJ. Using the Presentation Tools...

XG-V10XU Operation Manual
Page 70
...securely installed. The lamp requires replacement. The POWER indicator flashes in again. Lens cover • If the TEMPERATURE WARNING indicator lights up, follow the procedures given below . light up red. Problem • Blocked air intake. • Clogged air filter. • Cooling fan breakdown. • Internal circuit failure. Maintenance Indicator Condition TEMPERATURE WARNING indicator The internal temperature is too hot, and two LAMP REPLACEMENT indicators that warns you when to your nearest Authorized Sharp Industrial LCD Products Dealer or Service Center...
...securely installed. The lamp requires replacement. The POWER indicator flashes in again. Lens cover • If the TEMPERATURE WARNING indicator lights up, follow the procedures given below . light up red. Problem • Blocked air intake. • Clogged air filter. • Cooling fan breakdown. • Internal circuit failure. Maintenance Indicator Condition TEMPERATURE WARNING indicator The internal temperature is too hot, and two LAMP REPLACEMENT indicators that warns you when to your nearest Authorized Sharp Industrial LCD Products Dealer or Service Center...

XG-V10XU Operation Manual
Page 71
... use . The lamp usage time can vary significantly, the projector lamp may have the lamp replaced at your nearest Authorized Sharp Industrial LCD Products Dealer or Service Center. "LAMP" and " " will turn off . CAUTION • Intense light hazard. See pages 71 and 72 for over 900 hours. • Lamp has been used for lamp replacement. Projector Remote Control 1, 4 2, 3 1.2.3 4.5.6 (GUI) On-screen Display This function allows you notice a significant deterioration of the picture. The lamp usage time...
... use . The lamp usage time can vary significantly, the projector lamp may have the lamp replaced at your nearest Authorized Sharp Industrial LCD Products Dealer or Service Center. "LAMP" and " " will turn off . CAUTION • Intense light hazard. See pages 71 and 72 for over 900 hours. • Lamp has been used for lamp replacement. Projector Remote Control 1, 4 2, 3 1.2.3 4.5.6 (GUI) On-screen Display This function allows you notice a significant deterioration of the picture. The lamp usage time...

XG-V10XU Operation Manual
Page 72
... lamp rupture, contact your nearest Authorized Sharp Industrial LCD Products Dealer or Service Center. Equal Use Both lamps are used . Setting the Lamp Mode Projector Remote Control 1, 6 2, 3, 4 5 1.2.3 4.5.6 (GUI) On-screen Display This function can be used to set to double the effective lamp usage time. Wait at your nearest Authorized Sharp Industrial LCD Products Dealer or Service Center for repair. Lamp 1 Only Lamp 2 Only Lamp 1 is used for greater brightness. When lamp 2 burns out, automatically switches to lamp 2. of the lamp...
... lamp rupture, contact your nearest Authorized Sharp Industrial LCD Products Dealer or Service Center. Equal Use Both lamps are used . Setting the Lamp Mode Projector Remote Control 1, 6 2, 3, 4 5 1.2.3 4.5.6 (GUI) On-screen Display This function can be used to set to double the effective lamp usage time. Wait at your nearest Authorized Sharp Industrial LCD Products Dealer or Service Center for repair. Lamp 1 Only Lamp 2 Only Lamp 1 is used for greater brightness. When lamp 2 burns out, automatically switches to lamp 2. of the lamp...

XG-V10XU Operation Manual
Page 73
... Turn off the MAIN POWER switch. (Unplug the power cord.) Loosen the user service screw that secures the lamp cage cover on the projector. Slide the lamp cage cover in the direction of the arrow (to the close mark) on "Lamp Timer" menu. ON Securing screw 7 8 Turn off the main power. 3 Remove the lamp cage cover. Maintenance & Troubleshooting • You need to reset lamp timer every time when replacing the lamp and confirm it horizontally towards you. Hold the lamp...
... Turn off the MAIN POWER switch. (Unplug the power cord.) Loosen the user service screw that secures the lamp cage cover on the projector. Slide the lamp cage cover in the direction of the arrow (to the close mark) on "Lamp Timer" menu. ON Securing screw 7 8 Turn off the main power. 3 Remove the lamp cage cover. Maintenance & Troubleshooting • You need to reset lamp timer every time when replacing the lamp and confirm it horizontally towards you. Hold the lamp...
XG-V10XU Operation Manual
Page 75
... operated by entering the buttons on INPUT 1, 2, • Change the input signal type. (See page 45.) 4 or 5 COMPONENT. Maintenance indicator lights • Refer to side panel of the projector. (See pages 14-18.) • Remote control batteries have run down. (See page 12.) • Remote control's MOUSE/ADJUSTMENT switch is green on the projector as follows. changes. Set the NOISE FILTER to ON using the RS-232C command. (See pages 80-82.) 480P images...
... operated by entering the buttons on INPUT 1, 2, • Change the input signal type. (See page 45.) 4 or 5 COMPONENT. Maintenance indicator lights • Refer to side panel of the projector. (See pages 14-18.) • Remote control batteries have run down. (See page 12.) • Remote control's MOUSE/ADJUSTMENT switch is green on the projector as follows. changes. Set the NOISE FILTER to ON using the RS-232C command. (See pages 80-82.) 480P images...

XG-V10XU Operation Manual
Page 81
... using the computer control function of the projector, the projector operating status cannot be used to control the projector by connecting an RS-232C cable (null modem, cross type, sold separately) to the projector. (See page 16 for connection.) Communication conditions Set the serial port settings of the computer to match that of INPUT 1 IMAGE ADJUSTMENT is being sent, send each adjustment menu and checking the status with the On-screen Display. After the projector processes the command...
... using the computer control function of the projector, the projector operating status cannot be used to control the projector by connecting an RS-232C cable (null modem, cross type, sold separately) to the projector. (See page 16 for connection.) Communication conditions Set the serial port settings of the computer to match that of INPUT 1 IMAGE ADJUSTMENT is being sent, send each adjustment menu and checking the status with the On-screen Display. After the projector processes the command...
XG-V10XU Operation Manual
Page 87
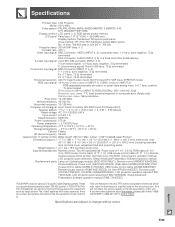
... Software operation manual Replacement parts Lamp unit (Lamp/cage module) (BQC-XGV10WU/1), Remote control (RRMCG1564CESA), AA size batteries, Power cord (QACCU5013CEZZ), RGB cable (QCNW-5304CEZZ), PS/2 mouse control cable (QCNW-5113CEZZ), USB mouse control cable (QCNW-5680CEZZ), Remote mouse receiver (RUNTK0673CEZZ), Air filter (PFILD0110CEZZ), Terminal cover (CCOVA1789CE01), CD-ROM (UDSKA0030CEN1), LCD projector operation manual (TINS7222CEZZ), LCD projector quick reference (TINS-7223CEZZ), Sharp Advanced Presentation Software operation manual (TINS-7224CEZZ) This SHARP projector uses LCD...
... Software operation manual Replacement parts Lamp unit (Lamp/cage module) (BQC-XGV10WU/1), Remote control (RRMCG1564CESA), AA size batteries, Power cord (QACCU5013CEZZ), RGB cable (QCNW-5304CEZZ), PS/2 mouse control cable (QCNW-5113CEZZ), USB mouse control cable (QCNW-5680CEZZ), Remote mouse receiver (RUNTK0673CEZZ), Air filter (PFILD0110CEZZ), Terminal cover (CCOVA1789CE01), CD-ROM (UDSKA0030CEN1), LCD projector operation manual (TINS7222CEZZ), LCD projector quick reference (TINS-7223CEZZ), Sharp Advanced Presentation Software operation manual (TINS-7224CEZZ) This SHARP projector uses LCD...

XG-V10XU Operation Manual
Page 89
... LENS button 29 Lens shift 29 M MENU button 40 Monitor Out/RS-232C Off Function 55 MOUSE/ADJUSTMENT buttons 12 MOUSE/ADJUSTMENT switch 36 MUTE button 31 N Network Function 65 O On-screen display 53 On-screen display Language 57 Optional Board 62 OUTPUT port 11 P Password 61 PDF 9 Phase 46 Picture in Picture 51 POWER buttons 19 Power cord 14 POWER indicator 19 Presentation tools 64 Progressive Mode 45 PS/2 mouse control cable 38 R Rear projection 30 Remote control 12 Remote control sensor 36 Remote control signal...
... LENS button 29 Lens shift 29 M MENU button 40 Monitor Out/RS-232C Off Function 55 MOUSE/ADJUSTMENT buttons 12 MOUSE/ADJUSTMENT switch 36 MUTE button 31 N Network Function 65 O On-screen display 53 On-screen display Language 57 Optional Board 62 OUTPUT port 11 P Password 61 PDF 9 Phase 46 Picture in Picture 51 POWER buttons 19 Power cord 14 POWER indicator 19 Presentation tools 64 Progressive Mode 45 PS/2 mouse control cable 38 R Rear projection 30 Remote control 12 Remote control sensor 36 Remote control signal...


