XGP10XU Operation Manual
Page 3
...will often require extensive work by the manufacturer. 9. Object and Liquid Entry Never push objects of any service or repairs to this LCD Projector, observe the following basic rules for its installation, use and servicing. In order not to the product. Heed Warnings All warnings...registers, stoves, or other similar surface. Use a damp cloth for long periods of power supply to dangerous voltage or other sources, refer to ensure your LCD Projector, please be followed. 5. Power Sources This product should be sure to . 11. This will prevent damage to the ...
...will often require extensive work by the manufacturer. 9. Object and Liquid Entry Never push objects of any service or repairs to this LCD Projector, observe the following basic rules for its installation, use and servicing. In order not to the product. Heed Warnings All warnings...registers, stoves, or other similar surface. Use a damp cloth for long periods of power supply to dangerous voltage or other sources, refer to ensure your LCD Projector, please be followed. 5. Power Sources This product should be sure to . 11. This will prevent damage to the ...
XGP10XU Operation Manual
Page 4
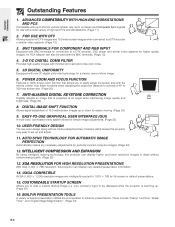
... resized to a DTV decoder, DVD player and similar video systems for full-screen or default presentations. 15. POWER ZOOM AND FOCUS FUNCTION Features a 130% power zoom function that is warming up to 300-inch screen size. (Page 20) 7. to 200 Hz vertical refresh...Information Outstanding Features 1. USER-FRIENDLY DESIGN The two-color design along with the remote control. XGA RESOLUTION FOR HIGH RESOLUTION PRESENTATIONS With XGA (1,024 ן768) resolution, this projector very easy to easily adjust the screen size with an intuitive Graphical User Interface (GUI) ...
... resized to a DTV decoder, DVD player and similar video systems for full-screen or default presentations. 15. POWER ZOOM AND FOCUS FUNCTION Features a 130% power zoom function that is warming up to 300-inch screen size. (Page 20) 7. to 200 Hz vertical refresh...Information Outstanding Features 1. USER-FRIENDLY DESIGN The two-color design along with the remote control. XGA RESOLUTION FOR HIGH RESOLUTION PRESENTATIONS With XGA (1,024 ן768) resolution, this projector very easy to easily adjust the screen size with an intuitive Graphical User Interface (GUI) ...

XGP10XU Operation Manual
Page 6
... turn off, the TEMPERATURE WARNING indicator on after a 90-second coolingoff period the power will automatically turn on the power by an Authorized Sharp Industrial LCD Products Dealer or Service Center. Then turn off the projector lamp. Temperature Monitor Function If the projector starts to overheat due to rise, the lamp will enter standby mode. Lamp...
... turn off, the TEMPERATURE WARNING indicator on after a 90-second coolingoff period the power will automatically turn on the power by an Authorized Sharp Industrial LCD Products Dealer or Service Center. Then turn off the projector lamp. Temperature Monitor Function If the projector starts to overheat due to rise, the lamp will enter standby mode. Lamp...
XGP10XU Operation Manual
Page 8
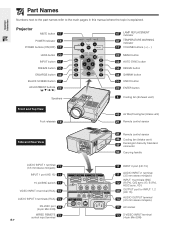
Projector MUTE button 17 POWER indicator 16 POWER buttons (ON/OFF) 17 LENS button 20 INPUT button 17 FREEZE button 33 ENLARGE button 34 BLACK SCREEN button 37 ADJUSTMENT buttons 23 Speakers 47 ...
Projector MUTE button 17 POWER indicator 16 POWER buttons (ON/OFF) 17 LENS button 20 INPUT button 17 FREEZE button 33 ENLARGE button 34 BLACK SCREEN button 37 ADJUSTMENT buttons 23 Speakers 47 ...
XGP10XU Operation Manual
Page 9
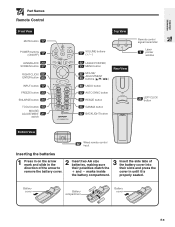
Battery cover Battery compartment Battery cover E-8 Important Information Part Names Remote Control Front View MUTE button 17 POWER buttons (ON/OFF) 17 LENS/BLACK 20 SCREEN button 37 RIGHT-CLICK/ 22 ENTER button 23 INPUT button 17 FREEZE button 33 ENLARGE button 34 ...
Battery cover Battery compartment Battery cover E-8 Important Information Part Names Remote Control Front View MUTE button 17 POWER buttons (ON/OFF) 17 LENS/BLACK 20 SCREEN button 37 RIGHT-CLICK/ 22 ENTER button 23 INPUT button 17 FREEZE button 33 ENLARGE button 34 ...
XGP10XU Operation Manual
Page 11
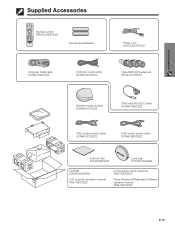
...Power cord QACCU5013CEZZ Computer RGB cable QCNW-5304CEZZ Computer audio cable QCNW-4870CEZZ Three BNC-RCA adaptors QPLGJ0107GEZZ Remote mouse receiver RUNTK0673CEZZ DIN-D-sub RS-232C cable QCNW-5288CEZZ PS/2 mouse control cable QCNW-5113CEZZ USB mouse control cable QCNW-5680CEZZ Extra air filter PFILD0088CEZZ Lens cap PCAPH1056CESA CD-ROM UDSKA0022CEN1 LCD projector... operation manual TINS-7052CEZZ LCD projector quick reference TINS-7053CEZZ Sharp Advanced Presentation Software operation manual TINS-7054CEZZ E-10
...Power cord QACCU5013CEZZ Computer RGB cable QCNW-5304CEZZ Computer audio cable QCNW-4870CEZZ Three BNC-RCA adaptors QPLGJ0107GEZZ Remote mouse receiver RUNTK0673CEZZ DIN-D-sub RS-232C cable QCNW-5288CEZZ PS/2 mouse control cable QCNW-5113CEZZ USB mouse control cable QCNW-5680CEZZ Extra air filter PFILD0088CEZZ Lens cap PCAPH1056CESA CD-ROM UDSKA0022CEN1 LCD projector... operation manual TINS-7052CEZZ LCD projector quick reference TINS-7053CEZZ Sharp Advanced Presentation Software operation manual TINS-7054CEZZ E-10
XGP10XU Operation Manual
Page 12
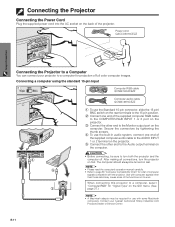
... "Computer/RGB" for "Signal Type" on the computer. Connecting the Projector Connecting the Power Cord Plug the supplied power cord into the AC socket on the computer. After making all connections, turn both the projector and the computer off. The computer should always be required for a... or 2 terminal on the projector. 5 Connect the other end to the Monitor output port on the back of the functions not to a Computer You can connect your nearest Authorized Sharp Industrial LCD Products Dealer or Service Center. Use with the projector. Power cord QACCU5013CEZZ Setup & Connections ...
... "Computer/RGB" for "Signal Type" on the computer. Connecting the Projector Connecting the Power Cord Plug the supplied power cord into the AC socket on the computer. After making all connections, turn both the projector and the computer off. The computer should always be required for a... or 2 terminal on the projector. 5 Connect the other end to the Monitor output port on the back of the functions not to a Computer You can connect your nearest Authorized Sharp Industrial LCD Products Dealer or Service Center. Use with the projector. Power cord QACCU5013CEZZ Setup & Connections ...
XGP10XU Operation Manual
Page 16
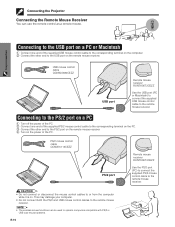
... control cable to the corresponding terminal on the computer. 2 Connect the other end to the PS/2 port on the remote mouse receiver. 4 Turn on the power of the supplied PS/2 mouse control cable to the corresponding terminal on the PC. 3 Connect the other end to the PS/2 port on a PC 1 .../2 port Remote mouse receiver RUNTK0673CEZZ Use the PS/2 port (PC) to connect the supplied PS/2 mouse control cable to the remote mouse receiver. Connecting the Projector Connecting the Remote Mouse Receiver You can be used to or from the computer while it is on. USB mouse control cable QCNW-5680CEZZ USB...
... control cable to the corresponding terminal on the computer. 2 Connect the other end to the PS/2 port on the remote mouse receiver. 4 Turn on the power of the supplied PS/2 mouse control cable to the corresponding terminal on the PC. 3 Connect the other end to the PS/2 port on a PC 1 .../2 port Remote mouse receiver RUNTK0673CEZZ Use the PS/2 port (PC) to connect the supplied PS/2 mouse control cable to the remote mouse receiver. Connecting the Projector Connecting the Remote Mouse Receiver You can be used to or from the computer while it is on. USB mouse control cable QCNW-5680CEZZ USB...

XGP10XU Operation Manual
Page 17
E-16 Operation Operation Basic Operations 1 Make the necessary connections before proceeding. Connect the power cord to a wall outlet. The POWER indicator lights up red and the projector enters standby mode. • If the bottom filter cover is not securely installed, the POWER indicator flashes.
E-16 Operation Operation Basic Operations 1 Make the necessary connections before proceeding. Connect the power cord to a wall outlet. The POWER indicator lights up red and the projector enters standby mode. • If the bottom filter cover is not securely installed, the POWER indicator flashes.

XGP10XU Operation Manual
Page 18
.... This odor will be displayed. When the power is turned on . 6 E-17 Press POWER OFF. Basic Operations 2 4 Press Power ON. • The flashing green LAMP REPLACEMENT indicator shows that the projector is not preset to "Level A" or "Level B", Power ON and Power OFF can be turned on , the LAMP REPLACEMENT...for the first time, a slight odor may take a short while before disconnecting the power cord. • The power can only be used on the remote control. (See page 41.) • After the projector is unpacked and turned on . • If the keylock level is set to ...
.... This odor will be displayed. When the power is turned on . 6 E-17 Press POWER OFF. Basic Operations 2 4 Press Power ON. • The flashing green LAMP REPLACEMENT indicator shows that the projector is not preset to "Level A" or "Level B", Power ON and Power OFF can be turned on , the LAMP REPLACEMENT...for the first time, a slight odor may take a short while before disconnecting the power cord. • The power can only be used on the remote control. (See page 41.) • After the projector is unpacked and turned on . • If the keylock level is set to ...
XGP10XU Operation Manual
Page 23
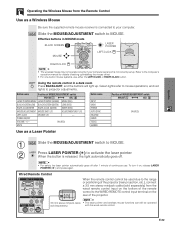
...-CLICK • The wireless mouse may not operate correctly if your computer. POWER ON/OFF VOLUME ON (RED) MUTE Button name INPUT UNDO FREEZE AUTO SYNC ENLARGE RESIZE TOOLS GAMMA Position of the projector. 3.5 mm stereo minijack cable • The laser pointer and wireless mouse... a dark room Press BACKLIGHT, and the buttons will light up . Slide the MOUSE/ADJUSTMENT switch to MOUSE. 2 Press LASER POINTER ( ) to projector adjustments. E-22 LASER POINTER/MENU LASER POINTER (GREEN) MENU (RED) BLACK SCREEN/LENS BLACK SCREEN (GREEN) LENS (RED) RIGHT-CLICK/ENTER RIGHT-CLICK...
...-CLICK • The wireless mouse may not operate correctly if your computer. POWER ON/OFF VOLUME ON (RED) MUTE Button name INPUT UNDO FREEZE AUTO SYNC ENLARGE RESIZE TOOLS GAMMA Position of the projector. 3.5 mm stereo minijack cable • The laser pointer and wireless mouse... a dark room Press BACKLIGHT, and the buttons will light up . Slide the MOUSE/ADJUSTMENT switch to MOUSE. 2 Press LASER POINTER ( ) to projector adjustments. E-22 LASER POINTER/MENU LASER POINTER (GREEN) MENU (RED) BLACK SCREEN/LENS BLACK SCREEN (GREEN) LENS (RED) RIGHT-CLICK/ENTER RIGHT-CLICK...

XGP10XU Operation Manual
Page 25
... Blue None Sharp Custom None Normal Level A Level B Options Language Lamp Timer BLK SCRN Disp [ON/OFF] OSD Display [ON/OFF] Video System Background Startup Image Economy Mode MNTR Out/RS232C[ON/OFF] Auto Power Off [ON/OFF] Keylock Level Password English Deutsch Español Nederlands Franç...ais Italiano Svenska Português Auto PAL (50/60Hz) SECAM NTSC4.43 NTSC3.58 Sharp Custom Blue None Sharp Custom None Normal Level A Level B Old Password New...
... Blue None Sharp Custom None Normal Level A Level B Options Language Lamp Timer BLK SCRN Disp [ON/OFF] OSD Display [ON/OFF] Video System Background Startup Image Economy Mode MNTR Out/RS232C[ON/OFF] Auto Power Off [ON/OFF] Keylock Level Password English Deutsch Español Nederlands Franç...ais Italiano Svenska Português Auto PAL (50/60Hz) SECAM NTSC4.43 NTSC3.58 Sharp Custom Blue None Sharp Custom None Normal Level A Level B Old Password New...
XGP10XU Operation Manual
Page 40
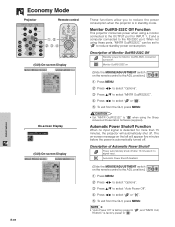
...; to select " " or " ". 5 To exit from the GUI, press MENU. • "Auto Power Off" is factory preset to " ", and "MNTR Out/ RS232C" is in standby mode. When not using the Sharp Advanced Presentation Software (supplied). Useful Features Economy Mode Projector Remote control 1, 5 2, 3, 4 (GUI) On-screen Display On-screen Display (GUI) On-screen Display...
...; to select " " or " ". 5 To exit from the GUI, press MENU. • "Auto Power Off" is factory preset to " ", and "MNTR Out/ RS232C" is in standby mode. When not using the Sharp Advanced Presentation Software (supplied). Useful Features Economy Mode Projector Remote control 1, 5 2, 3, 4 (GUI) On-screen Display On-screen Display (GUI) On-screen Display...
XGP10XU Operation Manual
Page 47
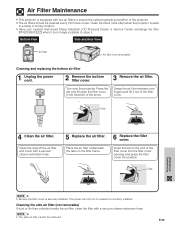
...be cleaned every 100 hours of use. Insert the tab on the end of the filter cover. Air Filter Maintenance • This projector is equipped with two air filters to clean it. Place the air filter underneath the tabs on unless it is no longer possible to... ensure the optimal operating condition of the projector. • The air filters should be removed. The power will not turn on the filter frame. 6 Replace the filter cover. Grasp the air filter between your nearest Authorized Sharp Industrial LCD Products Dealer or Service Center exchange the filter (PFILD0088CEZZ...
...be cleaned every 100 hours of use. Insert the tab on the end of the filter cover. Air Filter Maintenance • This projector is equipped with two air filters to clean it. Place the air filter underneath the tabs on unless it is no longer possible to... ensure the optimal operating condition of the projector. • The air filters should be removed. The power will not turn on the filter frame. 6 Replace the filter cover. Grasp the air filter between your nearest Authorized Sharp Industrial LCD Products Dealer or Service Center exchange the filter (PFILD0088CEZZ...
XGP10XU Operation Manual
Page 48
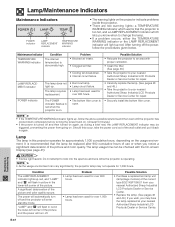
... of the picture and color quality occurs. Lamp The lamp in red when the projector is abnormally high. The power will automatically turn off and then turned on again, as during a brief rest, the LAMP REPLACEMENT indicator may have the lamp replaced at your nearest Authorized Sharp Industrial LCD Products Dealer or Service Center.
... of the picture and color quality occurs. Lamp The lamp in red when the projector is abnormally high. The power will automatically turn off and then turned on again, as during a brief rest, the LAMP REPLACEMENT indicator may have the lamp replaced at your nearest Authorized Sharp Industrial LCD Products Dealer or Service Center.
XGP10XU Operation Manual
Page 49
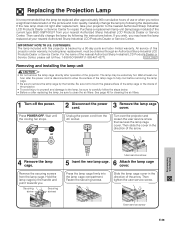
...Remove the lamp cage. Attach the lamp cage cover. IMPORTANT NOTE TO U.S. See page 46 for repair. or 2 3 Disconnect the power cord. Turn over the projector and loosen the user service screw that the lamp be replaced after approximately 900 cumulative hours of use or when you notice a significant ... cage directly after replacing the lamp, be sure to allow the surface of this projector is backed by the handle and pull it towards you may be obtained through an Authorized Sharp Industrial LCD Products Dealer or Service Center. The lamp may have the lamp replaced at least...
...Remove the lamp cage. Attach the lamp cage cover. IMPORTANT NOTE TO U.S. See page 46 for repair. or 2 3 Disconnect the power cord. Turn over the projector and loosen the user service screw that the lamp be replaced after approximately 900 cumulative hours of use or when you notice a significant ... cage directly after replacing the lamp, be sure to allow the surface of this projector is backed by the handle and pull it towards you may be obtained through an Authorized Sharp Industrial LCD Products Dealer or Service Center. The lamp may have the lamp replaced at least...
XGP10XU Operation Manual
Page 50
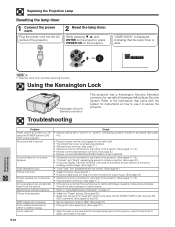
...Keylock level is set to "Level A" or "Level B", preventing operation of some or all buttons (See page 41.) • Projector power cord is not plugged into the AC socket of the projector. (See pages 11-15.) • "Contrast" and "Bright" adjustments are set to minimum position. (See page 26.) &#... switch is set to MOUSE. • Cables incorrectly connected to rear panel of the projector. 2 Reset the lamp timer. While pressing ƒ, © and ENTER on the projector, press POWER ON on the projector. Color is heard. Picture appears but no sound. Lens comes off and Black Screen ...
...Keylock level is set to "Level A" or "Level B", preventing operation of some or all buttons (See page 41.) • Projector power cord is not plugged into the AC socket of the projector. (See pages 11-15.) • "Contrast" and "Bright" adjustments are set to minimum position. (See page 26.) &#... switch is set to MOUSE. • Cables incorrectly connected to rear panel of the projector. 2 Reset the lamp timer. While pressing ƒ, © and ENTER on the projector, press POWER ON on the projector. Color is heard. Picture appears but no sound. Lens comes off and Black Screen ...
XGP10XU Operation Manual
Page 53
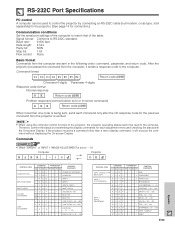
...sends a response code to the computer. Computer RABR _מ1 0 → ← Projector OK CONTROL ITEM POWER SETTING INPUT SWITCHING INPUT CHECK VOLUME ADJUSTMENT LENS ADJUSTMENT COMMAND PARAMETER C1 C2 C3 C4 P1 P2 P3 P4 ...* * COLOR (מ30 - ם30) R A T I _ * * * TINT (מ30 - ם30) R A S H _ * * * SHARPNESS (מ30 - ם30) R A R E _ _ _ 0 INPUT 1 DISPLAY R A R E _ _ _ 1 RESET E-52 Appendix Therefore, confirm the status by transmitting the display...
...sends a response code to the computer. Computer RABR _מ1 0 → ← Projector OK CONTROL ITEM POWER SETTING INPUT SWITCHING INPUT CHECK VOLUME ADJUSTMENT LENS ADJUSTMENT COMMAND PARAMETER C1 C2 C3 C4 P1 P2 P3 P4 ...* * COLOR (מ30 - ם30) R A T I _ * * * TINT (מ30 - ם30) R A S H _ * * * SHARPNESS (מ30 - ם30) R A R E _ _ _ 0 INPUT 1 DISPLAY R A R E _ _ _ 1 RESET E-52 Appendix Therefore, confirm the status by transmitting the display...
XGP10XU Operation Manual
Page 54
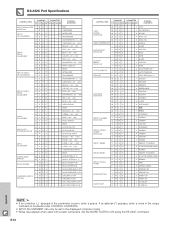
... PAL (50/60 Hz) M E S Y _ _ _ 3 SECAM M E S Y _ _ _ 4 NTSC 4.43 M E S Y _ _ _ 5 NTSC 3.58 VIDEO CONFIRMATION S Y S E _ _ _ 0 DISPLAY I M B G _ _ _ 1 SHARP BACKGROUND SELECTION I M B G _ _ _ 2 CUSTOM I M B G _ _ _ 3 BLUE I M B G _ _ _ 4 NONE STARTUP IMAGE SELECTION I M S I _ _ _ 1 SHARP I M S I _ _ _ 2 CUSTOM I M S I _ _ _ 3 NONE AUTO POWER OFF A P O W _ _ _ 0 AUTO POWER OFF A P O W _ _ _ 1 AUTO POWER ON KEYLOCK K E Y L _ _ _ * LEVEL SETTING (0מ2) M E L A _ _ _ 1 ENGLISH M E L A _ _ _ 2 DEUTSCH M E L A _ _ _ 3 ESPAÑOL M E L A _ _ _ 4 NEDERLANDS LANGUAGE...
... PAL (50/60 Hz) M E S Y _ _ _ 3 SECAM M E S Y _ _ _ 4 NTSC 4.43 M E S Y _ _ _ 5 NTSC 3.58 VIDEO CONFIRMATION S Y S E _ _ _ 0 DISPLAY I M B G _ _ _ 1 SHARP BACKGROUND SELECTION I M B G _ _ _ 2 CUSTOM I M B G _ _ _ 3 BLUE I M B G _ _ _ 4 NONE STARTUP IMAGE SELECTION I M S I _ _ _ 1 SHARP I M S I _ _ _ 2 CUSTOM I M S I _ _ _ 3 NONE AUTO POWER OFF A P O W _ _ _ 0 AUTO POWER OFF A P O W _ _ _ 1 AUTO POWER ON KEYLOCK K E Y L _ _ _ * LEVEL SETTING (0מ2) M E L A _ _ _ 1 ENGLISH M E L A _ _ _ 2 DEUTSCH M E L A _ _ _ 3 ESPAÑOL M E L A _ _ _ 4 NEDERLANDS LANGUAGE...

XGP10XU Operation Manual
Page 55
...C7 C8 C9 C10 C11 C12 C13 C14 C15 System Address Function Key Data Bit Data Expansion Mask Data Deter- Sharp remote control signal format Transmission format: 15-bit format D D D D D D D D D D D...control input, connect the cable from the WIRED REMOTE control input terminal on the projector to D Common Data Bit Reverse in D Appendix E-54 mination Example of Reverse ...at "10110". • Codes C14 and C15 are , therefore, not listed here. Control Item (Function) 1 POWER ON 2 POWER OFF 3 VOLUME מ 4 VOLUME ם 5 MUTE 6 MENU 7 LENS 8 ...
...C7 C8 C9 C10 C11 C12 C13 C14 C15 System Address Function Key Data Bit Data Expansion Mask Data Deter- Sharp remote control signal format Transmission format: 15-bit format D D D D D D D D D D D...control input, connect the cable from the WIRED REMOTE control input terminal on the projector to D Common Data Bit Reverse in D Appendix E-54 mination Example of Reverse ...at "10110". • Codes C14 and C15 are , therefore, not listed here. Control Item (Function) 1 POWER ON 2 POWER OFF 3 VOLUME מ 4 VOLUME ם 5 MUTE 6 MENU 7 LENS 8 ...


