XGP10XU Operation Manual
Page 4
... Automatically makes any necessary adjustments for simple image adjustments. (Page 23) 10. XGA RESOLUTION FOR HIGH RESOLUTION PRESENTATIONS With XGA (1,024 ן768) resolution, this projector can display higher and lower resolution images in detail without compromising quality. (Page ... Y/C DIGITAL COMB FILTER Provides high quality images with minimal dot crawl and cross color noise. 5. 3D DIGITAL UNIFORMITY Equipped with the remote control. BUILT-IN PRESENTATION TOOLS A variety of 16:9 wide-screen images up . (Page 38) 16. USER-FRIENDLY DESIGN The two-...
... Automatically makes any necessary adjustments for simple image adjustments. (Page 23) 10. XGA RESOLUTION FOR HIGH RESOLUTION PRESENTATIONS With XGA (1,024 ן768) resolution, this projector can display higher and lower resolution images in detail without compromising quality. (Page ... Y/C DIGITAL COMB FILTER Provides high quality images with minimal dot crawl and cross color noise. 5. 3D DIGITAL UNIFORMITY Equipped with the remote control. BUILT-IN PRESENTATION TOOLS A variety of 16:9 wide-screen images up . (Page 38) 16. USER-FRIENDLY DESIGN The two-...
XGP10XU Operation Manual
Page 5
...Appendix E-4 only 6 Part Names 7 Setup & Connections Supplied Accessories 10 Connecting the Projector 11 Useful Features Freeze Function 33 Digital Image Magnification 34 Gamma Correction 35 Selecting the... Basic Operations 16 Setting up the Screen 18 Operating the Wireless Mouse from the Remote Control 21 Using the GUI (Graphical User Interface) Menu Screens 23 Selecting the On...49 Appendix Optional Lenses 50 Transporting the Projector 50 Connection Pin Assignments 51 RS-232C Port Specifications 52 Wired Remote Control Terminal Specifications 54 Computer Compatibility Chart 55...
...Appendix E-4 only 6 Part Names 7 Setup & Connections Supplied Accessories 10 Connecting the Projector 11 Useful Features Freeze Function 33 Digital Image Magnification 34 Gamma Correction 35 Selecting the... Basic Operations 16 Setting up the Screen 18 Operating the Wireless Mouse from the Remote Control 21 Using the GUI (Graphical User Interface) Menu Screens 23 Selecting the On...49 Appendix Optional Lenses 50 Transporting the Projector 50 Connection Pin Assignments 51 RS-232C Port Specifications 52 Wired Remote Control Terminal Specifications 54 Computer Compatibility Chart 55...

XGP10XU Operation Manual
Page 6
...The laser pointer on the power by an Authorized Sharp Industrial LCD Products Dealer or Service Center. Then turn off , the TEMPERATURE WARNING indicator on the left corner of the picture. and " " will flash in . Lamp Monitor Function When the projector is turned on page 47, for details. •... to overheat due to "Lamp/Maintenance Indicators" on yourself or others. (The laser beam used for 1,000 hours, the projector power will automatically turn on the remote control emits a laser beam from the wall outlet and wait at least 10 minutes. See pages 48 and 49 for the laser ...
...The laser pointer on the power by an Authorized Sharp Industrial LCD Products Dealer or Service Center. Then turn off , the TEMPERATURE WARNING indicator on the left corner of the picture. and " " will flash in . Lamp Monitor Function When the projector is turned on page 47, for details. •... to overheat due to "Lamp/Maintenance Indicators" on yourself or others. (The laser beam used for 1,000 hours, the projector power will automatically turn on the remote control emits a laser beam from the wall outlet and wait at least 10 minutes. See pages 48 and 49 for the laser ...
XGP10XU Operation Manual
Page 8
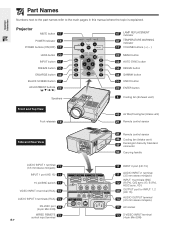
... Information Part Names Numbers next to the part names refer to the main pages in this manual where the topic is explained. Projector MUTE button 17 POWER indicator 16 POWER buttons (ON/OFF) 17 LENS button 20 INPUT button 17 FREEZE button 33 ENLARGE button... button 5 Cooling fan (Exhaust vent) Front and Top View Foot releases 19 46 Air filter/Cooling fan (Intake vent) 21 Remote control sensor Side and Rear View 21 Remote control sensor 46 Cooling fan (Intake vent) 49 Kensington Security Standard connector 50 Carrying handle AUDIO INPUT 1 terminal (3.5 mm stereo minijack)...
... Information Part Names Numbers next to the part names refer to the main pages in this manual where the topic is explained. Projector MUTE button 17 POWER indicator 16 POWER buttons (ON/OFF) 17 LENS button 20 INPUT button 17 FREEZE button 33 ENLARGE button... button 5 Cooling fan (Exhaust vent) Front and Top View Foot releases 19 46 Air filter/Cooling fan (Intake vent) 21 Remote control sensor Side and Rear View 21 Remote control sensor 46 Cooling fan (Intake vent) 49 Kensington Security Standard connector 50 Carrying handle AUDIO INPUT 1 terminal (3.5 mm stereo minijack)...
XGP10XU Operation Manual
Page 9
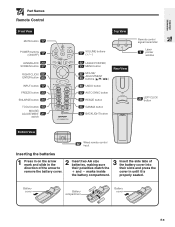
Battery cover Battery compartment Battery cover E-8 properly seated. Important Information Part Names Remote Control Front View MUTE button 17 POWER buttons (ON/OFF) 17 LENS/BLACK 20 SCREEN button 37 RIGHT-CLICK/ 22 ENTER button 23 INPUT button 17 ... buttons Rear View 20 UNDO button 32 AUTO SYNC button 36 RESIZE button 35 GAMMA button 22 BACKLIGHT button Remote control signal transmitter Laser 5 pointer window 22 LEFT-CLICK button Bottom View 22 Wired remote control input Inserting the batteries 1 Press in on the arrow mark and slide in the 2 Insert two AA size...
Battery cover Battery compartment Battery cover E-8 properly seated. Important Information Part Names Remote Control Front View MUTE button 17 POWER buttons (ON/OFF) 17 LENS/BLACK 20 SCREEN button 37 RIGHT-CLICK/ 22 ENTER button 23 INPUT button 17 ... buttons Rear View 20 UNDO button 32 AUTO SYNC button 36 RESIZE button 35 GAMMA button 22 BACKLIGHT button Remote control signal transmitter Laser 5 pointer window 22 LEFT-CLICK button Bottom View 22 Wired remote control input Inserting the batteries 1 Press in on the arrow mark and slide in the 2 Insert two AA size...
XGP10XU Operation Manual
Page 11
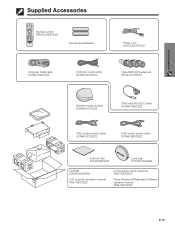
...-4870CEZZ Three BNC-RCA adaptors QPLGJ0107GEZZ Remote mouse receiver RUNTK0673CEZZ DIN-D-sub RS-232C cable QCNW-5288CEZZ PS/2 mouse control cable QCNW-5113CEZZ USB mouse control cable QCNW-5680CEZZ Extra air filter PFILD0088CEZZ Lens cap PCAPH1056CESA CD-ROM UDSKA0022CEN1 LCD projector operation manual TINS-7052CEZZ LCD projector quick reference TINS-7053CEZZ Sharp Advanced Presentation Software operation manual TINS...
...-4870CEZZ Three BNC-RCA adaptors QPLGJ0107GEZZ Remote mouse receiver RUNTK0673CEZZ DIN-D-sub RS-232C cable QCNW-5288CEZZ PS/2 mouse control cable QCNW-5113CEZZ USB mouse control cable QCNW-5680CEZZ Extra air filter PFILD0088CEZZ Lens cap PCAPH1056CESA CD-ROM UDSKA0022CEN1 LCD projector operation manual TINS-7052CEZZ LCD projector quick reference TINS-7053CEZZ Sharp Advanced Presentation Software operation manual TINS...
XGP10XU Operation Manual
Page 16
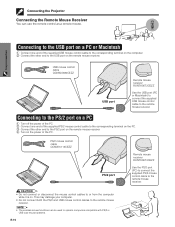
... your computer. • Do not connect both the PS/2 and USB mouse control cables to the remote mouse receiver. • The wireless mouse functions can use the remote control as a remote mouse. Connecting the Projector Connecting the Remote Mouse Receiver You can be used to the remote mouse receiver. Setup & Connections Connecting to the USB port on a PC...
... your computer. • Do not connect both the PS/2 and USB mouse control cables to the remote mouse receiver. • The wireless mouse functions can use the remote control as a remote mouse. Connecting the Projector Connecting the Remote Mouse Receiver You can be used to the remote mouse receiver. Setup & Connections Connecting to the USB port on a PC...

XGP10XU Operation Manual
Page 18
... is being received, "NOT REG." Press MUTE again to turn off the power, wait until the indicator stops flashing before 5 2, 6 operating the projector. • If the power is pressed twice, the POWER indicator will light up red and the cooling fan will be displayed. Red: Change the lamp...8226; If the keylock level is set to "Level A" or "Level B", Power ON and Power OFF can be used on the remote control. (See page 41.) • After the projector is warming up . Press POWER OFF again while the message is displayed. • If you accidentally pressed POWER OFF and do ...
... is being received, "NOT REG." Press MUTE again to turn off the power, wait until the indicator stops flashing before 5 2, 6 operating the projector. • If the power is pressed twice, the POWER indicator will light up red and the cooling fan will be displayed. Red: Change the lamp...8226; If the keylock level is set to "Level A" or "Level B", Power ON and Power OFF can be used on the remote control. (See page 41.) • After the projector is warming up . Press POWER OFF again while the message is displayed. • If you accidentally pressed POWER OFF and do ...
XGP10XU Operation Manual
Page 21
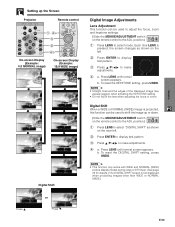
...Press ENTER to display test pattern. 3 Press to shift the image up the Screen Projector Remote control 1, 4a 3 2 4b On-screen Display (Example: 4:3 NORMAL image) On-screen Display (Example: 16:9 WIDE image) Press ∂. on the remote control to the ADJ. b. To reset the KEYSTONE setting, press UNDO. • ... Shift When a WIDE or NORMAL (WIDE) image is not displayed when projecting images other than WIDE or NORMAL (WIDE). on the remote control to the ADJ. To reset the DIGITAL SHIFT setting, press UNDO. • This function only works with WIDE and NORMAL (WIDE)...
...Press ENTER to display test pattern. 3 Press to shift the image up the Screen Projector Remote control 1, 4a 3 2 4b On-screen Display (Example: 4:3 NORMAL image) On-screen Display (Example: 16:9 WIDE image) Press ∂. on the remote control to the ADJ. b. To reset the KEYSTONE setting, press UNDO. • ... Shift When a WIDE or NORMAL (WIDE) image is not displayed when projecting images other than WIDE or NORMAL (WIDE). on the remote control to the ADJ. To reset the DIGITAL SHIFT setting, press UNDO. • This function only works with WIDE and NORMAL (WIDE)...
XGP10XU Operation Manual
Page 22
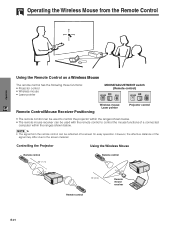
...; 45˚ 30˚ Remote control 30˚ 13Ј(4 m) 30˚ 120˚ Remote mouse receiver Remote control E-21 MOUSE ADJ. Remote Control/Mouse Receiver Positioning Wireless mouse Laser pointer Projector control • The remote control can be used to control the projector within the ranges shown below . • The remote mouse receiver can be used with the remote control to the screen material. However...
...; 45˚ 30˚ Remote control 30˚ 13Ј(4 m) 30˚ 120˚ Remote mouse receiver Remote control E-21 MOUSE ADJ. Remote Control/Mouse Receiver Positioning Wireless mouse Laser pointer Projector control • The remote control can be used to control the projector within the ranges shown below . • The remote mouse receiver can be used with the remote control to the screen material. However...
XGP10XU Operation Manual
Page 23
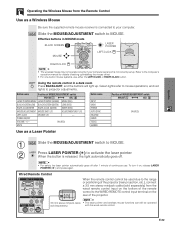
...; The laser pointer and wireless mouse functions can still be operated (sold separately) from the Remote Control Use as a Laser Pointer 1 MOUSE ADJ. Wired Remote Control 1 3 L AUDIO R VIDEO When the remote control cannot be used due to the range or positioning of the projector (rear projection, etc.), connect a 3.5 mm stereo minijack cable (sold separately) with the wired...
...; The laser pointer and wireless mouse functions can still be operated (sold separately) from the Remote Control Use as a Laser Pointer 1 MOUSE ADJ. Wired Remote Control 1 3 L AUDIO R VIDEO When the remote control cannot be used due to the range or positioning of the projector (rear projection, etc.), connect a 3.5 mm stereo minijack cable (sold separately) with the wired...
XGP10XU Operation Manual
Page 24
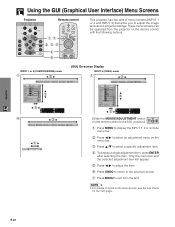
.... 2 Press ß/© to select an adjustment menu on the menu bar. 3 Press ∂/ƒ to exit from the projector or the remote control with the following buttons. Only the menu bar and the selected adjustment item will appear. 5 Press ß/© to adjust the ...details on items on the menu screen, see the tree charts on the remote control to adjust the image and various projector settings. Operation Using the GUI (Graphical User Interface) Menu Screens Projector Remote control 1, 7 2, 3, 5 4 6 This projector has two sets of menu screens (INPUT 1 or 2 and INPUT 3) ...
.... 2 Press ß/© to select an adjustment menu on the menu bar. 3 Press ∂/ƒ to exit from the projector or the remote control with the following buttons. Only the menu bar and the selected adjustment item will appear. 5 Press ß/© to adjust the ...details on items on the menu screen, see the tree charts on the remote control to adjust the image and various projector settings. Operation Using the GUI (Graphical User Interface) Menu Screens Projector Remote control 1, 7 2, 3, 5 4 6 This projector has two sets of menu screens (INPUT 1 or 2 and INPUT 3) ...
XGP10XU Operation Manual
Page 26
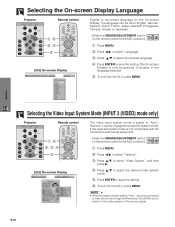
...the system mode is not compatible with the connected audiovisual equipment. (Slide the MOUSE/ADJUSTMENT switch MOUSE ADJ. Selecting the On-screen Display Language Projector Remote control 1, 5 2, 3 4 (GUI) On-screen Display English is preset to save the setting. The language can be set to "Auto... language . 4 Press ENTER to the ADJ. Operation Selecting the Video Input System Mode (INPUT 3 (VIDEO) mode only) Projector Remote control 1, 6 2, 3, 4 5 (GUI) On-screen Display The video input system mode is the preset language for the On-screen Display. E-25
...the system mode is not compatible with the connected audiovisual equipment. (Slide the MOUSE/ADJUSTMENT switch MOUSE ADJ. Selecting the On-screen Display Language Projector Remote control 1, 5 2, 3 4 (GUI) On-screen Display English is preset to save the setting. The language can be set to "Auto... language . 4 Press ENTER to the ADJ. Operation Selecting the Video Input System Mode (INPUT 3 (VIDEO) mode only) Projector Remote control 1, 6 2, 3, 4 5 (GUI) On-screen Display The video input system mode is the preset language for the On-screen Display. E-25
XGP10XU Operation Manual
Page 27
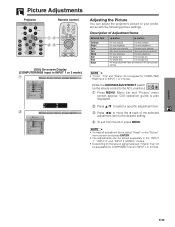
... brightness For less color intensity For more color intensity Skin tones become purplish Skin tones become greenish For less sharpness For more sharpness For weaker red For stronger red For weaker blue For stronger blue All image adjustment items are returned to ...adjustment items, select "Reset" on the "Picture" menu screen and press ENTER. • The adjustments can adjust the projector's picture to your preferences with the following picture settings. Picture Adjustments Projector Remote control 1, 4 2, 3 (GUI) On-screen Display (COMPUTER/RGB input in INPUT 1 or 2 mode) 1 2 ...
... brightness For less color intensity For more color intensity Skin tones become purplish Skin tones become greenish For less sharpness For more sharpness For weaker red For stronger red For weaker blue For stronger blue All image adjustment items are returned to ...adjustment items, select "Reset" on the "Picture" menu screen and press ENTER. • The adjustments can adjust the projector's picture to your preferences with the following picture settings. Picture Adjustments Projector Remote control 1, 4 2, 3 (GUI) On-screen Display (COMPUTER/RGB input in INPUT 1 or 2 mode) 1 2 ...
XGP10XU Operation Manual
Page 28
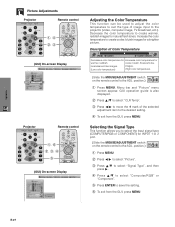
...allows you to select the input signal type (COMPUTER/RGB or COMPONENT) for a brighter picture. Operation Picture Adjustments Projector Remote control 1, 4 2, 3 (GUI) On-screen Display Projector Remote control 1, 6 2, 3, 4 5 (GUI) On-screen Display Adjusting the Color Temperature This function can be used... "Computer/RGB" or "Component". 5 Press ENTER to the ADJ. on the remote control to save the setting. 6 To exit from the GUI, press MENU. Increase the color temperature to the projector (video, computer image, TV broadcast, etc.). position.) 1 Press MENU. GUI operation...
...allows you to select the input signal type (COMPUTER/RGB or COMPONENT) for a brighter picture. Operation Picture Adjustments Projector Remote control 1, 4 2, 3 (GUI) On-screen Display Projector Remote control 1, 6 2, 3, 4 5 (GUI) On-screen Display Adjusting the Color Temperature This function can be used... "Computer/RGB" or "Component". 5 Press ENTER to the ADJ. on the remote control to save the setting. 6 To exit from the GUI, press MENU. Increase the color temperature to the projector (video, computer image, TV broadcast, etc.). position.) 1 Press MENU. GUI operation...

XGP10XU Operation Manual
Page 29
... a single image using all adjustment items, select "Reset" on the "Audio" menu screen and press ENTER. E-28 on the remote control to the ADJ. Operation Picture Adjustments Projector Remote control 1, 6 2, 3, 4 5 (GUI) On-screen Display Audio Adjustments Projector Remote control 1, 5 2, 3, 4 (GUI) On-screen Display 2 3 I /P Conversion", and then press ©. 4 Press ∂/ƒ to select "Interlaced.... position.) 1 Press MENU. The progressive display projects a smoother video image. (Slide the MOUSE/ADJUSTMENT switch MOUSE ADJ. on the remote control to standard settings.
... a single image using all adjustment items, select "Reset" on the "Audio" menu screen and press ENTER. E-28 on the remote control to the ADJ. Operation Picture Adjustments Projector Remote control 1, 6 2, 3, 4 5 (GUI) On-screen Display Audio Adjustments Projector Remote control 1, 5 2, 3, 4 (GUI) On-screen Display 2 3 I /P Conversion", and then press ©. 4 Press ∂/ƒ to select "Interlaced.... position.) 1 Press MENU. The progressive display projects a smoother video image. (Slide the MOUSE/ADJUSTMENT switch MOUSE ADJ. on the remote control to standard settings.
XGP10XU Operation Manual
Page 30
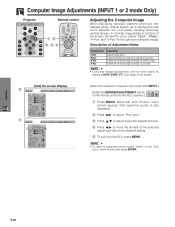
... position.) 1 Press MENU. See page 32 for the optimum computer image. on the remote control to tracking on your VCR). Computer Image Adjustments (INPUT 1 or 2 mode Only) Projector Remote control 1, 5 2, 3, 4 Adjusting the Computer Image When displaying computer patterns which are very... detailed (tiling, vertical stripes, etc.), interference may occur between the LCD pixels, causing flickering, vertical stripes, or contrast...
... position.) 1 Press MENU. See page 32 for the optimum computer image. on the remote control to tracking on your VCR). Computer Image Adjustments (INPUT 1 or 2 mode Only) Projector Remote control 1, 5 2, 3, 4 Adjusting the Computer Image When displaying computer patterns which are very... detailed (tiling, vertical stripes, etc.), interference may occur between the LCD pixels, causing flickering, vertical stripes, or contrast...
XGP10XU Operation Manual
Page 31
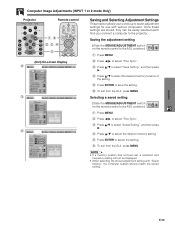
...Press ∂/ƒ to select the desired memory location of the setting. 5 Press ENTER to the projector. on the remote control to the ADJ. on the remote control to the ADJ. Selecting a saved setting (Slide the MOUSE/ADJUSTMENT switch MOUSE ADJ. Saving the adjustment...should match the stored setting. Operation E-30 Computer Image Adjustments (INPUT 1 or 2 mode Only) Projector Remote control 1, 6 2, 3, 4 5 (GUI) On-screen Display 2 3 4 Saving and Selecting Adjustment Settings This projector allows you connect a computer to save the setting. 6 To exit from the GUI, press MENU...
...Press ∂/ƒ to select the desired memory location of the setting. 5 Press ENTER to the projector. on the remote control to the ADJ. on the remote control to the ADJ. Selecting a saved setting (Slide the MOUSE/ADJUSTMENT switch MOUSE ADJ. Saving the adjustment...should match the stored setting. Operation E-30 Computer Image Adjustments (INPUT 1 or 2 mode Only) Projector Remote control 1, 6 2, 3, 4 5 (GUI) On-screen Display 2 3 4 Saving and Selecting Adjustment Settings This projector allows you connect a computer to save the setting. 6 To exit from the GUI, press MENU...
XGP10XU Operation Manual
Page 32
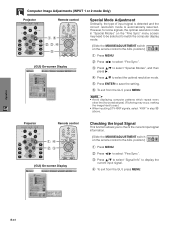
...setting. 6 To exit from the GUI, press MENU. However, for some signals, the optimal resolution mode in step 4 above. Projector Remote control 1, 4 2, 3 (GUI) On-screen Display Checking the Input Signal This function allows you to match the computer display mode. ...(Slide the MOUSE/ADJUSTMENT switch MOUSE ADJ. on the remote control to the ADJ. on the remote control to the ADJ. Operation Computer Image Adjustments (INPUT 1 or 2 mode Only) Projector Remote control 1, 6 2, 3, 4 5 (GUI) On-screen Display Special Mode Adjustment Ordinarily...
...setting. 6 To exit from the GUI, press MENU. However, for some signals, the optimal resolution mode in step 4 above. Projector Remote control 1, 4 2, 3 (GUI) On-screen Display Checking the Input Signal This function allows you to match the computer display mode. ...(Slide the MOUSE/ADJUSTMENT switch MOUSE ADJ. on the remote control to the ADJ. on the remote control to the ADJ. Operation Computer Image Adjustments (INPUT 1 or 2 mode Only) Projector Remote control 1, 6 2, 3, 4 5 (GUI) On-screen Display Special Mode Adjustment Ordinarily...
XGP10XU Operation Manual
Page 33
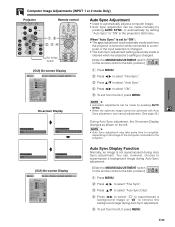
...Auto Sync adjustment may take some time to complete, depending on the image of the computer connected to the projector. on the remote control to the ADJ. on the remote control to the ADJ. When "Auto Sync" is set to "ON": • The sync adjustment is automatically... to superimpose a background image during Auto Sync adjustment. 5 To exit from the GUI, press MENU. Computer Image Adjustments (INPUT 1 or 2 mode Only) Projector Remote control 1, 5 2, 3, 4 AUTO SYNC button (GUI) On-screen Display Auto Sync Adjustment • Used to automatically adjust a computer image. • Auto ...
...Auto Sync adjustment may take some time to complete, depending on the image of the computer connected to the projector. on the remote control to the ADJ. on the remote control to the ADJ. When "Auto Sync" is set to "ON": • The sync adjustment is automatically... to superimpose a background image during Auto Sync adjustment. 5 To exit from the GUI, press MENU. Computer Image Adjustments (INPUT 1 or 2 mode Only) Projector Remote control 1, 5 2, 3, 4 AUTO SYNC button (GUI) On-screen Display Auto Sync Adjustment • Used to automatically adjust a computer image. • Auto ...


