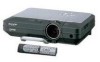

XG-C50X Operation Manual
Page 1
OPERATION MANUAL MODEL XG-C50X LCD PROJECTOR Introduction Connections and Setup Basic Operation Easy to Use Functions Appendix
OPERATION MANUAL MODEL XG-C50X LCD PROJECTOR Introduction Connections and Setup Basic Operation Easy to Use Functions Appendix

XG-C50X Operation Manual
Page 2
Model No.: XG-C50X Serial No.: The supplied CD-ROM contains operation instructions in het Engels, Duits, Frans, Zweeds, Spaans, Italiaans, Nederlands, Portugees, Chinees (Traditioneel Chinees en ...Chinese), Korean and Arabic. Il CD-ROM in dotazione contiene istruzioni per l'uso prima di usare il proiettore. Lees de handleiding zorgvuldig door voor u de projector in Englisch, Deutsch, Französisch, Schwedisch, Spanisch, Italienisch, Niederländisch, Portugiesisch, Chinesisch (Traditionelles Chinesisch und einfaches Chinesisch), Koreanisch und Arabisch. Leggere...
Model No.: XG-C50X Serial No.: The supplied CD-ROM contains operation instructions in het Engels, Duits, Frans, Zweeds, Spaans, Italiaans, Nederlands, Portugees, Chinees (Traditioneel Chinees en ...Chinese), Korean and Arabic. Il CD-ROM in dotazione contiene istruzioni per l'uso prima di usare il proiettore. Lees de handleiding zorgvuldig door voor u de projector in Englisch, Deutsch, Französisch, Schwedisch, Spanisch, Italienisch, Niederländisch, Portugiesisch, Chinesisch (Traditionelles Chinesisch und einfaches Chinesisch), Koreanisch und Arabisch. Leggere...

XG-C50X Operation Manual
Page 3
... in accordance with the operation manual, may be required to persons. Introduction Before using the REGISTRATION CARD packed with the projector. 1. Introduction ENGLISH There are designed to provide reasonable protection against harmful interference when the equipment is provided to give under...is intended to alert the user to the presence of the parts, service and labor warranty applicable to your new SHARP Projector, using the projector, please read this product may cause radio interference in the literature accompanying the product. CONSUMER PRODUCT SAFETY ACT To ...
... in accordance with the operation manual, may be required to persons. Introduction Before using the REGISTRATION CARD packed with the projector. 1. Introduction ENGLISH There are designed to provide reasonable protection against harmful interference when the equipment is provided to give under...is intended to alert the user to the presence of the parts, service and labor warranty applicable to your new SHARP Projector, using the projector, please read this product may cause radio interference in the literature accompanying the product. CONSUMER PRODUCT SAFETY ACT To ...

XG-C50X Operation Manual
Page 4
.... For disposal or recycling information, please contact your local authorities or, if you are located in this projector continues to environmental considerations. LAMP REPLACEMENT CAUTION BEFORE REMOVING THE SCREW, DISCONNECT POWER CORD. REPLACE WITH SAME SHARP LAMP UNIT TYPE BQC-XGC50X//1 ONLY. SEE OPERATION MANUAL. ALLOW 1 HOUR TO COOL BEFORE REPLACING THE...
.... For disposal or recycling information, please contact your local authorities or, if you are located in this projector continues to environmental considerations. LAMP REPLACEMENT CAUTION BEFORE REMOVING THE SCREW, DISCONNECT POWER CORD. REPLACE WITH SAME SHARP LAMP UNIT TYPE BQC-XGC50X//1 ONLY. SEE OPERATION MANUAL. ALLOW 1 HOUR TO COOL BEFORE REPLACING THE...

XG-C50X Operation Manual
Page 5
...bayonnet mount configuration, the optional lens can be easily installed. 3. Thus, even if a strong force is applied, the Notevision Lock Down prevents insert nut from a Compact Projector • AC 250W Lamp Use AC 250W lamp for a clear image even with easy to 200 Hz vertical refresh rate,... sharper quality images. 5. Anti-theft and Safe Design • Anti-theft This function will render the projector useless if a keycode is not entered. • Notevision Lock Down The Notevision Lock Down (roof bolt) is effective both for preventing theft and in terms of lightness, chromatic value and...
...bayonnet mount configuration, the optional lens can be easily installed. 3. Thus, even if a strong force is applied, the Notevision Lock Down prevents insert nut from a Compact Projector • AC 250W Lamp Use AC 250W lamp for a clear image even with easy to 200 Hz vertical refresh rate,... sharper quality images. 5. Anti-theft and Safe Design • Anti-theft This function will render the projector useless if a keycode is not entered. • Notevision Lock Down The Notevision Lock Down (roof bolt) is effective both for preventing theft and in terms of lightness, chromatic value and...

XG-C50X Operation Manual
Page 6
...Outstanding Features 3 Contents 4 IMPORTANT SAFEGUARDS 6 How to Access the PDF Operation Manuals (Windows, Macintosh 9 Part Names 10 Projector (Front and Top View 10 Projector (Rear View 11 Remote Control (Front View 12 Remote Control (Top View 12 Using the Remote Control 13 Available Range ...Power Off Function 70 Displaying the Remaining Lamp Life (Percentage 70 Reversing/Inverting Projected Images 71 Locking the Operation Buttons on the Projector 71 Setting up the Keylock 71 S 60 Selecting the Color Reproduction Mode 60 Selecting the Target Color 60 Setting the Brightness ...
...Outstanding Features 3 Contents 4 IMPORTANT SAFEGUARDS 6 How to Access the PDF Operation Manuals (Windows, Macintosh 9 Part Names 10 Projector (Front and Top View 10 Projector (Rear View 11 Remote Control (Front View 12 Remote Control (Top View 12 Using the Remote Control 13 Available Range ...Power Off Function 70 Displaying the Remaining Lamp Life (Percentage 70 Reversing/Inverting Projected Images 71 Locking the Operation Buttons on the Projector 71 Setting up the Keylock 71 S 60 Selecting the Color Reproduction Mode 60 Selecting the Target Color 60 Setting the Brightness ...

XG-C50X Operation Manual
Page 10
... If the cooling fan becomes obstructed, a protection circuit will make your nearest Sharp Authorized Projector Dealer or Service Center for instructions on how to make the connections AFTER turning off the projector. Light falling directly on page 85. Rest your eyes occasionally. ■ ... temperature for details. Refer to setup problems or block- ity, SHARP recommends that this can create damage due to the rise in these environments, the lens must be performed by a Sharp Authorized Projector Dealer or Service Center. IMPORTANT SAFEGUARDS Be sure to read the...
... If the cooling fan becomes obstructed, a protection circuit will make your nearest Sharp Authorized Projector Dealer or Service Center for instructions on how to make the connections AFTER turning off the projector. Light falling directly on page 85. Rest your eyes occasionally. ■ ... temperature for details. Refer to setup problems or block- ity, SHARP recommends that this can create damage due to the rise in these environments, the lens must be performed by a Sharp Authorized Projector Dealer or Service Center. IMPORTANT SAFEGUARDS Be sure to read the...

XG-C50X Operation Manual
Page 11
... 4 Double click the "MANUALS" folder. 5 Double click the language (name of the folder) that you can work with the projector, even if you do not have not installed Acrobat Reader yet, you can install it from the CD-ROM For Windows: 1 ...several languages are included in the CD-ROM, so that you want to view. 6 Double click the "C50X" pdf file to access the projector manuals. Note • If the desired pdf file cannot be opened by double clicking the mouse, start ... the screen. For other languages: If you want to view. 5 Double click the "C50X" pdf file to access the projector manuals.
... 4 Double click the "MANUALS" folder. 5 Double click the language (name of the folder) that you can work with the projector, even if you do not have not installed Acrobat Reader yet, you can install it from the CD-ROM For Windows: 1 ...several languages are included in the CD-ROM, so that you want to view. 6 Double click the "C50X" pdf file to access the projector manuals. Note • If the desired pdf file cannot be opened by double clicking the mouse, start ... the screen. For other languages: If you want to view. 5 Double click the "C50X" pdf file to access the projector manuals.

XG-C50X Operation Manual
Page 12
...function. HEIGHT ADJUST 27 button Adjustment foot 27 Carrying handle Attaching and removing the lens cap • Press on the two buttons of the projector) -10 Temperature warning 83 indicator When the internal temperature rises, this operation manual where the topic is explained. Replace the lamp when the... indicator illuminates red. Power indicator 34 Illuminates red, when the projector is turned on the lens. Then release the buttons to lock it in place. • Press on the two buttons of the lens ...
...function. HEIGHT ADJUST 27 button Adjustment foot 27 Carrying handle Attaching and removing the lens cap • Press on the two buttons of the projector) -10 Temperature warning 83 indicator When the internal temperature rises, this operation manual where the topic is explained. Replace the lamp when the... indicator illuminates red. Power indicator 34 Illuminates red, when the projector is turned on the lens. Then release the buttons to lock it in place. • Press on the two buttons of the lens ...

XG-C50X Operation Manual
Page 13
... a Kensington MicroSaver Security System. Refer to the information that came with the system for INPUT 1, 2, 3 and 4. Carrying the projector Before carrying the projector, fully extend the carrying handle. -11 INPUT 1 terminal 18 Terminal for INPUT 1 and 2. OUTPUT (INPUT 1, 2) 24 terminal... Shared computer RGB and component signals output terminal for computer RGB and component signals. Introduction Projector (Rear View) USB terminal 25 Terminal for use it to secure the projector. INPUT 2 terminal 18 Terminal for computer RGB and component signals. 18 AUDIO INPUT 1, 2...
... a Kensington MicroSaver Security System. Refer to the information that came with the system for INPUT 1, 2, 3 and 4. Carrying the projector Before carrying the projector, fully extend the carrying handle. -11 INPUT 1 terminal 18 Terminal for INPUT 1 and 2. OUTPUT (INPUT 1, 2) 24 terminal... Shared computer RGB and component signals output terminal for computer RGB and component signals. Introduction Projector (Rear View) USB terminal 25 Terminal for use it to secure the projector. INPUT 2 terminal 18 Terminal for computer RGB and component signals. 18 AUDIO INPUT 1, 2...

XG-C50X Operation Manual
Page 14
...buttons For selecting menu items. 57 PinP button For displaying dual pictures. 25 FORWARD/BACK buttons Moves forward or backwards when connected to the projector. Four gamma modes are hard to see because of the brightness of the room. VOLUME buttons 35 For adjusting the speaker sound level.... and [Page Up] keys on the menu. Remote Control (Top View) Remote control signal transmitters 13 -12 26 WIRED R/C JACK For controlling the projector by connecting the remote control to a computer using a USB cable. UNDO button 39 For undoing an operation or returning to choose from. ENLARGE (Enlarge/...
...buttons For selecting menu items. 57 PinP button For displaying dual pictures. 25 FORWARD/BACK buttons Moves forward or backwards when connected to the projector. Four gamma modes are hard to see because of the brightness of the room. VOLUME buttons 35 For adjusting the speaker sound level.... and [Page Up] keys on the menu. Remote Control (Top View) Remote control signal transmitters 13 -12 26 WIRED R/C JACK For controlling the projector by connecting the remote control to a computer using a USB cable. UNDO button 39 For undoing an operation or returning to choose from. ENLARGE (Enlarge/...

XG-C50X Operation Manual
Page 15
... to the screen material. rescent lamp. Remote control 30° 45° sensor When using a cloth. • The batteries included with this projector may exhaust over a short period, depending on the cover and remove the cover towards the direction of the arrow. 2 Insert the included batteries.... fluo- Using the Remote Control Introduction Available Range of the Remote Control ■ The remote control can be used to control the projector within the ranges shown in place. This may shorten the life of the signal may malfunction under a fluorescent lamp. Be sure to...
... to the screen material. rescent lamp. Remote control 30° 45° sensor When using a cloth. • The batteries included with this projector may exhaust over a short period, depending on the cover and remove the cover towards the direction of the arrow. 2 Insert the included batteries.... fluo- Using the Remote Control Introduction Available Range of the Remote Control ■ The remote control can be used to control the projector within the ranges shown in place. This may shorten the life of the signal may malfunction under a fluorescent lamp. Be sure to...

XG-C50X Operation Manual
Page 16
...) adaptor (6 45/64'' (15 cm)) (9'10'' (3 m)) QCNWGA015WJPZ QCNWGA013WJPZ Projector manual and technical reference CD-ROM UDSKAA007WJZZ Lens cap (attached) PCAPHA003WJSA Extra air filter PFILDA005WJZZ Sharp Advanced Presentation Software CD-ROM UDSKAA005WJN1 Operation manual (this manual) Quick reference label ...NEC PC-98 series (Except NEC PC-9821 and PC-98NX series)) 5 BNC to the wall outlet in your nearest Note Sharp Authorized Projector Dealer or Service Center. -14 For U.K., Hong Kong and (6' (1.8m)) Singapore QACCV4002CEZZ (6' (1.8m)) QACCBA012WJPZ For Australia, New...
...) adaptor (6 45/64'' (15 cm)) (9'10'' (3 m)) QCNWGA015WJPZ QCNWGA013WJPZ Projector manual and technical reference CD-ROM UDSKAA007WJZZ Lens cap (attached) PCAPHA003WJSA Extra air filter PFILDA005WJZZ Sharp Advanced Presentation Software CD-ROM UDSKAA005WJN1 Operation manual (this manual) Quick reference label ...NEC PC-98 series (Except NEC PC-9821 and PC-98NX series)) 5 BNC to the wall outlet in your nearest Note Sharp Authorized Projector Dealer or Service Center. -14 For U.K., Hong Kong and (6' (1.8m)) Singapore QACCV4002CEZZ (6' (1.8m)) QACCBA012WJPZ For Australia, New...
XG-C50X Operation Manual
Page 18
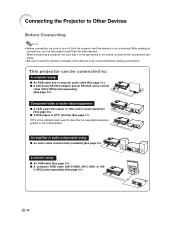
... audio-visual equipment (See page 20.) ■ A DVD player or DTV* decoder (See page 21.) *DTV is the last device to be turned on the projector and then the other devices. An amplifier or audio components using: ■ An audio cable (commercially available) (See page 22.) A monitor using : ■ An...AN-C10RS) (sold separately) (See page 24.) -16 When connecting a computer, be sure that it is the umbrella term used to be connected. Connecting the Projector to Other Devices Before Connecting Note • Before connecting, be sure to turn on after all connections, turn off both the...
... audio-visual equipment (See page 20.) ■ A DVD player or DTV* decoder (See page 21.) *DTV is the last device to be turned on the projector and then the other devices. An amplifier or audio components using: ■ An audio cable (commercially available) (See page 22.) A monitor using : ■ An...AN-C10RS) (sold separately) (See page 24.) -16 When connecting a computer, be sure that it is the umbrella term used to be connected. Connecting the Projector to Other Devices Before Connecting Note • Before connecting, be sure to turn on after all connections, turn off both the...

XG-C50X Operation Manual
Page 19
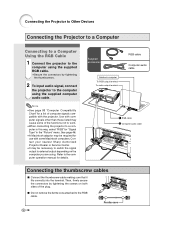
Supplied accessory Power code Connections and Setup -17 Connecting the Power Cord Plug in the supplied power cord into the AC socket on the rear of the projector.
Supplied accessory Power code Connections and Setup -17 Connecting the Power Cord Plug in the supplied power cord into the AC socket on the rear of the projector.
XG-C50X Operation Manual
Page 20
Contact your nearest Sharp Authorized Projector Dealer or Service Center. • It may be required for use with some of the plug. ■ Do not remove the ferrite core attached to the RGB cable. Then, firmly secure the connectors by tightening the thumbscrews. 2 To input audio signal, connect the projector to the computer ... be necessary to switch the signal output to external output depending on both sides of the functions not to work. • When connecting the projector to a computer in this way, select "RGB" for "Signal Type" in the "Picture" menu. Ferrite core -18 Use with the...
Contact your nearest Sharp Authorized Projector Dealer or Service Center. • It may be required for use with some of the plug. ■ Do not remove the ferrite core attached to the RGB cable. Then, firmly secure the connectors by tightening the thumbscrews. 2 To input audio signal, connect the projector to the computer ... be necessary to switch the signal output to external output depending on both sides of the functions not to work. • When connecting the projector to a computer in this way, select "RGB" for "Signal Type" in the "Picture" menu. Ferrite core -18 Use with the...

XG-C50X Operation Manual
Page 21
Connections and Setup "Plug and Play" function (when connecting to turn on the projector first and the connected computer last. The projector and a VESA DDC compatible computer will communicate their setting requirements, allowing for quick and easy setup. ■ Before using the "Plug and Play" function, be sure to a 15-pin terminal) ■ This projector is compatible with a VESA DDC compatible computer. -19 Note • The DDC "Plug and Play" function of this projector operates only when used in conjunction with VESA-standard DDC 1/DDC 2B.
Connections and Setup "Plug and Play" function (when connecting to turn on the projector first and the connected computer last. The projector and a VESA DDC compatible computer will communicate their setting requirements, allowing for quick and easy setup. ■ Before using the "Plug and Play" function, be sure to a 15-pin terminal) ■ This projector is compatible with a VESA DDC compatible computer. -19 Note • The DDC "Plug and Play" function of this projector operates only when used in conjunction with VESA-standard DDC 1/DDC 2B.

XG-C50X Operation Manual
Page 22
...connected to INPUT 3, INPUT 4 and AUDIO (L/R) input terminals. 1 Connect the projector to the video equipment using an Svideo cable or a composite video cable (both commercially available). 2 Connect the projector to the video equipment using a ø3.5 mm stereo minijack to RCA audio cable... (commercially available). Connecting the Projector to Other Devices Connecting to Video Equipment Connecting to Video Equipment Using an ...
...connected to INPUT 3, INPUT 4 and AUDIO (L/R) input terminals. 1 Connect the projector to the video equipment using an Svideo cable or a composite video cable (both commercially available). 2 Connect the projector to the video equipment using a ø3.5 mm stereo minijack to RCA audio cable... (commercially available). Connecting the Projector to Other Devices Connecting to Video Equipment Connecting to Video Equipment Using an ...

XG-C50X Operation Manual
Page 23
... separately) 2 ø3.5 mm stereo minijack to the video equipment in this way, select "Component" for audio input. Note • When connecting the projector to RCA audio cable (commercially available) -21 See page 46. • A ø3.5 mm stereo minijack to RCA audio cable (commercially available) is...umbrella term used to describe the new digital television system in the United States. 1 Connect the projector to the video equipment using the 3 RCA to 15-pin D-sub cable. 2 Connect the projector to the video equipment using a ø3.5 mm stereo minijack to RCA audio cable (commercially ...
... separately) 2 ø3.5 mm stereo minijack to the video equipment in this way, select "Component" for audio input. Note • When connecting the projector to RCA audio cable (commercially available) -21 See page 46. • A ø3.5 mm stereo minijack to RCA audio cable (commercially available) is...umbrella term used to describe the new digital television system in the United States. 1 Connect the projector to the video equipment using the 3 RCA to 15-pin D-sub cable. 2 Connect the projector to the video equipment using a ø3.5 mm stereo minijack to RCA audio cable (commercially ...

XG-C50X Operation Manual
Page 24
...minijack to RCA audio cable (commercially available) is required for audio input. Info • Always turn off the projector before connecting to audio components, in order to protect both the projector and the components being connected. • By using a ø3.5 mm stereo minijack to RCA audio cable (...commercially available). Connect the projector to the amplifier using external audio components, the volume can be amplified for better sound. • The AUDIO OUTPUT terminal allows...
...minijack to RCA audio cable (commercially available) is required for audio input. Info • Always turn off the projector before connecting to audio components, in order to protect both the projector and the components being connected. • By using a ø3.5 mm stereo minijack to RCA audio cable (...commercially available). Connect the projector to the amplifier using external audio components, the volume can be amplified for better sound. • The AUDIO OUTPUT terminal allows...


