XG-C330X , XG-C335X , XG-C430X Operation Manual
Page 1
Introduction Quick Start LCD PROJECTOR MODEL XG-C430X XG-C335X XG-C330X OPERATION MANUAL Setup Connections Basic Operation Useful Features Appendix
Introduction Quick Start LCD PROJECTOR MODEL XG-C430X XG-C335X XG-C330X OPERATION MANUAL Setup Connections Basic Operation Useful Features Appendix
XG-C330X , XG-C335X , XG-C430X Operation Manual
Page 6
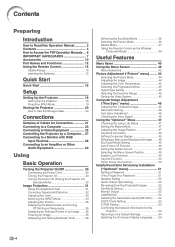
... How to Read this Operation Manual 3 Contents 4 How to Access the PDF Operation Manuals ... 6 IMPORTANT SAFEGUARDS 7 Accessories 10 Part Names and Functions 12 Using the Remote Control 15 Usable Range 15 Inserting the Batteries 15 Quick Start Quick Start 16 Setup Setting Up the Projector 18 Setting Up the Projector 18 Projection (PRJ) Mode 19...
... How to Read this Operation Manual 3 Contents 4 How to Access the PDF Operation Manuals ... 6 IMPORTANT SAFEGUARDS 7 Accessories 10 Part Names and Functions 12 Using the Remote Control 15 Usable Range 15 Inserting the Batteries 15 Quick Start Quick Start 16 Setup Setting Up the Projector 18 Setting Up the Projector 18 Projection (PRJ) Mode 19...
XG-C330X , XG-C335X , XG-C430X Operation Manual
Page 7
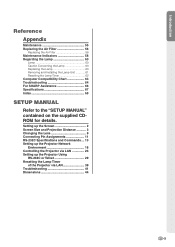
... 64 For SHARP Assistance 66 Specifications 67 Index 68 SETUP MANUAL Refer to the "SETUP MANUAL" contained on the supplied CDROM for details. Setting up the Screen 2 Screen Size and Projection Distance 3 Changing the Lens 9 Connecting Pin Assignments 11 RS-232C Specifications and Commands ... 13 Setting up the Projector Network Environment 18 Controlling the Projector via LAN...
... 64 For SHARP Assistance 66 Specifications 67 Index 68 SETUP MANUAL Refer to the "SETUP MANUAL" contained on the supplied CDROM for details. Setting up the Screen 2 Screen Size and Projection Distance 3 Changing the Lens 9 Connecting Pin Assignments 11 RS-232C Specifications and Commands ... 13 Setting up the Projector Network Environment 18 Controlling the Projector via LAN...
XG-C330X , XG-C335X , XG-C430X Operation Manual
Page 8
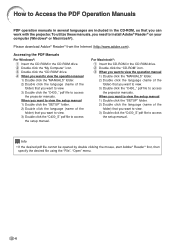
...start Adobe® Reader® first, then specify the desired file using the "File", "Open" menu. -6 When you want to view the setup manual 1) Double click the "SETUP" folder. 2) Double click the language (name of the folder) that you want to view. 3) Double click the "C430_" pdf file to install...in the CD-ROM, so that you want to view. 3) Double click the "C430_S" pdf file to access the setup manual. To utilize these manuals, you can work with the projector. Accessing the PDF Manuals For Windows®: 1 Insert the CD-ROM in the CD-ROM drive. 2 Double click the "My Computer" icon...
...start Adobe® Reader® first, then specify the desired file using the "File", "Open" menu. -6 When you want to view the setup manual 1) Double click the "SETUP" folder. 2) Double click the language (name of the folder) that you want to view. 3) Double click the "C430_" pdf file to install...in the CD-ROM, so that you want to view. 3) Double click the "C430_S" pdf file to access the setup manual. To utilize these manuals, you can work with the projector. Accessing the PDF Manuals For Windows®: 1 Insert the CD-ROM in the CD-ROM drive. 2 Double click the "My Computer" icon...
XG-C330X , XG-C335X , XG-C430X Operation Manual
Page 13
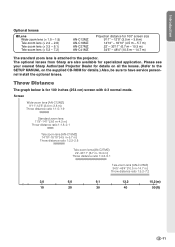
....) Also, be sure to have service personnel install the optional lenses. Please see your nearest Sharp Authorized Projector Dealer for details on all the lenses. (Refer to the projector. Throw Distance The graph below is attached to the SETUP MANUAL on the supplied CD-ROM for specialized application. Introduction Optional lenses ■ Lens Wide-zoom...
....) Also, be sure to have service personnel install the optional lenses. Please see your nearest Sharp Authorized Projector Dealer for details on all the lenses. (Refer to the projector. Throw Distance The graph below is attached to the SETUP MANUAL on the supplied CD-ROM for specialized application. Introduction Optional lenses ■ Lens Wide-zoom...

XG-C330X , XG-C335X , XG-C430X Operation Manual
Page 20
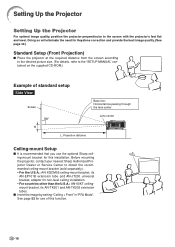
...projector, contact your nearest Sharp Authorized Projector Dealer or Service Center to the screen with the projector's feet flat and level. See page 52 for use the optional Sharp ceiling-mount bracket for this function. -18 Setting Up the Projector Setting Up the Projector For optimal image quality, position the projector... 32.) Standard Setup (Front Projection) ■ Place the projector at the required distance from the screen according to the desired picture size. (For details, refer to the "SETUP MANUAL" contained on the supplied CD-ROM.) Example of standard setup Side View Screen...
...projector, contact your nearest Sharp Authorized Projector Dealer or Service Center to the screen with the projector's feet flat and level. See page 52 for use the optional Sharp ceiling-mount bracket for this function. -18 Setting Up the Projector Setting Up the Projector For optimal image quality, position the projector... 32.) Standard Setup (Front Projection) ■ Place the projector at the required distance from the screen according to the desired picture size. (For details, refer to the "SETUP MANUAL" contained on the supplied CD-ROM.) Example of standard setup Side View Screen...

XG-C330X , XG-C335X , XG-C430X Operation Manual
Page 21
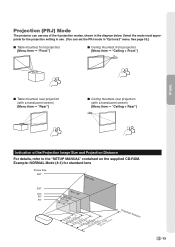
See page 52.) ■ Table mounted, front projection [Menu item ➞ "Front"] ■ Ceiling mounted, front projection [Menu item ➞ "Ceiling + Front"] Setup ■ Table mounted, rear projection (with a translucent screen) [Menu item ➞ "Rear"] ■ Ceiling mounted, rear projection (with a translucent screen) [Menu item... setting in use. (You can use any of the Projection Image Size and Projection Distance For details, refer to the "SETUP MANUAL" contained on the supplied CD-ROM. Projection (PRJ) Mode The projector can set the PRJ mode in the diagram below.
See page 52.) ■ Table mounted, front projection [Menu item ➞ "Front"] ■ Ceiling mounted, front projection [Menu item ➞ "Ceiling + Front"] Setup ■ Table mounted, rear projection (with a translucent screen) [Menu item ➞ "Rear"] ■ Ceiling mounted, rear projection (with a translucent screen) [Menu item... setting in use. (You can use any of the Projection Image Size and Projection Distance For details, refer to the "SETUP MANUAL" contained on the supplied CD-ROM. Projection (PRJ) Mode The projector can set the PRJ mode in the diagram below.
XG-C330X , XG-C335X , XG-C430X Operation Manual
Page 29
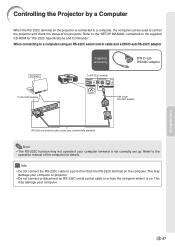
... of the computer for "RS-232C Specifications and Commands". This may damage your computer or projector. • Do not connect or disconnect an RS-232C serial control cable to the "SETUP MANUAL" contained on . Connections -27 Controlling the Projector by a Computer When the RS-232C terminal on the computer. Refer to a computer using an...may not operate if your computer. This may damage your computer terminal is on the supplied CD-ROM for details. When connecting to the operation manual of the projector. Refer to or from the computer while it is not correctly set up.
... of the computer for "RS-232C Specifications and Commands". This may damage your computer or projector. • Do not connect or disconnect an RS-232C serial control cable to the "SETUP MANUAL" contained on . Connections -27 Controlling the Projector by a Computer When the RS-232C terminal on the computer. Refer to a computer using an...may not operate if your computer. This may damage your computer terminal is on the supplied CD-ROM for details. When connecting to the operation manual of the projector. Refer to or from the computer while it is not correctly set up.

XG-C330X , XG-C335X , XG-C430X Operation Manual
Page 54
... Description Normal image (Projected from the front of the screen) Inverted image (Projected from the front of the screen with an inverted projector) Reversed image (Projected from the rear of the screen or with a mirror) Reversed and inverted image (Projected with VOLUME. VAO...• Refer to the computer's operation manual for instructions for normal environments. Note • Refer to the "SETUP MANUAL" contained on or off when the projector is recommended that both the projector and computer are set for the reversed image and ceiling-mount setups. (See page 19.) -52 Menu ...
... Description Normal image (Projected from the front of the screen) Inverted image (Projected from the front of the screen with an inverted projector) Reversed image (Projected from the rear of the screen or with a mirror) Reversed and inverted image (Projected with VOLUME. VAO...• Refer to the computer's operation manual for instructions for normal environments. Note • Refer to the "SETUP MANUAL" contained on or off when the projector is recommended that both the projector and computer are set for the reversed image and ceiling-mount setups. (See page 19.) -52 Menu ...
XG-C330X , XG-C335X , XG-C430X Operation Manual
Page 56
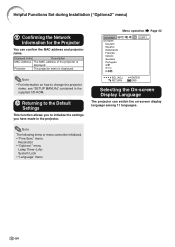
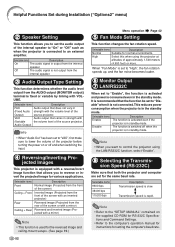
Displayed items Description MAC Address The MAC address of the projector is displayed. Projector The projector name is displayed. Note The following items or menu cannot be initialized. • "Fine Sync" menu Resolution • "Options1" menu ...among 11 languages. Helpful Functions Set during Installation ("Options2" menu) q Confirming the Network Information for the Projector You can switch the on how to initialize the settings you to change the projector name, see "SETUP MANUAL" contained in the projector. RETURN ENTER END Selecting the On-screen Display Language The...
Displayed items Description MAC Address The MAC address of the projector is displayed. Projector The projector name is displayed. Note The following items or menu cannot be initialized. • "Fine Sync" menu Resolution • "Options1" menu ...among 11 languages. Helpful Functions Set during Installation ("Options2" menu) q Confirming the Network Information for the Projector You can switch the on how to initialize the settings you to change the projector name, see "SETUP MANUAL" contained in the projector. RETURN ENTER END Selecting the On-screen Display Language The...

XG-C330X , XG-C335X , XG-C430X Operation Manual
Page 64
... also reset the lamp timer via the LAN. (Refer to the SETUP MANUAL on the supplied CD-ROM for lamp unit cover) AC socket STANDBY/ON button ENTER button " button MENU button Then tighten the user service screw to the projector. Regarding the Lamp 5 Insert the new lamp unit. • ...Press the lamp unit firmly into the AC socket of the projector. 2 Reset the lamp timer. • While simultaneously holding down ", ENTER and MENU on the projector, press STANDBY/ON on the projector. • "LAMP 0000H" is displayed, indicating that the lamp timer is connected to ...
... also reset the lamp timer via the LAN. (Refer to the SETUP MANUAL on the supplied CD-ROM for lamp unit cover) AC socket STANDBY/ON button ENTER button " button MENU button Then tighten the user service screw to the projector. Regarding the Lamp 5 Insert the new lamp unit. • ...Press the lamp unit firmly into the AC socket of the projector. 2 Reset the lamp timer. • While simultaneously holding down ", ENTER and MENU on the projector, press STANDBY/ON on the projector. • "LAMP 0000H" is displayed, indicating that the lamp timer is connected to ...

XGC330X|XGC430X Operation Manual
Page 7
... 64 For SHARP Assistance 66 Specifications 67 Index 68 SETUP MANUAL Refer to the "SETUP MANUAL" contained on the supplied CDROM for details. Setting up the Screen 2 Screen Size and Projection Distance 3 Changing the Lens 9 Connecting Pin Assignments 11 RS-232C Specifications and Commands ... 13 Setting up the Projector Network Environment 18 Controlling the Projector via LAN...
... 64 For SHARP Assistance 66 Specifications 67 Index 68 SETUP MANUAL Refer to the "SETUP MANUAL" contained on the supplied CDROM for details. Setting up the Screen 2 Screen Size and Projection Distance 3 Changing the Lens 9 Connecting Pin Assignments 11 RS-232C Specifications and Commands ... 13 Setting up the Projector Network Environment 18 Controlling the Projector via LAN...

XGC330X|XGC430X Operation Manual
Page 8
..."File", "Open" menu. -6 When you want to view the setup manual 1) Double click the "SETUP" folder. 2) Double click the language (name of the folder) that you want to view. 3) Double click the "C430_S" pdf file to access the projector manuals. For Macintosh®: 1 Insert the CD-ROM in the CD-ROM..., so that you can work with the projector. Please download ...
..."File", "Open" menu. -6 When you want to view the setup manual 1) Double click the "SETUP" folder. 2) Double click the language (name of the folder) that you want to view. 3) Double click the "C430_S" pdf file to access the projector manuals. For Macintosh®: 1 Insert the CD-ROM in the CD-ROM..., so that you can work with the projector. Please download ...

XGC330X|XGC430X Operation Manual
Page 13
... is attached to have service personnel install the optional lenses. Please see your nearest Sharp Authorized Projector Dealer for details on all the lenses. (Refer to the SETUP MANUAL on the supplied CD-ROM for details.) Also, be sure to the projector. Screen Wide-zoom lens (AN-C12MZ) 9'11"-12'5" (3.0 m-3.8 m) Throw distance ratio 1:1.5-1.9 Standard zoom...' - 33'11" (6.7 m - 10.3 m) 34'5" - 48'4" (10.5 m - 14.7 m) The standard zoom lens is for 100 inches (254 cm) screen with 4:3 normal mode. The optional lenses from Sharp are also available for specialized application.
... is attached to have service personnel install the optional lenses. Please see your nearest Sharp Authorized Projector Dealer for details on all the lenses. (Refer to the SETUP MANUAL on the supplied CD-ROM for details.) Also, be sure to the projector. Screen Wide-zoom lens (AN-C12MZ) 9'11"-12'5" (3.0 m-3.8 m) Throw distance ratio 1:1.5-1.9 Standard zoom...' - 33'11" (6.7 m - 10.3 m) 34'5" - 48'4" (10.5 m - 14.7 m) The standard zoom lens is for 100 inches (254 cm) screen with 4:3 normal mode. The optional lenses from Sharp are also available for specialized application.
XGC330X|XGC430X Operation Manual
Page 20
...EP101B extension tube and AN-JT200 universal bracket, adaptor for use the optional Sharp ceiling-mount bracket for this function. -18 Before mounting the projector, contact your nearest Sharp Authorized Projector Dealer or Service Center to obtain the recommended ceiling-mount bracket (sold ... "Ceiling + Front" in "PRJ Mode". Setting Up the Projector Setting Up the Projector For optimal image quality, position the projector perpendicular to the "SETUP MANUAL" contained on the supplied CD-ROM.) Example of standard setup Side View Screen Base line: Horizontal line passing through the lens...
...EP101B extension tube and AN-JT200 universal bracket, adaptor for use the optional Sharp ceiling-mount bracket for this function. -18 Before mounting the projector, contact your nearest Sharp Authorized Projector Dealer or Service Center to obtain the recommended ceiling-mount bracket (sold ... "Ceiling + Front" in "PRJ Mode". Setting Up the Projector Setting Up the Projector For optimal image quality, position the projector perpendicular to the "SETUP MANUAL" contained on the supplied CD-ROM.) Example of standard setup Side View Screen Base line: Horizontal line passing through the lens...
XGC330X|XGC430X Operation Manual
Page 21
..., front projection [Menu item ➞ "Front"] ■ Ceiling mounted, front projection [Menu item ➞ "Ceiling + Front"] Setup ■ Table mounted, rear projection (with a translucent screen) [Menu item ➞ "Rear"] ■ Ceiling mounted, rear projection...(You can use any of the Projection Image Size and Projection Distance For details, refer to the "SETUP MANUAL" contained on the supplied CD-ROM. Select the mode most appropriate for standard lens Picture Size 500"... Projection Distance -19 Projection (PRJ) Mode The projector can set the PRJ mode in "Options2" menu.
..., front projection [Menu item ➞ "Front"] ■ Ceiling mounted, front projection [Menu item ➞ "Ceiling + Front"] Setup ■ Table mounted, rear projection (with a translucent screen) [Menu item ➞ "Rear"] ■ Ceiling mounted, rear projection...(You can use any of the Projection Image Size and Projection Distance For details, refer to the "SETUP MANUAL" contained on the supplied CD-ROM. Select the mode most appropriate for standard lens Picture Size 500"... Projection Distance -19 Projection (PRJ) Mode The projector can set the PRJ mode in "Options2" menu.

XGC330X|XGC430X Operation Manual
Page 29
This may not operate if your computer terminal is not correctly set up. Refer to the operation manual of the projector. Connections -27 Refer to a computer using an RS-232C serial control cable and a DIN-D-sub RS-232C adaptor Supplied accessory DIN-D-sub RS232C ... Note • The RS-232C function may damage your computer. When connecting to the "SETUP MANUAL" contained on the supplied CD-ROM for details. Info • Do not connect the RS-232C cable to control the projector and check the status of the computer for "RS-232C Specifications and Commands". This may...
This may not operate if your computer terminal is not correctly set up. Refer to the operation manual of the projector. Connections -27 Refer to a computer using an RS-232C serial control cable and a DIN-D-sub RS-232C adaptor Supplied accessory DIN-D-sub RS232C ... Note • The RS-232C function may damage your computer. When connecting to the "SETUP MANUAL" contained on the supplied CD-ROM for details. Info • Do not connect the RS-232C cable to control the projector and check the status of the computer for "RS-232C Specifications and Commands". This may...
XGC330X|XGC430X Operation Manual
Page 54
... items Description On The audio signal is recommended that the function be set to the computer's operation manual for instructions for normal environments. Note • Refer to the "SETUP MANUAL" contained on or off when the projector is set to "High", the fan rotation speeds up, and the fan noise becomes louder. 6 Monitor Output...
... items Description On The audio signal is recommended that the function be set to the computer's operation manual for instructions for normal environments. Note • Refer to the "SETUP MANUAL" contained on or off when the projector is set to "High", the fan rotation speeds up, and the fan noise becomes louder. 6 Monitor Output...

XGC330X|XGC430X Operation Manual
Page 56
..." menu) q Confirming the Network Information for the Projector You can switch the on how to initialize the settings you to change the projector name, see "SETUP MANUAL" contained in the projector. w Returning to the Default Settings This function allows you have made in the supplied CD-ROM. Projector The projector name is displayed. RETURN ENTER END Selecting...
..." menu) q Confirming the Network Information for the Projector You can switch the on how to initialize the settings you to change the projector name, see "SETUP MANUAL" contained in the projector. w Returning to the Default Settings This function allows you have made in the supplied CD-ROM. Projector The projector name is displayed. RETURN ENTER END Selecting...

XGC330X|XGC430X Operation Manual
Page 64
... this may cause the lamp to become damaged or explode. • You can also reset the lamp timer via the LAN. (Refer to the SETUP MANUAL on the supplied CD-ROM for lamp unit cover) AC socket STANDBY/ON button ENTER button " button MENU button Regarding the Lamp 5 Insert the new... lamp unit. • Press the lamp unit firmly into the AC socket of the projector. 2 Reset the lamp timer. • While simultaneously holding down ", ENTER and MENU on the projector, press STANDBY/ON on the projector. • "LAMP 0000H" is displayed, indicating that the lamp timer is connected to the...
... this may cause the lamp to become damaged or explode. • You can also reset the lamp timer via the LAN. (Refer to the SETUP MANUAL on the supplied CD-ROM for lamp unit cover) AC socket STANDBY/ON button ENTER button " button MENU button Regarding the Lamp 5 Insert the new... lamp unit. • Press the lamp unit firmly into the AC socket of the projector. 2 Reset the lamp timer. • While simultaneously holding down ", ENTER and MENU on the projector, press STANDBY/ON on the projector. • "LAMP 0000H" is displayed, indicating that the lamp timer is connected to the...


